Shipping
All modules
Offer in-store pickup and manage pickup locations
Shipping · 9 of 13 · 5 min read
In-store pickup (Click & Collect) lets the customer collect the order at a company location instead of having it shipped by a carrier, for example at an office, a shop or a warehouse. In this article you set up the pickup carrier and the places where the customer can collect.
How in-store pickup works
Pickup relies on two elements: a carrier with the Click & Collect option on, and one or more pickup points linked to that carrier.
- Click & Collect orders use the chosen pickup point and do not pay for delivery.
- Only Click & Collect carriers can have pickup points.
- A Click & Collect carrier with no active pickup point is not offered.
- A deactivated pickup point stays on existing orders, but is hidden at checkout. From the back office you can see the pickup point chosen at checkout, but you cannot change it.
If a pickup point closes for a period, deactivate it: the orders that use it keep it. If a pickup point was created by mistake and has never been used, delete it.
Creating the pickup carrier
Pickup points can only be added after you create a Click & Collect carrier. The demo already has the carrier Pickup at our premises.
Before you start: creating or editing carriers and pickup points requires the
Delivery Managergroup.
- Open the Delivery Settings page, as described in Overview of shipping settings and the carrier list.
- In the Carriers tab, press Add Carrier.
- In the General section, enter the Name and turn on Click & Collect.
- Fill in the other fields as for any carrier and press Save.
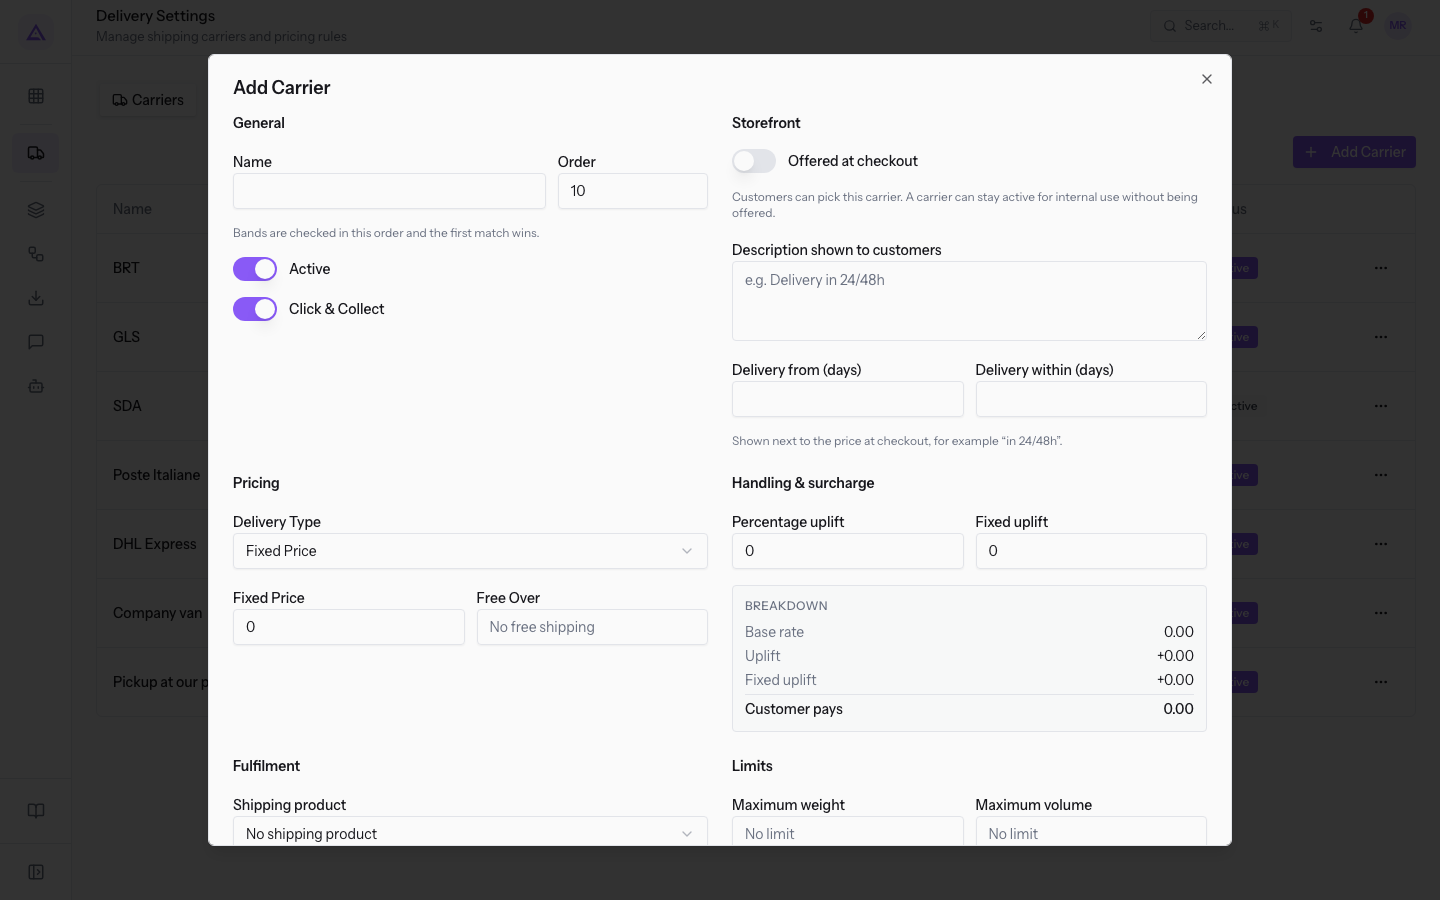
The other fields in the window are described in Add a fixed-price carrier and in Set surcharges, weight limits and served countries.
The pickup points list
The Pickup locations tab of the Delivery Settings page lists all pickup points, active and deactivated. At the top, the help text reads "Click & Collect orders use the selected pickup point and are not charged delivery."
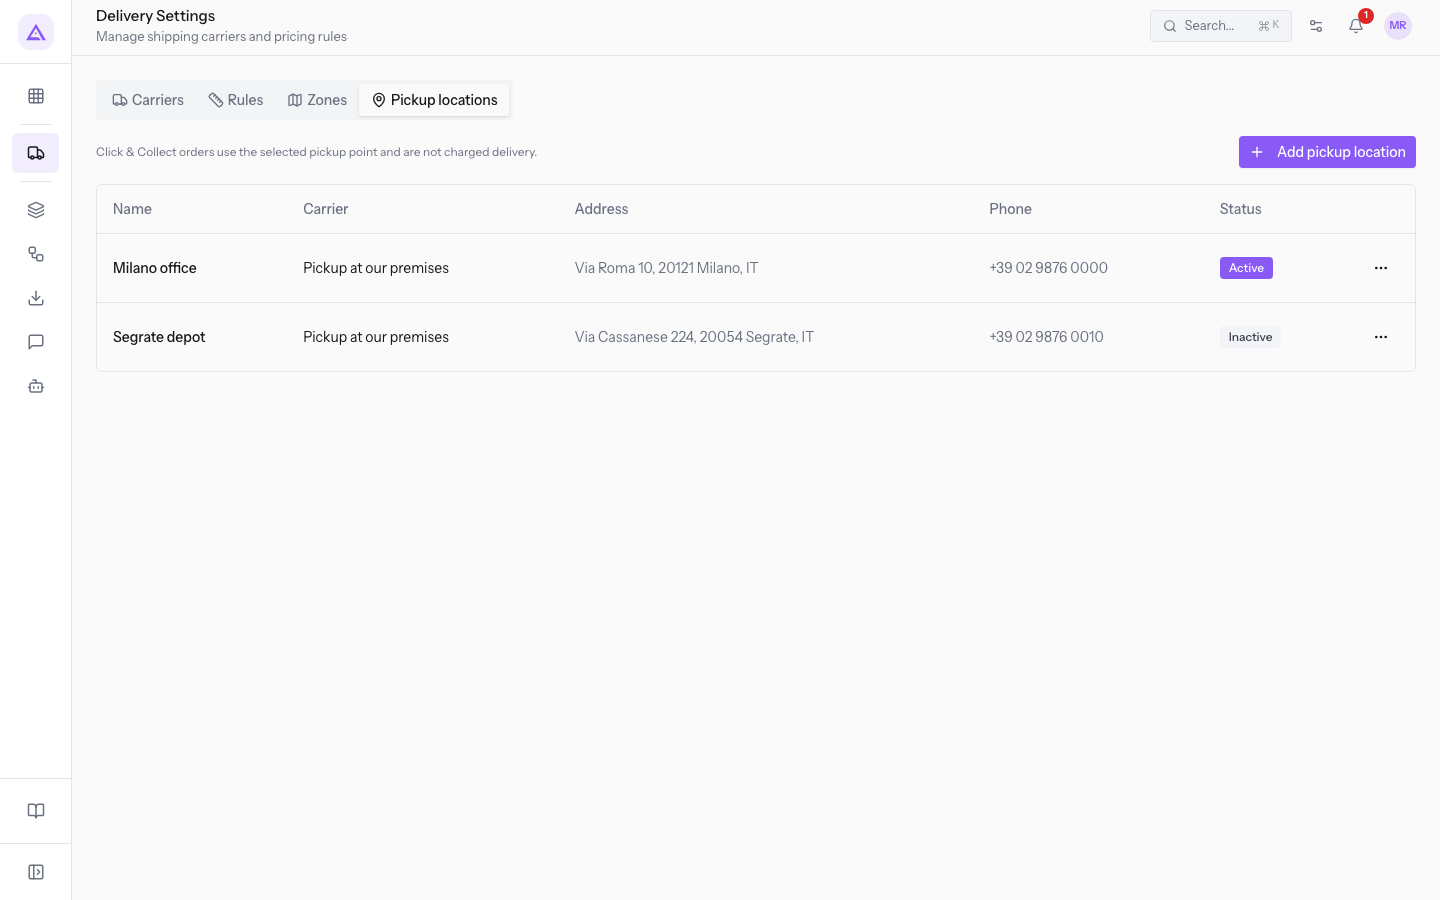
The list has these columns:
- Name: the name of the pickup point, for example Milano office.
- Carrier: the pickup point's Click & Collect carrier.
- Address: street, postal code, city and country on one line. Parts that are not filled in are skipped.
- Phone: the pickup point's number.
- Status: Active or Inactive. In the demo, Milano office is active and Segrate depot is deactivated.
The menu at the end of each row contains:
- Edit: opens the Edit pickup location window.
- Deactivate or Activate: changes the pickup point's status without deleting it.
- Delete: deletes the pickup point after a confirmation request.
If no pickup point exists yet, the list shows the message No pickup locations configured.
If no Click & Collect carrier exists, the tab does not show the list. Instead it shows the message Create a Click & Collect carrier before adding pickup locations. and the Go to carriers button, which opens the Carriers tab.
Adding or editing a pickup point
Each pickup point is a place where the customer collects the order. The same window is used to create a pickup point and to edit it.
- In the Pickup locations tab, press Add pickup location. To edit an existing pickup point, open the row menu and choose Edit.
- Fill in the fields in the General, Address, Fulfilment and Opening hours sections.
- Press Save.
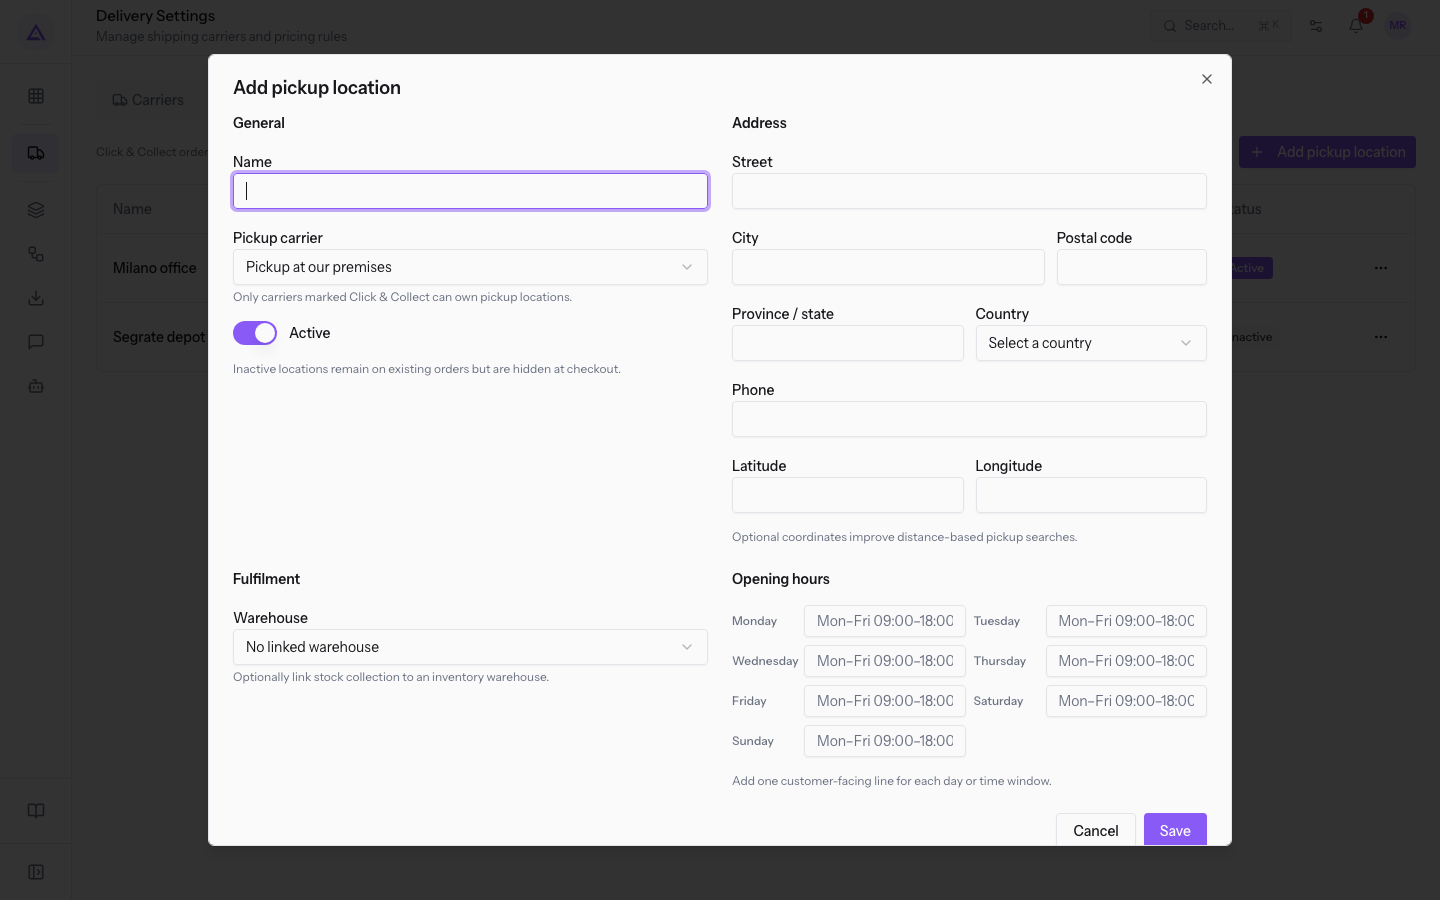
General
- Name: the name of the pickup point shown in the list, for example Milano office. The field is required.
- Pickup carrier: the Click & Collect carrier the pickup point belongs to. It lists only Click & Collect carriers. If there is only one, it is chosen automatically, as
Pickup at our premisesis in the demo. Without a carrier the Save button is not active. Field help: "Only carriers marked Click & Collect can own pickup locations." - Active: on for new pickup points. Field help: "Inactive locations remain on existing orders but are hidden at checkout."
Address
All address fields are optional.
- Street, City and Postal code: for example Via Roma 10, Milano, 20121.
- Province / state: the province or region of the pickup point.
- Country: chosen from a list; without a choice the field shows Select a country.
- Phone: the pickup point's number.
- Latitude and Longitude: the coordinates of the pickup point, as decimal numbers. Field help: "Optional coordinates improve distance-based pickup searches."
Fulfilment
- Warehouse: the warehouse from which stock is picked for pickup, for example Main warehouse. Without a choice the field shows No linked warehouse. Field help: "Optionally link stock collection to an inventory warehouse."
Opening hours
- Monday, Tuesday, Wednesday, Thursday, Friday, Saturday, Sunday: one text field per day with the pickup point's hours. Section help: "Add one customer-facing line for each day or time window."
Note: days left empty are not saved. Leave closing days empty.
Deactivating, reactivating or deleting a pickup point
Deactivate a pickup point when it must no longer appear at checkout, but the orders that use it must keep it.
- In the Pickup locations tab, open the row menu, for example the one for Segrate depot.
- Choose Deactivate. For a deactivated pickup point the option is Activate.
The Status column changes to Inactive or Active.
To delete a pickup point, choose Delete from the row menu and confirm.
Important: a deactivated pickup point stays on existing orders. If the pickup point has already been used in an order, deactivate it instead of deleting it.
Filtering sales orders by pickup point
Sales orders have a Click & Collect filter, which shows the orders with a given pickup point.
- Open the sales orders list.
- In the Collection location filter, which normally shows All locations, choose a pickup point.
To add shipping to a single order, see Adding shipping to a quote or sales order.
See it on your company, not on a slide deck.
In 30 minutes we map the software you use today.We show you how much work and how much margin Archimedes gives back.
Show me on my business →What industry are you in?
One tap — it lets us prepare the demo around your world.
What tools do you use today?
Pick the ones you recognise — or just type them. It helps us show you how they migrate.
Last step: your details.
We reply within one working day — and right after, if you like, you pick the demo slot yourself.
We couldn't send your request. Try again, or write to us at [email protected].
By sending, you agree to your data being processed so we can get back to you about the demo. Privacy notice.
Preview form — nothing is sent from this page.
Want to schedule the demo now?
Your call: book the slot you prefer yourself, or we'll call you to arrange it.
Live availability, 30 minutes, instant confirmation. The calendar opens in a new tab.
Lock in your slot ↗We'll get back to you within one working day — and we'll join the call already knowing your world.
The calendar is open in another tab: pick a slot and the demo is booked. Can't see it? Reopen it ↗
Preview page: nothing was sent.
Our calendar is live: take the slot that suits you and the demo is booked. 30 minutes, instant confirmation, no waiting.
Lock in your slot ↗