Shipping
All modules
Define shipping zones by postal code, province, or country
Shipping · 7 of 13 · 5 min read
A shipping zone is a set of geographic areas defined by postal code prefix, province, or country. For example, a city centre, an island, or a hard-to-reach location. Zones are shared across all carriers. For each carrier, you then decide how to handle each zone, that is, whether to add a surcharge or exclude it.
How to choose the area type
Each zone contains one or more areas. Each area has an Area type and a value.
- If the zone covers part of a city or a few municipalities, choose Postal-code prefix. For example 20121, 20122, and 20123 for the Milano city centre (Area C) zone.
- If the zone covers one or more entire provinces, choose Province and enter the province code, such as
PA. In the demo, Sicily and Sardinia are defined this way. - If the zone covers an entire country, choose Country and enter the country code, such as
IT.
A zone defines only the territory. Surcharges and exclusions are not set on the zone: they are set per carrier, as explained in Apply a surcharge or exclude a carrier in a zone.
The Zones tab
The Zones tab on the Delivery Settings page lists all zones in the organization.
Before you start: creating, editing, and deleting zones requires the
Delivery Managergroup.
- Open the Delivery Settings page. To get there, see Overview of shipping settings and the carrier list.
- Press the Zones tab.
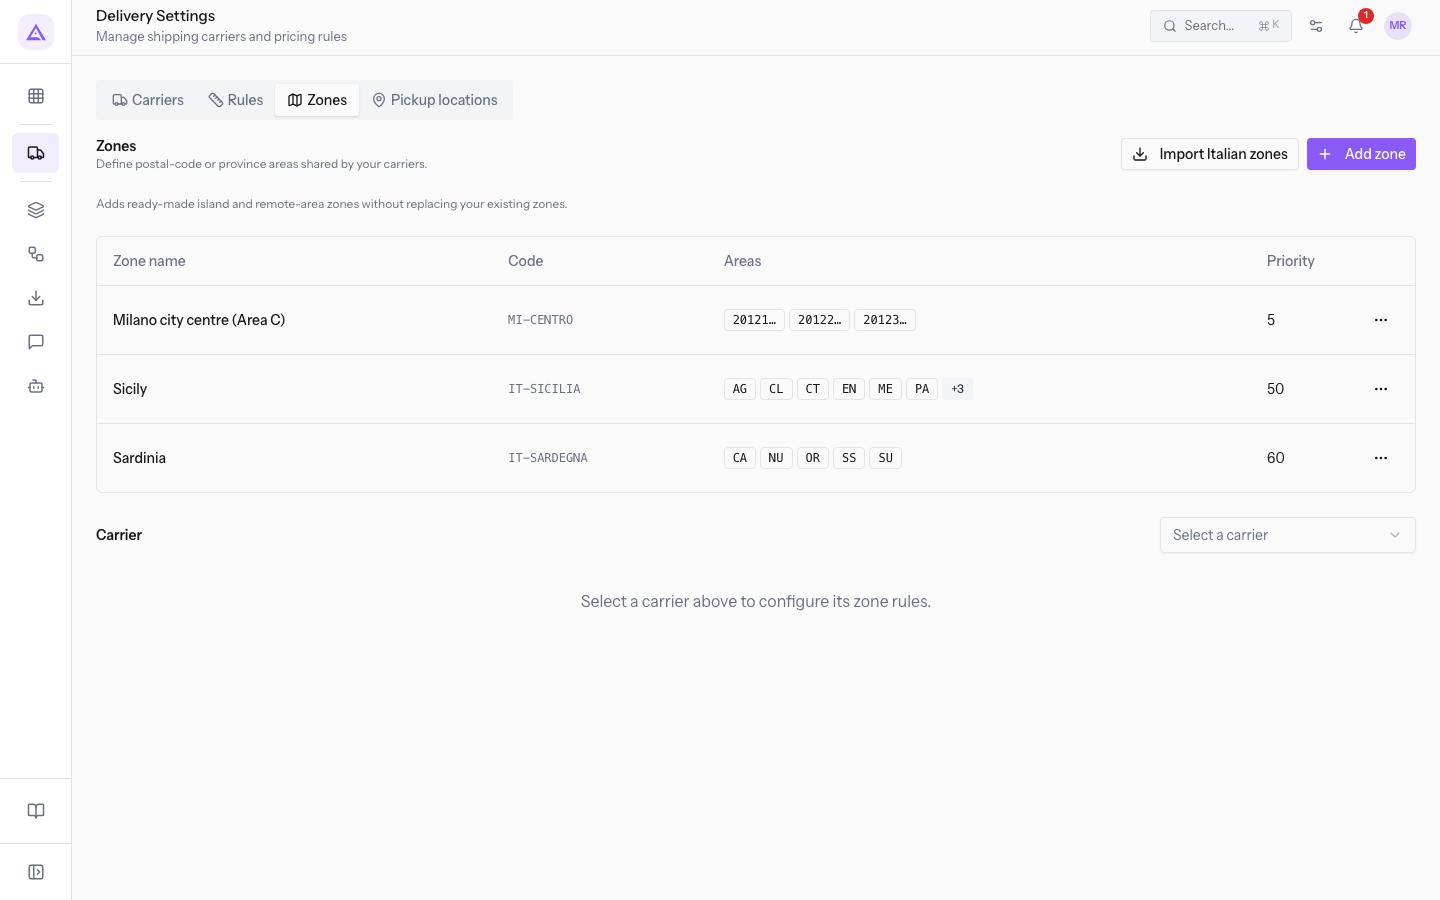
At the top are the Zones title, the help text "Define postal-code or province areas shared by your carriers.", and the Import Italian zones and Add zone buttons.
The list has these columns:
- Zone name: the name of the zone. If the zone is not active, the Inactive label appears next to the name and the row is lighter.
- Code: the code of the zone. If no code was entered, a dash appears.
- Areas: the areas of the zone. A postal code prefix is followed by dots, for example 20121…. A province appears with its code only. At most six areas are shown: the others are summarized in a label with a plus sign and their number.
- Priority: the priority number of the zone.
The ⋯ menu at the end of each row contains Edit and Delete.
If there are no zones yet, the list shows the message No shipping zones configured.
Below the list is the Carrier panel, where you set each carrier's behaviour in the zones. This panel is described in Apply a surcharge or exclude a carrier in a zone.
Add a zone
Create a zone when you need to handle part of the territory differently from the rest, with at least one carrier.
- On the Zones tab, press Add zone. The Add zone window opens.
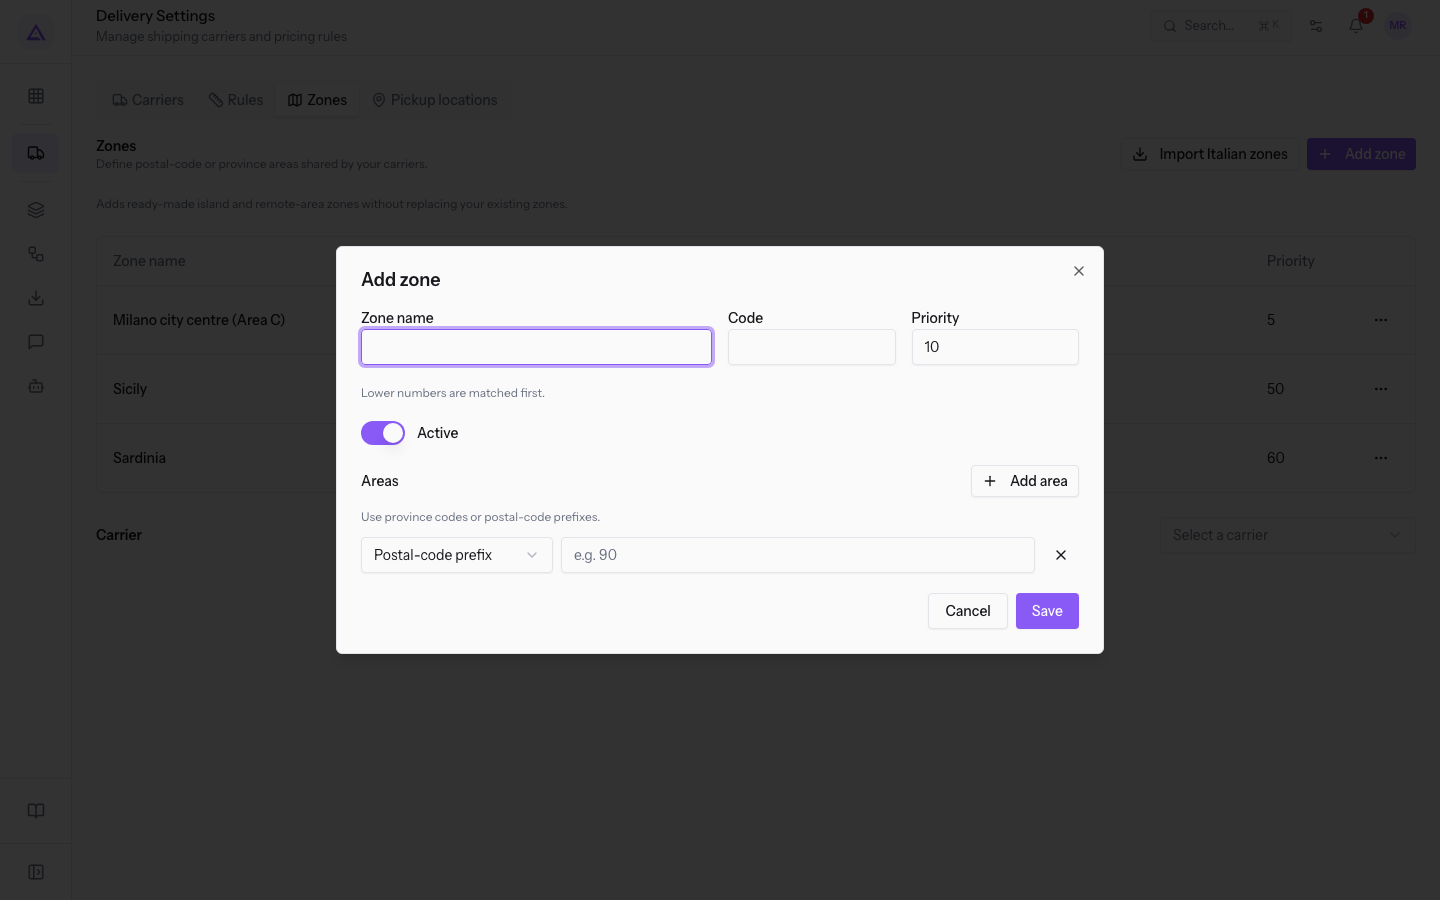
- Fill in Zone name and, if needed, Code and Priority.
- In the first row of Areas, choose the Area type and enter the value.
- To add another area, press Add area. A new row is added with the Postal-code prefix type.
- Press Save.
The fields of the window are:
- Zone name: the name shown in the list and in the carrier zone rules, for example Milano city centre (Area C). The field is required.
- Code: a short code to recognize the zone. The field is optional.
- Priority: a whole number. The suggested value is
10. The help text says: "Lower numbers are matched first." If the field is left empty, the zone is saved with priority 10. In the demo, Milano city centre (Area C) has priority 5, Sicily 50, and Sardinia 60. - Active: the switch is on for a new zone. Turn it off to keep a zone without using it: it will appear in the list with the Inactive label.
- Areas: the list of the zone's areas. The help text says: "Use province codes or postal-code prefixes." Each row contains:
- Area type: the options are Postal-code prefix (placeholder
e.g. 90), Province (placeholdere.g. PA), and Country (placeholdere.g. IT). - The area value: a postal code prefix, a province code, or a country code, depending on the chosen type.
- Remove area: the button with the X removes the row.
- Area type: the options are Postal-code prefix (placeholder
Note: empty rows in Areas are not saved. You can leave a row empty after clicking Add area without having to remove it.
Edit or delete a zone
You can change the name, areas, priority, or status of an existing zone, or delete it.
- On the Zones tab, open the ⋯ menu of the row, for example the one for Milano city centre (Area C).
- Press Edit. The Edit zone window opens, with the same fields as Add zone already filled in with the zone's data.
- Change the fields you need and press Save.
To delete a zone, open the ⋯ menu of the row and press Delete. Confirm the question Delete this item?.
Tip: if you will still need a zone, turn off Active instead of deleting it.
Import the Italian zones
The Import Italian zones button adds ready-made zones for islands and remote areas of Italy. Use it so you don't have to enter postal code or province lists by hand. The help text says: "Adds ready-made island and remote-area zones without replacing your existing zones."
- On the Zones tab, press Import Italian zones.
- The message Italian shipping zones imported appears.
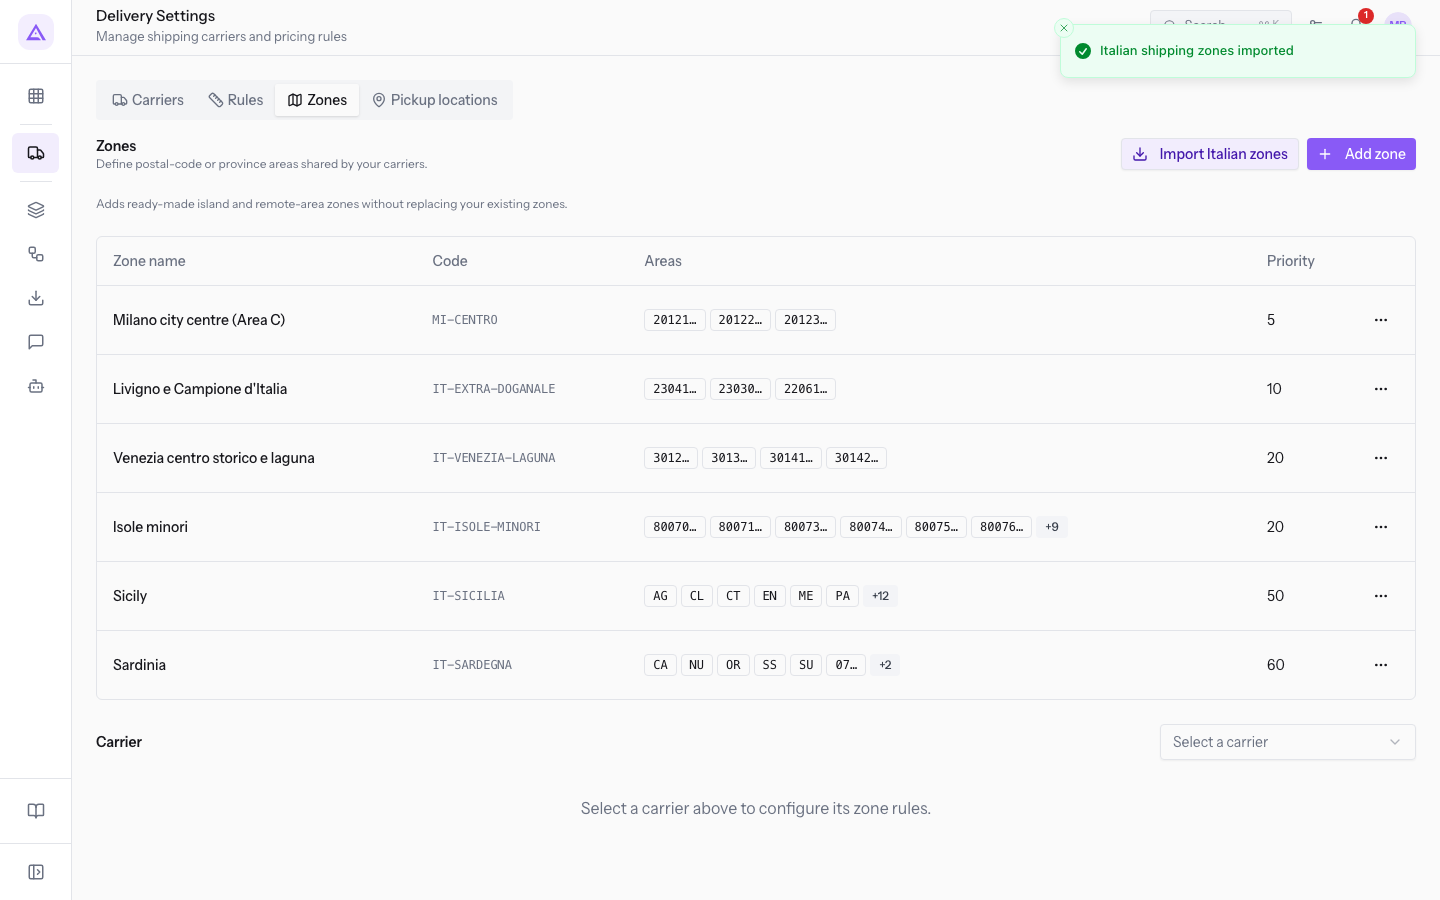
In the demo, before the import there were three zones: Milano city centre (Area C) for postal codes 20121, 20122, and 20123, and Sicily and Sardinia defined by province. After the import, the list also contains:
- Livigno e Campione d'Italia, with postal code prefixes 23041, 23030, and 22061, priority 10.
- Venezia centro storico e laguna, with postal code prefixes 3012, 3013, 30141, and 30142, priority 20.
- Isole minori, with postal code prefixes such as 80070 and 80071, priority 20.
Sicily and Sardinia are not created a second time. The list shows them once, with more areas than before.
After the import, set each carrier's behaviour in the new zones, as explained in Apply a surcharge or exclude a carrier in a zone.
See it on your company, not on a slide deck.
In 30 minutes we map the software you use today.We show you how much work and how much margin Archimedes gives back.
Show me on my business →What industry are you in?
One tap — it lets us prepare the demo around your world.
What tools do you use today?
Pick the ones you recognise — or just type them. It helps us show you how they migrate.
Last step: your details.
We reply within one working day — and right after, if you like, you pick the demo slot yourself.
We couldn't send your request. Try again, or write to us at [email protected].
By sending, you agree to your data being processed so we can get back to you about the demo. Privacy notice.
Preview form — nothing is sent from this page.
Want to schedule the demo now?
Your call: book the slot you prefer yourself, or we'll call you to arrange it.
Live availability, 30 minutes, instant confirmation. The calendar opens in a new tab.
Lock in your slot ↗We'll get back to you within one working day — and we'll join the call already knowing your world.
The calendar is open in another tab: pick a slot and the demo is booked. Can't see it? Reopen it ↗
Preview page: nothing was sent.
Our calendar is live: take the slot that suits you and the demo is booked. 30 minutes, instant confirmation, no waiting.
Lock in your slot ↗