Tree of Knowledge
All modules
Tree of Knowledge
Tree of Knowledge · 1 of 14 · 5 min read
The Tree of Knowledge module shares private information with people outside the company. You create a portal, organize it as a tree with sections, pages and reels, invite people with a personal link, and see which content they have opened.
How it works
The module works with these concepts.
- Portal: the collection of content to share, with name, description and status.
- Section: groups pages, reels and other sections. It has no text of its own.
- Page: a text written in the editor. It is the only content that can have Attachments.
- Reel: a short video, recorded from the browser or uploaded from a file.
- Invitation: gives a person access to a portal. Each invitation has its own link.
- Visitor: the invited person who opens the link. They do not access Archimedes.
Sections, pages and reels are the elements of the tree.
A portal has two statuses.
- Draft: the portal is being prepared. The visitor cannot enter, even with a valid link.
- Published: the visitor can enter from their link.
Note: in this module "portal" always means the Tree of Knowledge portal, not the client portal.
Choose the type of element based on what you need to share.
- If you need to group other elements, create a section.
- If you need to share a text or files, create a page.
- If you need to show an operation with a short video, create a reel.
Menu entries
The module has a single menu entry, Tree of Knowledge, which opens the Portals screen. The other screens open from here.
The Portals screen
The screen lists the organization's portals. For each portal it shows name, status, description, date and author. The Search portals... field searches the list.
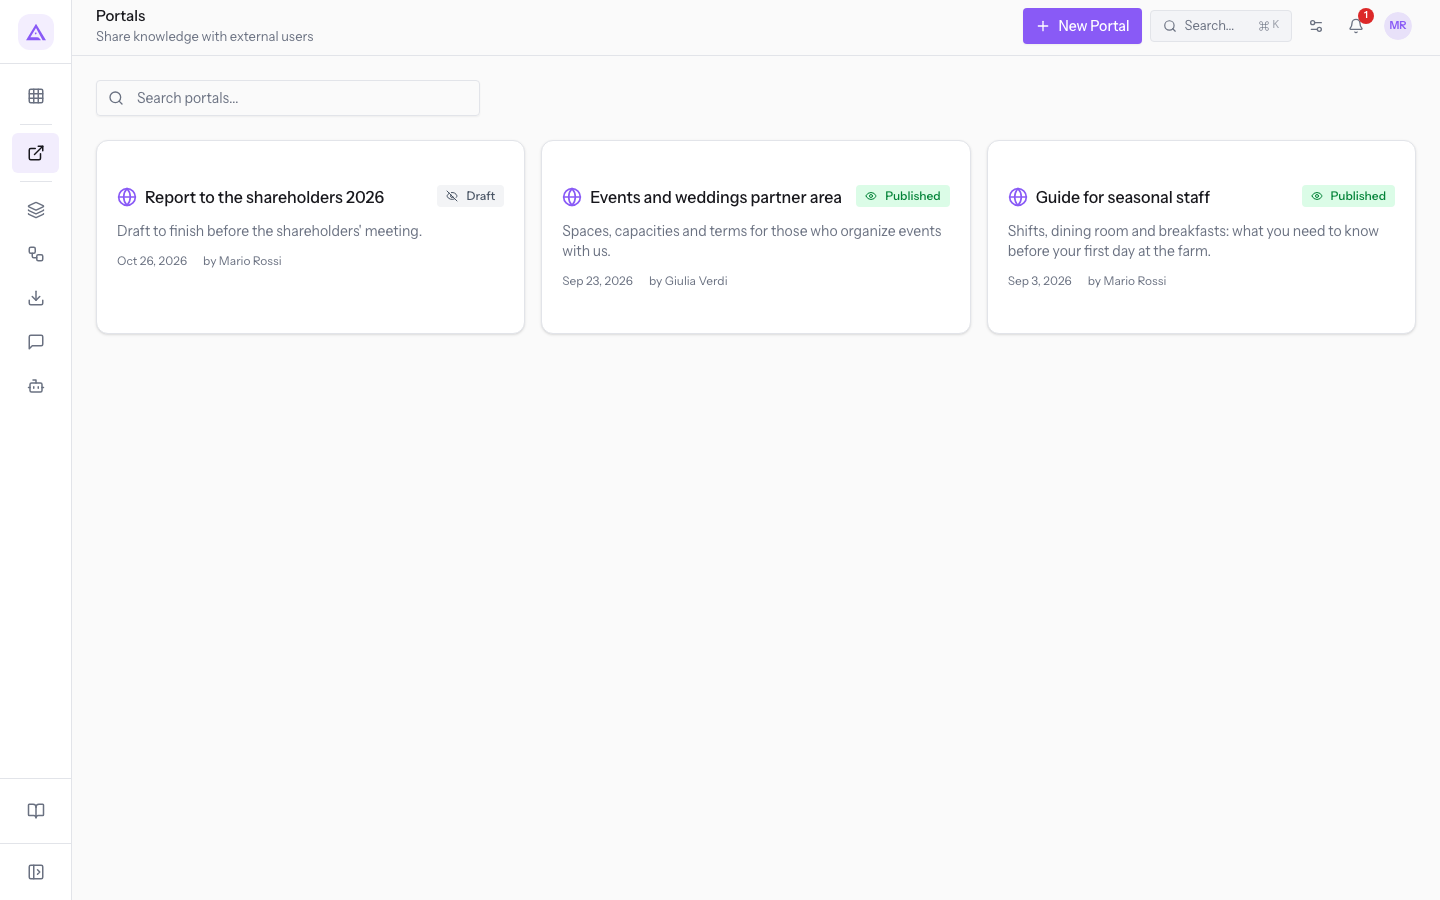
The New Portal button opens the Create Portal window. Pressing a portal opens its editor.
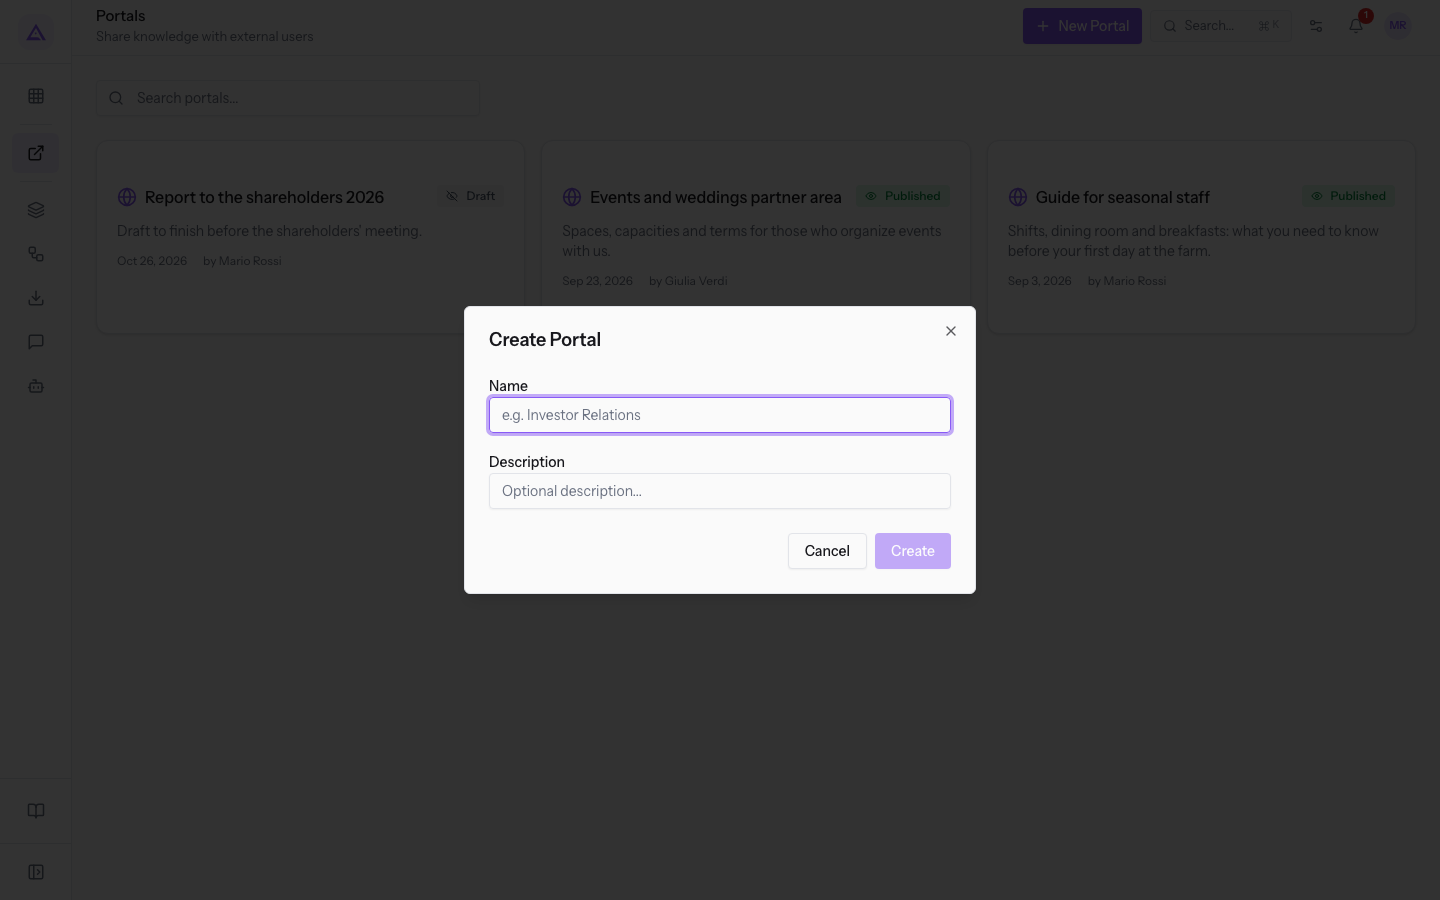
- Name: the name of the portal.
- Description: an optional text about the portal's content. The editor shows it under the name.
The portal editor
The editor builds the portal. On the left, under Content, is the tree. On the right the selected element appears. In the header are the status switch and the Invitations and Analytics buttons.
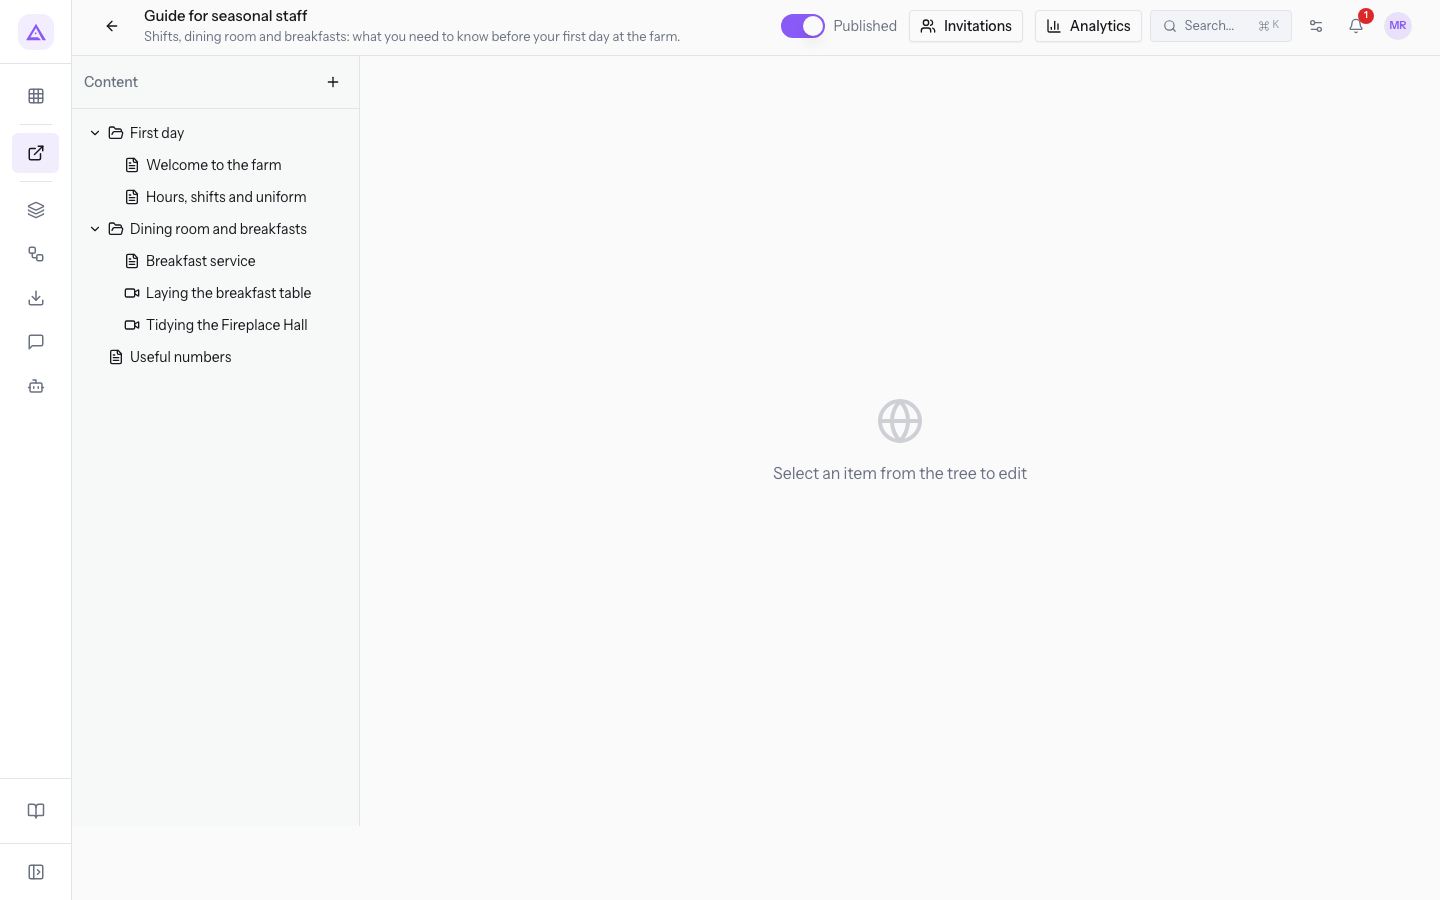
What you can do from the editor:
- Add an element: the + button next to Content opens the Add Content window, where you choose type and title. If the tree already contains something, also choose Parent Section (optional) or Root level.
- Rename an element: press its title.
- Write a page: press Edit, write the text and press Save Page.
- Attach a file to a page: in the Attachments block press Upload File. The attachment title is suggested from the file name.
- Prepare a reel: a reel without video shows No video uploaded yet and offers Record Reel and Upload Video.
- Publish: the switch in the header changes the portal from Draft to Published and back. The effect is immediate.
Important: selecting another element closes the edit and reloads the saved text. Unsaved changes to a page are lost without warning.
Important: deleting a section also deletes everything it contains. A confirmation is requested before deletion.
The Manage Invitations window
The Invitations button in the editor opens the Manage Invitations window. The window creates the portal's invitations and lists them. For each invitation it shows name, email, status, creation date, last visit and number of events.
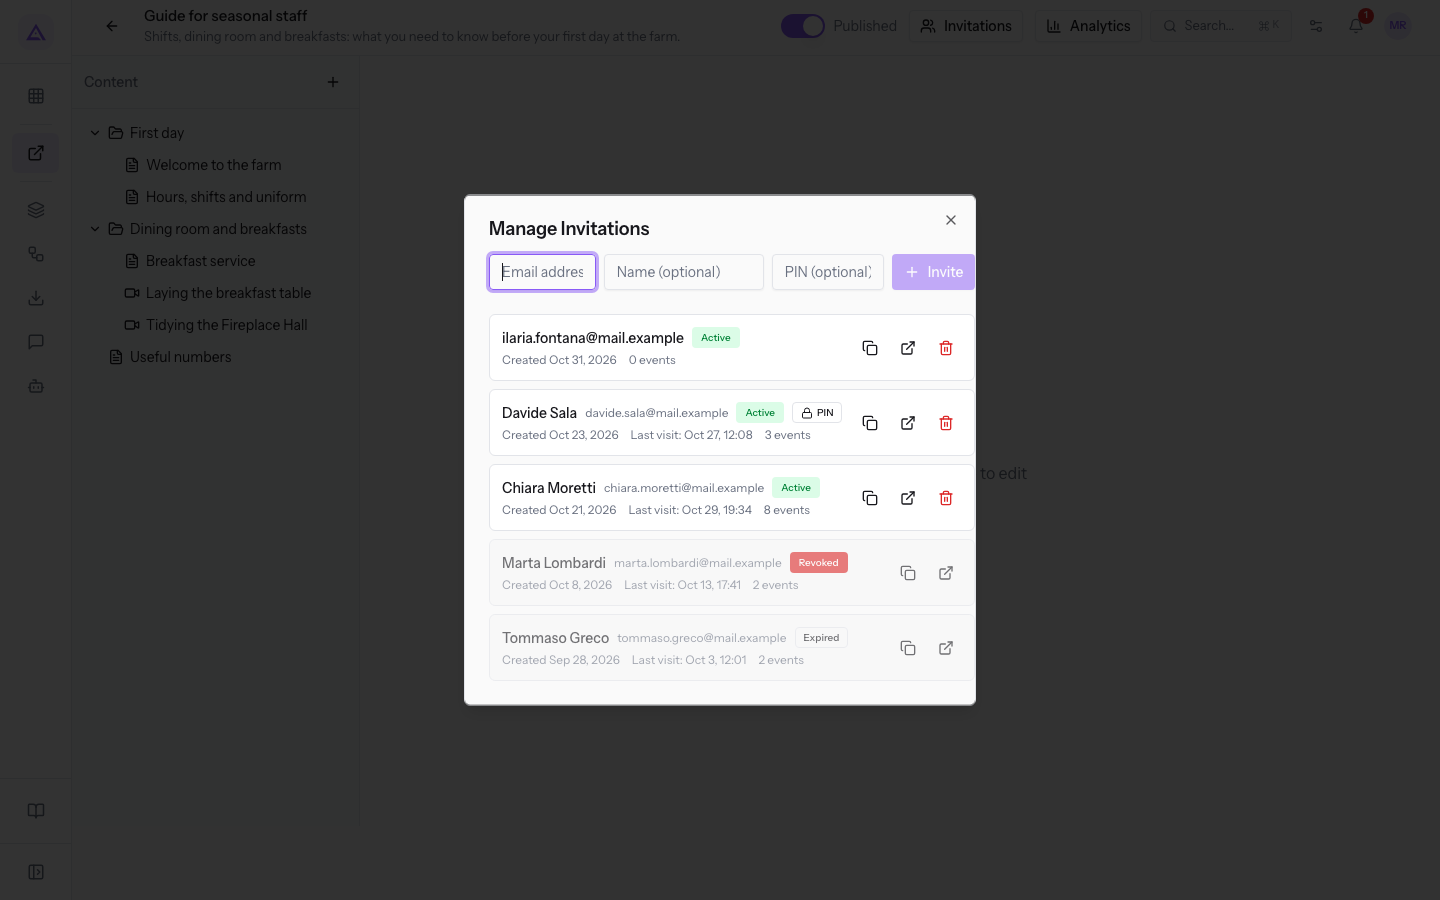
- Email address: the visitor's address.
- Name (optional): the visitor's name.
- PIN (optional): the code the visitor enters to open the portal.
Choose whether to set a PIN based on the portal.
- If you want an extra check when the link is opened, set the PIN and tell the visitor when you create the invitation: afterwards it cannot be recovered.
- If the personal link is enough, leave the field empty.
Before you start: the organization must have a privacy notice to show. Without a notice you cannot create an invitation.
The statistics screen
The Analytics button in the editor opens the statistics: the visitors' activity on the portal's content. At the top appear Total Visits, Unique Visitors, Page Views, Reel Watches and Avg Duration.
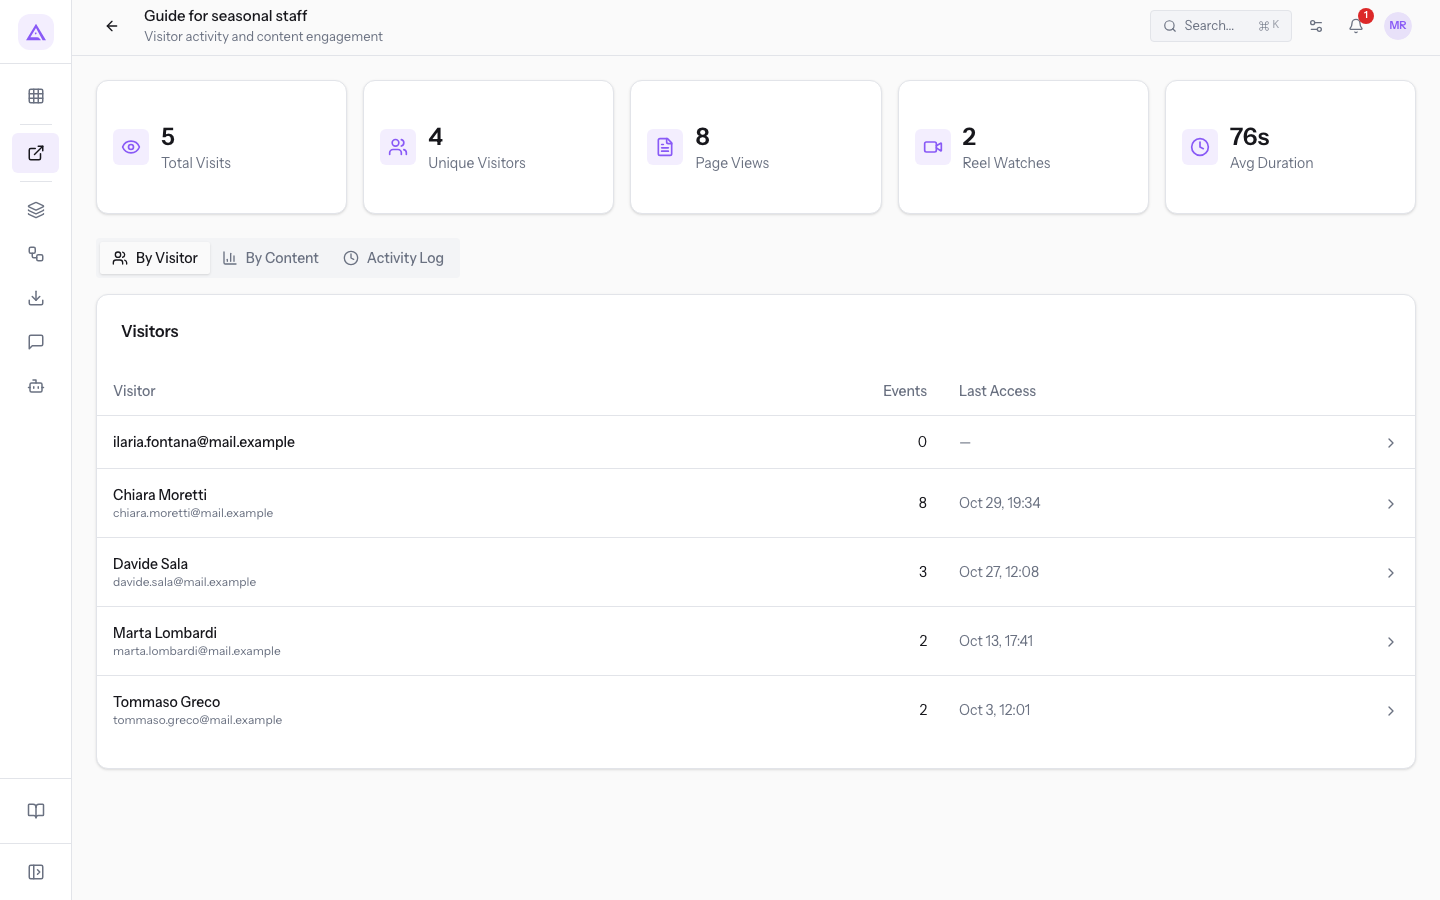
The screen has three tabs.
- By Visitor: the visitors and the content they viewed.
- By Content: the visits to each page and reel.
- Activity Log: the recorded events. You can search with Search visitor or content... and filter with All visitors and All events.
The module records each entry into the portal, each page opened and each reel watched, with the duration.
The portal as seen by the visitor
The visitor opens the portal from their own link, without accessing Archimedes. The link is valid for one person only, so the statistics attribute each visit to the individual visitor.
- If the invitation has a PIN, the visitor enters it once per browser session.
- If the portal is in Draft, the link screen says that the portal is not available.
- If the invitation is revoked, the module records its date and does not delete it. A revocation cannot be undone.
Who can do what
The module's permissions separate who writes the content from who publishes and invites.
- Module manager: creates portals, publishes them, creates and revokes invitations, creates, edits and deletes sections, pages and reels.
- Module author: sees the portals, creates and edits sections, pages and reels but does not delete them. Sees invitations and statistics read-only and cannot change the portal's status.
Links with other modules
- Documents: the page attachments are documents of the Documents module. The visitor can download all the attachments of the pages they open.
- Privacy notice: it is needed to create an invitation and is shown to the visitor. Acknowledgement is recorded with the email and the invitation reference.
- Dashboard: the module provides a summary widget.
The Help module's knowledge base is a separate list: its articles do not belong to the portals.
See it on your company, not on a slide deck.
In 30 minutes we map the software you use today.We show you how much work and how much margin Archimedes gives back.
Show me on my business →What industry are you in?
One tap — it lets us prepare the demo around your world.
What tools do you use today?
Pick the ones you recognise — or just type them. It helps us show you how they migrate.
Last step: your details.
We reply within one working day — and right after, if you like, you pick the demo slot yourself.
We couldn't send your request. Try again, or write to us at [email protected].
By sending, you agree to your data being processed so we can get back to you about the demo. Privacy notice.
Preview form — nothing is sent from this page.
Want to schedule the demo now?
Your call: book the slot you prefer yourself, or we'll call you to arrange it.
Live availability, 30 minutes, instant confirmation. The calendar opens in a new tab.
Lock in your slot ↗We'll get back to you within one working day — and we'll join the call already knowing your world.
The calendar is open in another tab: pick a slot and the demo is booked. Can't see it? Reopen it ↗
Preview page: nothing was sent.
Our calendar is live: take the slot that suits you and the demo is booked. 30 minutes, instant confirmation, no waiting.
Lock in your slot ↗