Contacts
All modules
Creating and editing a contact
Contacts · 3 of 13 · 5 min read
Contacts are the organization's address book: the people and entities you work with, for example a company customer like Rossi Arredamenti S.r.l., a professional firm like Studio Bianchi & Associati or a private customer like Anna Russo. From the New Contact window you enter identity, contact details and classification; from the Edit Contact window you update the same data later on.
Choosing the contact type
The Type field decides which fields the form shows and how the contact is treated throughout the rest of the system. Choose the type before filling in the rest.
- If you are registering a natural person, choose Person: the form asks for Full Name, Job Title and the link to an entity.
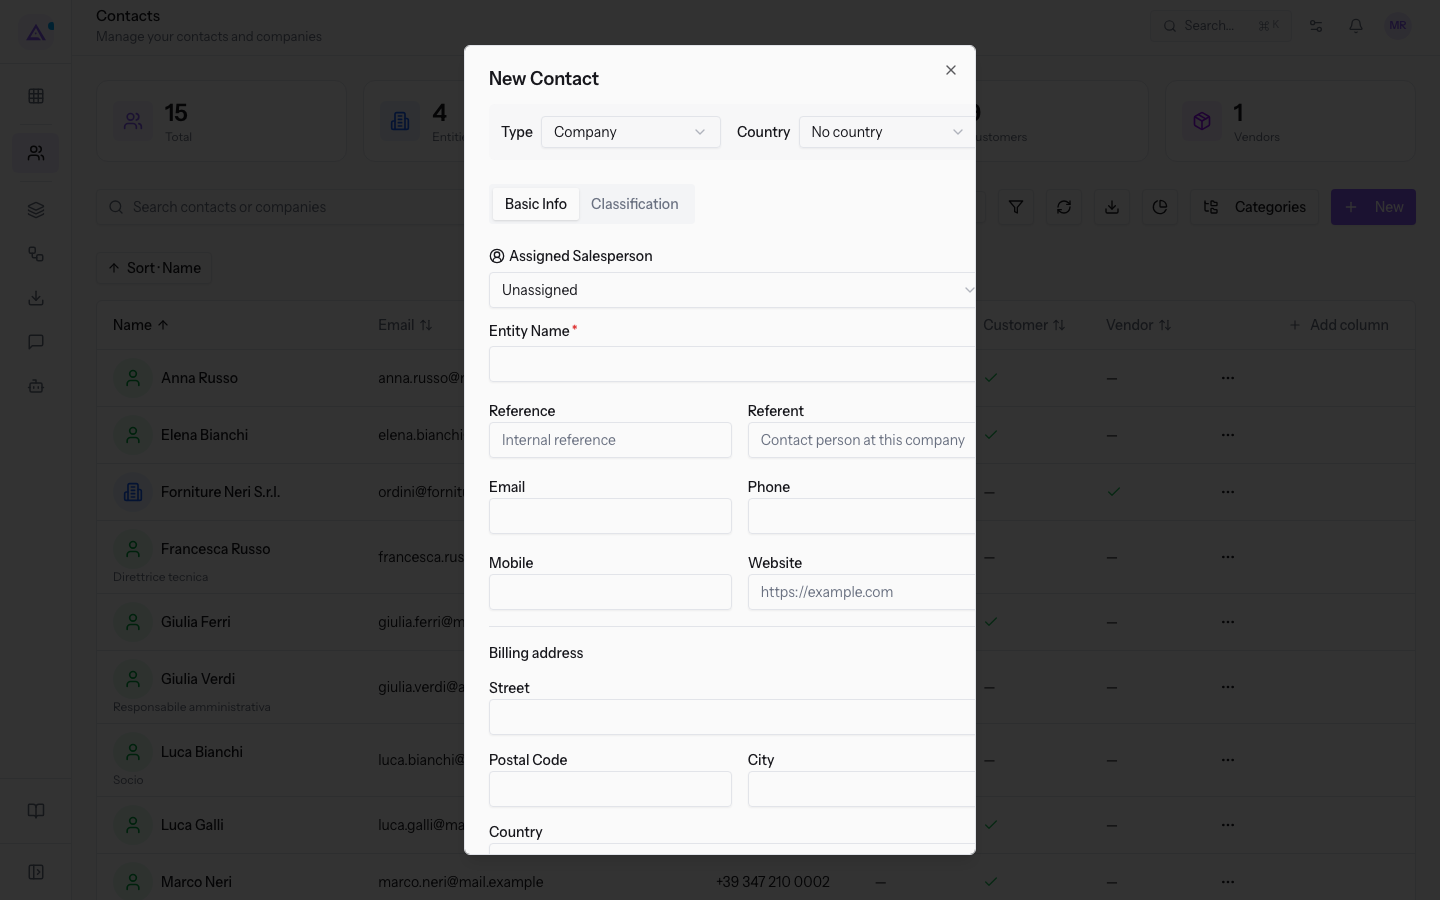
- If you are registering an organization, choose Company, Non-Profit, Government, Association or Foundation: the form asks for Entity Name, Referent and, in the Classification tab, the Parent company toggle.
Note: the type can also be changed later, from the Type field in the Edit Contact window.
Creating a contact
Creation starts from the contact list.
- Open Contacts.
- Click New Contact.
- Choose the Type value.
- Fill in the Basic Info tab, then the Classification tab.
- Click Create Contact. To close without saving, use Cancel.
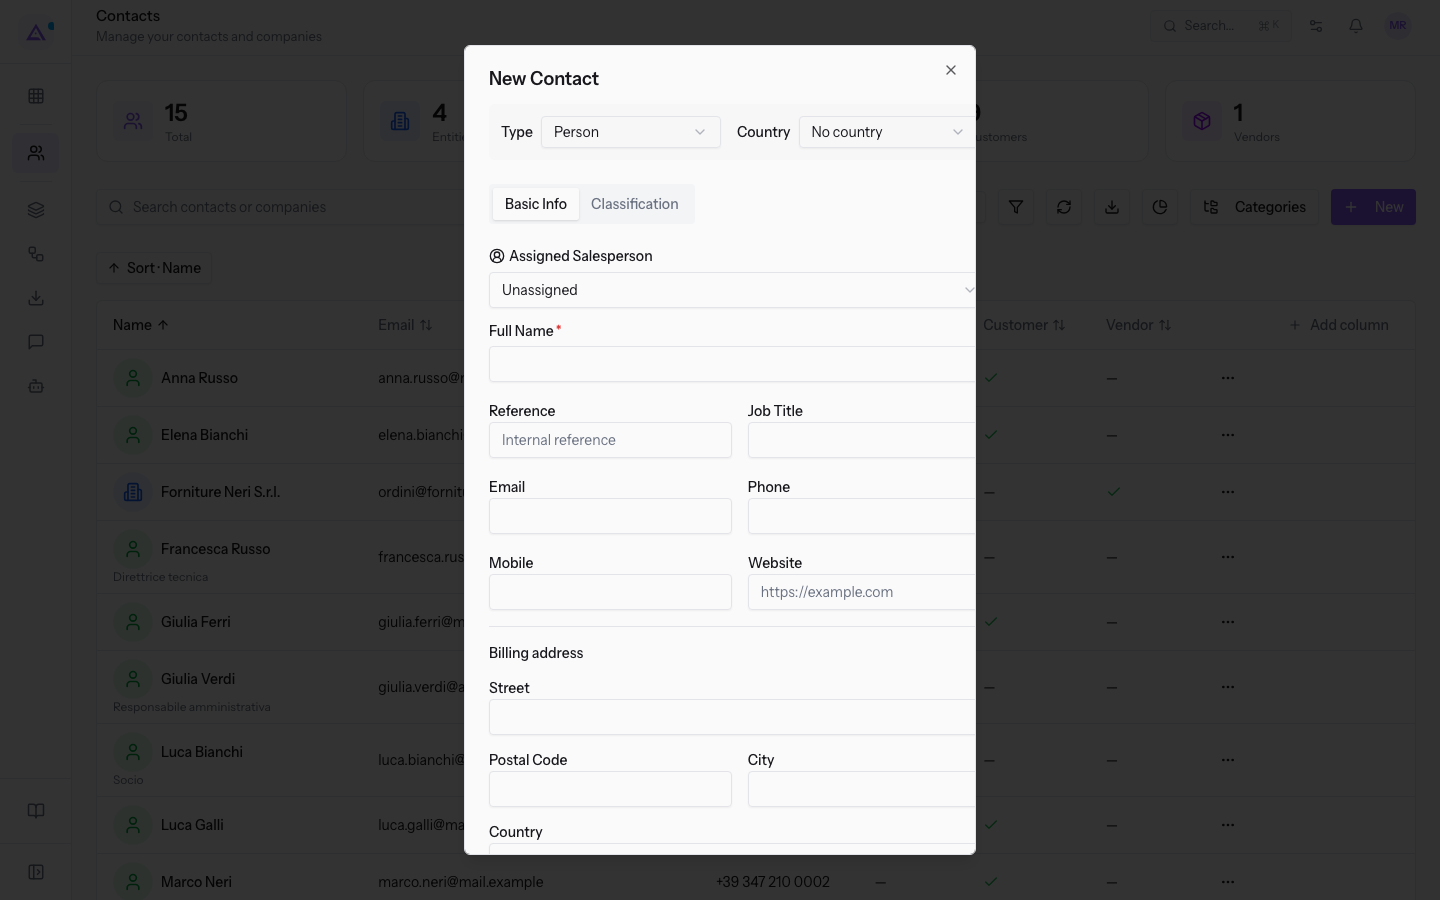
The fields in the Basic Info tab
The Basic Info tab collects identity and contact details.
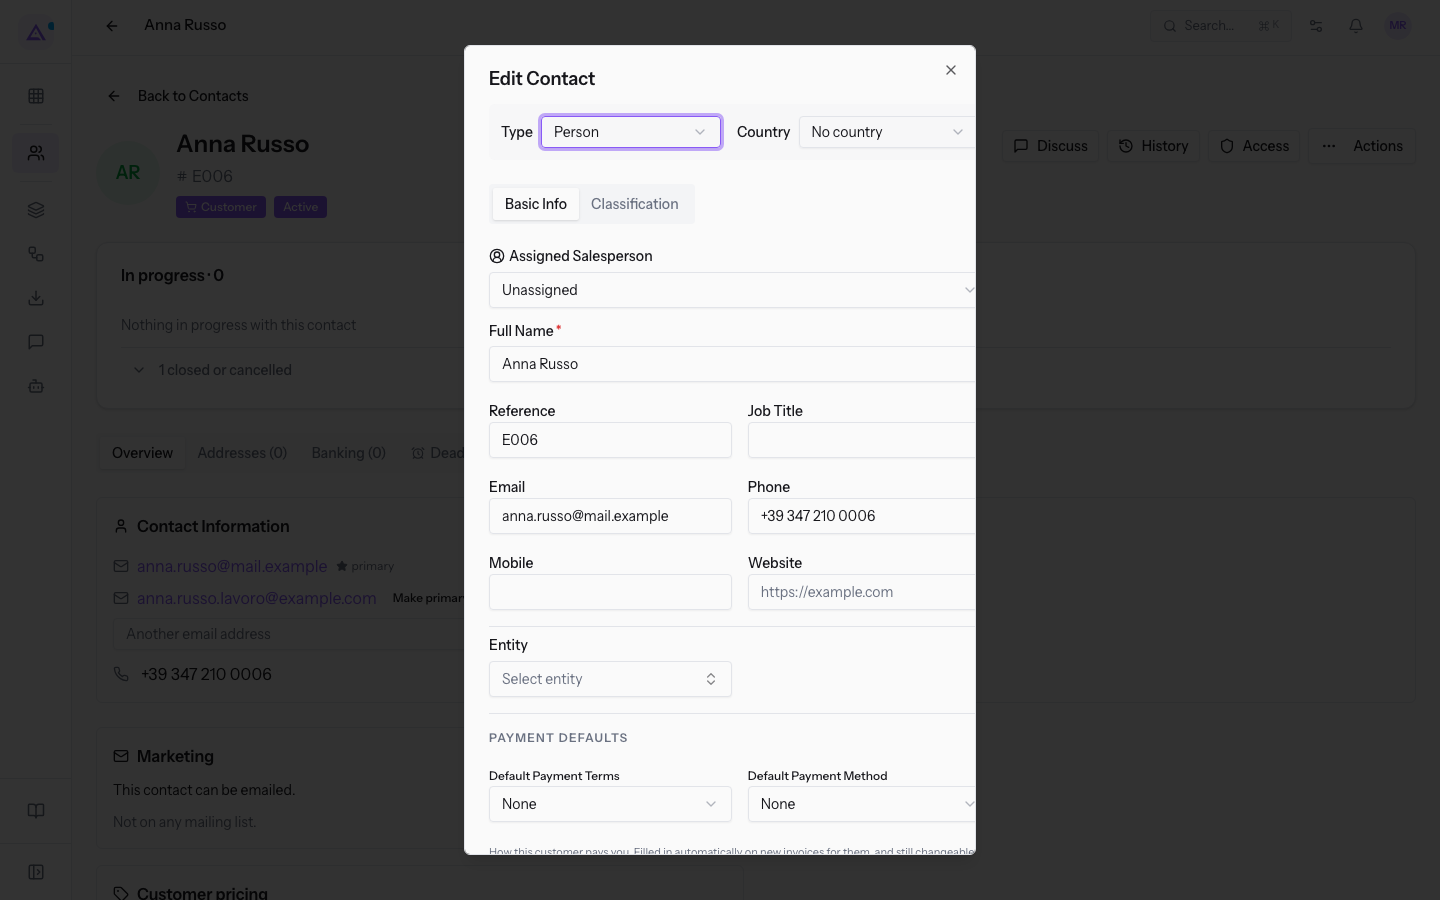
- Type: the nature of the contact. The options are Person, Company, Non-Profit, Government, Association, Foundation.
- Full Name: the person's name, for example
Anna Russo. The field is required and only appears when Type is set to Person. - Entity Name: the organization's name, for example
Rossi Arredamenti S.r.l.. The field is required and replaces Full Name for all types other than Person. - Reference: the contact's internal code, for example
E006. - Job Title: the person's job title. The field only appears when Type is set to Person.
- Referent: the entity's reference person. The field appears in place of Job Title for entities.
- Email: the main email address, for example
[email protected]. - Phone: the landline number, for example
+39 347 210 0006. - Mobile: the mobile phone number.
- Website: the website address.
- Street, Postal Code, City, Country: the address details. Country starts at No country.
- Assigned Salesperson: the sales user who follows the contact. The initial value is Unassigned; in the demo organization the other option is
Mario Rossi — Commerciale. - Standing notes for orders: the text to carry over onto the contact's orders.
- Notes: free-form notes about the contact.
Linking a person to an entity
A person can belong to an entity in the address book. Link the person when you work with them as a company's reference person; leave the field empty for a private customer. An entity's members can also be managed from the entity's page, as explained in Managing an entity's Members and Locations.
- In the Basic Info tab, with Type set to Person, open Entities. The initial value is Select entity.
- Choose the entity from the list, for example
Rossi Arredamenti S.r.l.. - Fill in the role fields that appear below the entity. To remove the link, use Clear selection.
- Entities: the entity the person belongs to.
- Role: the person's role in the entity, chosen from a list of predefined roles. The initial value is No role. The field only appears after choosing an entity.
- Role Title (custom): the role title to use when no role in the list fits. The field only appears after choosing an entity.
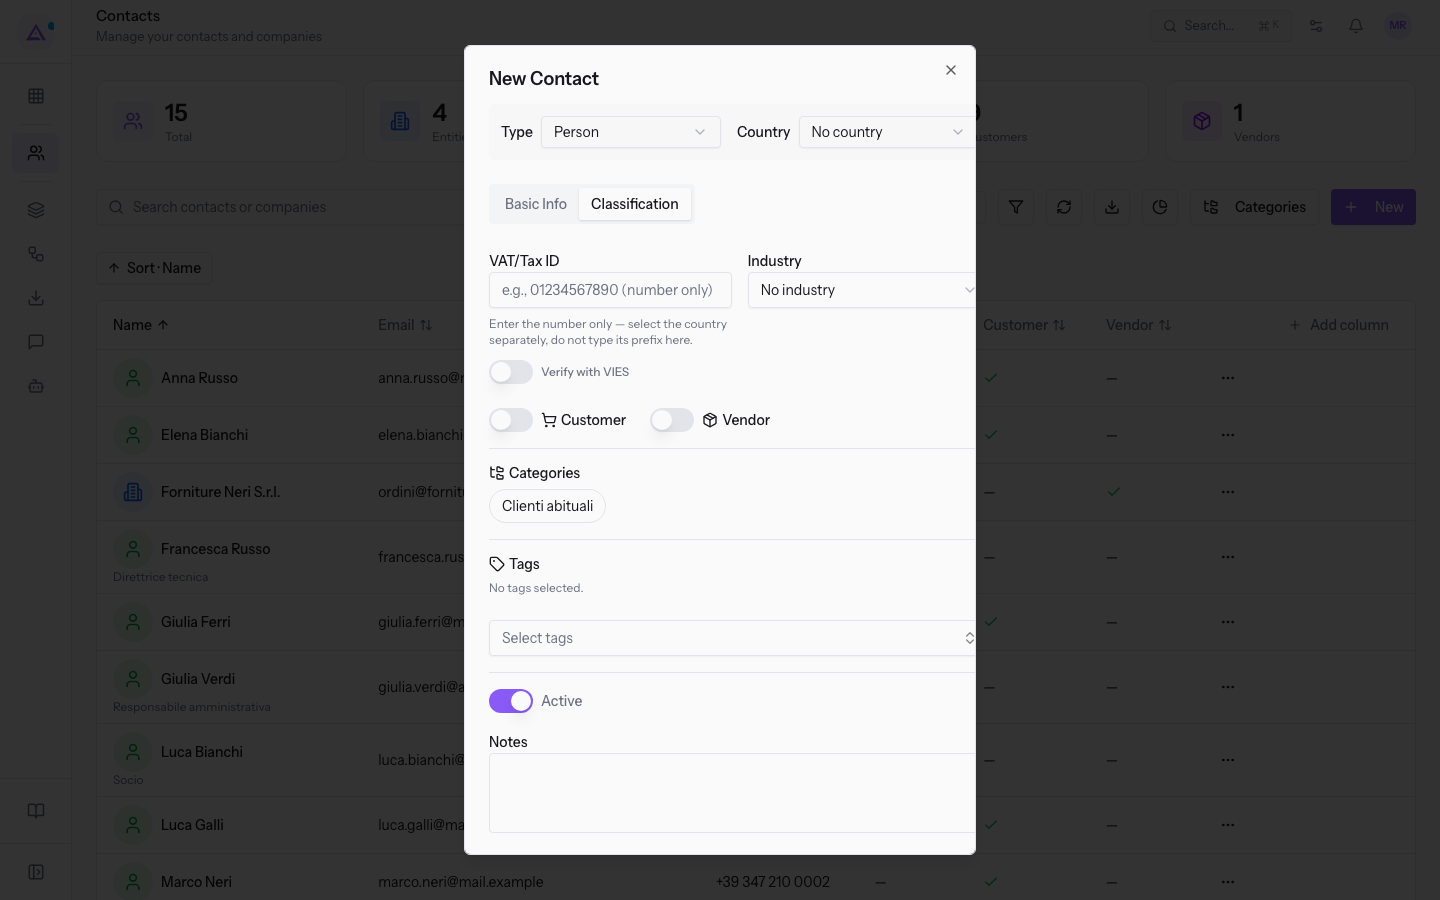
The fields in the Classification tab
The Classification tab contains the tax details, the industry and the flags that decide where the contact is suggested in the other modules.
- In the New Contact or Edit Contact window, open the Classification tab.
- Fill in the fields, then go back to the Basic Info tab or save.
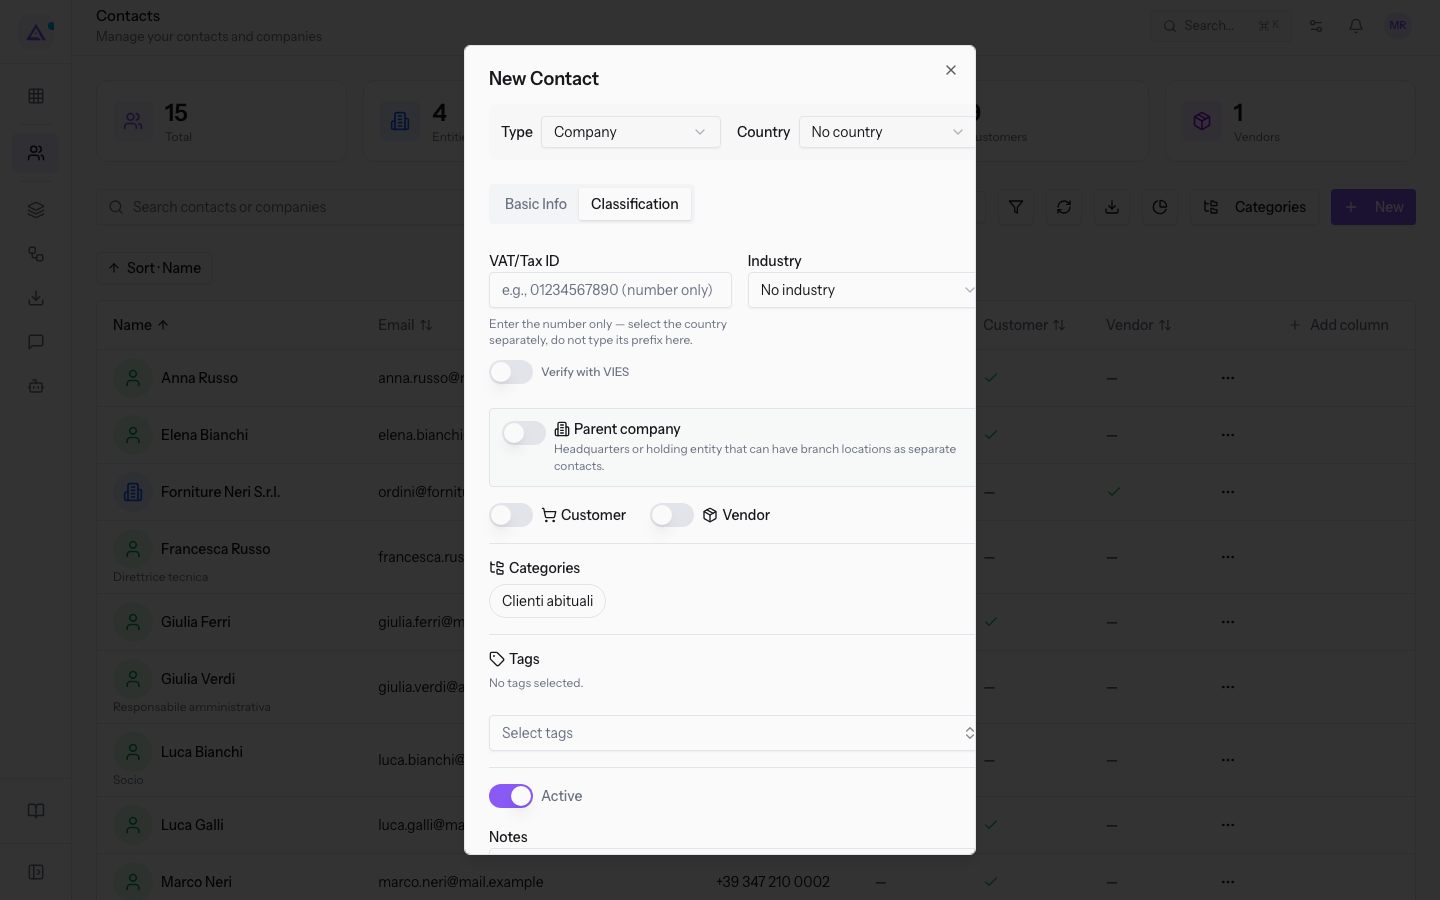
- VAT/Tax ID: the contact's tax identifier.
- Verify with VIES: toggle for verifying the VAT number with VIES. It is off when the form opens.
- Industry: the business sector. The initial value is No industry.
- Parent company: toggle that marks the entity as a parent company. It is off when the form opens and only appears for types other than Person.
- Customer: toggle that classifies the contact as a customer. It is off when the form opens.
- Vendor: toggle that classifies the contact as a vendor. It is off when the form opens.
- Select tags: the categories to assign to the contact; the available categories are managed as described in Managing categories and assigning them to contacts.
- Active: toggle for the contact's status. It is on when the form opens.
- Notes: free-form notes about the contact.
Note: a contact can be both Customer and Vendor; the two toggles are independent.
Editing a contact
Editing opens from the contact's page, described in Reading a contact's page. The Edit Contact window has the same Basic Info and Classification tabs as creation, with the values already filled in.
- Open the contact from the Contacts list, for example
Anna Russo. - Click Actions.
- Choose Edit Contact.
- Update the fields and click Save Changes. To exit without saving, use Cancel.
Note: addresses and bank accounts are not entered in this window, but from the contact's Indirizzi (0) and Bancario (0) tabs, as explained in Adding Addresses and Bank Accounts to a contact.
Deleting a contact
Deletion starts from the same menu as editing.
Before you begin: deleting a contact is reserved for the Contacts module manager; with the module's user permissions you can create and edit contacts, not delete them.
- Open the contact and click Actions.
- Choose Delete Contact.
Important: deleting a contact is a soft delete: the record is not removed from the database, so the documents that reference it stay consistent.
See it on your company, not on a slide deck.
In 30 minutes we map the software you use today.We show you how much work and how much margin Archimedes gives back.
Show me on my business →What industry are you in?
One tap — it lets us prepare the demo around your world.
What tools do you use today?
Pick the ones you recognise — or just type them. It helps us show you how they migrate.
Last step: your details.
We reply within one working day — and right after, if you like, you pick the demo slot yourself.
We couldn't send your request. Try again, or write to us at [email protected].
By sending, you agree to your data being processed so we can get back to you about the demo. Privacy notice.
Preview form — nothing is sent from this page.
Want to schedule the demo now?
Your call: book the slot you prefer yourself, or we'll call you to arrange it.
Live availability, 30 minutes, instant confirmation. The calendar opens in a new tab.
Lock in your slot ↗We'll get back to you within one working day — and we'll join the call already knowing your world.
The calendar is open in another tab: pick a slot and the demo is booked. Can't see it? Reopen it ↗
Preview page: nothing was sent.
Our calendar is live: take the slot that suits you and the demo is booked. 30 minutes, instant confirmation, no waiting.
Lock in your slot ↗