eCommerce
All modules
Approve shop access requests
eCommerce · 10 of 13 · 4 min read
The Access requests page lists who has requested access to the shop or a business account, and the decision made on each request. Here you approve or reject requests, for example from a private customer who wants to make a purchase, or from a business requesting the terms reserved for businesses.
When access requests appear
Access requests appear when the shop sells to businesses (B2B or Mixed) or admits customers after approval.
- If the shop sells only to private individuals and is open to everyone, you receive no requests: the page shows This shop takes no access requests.
- If you choose Account required, admitted after approval in Shop access, only the customers you approve can see the shop. Visitors request access and wait for your approval.
- If the shop sells to businesses, a business can request a business account. It receives business prices and payment terms after the shop approves the business.
The visitor requests access from the shop. They receive a link to confirm their email address, then the request appears on this page.
If you change the settings and the shop no longer receives requests, existing requests are not deleted.
Opening the requests list
The Access requests item is visible to members of the eCommerce Manager group.
- Open eCommerce › Access requests.
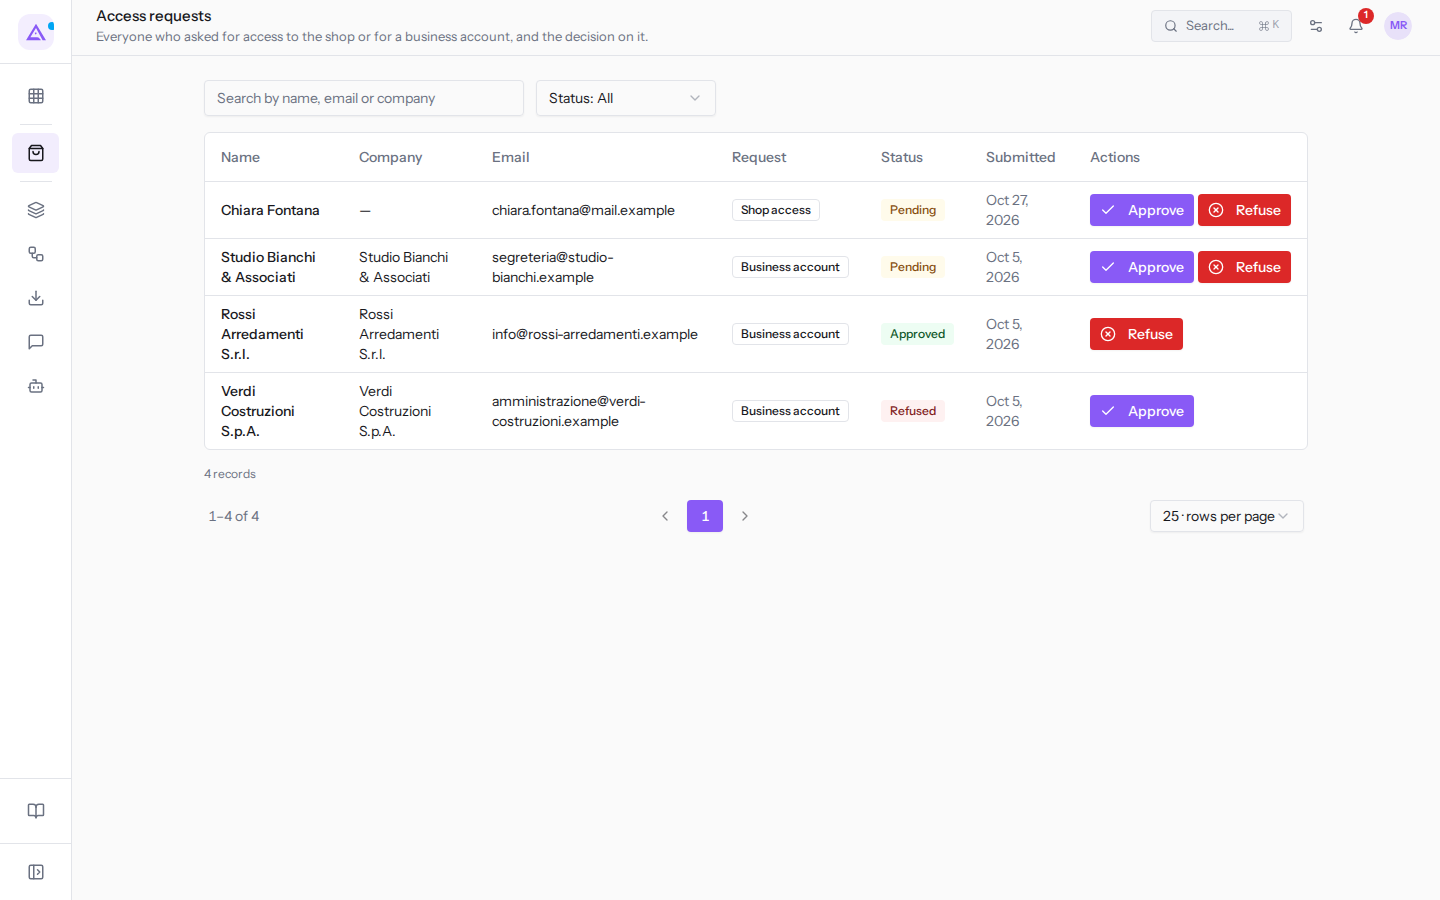
The list has these columns:
- Name: the name of the person who submitted the request. For example
Rossi Arredamenti S.r.l.. - Company: the applicant's company, for example
Studio Bianchi & Associati. For a private individual the cell shows a dash (—), for example forChiara Fontana. - Email: the applicant's email address.
- Request: what the applicant has requested.
- Shop access: access to the shop to view products and make purchases.
- Business account: an account for the business, with the terms reserved for business customers.
- Status: the decision on the request.
- Pending: no decision has been made yet.
- Approved: the applicant has access.
- Refused: the applicant does not have access.
- Submitted: when the request was submitted.
- Actions: the buttons for deciding on the request.
For example, the request from Rossi Arredamenti S.r.l. is approved, that from Verdi Costruzioni S.p.A. is refused, and those from Studio Bianchi & Associati and Chiara Fontana are pending.
Searching and filtering requests
Use the search and filter to find the requests to decide on.
- Type in the Search by name, email or company field and press Enter, for example
Bianchi. - Open the Status filter and choose one of the options.
- Status: All: shows all requests. This is the default value.
- Pending: shows only requests to be decided.
- Approved: shows only approved requests.
- Refused: shows only refused requests.
- To return to the full list, click Clear filters.
At the bottom of the list, choose how many rows to display with Rows per page and move between pages with Previous page and Next page.
Approving or rejecting a pending request
A Pending request has the Approve and Refuse buttons in the Actions column.
- If you know the applicant and want them to shop in the store, choose Approve.
- If you do not want to grant access, choose Refuse.
- Open eCommerce › Access requests.
- Find the request, for example
Studio Bianchi & Associati. - In the Actions column, click Approve or Refuse.
The request status changes to Approved or Refused.
Changing a decision already made
A decision can be changed later. Each request shows only the action that changes its current status.
- A Refused request has only the Approve button, for example
Verdi Costruzioni S.p.A.. - An Approved request has only the Refuse button, for example
Rossi Arredamenti S.r.l..
To remove access from an already-approved applicant:
- Find the request using the Search by name, email or company field.
- In the Actions column, click Refuse. The Refuse Rossi Arredamenti S.r.l.? window opens.
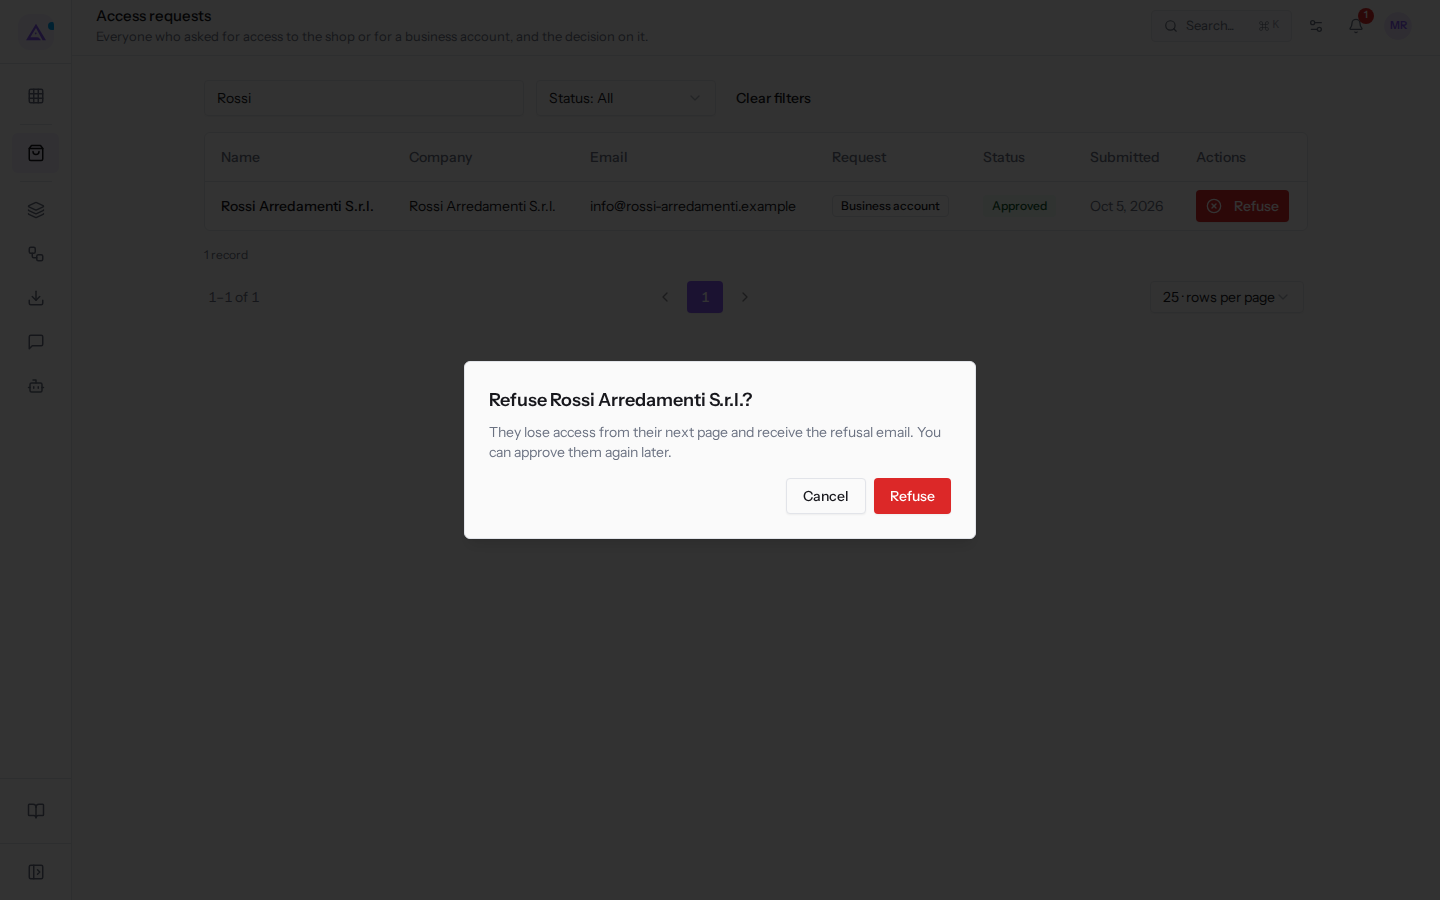
- Click Refuse to confirm, or Cancel to leave the request approved.
The applicant loses access from the next page they open in the shop and receives the rejection email. You can approve the request again later with Approve.
See it on your company, not on a slide deck.
In 30 minutes we map the software you use today.We show you how much work and how much margin Archimedes gives back.
Show me on my business →What industry are you in?
One tap — it lets us prepare the demo around your world.
What tools do you use today?
Pick the ones you recognise — or just type them. It helps us show you how they migrate.
Last step: your details.
We reply within one working day — and right after, if you like, you pick the demo slot yourself.
We couldn't send your request. Try again, or write to us at [email protected].
By sending, you agree to your data being processed so we can get back to you about the demo. Privacy notice.
Preview form — nothing is sent from this page.
Want to schedule the demo now?
Your call: book the slot you prefer yourself, or we'll call you to arrange it.
Live availability, 30 minutes, instant confirmation. The calendar opens in a new tab.
Lock in your slot ↗We'll get back to you within one working day — and we'll join the call already knowing your world.
The calendar is open in another tab: pick a slot and the demo is booked. Can't see it? Reopen it ↗
Preview page: nothing was sent.
Our calendar is live: take the slot that suits you and the demo is booked. 30 minutes, instant confirmation, no waiting.
Lock in your slot ↗