Helpdesk
All modules
Assign a ticket and update its details
Helpdesk · 8 of 15 · 4 min read
From a ticket's page you assign the request to an operator or a team, and update type, channel and due date. With the Edit Ticket window you change all the ticket's data instead: subject, priority, contact, tags, description and custom fields.
Assign to an operator, a team, or no one
A ticket can be assigned to a team, to a user, to both, or to nobody. A ticket with no team and no assignee stays in the unassigned queue.
- If you already know who should handle the ticket, choose the user in Assignee.
- If the ticket concerns a group, for example maintenance, choose the team and let the team's assignment method pick the assignee.
- If nobody has taken it yet, leave Unassigned.
Teams are set up in Helpdesk › Settings, on the Teams tab. Each team has an assignment method:
- Manual: no member is assigned automatically. You choose the assignee.
- Round robin: tickets go to members in turn. With N members and N consecutive tickets, each member receives one.
- Least tickets: the ticket goes to the member with the fewest open tickets in the team. If open tickets are tied, the rotation turn decides.
When you choose a team with automatic assignment, the ticket immediately gets an assignee from among the members. A manual reassignment does not move the rotation turn.
Note: if a team with automatic assignment has no members, the ticket stays unassigned.
Update details from the ticket page
The Details panel, in the right column of the ticket page, changes one field at a time. Each change is saved as soon as you choose the new value.
- Open Helpdesk › Tickets and press the ticket's row, for example
No Wi-Fi in the upstairs rooms.
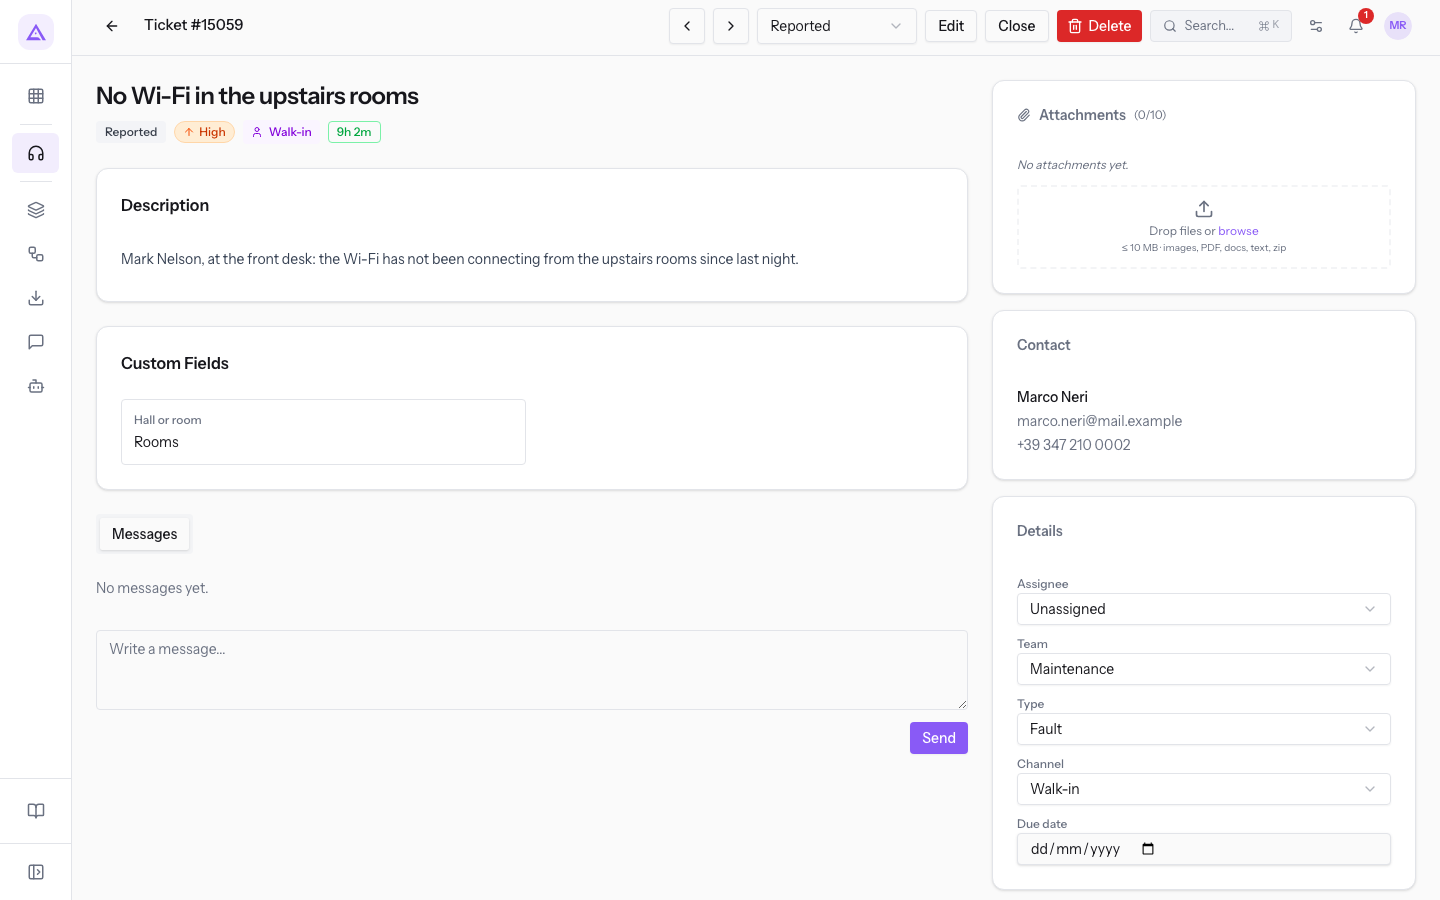
- In the Details panel, open the menu of the field to change and choose the new value.
- Check the confirmation message at the bottom, such as Assignee updated.
The panel's fields:
- Assignee: the user responsible for the ticket. Options: Unassigned, Julia Green, Martin Ross. On change, Assignee updated appears.
- Team: the team of the ticket. Options: No team, Front desk, Maintenance. On change, Team updated appears.
- Type: the category of the ticket, such as Fault. The other options are Billing, Booking, Complaint, Information and No type, which removes the type. On change, Type updated appears.
- Channel: where the request came from. Options: No channel, Phone, Email, Web, Walk-in, Voicemail, Other. On change, Channel updated appears.
- Due date: the date agreed for the ticket. The field is optional and can stay empty. On change, Due date updated appears.
Note: the type and the priority determine the ticket's SLA deadline. When you change the type, the SLA deadline is recalculated. The Due date field is a separate date, which you set yourself.
Every change is recorded in the ticket's History: the counter next to the entry increases with each change.
Edit all the ticket's data
The Edit Ticket window gathers all the ticket's data on one screen. Use it when you need to change the subject, priority, contact, tags, description or custom fields, which the Details panel does not show.
- Open the ticket page from Helpdesk › Tickets.
- Press Edit in the header. The Edit Ticket window opens.
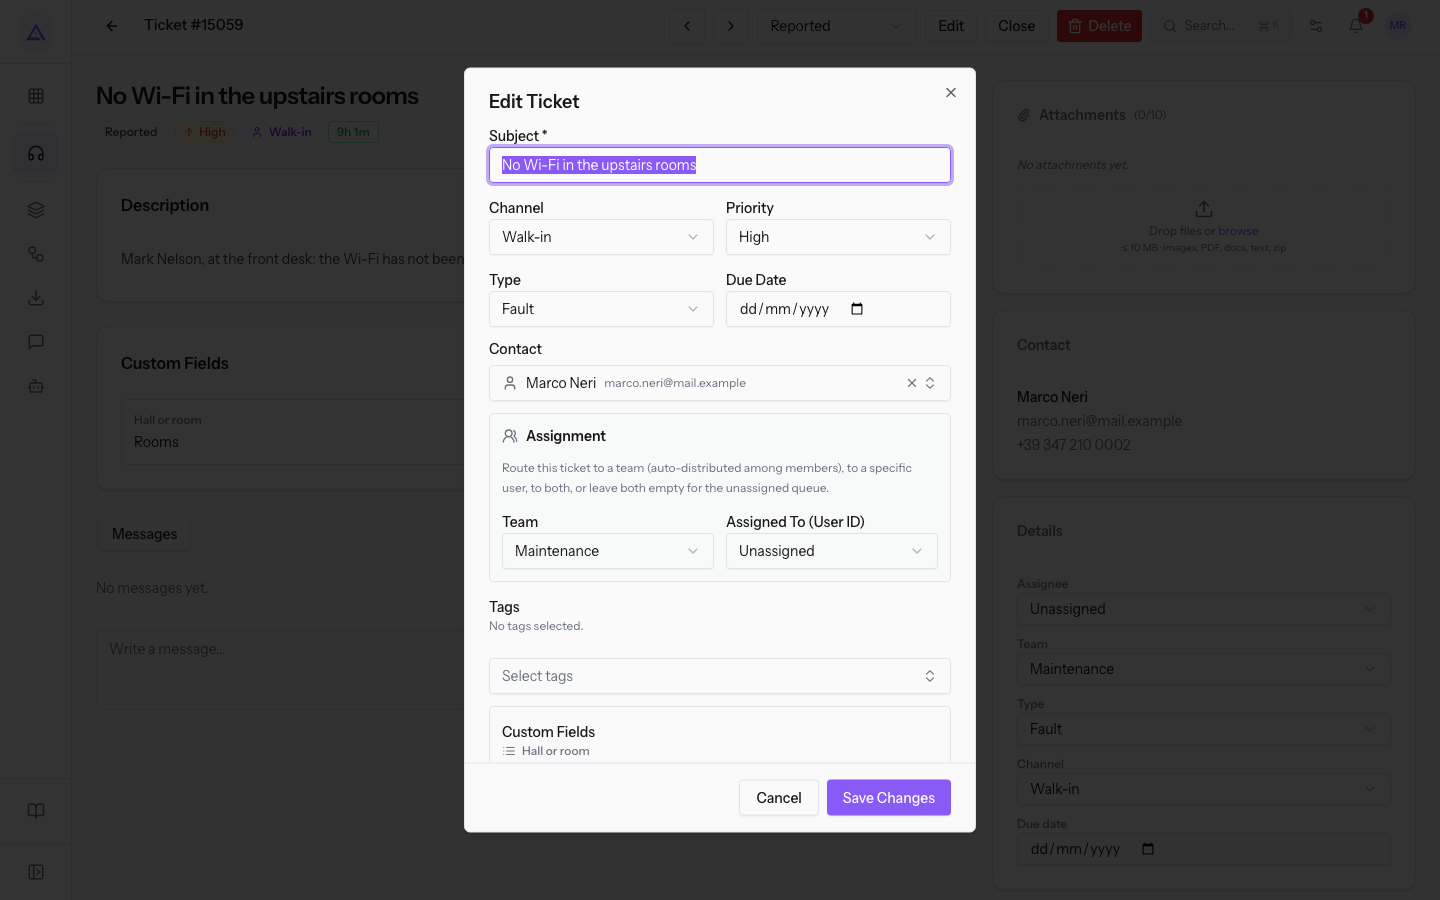
- Change the fields you need.
- Press Save Changes. To leave without saving, press Cancel.
The window's fields:
- Subject: the ticket title, for example
No Wi-Fi in the upstairs rooms. The field is required. - Channel: the same options as in the Details panel, such as Walk-in.
- Priority: options Urgent, High, Normal, Low. Changing the priority recalculates the SLA deadline.
- Type: the category of the ticket, such as Fault.
- Due Date: the agreed date. The field is optional.
- Contact: the person who opened the request, such as
Mark Nelson [email protected]. Clear selection removes the contact. - Assignment: the section with Team and Assigned To (User ID), with the same options as in the Details panel. The help text reminds you that you can assign the ticket to a team, to a user, to both, or leave both empty for the unassigned queue.
- Select tags: adds the shared catalog's tags to the ticket.
- Description: the text of the request. The Bold, Italic, Bulleted list and Numbered list buttons format the text. Preview shows the result.
- Custom Fields: the additional fields defined for tickets. In the demo, the Hall or room dropdown offers No value, Barn, Giardino degli ulivi, Hall del Camino, Terrazza and Rooms. The sample ticket has the value Rooms.
Note: custom fields and tags are defined in Helpdesk › Settings. This menu entry is visible only to support managers.
See it on your company, not on a slide deck.
In 30 minutes we map the software you use today.We show you how much work and how much margin Archimedes gives back.
Show me on my business →What industry are you in?
One tap — it lets us prepare the demo around your world.
What tools do you use today?
Pick the ones you recognise — or just type them. It helps us show you how they migrate.
Last step: your details.
We reply within one working day — and right after, if you like, you pick the demo slot yourself.
We couldn't send your request. Try again, or write to us at [email protected].
By sending, you agree to your data being processed so we can get back to you about the demo. Privacy notice.
Preview form — nothing is sent from this page.
Want to schedule the demo now?
Your call: book the slot you prefer yourself, or we'll call you to arrange it.
Live availability, 30 minutes, instant confirmation. The calendar opens in a new tab.
Lock in your slot ↗We'll get back to you within one working day — and we'll join the call already knowing your world.
The calendar is open in another tab: pick a slot and the demo is booked. Can't see it? Reopen it ↗
Preview page: nothing was sent.
Our calendar is live: take the slot that suits you and the demo is booked. 30 minutes, instant confirmation, no waiting.
Lock in your slot ↗