Chat
All modules
Setting the chat rules for the whole organization
Chat · 15 of 16 · 5 min read
Chat rules determine who can create channels and who can notify an entire channel. They apply to all members of the organization. Organization owners and administrators also decide the order of channels in the sidebar, manage custom emoji, and assign a colleague as owner of channels that have been left without an owner.
As long as the switches are off, the chat remains open to everyone: anyone can create public and private channels, and anyone can notify an entire channel.
Choosing who creates channels and who notifies everyone
These rules are not changed from Chat, but from the organization page, and they are changed by organization owners and administrators.
The rules about creation concern roles in the organization; the rule about mass mentions concerns roles within individual channels.
- If you want private channels to be opened only by administrators, turn on Only admins create private channels. In this organization it is on.
- If you want public channels to also be opened only by administrators, turn on Only admins create public channels.
- If mass mentions are disruptive in a large channel, turn on Only channel owners and admins use @channel, @here and @all.
- Open Management › Organization › Defaults.
- Scroll to the Chat section, at the bottom of the page.
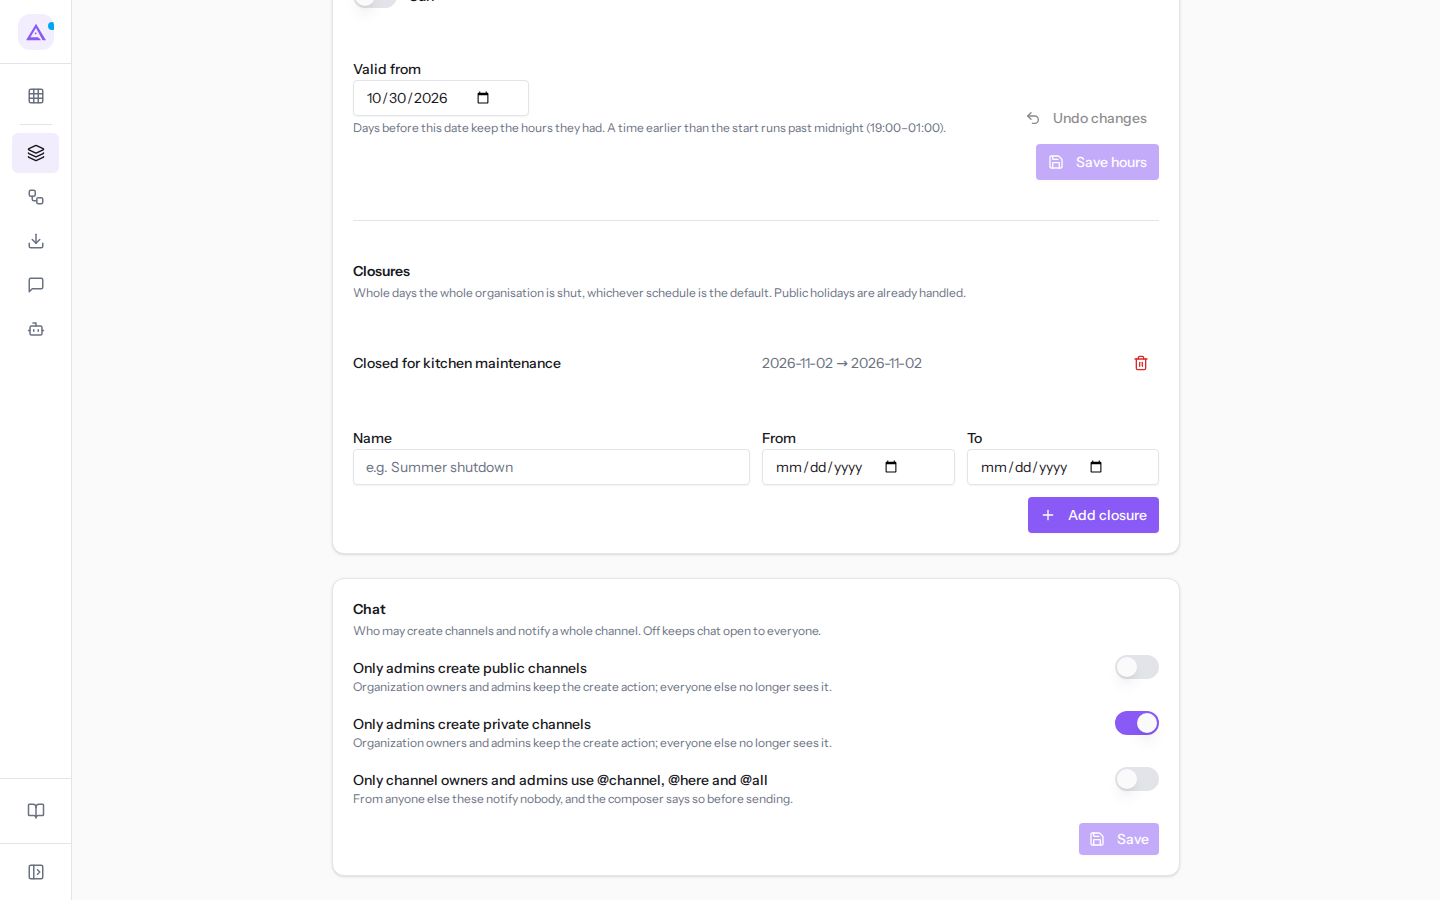
- Turn the switches you need on or off.
- Press the Save button at the bottom of the Chat section.
What changes for colleagues who are not organization owners or administrators:
- Only admins create public channels: in the dialog to create a channel they can only choose a private channel and read «You can create private channels only.»
- Only admins create private channels: the Private channel (members only) checkbox disappears and the dialog says «You can create public channels only.»
- With both on, the «+» icon (New channel) next to CHANNELS no longer appears.
- Only channel owners and admins use @channel, @here and @all: their messages with these mentions are published, but do not notify anyone. The message box signals it before sending: «In this organization only channel owners and admins can notify everyone. @channel, @here and @all in your message will notify nobody.»
The rule about mentions only applies in channels: it does not apply in direct messages and group conversations.
Deciding the order of channels
The order of channels in the sidebar is the same for all members of the organization. It serves to put at the top the channels that matter for everyone, for example #general and #announcements before department channels. It is decided by organization owners and administrators.
- Open Chat.
- In the sidebar, grab the channel from the handle with the dots on the left side of the row and drag it to the position you want. On the handle the hint «Drag to set the channel order for everyone» appears.
The order is saved as soon as you release the channel and takes effect immediately for everyone. Each person only sees the channels they belong to, and their starred conversations remain in the STARRED section.
To move a channel with the keyboard, press Space, use the arrow keys, then press Space again to release it or Esc to cancel.
Adding a custom emoji
Custom emoji are added to the organization's emoji list: all colleagues find them in the Custom group of the selector and use them to react and in messages, also by writing the code between two colons. They are useful for symbols specific to the company, such as :vendemmia:, the bunch of grapes used in the #harvest-2025 channel.
Only organization owners and administrators can add and remove them: for others the Add custom emoji item does not appear.
- In the message box of any conversation, click the smiley icon (Insert emoji).
- At the bottom of the selector, click Add custom emoji. The Custom emoji dialog opens, with the list of emoji already present, here
:vendemmia:.
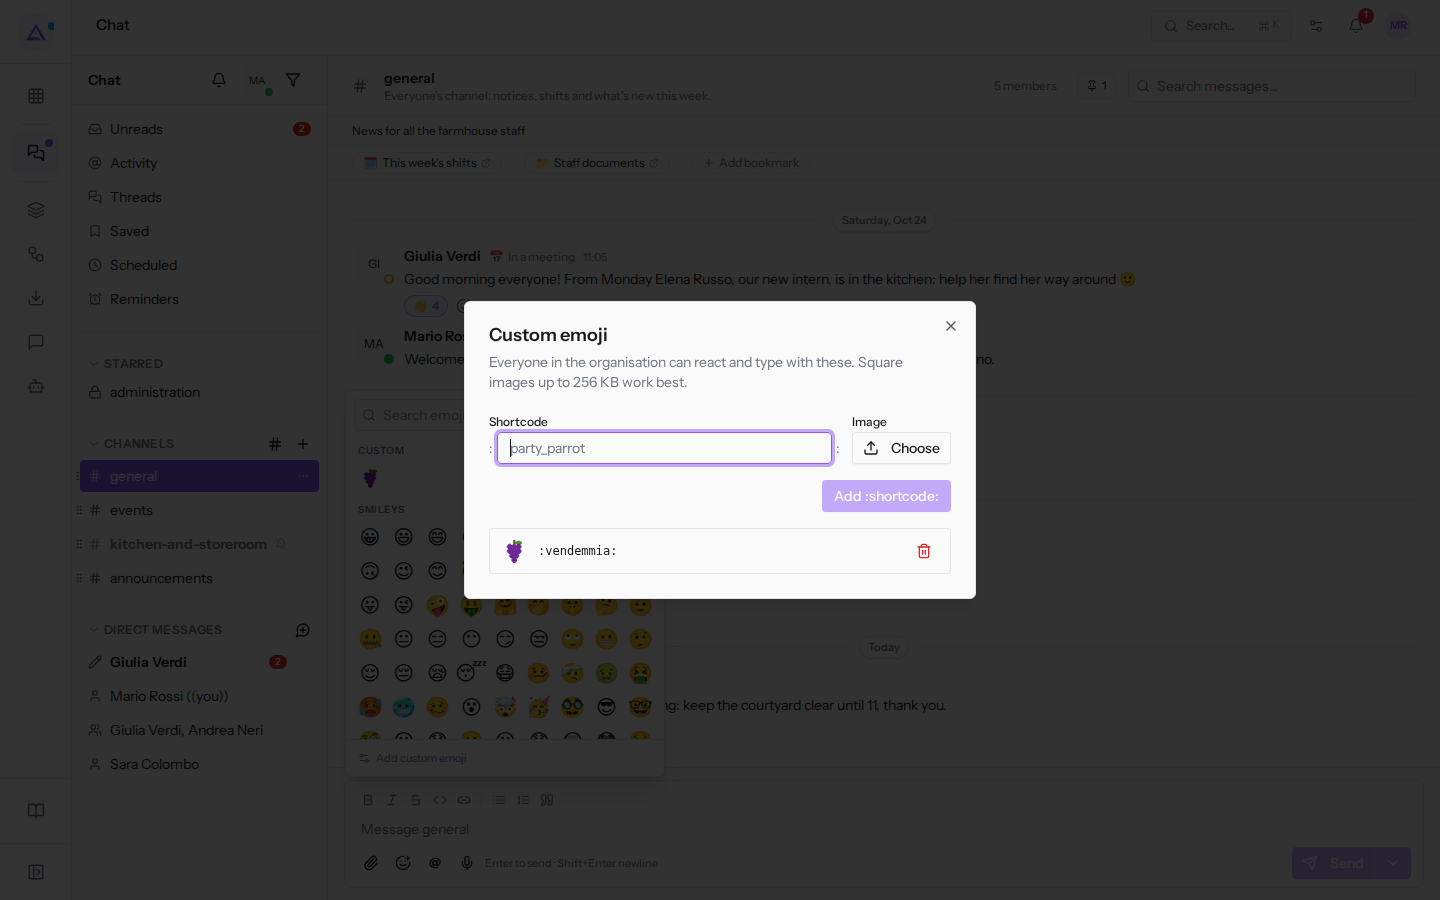
- In the Shortcode field, write the name of the emoji, for example
fienile. Uppercase letters become lowercase and spaces and symbols become underscores; the maximum is 32 characters. - Next to Image, click Choose and select the image: PNG, GIF, JPG or WebP, preferably square, up to 256 KB. A larger image will be rejected.
- Click the add button, which shows the chosen code, for example Add :fienile:. As long as the code is empty the button shows «Add :shortcode:».
The emoji is immediately available for everyone. To remove it, in the same dialog click the red bin icon (Remove) next to its code.
Assigning an owner to a channel
A channel is left without an owner when all its owners have left the organization or have been deactivated: this is the case of #haccp-course. No one can assign its roles or hand it over any more, which is why organization owners and administrators find it in Browse channels, in the CHANNELS WITHOUT AN OWNER section, and with Assign owner assign it to a colleague. Whoever assigns the owner does not join the channel and does not see its messages.
The procedure is in Archiving, restoring and leaving a channel.
See it on your company, not on a slide deck.
In 30 minutes we map the software you use today.We show you how much work and how much margin Archimedes gives back.
Show me on my business →What industry are you in?
One tap — it lets us prepare the demo around your world.
What tools do you use today?
Pick the ones you recognise — or just type them. It helps us show you how they migrate.
Last step: your details.
We reply within one working day — and right after, if you like, you pick the demo slot yourself.
We couldn't send your request. Try again, or write to us at [email protected].
By sending, you agree to your data being processed so we can get back to you about the demo. Privacy notice.
Preview form — nothing is sent from this page.
Want to schedule the demo now?
Your call: book the slot you prefer yourself, or we'll call you to arrange it.
Live availability, 30 minutes, instant confirmation. The calendar opens in a new tab.
Lock in your slot ↗We'll get back to you within one working day — and we'll join the call already knowing your world.
The calendar is open in another tab: pick a slot and the demo is booked. Can't see it? Reopen it ↗
Preview page: nothing was sent.
Our calendar is live: take the slot that suits you and the demo is booked. 30 minutes, instant confirmation, no waiting.
Lock in your slot ↗