Inventory
All modules
Configure warehouses, locations, and operation types
Inventory · 14 of 14 · 8 min read
The warehouse configuration establishes where goods are located and how they enter and exit. You can define warehouses, organize their locations in a tree structure, route incoming goods to a shelf, and set the numbering and behavior of each operation type: for example, receipts, deliveries, and internal transfers.
to configure warehouses, locations, routes, and operation types, the Inventory Manager permission is required. Staff with the Inventory User permission can view warehouses and locations and create putaway rules, but cannot configure the rest.
The configuration items are in the Inventory menu: Warehouses, Locations, Routes, Operation Types, Putaway Rules.
Warehouses
A warehouse is the physical location where you store goods. It has a name and a code that appears in the operation numbering. There is a single warehouse, Main Warehouse, with code WH.
The Warehouses list shows the columns Name, Code, Reception, Delivery, Status, and Default.
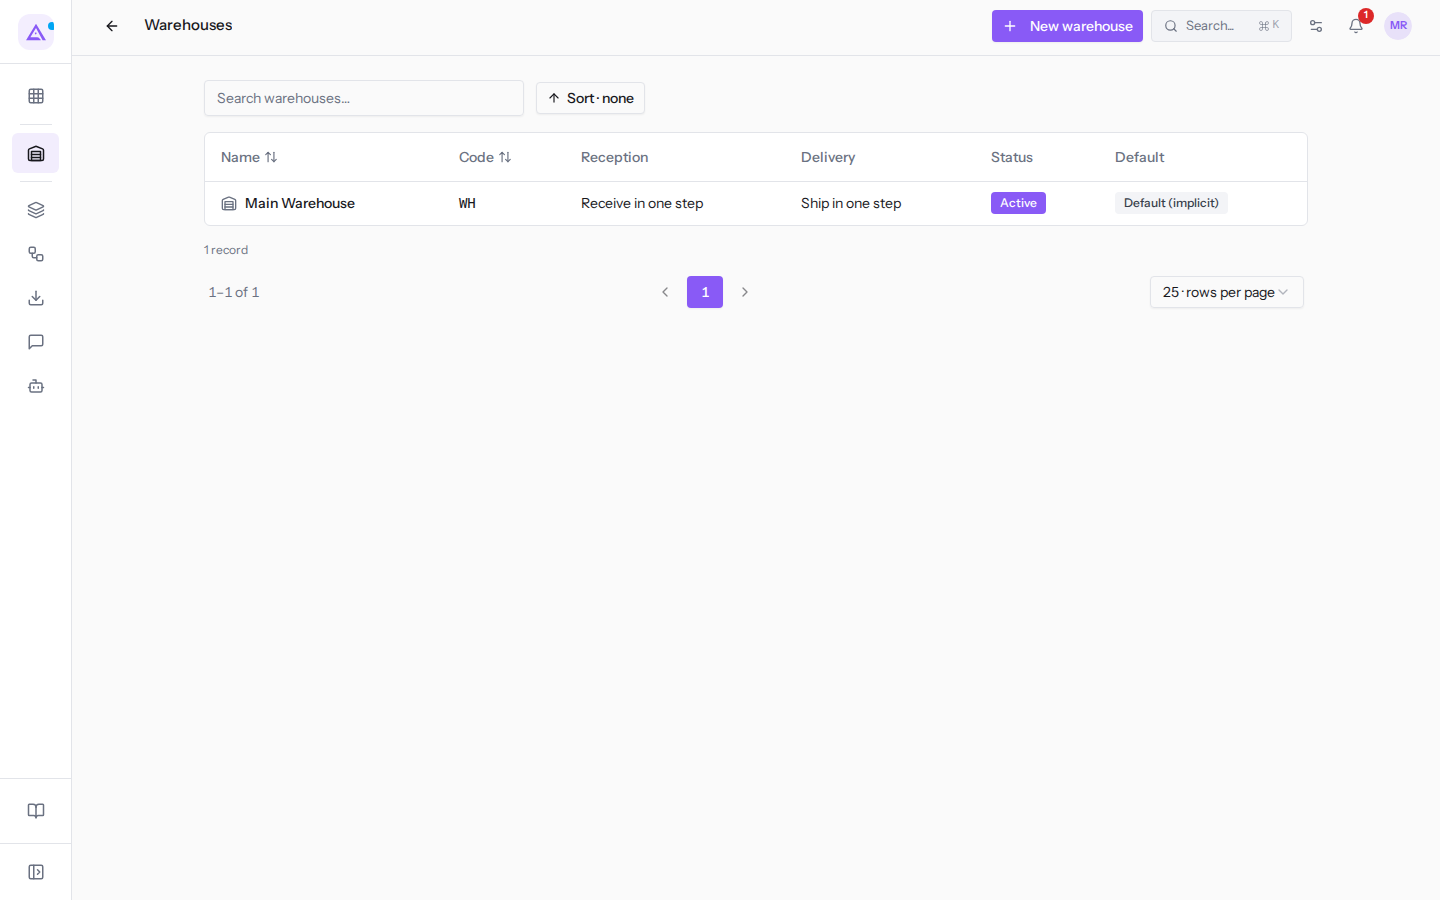
With a single warehouse, the Default column shows Default (implicit). When there are multiple warehouses, click Make default in the row of the one you want to use as the default.
Choosing reception and delivery steps
Steps determine how many operations goods go through before entering stock or leaving the warehouse. You choose them in the Reception and Delivery fields of the warehouse.
- If goods go directly to the shelf, choose Receive in one step. This is the initial value.
- If goods first pass through the input area and are then stored, choose Receive, then store.
- If goods need to be quality-checked before storage, choose Receive, quality check, then store.
- If you ship directly from the shelf, choose Ship in one step. This is the initial value.
- If you pick the goods and bring them to the exit before shipping, choose Pick, then ship.
- If the goods also need to be packed, choose Pick, pack, then ship.
A new warehouse automatically creates the Stock, Input, Output, Packing Zone, and Quality Control locations, and the Receipts, Delivery Orders, and Internal Transfers operation types. With more steps, it also creates the picking, packing, putaway, and quality control operation types.
Create a warehouse
- Go to Inventory › Settings › Warehouses.
- Click New warehouse.
- Fill in the fields and click Create.
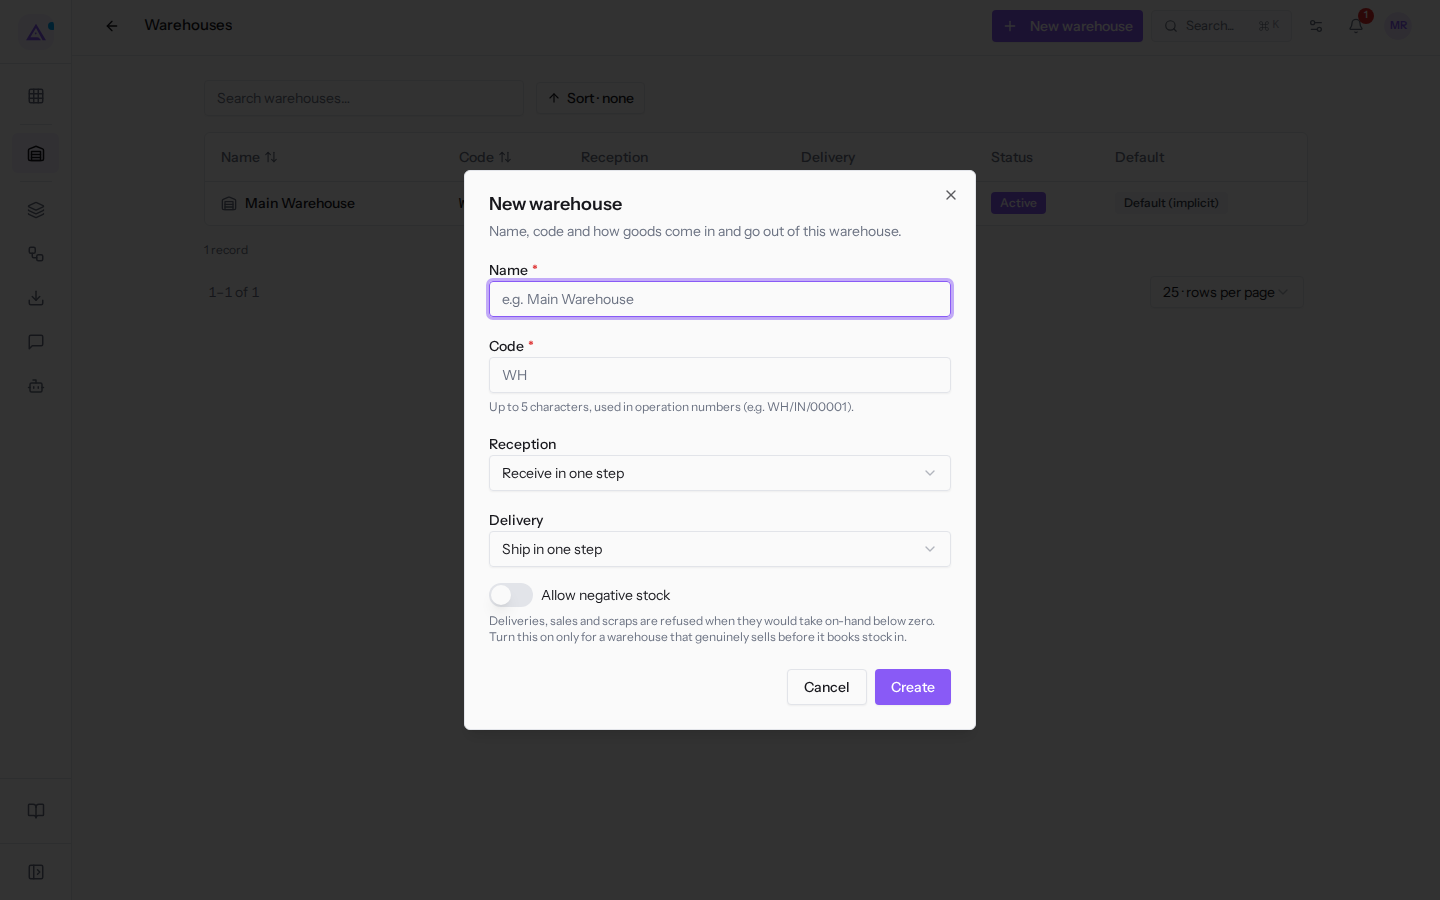
Name and Code are required. The code has up to 5 characters and appears in operation numbering: with WH, receipts are called WH/IN/00001. Reception and Delivery are the steps described above.
Allow negative stock allows you to withdraw more goods than are currently in stock and is disabled by default.
Important: with Allow negative stock disabled, shipments, sales, and write-offs that would bring stock below zero are rejected. Enable this option only for a warehouse that sells before recording the incoming stock.
Edit a warehouse
- In the Warehouses list, click the warehouse, for example
Main Warehouse. The record shows the Settings and locations of the warehouse. - Click Edit.
- Change the fields and click Save. The fields are the same as in New warehouse.
Note: if you change the Code, new operations use the new numbering. Existing documents keep their number.
From the warehouse record you can add a location with New location.
Locations
A location is a place inside the warehouse where goods are stored. Locations form a tree: in the example, Main Warehouse / Stock contains Main Warehouse / Stock / Shelf A and Main Warehouse / Stock / Shelf B; alongside are Input, Output, Packing Zone, and Quality Control.
The Locations list also shows the virtual locations Customers, Vendors, Inventory Adjustment, and Scrap. Goods arriving from or leaving to a virtual location do not affect internal stock.
The list has the columns Location, Type, Warehouse, Status, and Removal Strategy, and the filters Type, Warehouse, and Active only.
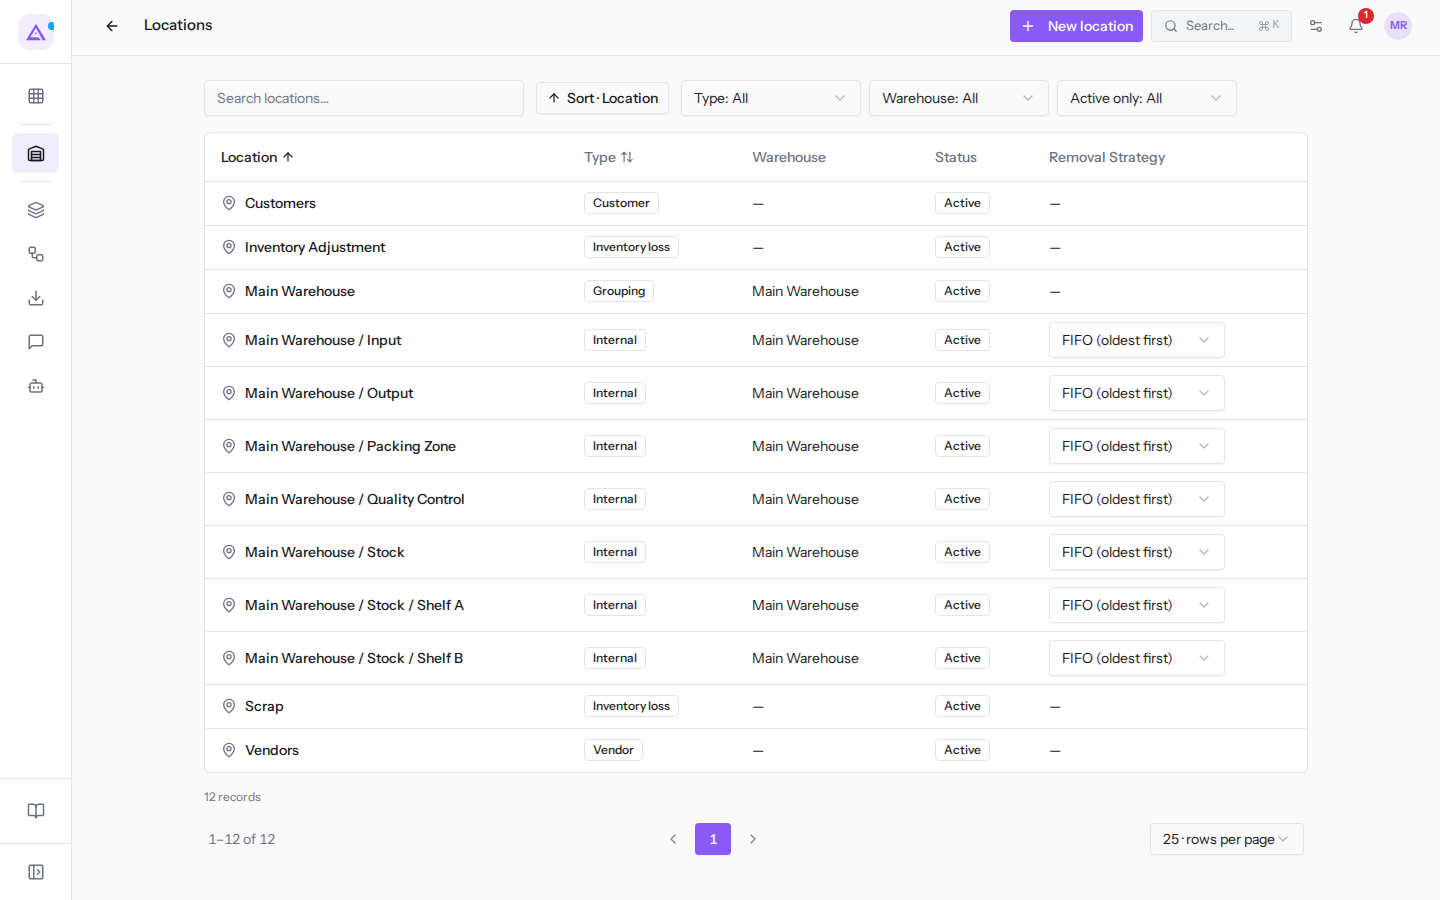
Opening a location, the Locations inside section lists the locations it contains; from there New location creates one inside it.
Create a location
- Go to Inventory › Settings › Stock Locations.
- Click New location.
- Fill in the fields and click Create.
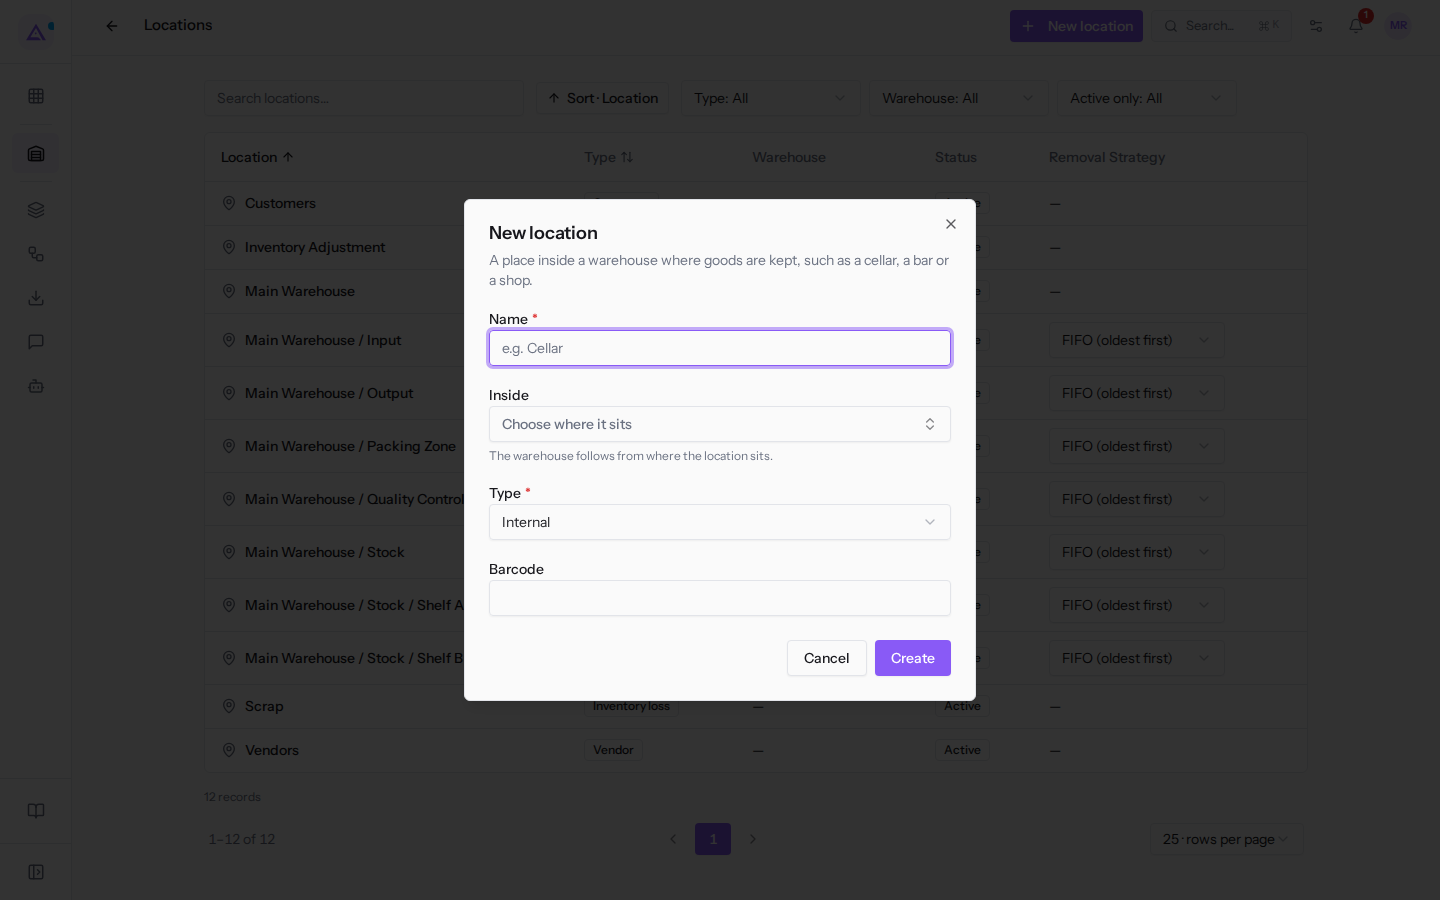
The Name is required, for example Shelf A. In Inside choose the location that contains it, for example Main Warehouse / Stock: the warehouse of the new location is the one of the location it is inside. The Type is required and defaults to Internal; the alternative is Grouping. The Barcode is optional.
To edit a location, open it from the list and click Edit: you can change Name, Inside, and Barcode, then click Save. The Type does not appear in edit mode.
Choose the removal strategy
The removal strategy determines which goods are picked first. You set it directly from the Removal Strategy column in the Locations list. The example locations use FIFO (oldest first); the alternatives are LIFO (newest first), FEFO (expires first), suitable for products with an expiry date, and Closest location.
Archive and restore a location
If a location is no longer needed, open it and click Archive. An archived location is no longer offered when you choose where goods are located.
Important: archiving is refused if the location still contains goods or packages, contains active sub-locations, is used by an open transfer, is part of a warehouse configuration (such as Stock), or is referenced in a putaway rule, a route rule, a reorder rule, or as the default location of an operation type. The confirmation message only mentions goods and open transfers. In the example, for instance, Shelf A and Shelf B cannot be archived while putaway rules use them.
To review archived locations, set the Active only filter to No; with Restore the location becomes active again.
Putaway Rules
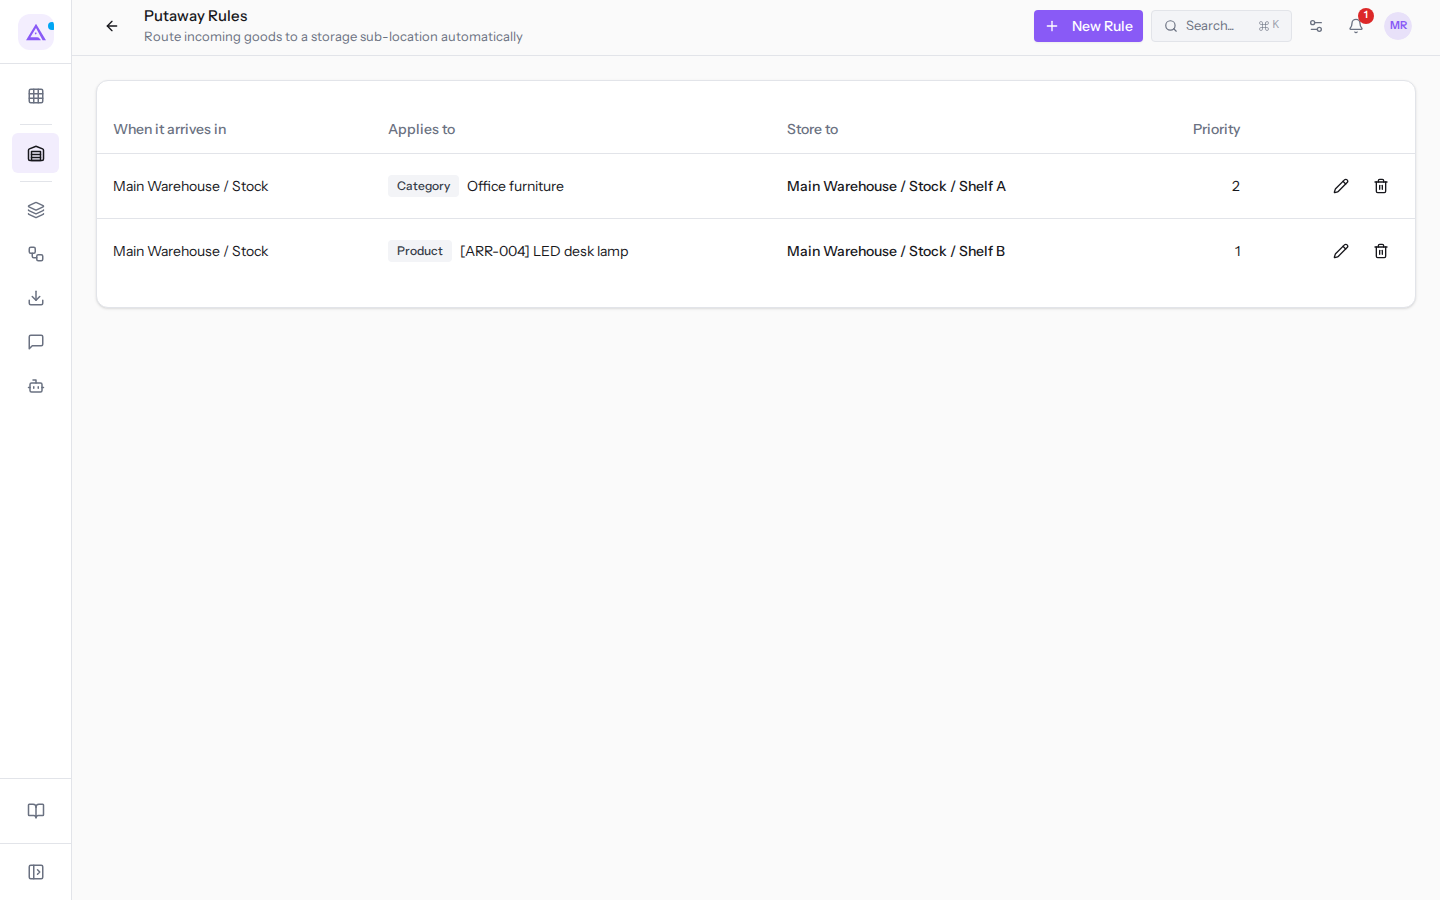
A putaway rule automatically routes incoming goods to a sub-location, by product or by category. In the example, LED desk lamp goes to Shelf B and the Office furniture category goes to Shelf A.
The Putaway Rules list has the columns When it arrives in, Applies to, Store to, and Priority. Each rule has icons to edit and delete it.
- Go to Inventory › Settings › Putaway Rules.
- Click New Rule.
- Fill in the fields and click Create Rule.
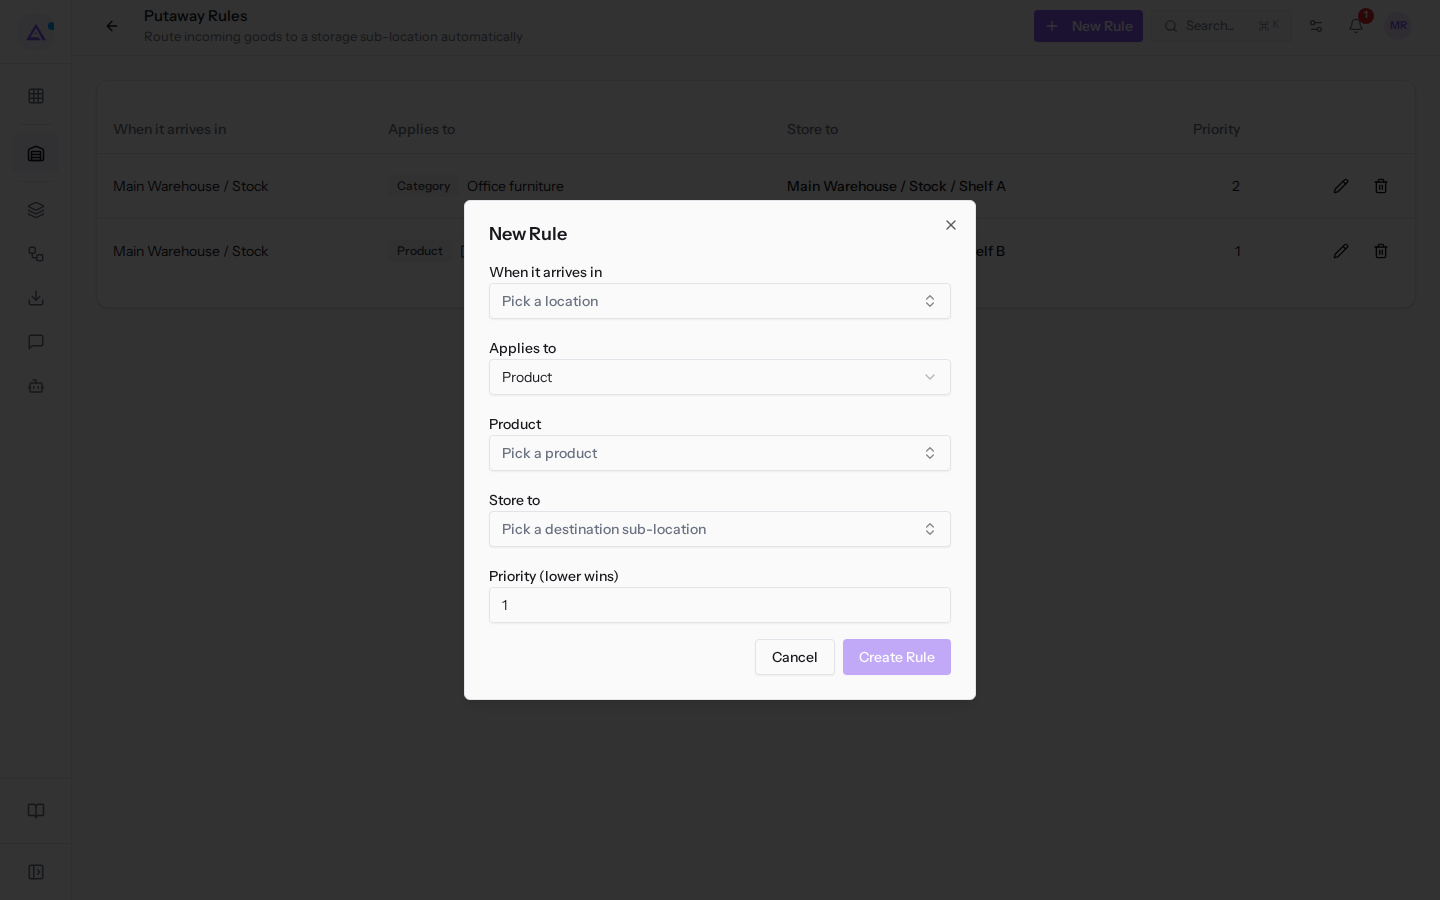
In When it arrives in choose the location where goods arrive, for example Main Warehouse / Stock. In Applies to choose Product if a product has its own shelf, then specify the product in the Product field (for example LED desk lamp); choose Category if all products of a category go to the same place. In Store to specify the destination sub-location, for example Main Warehouse / Stock / Shelf B.
Priority (lower wins) is used when multiple rules apply to the same goods: the one with the lower number wins. The initial value is 1.
Operation Types
An operation type is the type of a transfer, with its numbering. In the example, there are WH: Receipts (WH/IN/), WH: Delivery Orders (WH/OUT/) and WH: Internal Transfers (WH/INT/).
The Operation Types list has the columns Name, Warehouse, Code, Sequence Prefix, In Progress and Dashboard.
Create or edit an operation type
- Go to Inventory › Settings › Operation Types.
- Click New Operation Type, or an existing type to edit it.
- Fill in the fields and click Save.
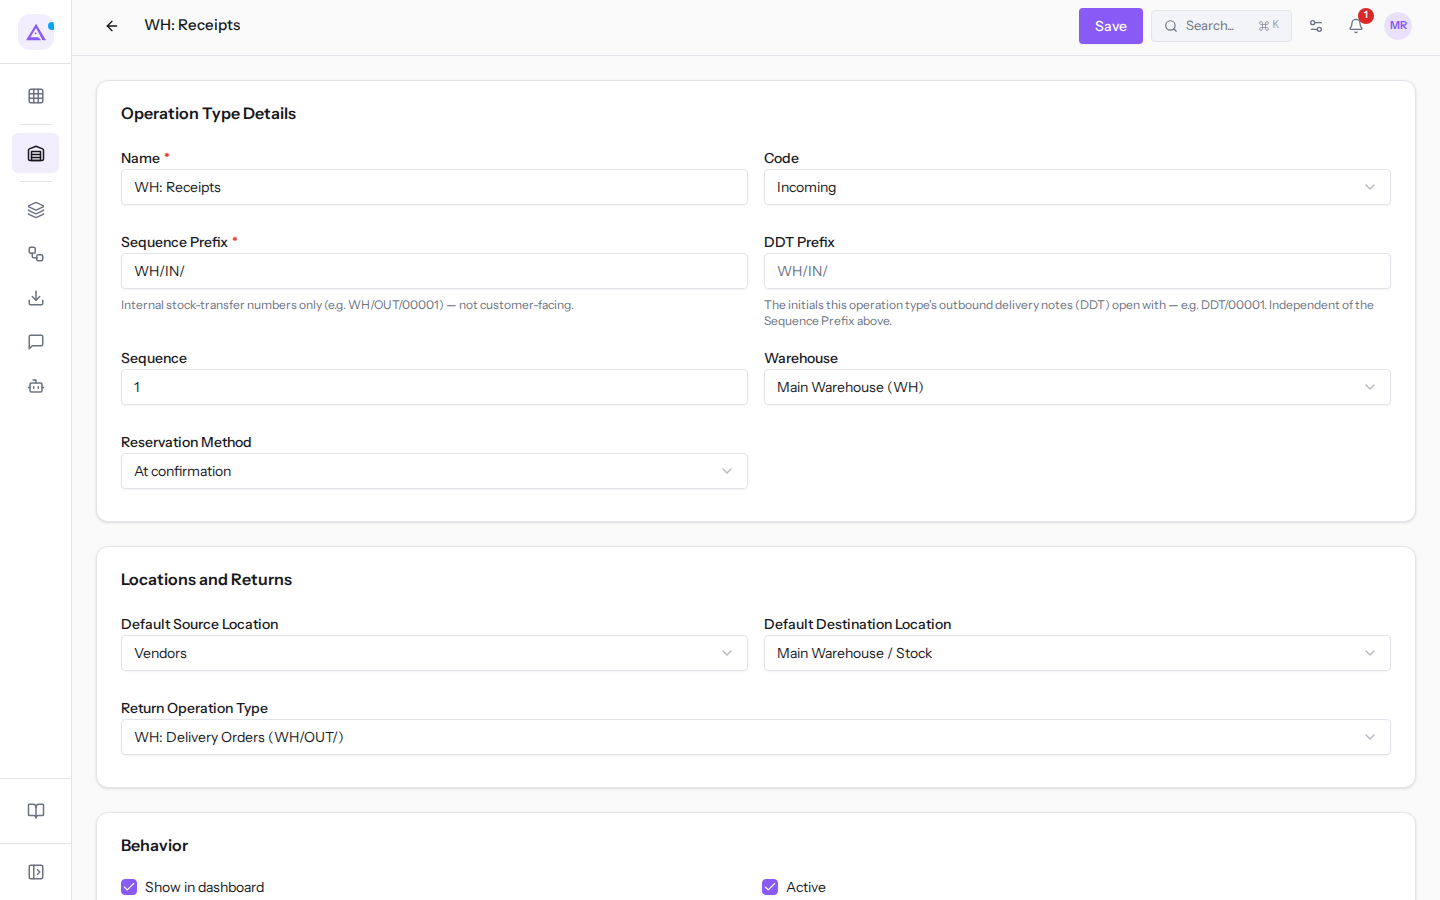
In the Operation Type Details section:
- Name: for example
WH: Receipts. This field is required. - Code: the nature of the operation: Incoming (the initial value), Outgoing, Internal Transfer, Manufacturing or Return.
- Sequence Prefix: the beginning of the number of each transfer, for example WH/IN/. It is used only for internal numbering and does not appear to customers. This field is required.
- DDT Prefix: the initials of the outgoing transport documents (DDT) for this operation type, for example DDT/00001. It is independent of the Sequence Prefix. This field is optional.
- Sequence: a number, 10 for a new type.
- Warehouse: None or Main Warehouse (WH).
- Reservation Method: when goods are reserved for transfers of this type. With At confirmation, the initial value, the reservation starts automatically when you confirm the transfer; the alternatives are Manual and At validation.
In the Locations and Returns section, for WH: Receipts the Default Source Location is Vendors, the Default Destination Location is Main Warehouse / Stock and the Return Operation Type is WH: Delivery Orders (WH/OUT/).
In the Behavior section, Show in dashboard shows the type in the Overview and is disabled for a new type; Active indicates that the type is in use; Create Lots allows writing a new lot in the transfer and Use Existing Lots to choose an already existing one.
Routes
A route collects the rules that move goods between locations. In the example, organization there are no routes: the Routes list shows No routes found.
The list has the columns Name, Applicable On, Rules and Status.
- Go to Inventory › Settings › Routes.
- Click New Route.
- Fill in the fields and click Create.
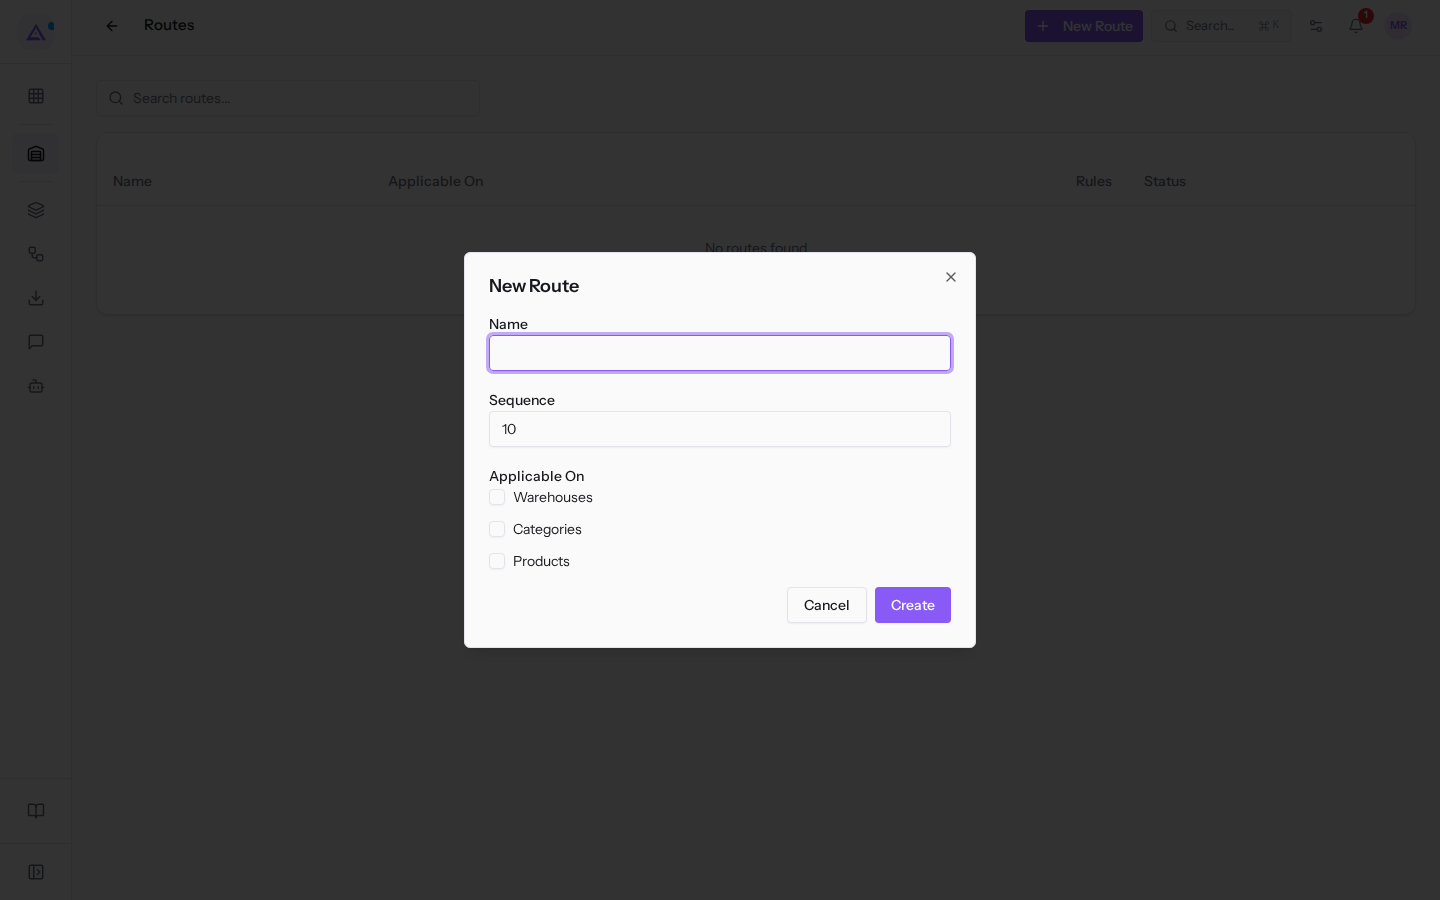
The Name is required; the Sequence defaults to 10. In Applicable On check where the route can be used: Warehouses, Categories or Products.
Rules are added afterwards: open the route from the list and, in the Rules section of its record, click Add Rule.
See it on your company, not on a slide deck.
In 30 minutes we map the software you use today.We show you how much work and how much margin Archimedes gives back.
Show me on my business →What industry are you in?
One tap — it lets us prepare the demo around your world.
What tools do you use today?
Pick the ones you recognise — or just type them. It helps us show you how they migrate.
Last step: your details.
We reply within one working day — and right after, if you like, you pick the demo slot yourself.
We couldn't send your request. Try again, or write to us at [email protected].
By sending, you agree to your data being processed so we can get back to you about the demo. Privacy notice.
Preview form — nothing is sent from this page.
Want to schedule the demo now?
Your call: book the slot you prefer yourself, or we'll call you to arrange it.
Live availability, 30 minutes, instant confirmation. The calendar opens in a new tab.
Lock in your slot ↗We'll get back to you within one working day — and we'll join the call already knowing your world.
The calendar is open in another tab: pick a slot and the demo is booked. Can't see it? Reopen it ↗
Preview page: nothing was sent.
Our calendar is live: take the slot that suits you and the demo is booked. 30 minutes, instant confirmation, no waiting.
Lock in your slot ↗