Messages and collaboration
All modules
Create a channel and join existing channels
Messages and collaboration · 6 of 15 · 4 min read
A channel gathers the staff conversation around a topic: for example weddings, the kitchen or guest reception. From Chat you can create a channel, find the public channels you are not part of, join them, leave them and read the archived ones.
Public and private channels
When you create a channel you choose who can see it.
- If the topic concerns all staff, for example
weddingsorkitchen, create a public channel. Public channels are visible to the whole organization. Anyone who is not a member finds it in Browse channels and joins on their own. - If the topic concerns only a few people, such as
admin, turn on Private channel (members only). The channel is visible only to its members.
#general is the organization's default channel.
Note: only users who have access take part in the chat. Staff without access cannot be added to a channel.
Create a channel
The button next to the CHANNELS section of the sidebar opens the window to create a new channel.
- Open Chat.
- In the sidebar, next to CHANNELS, press New channel. The New channel window opens.
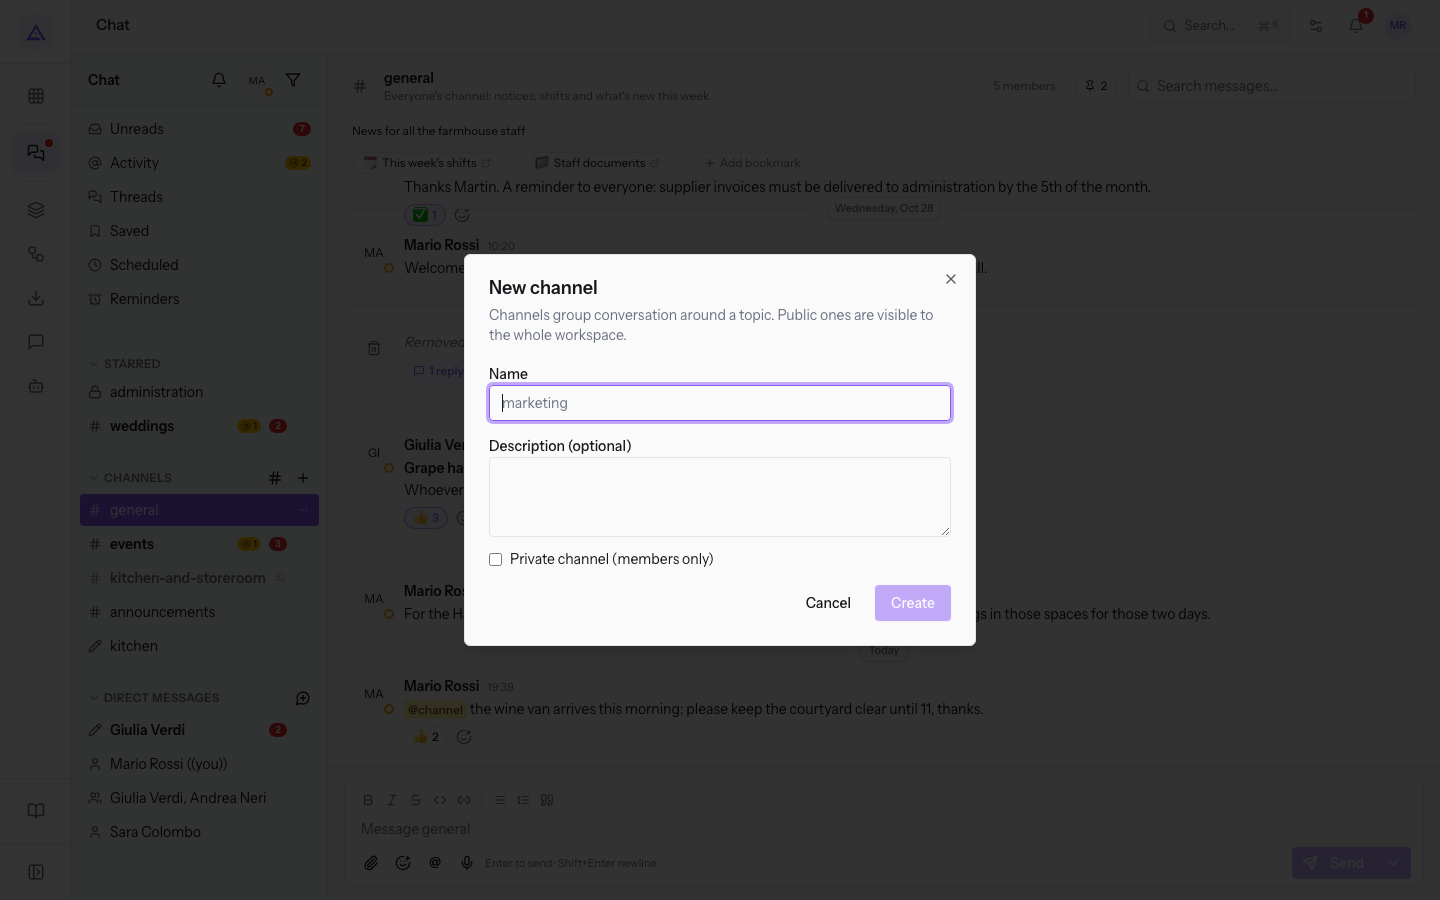
- Fill in the fields and press Create.
The fields of the window:
- Name: the channel name, for example
weddings. In the sidebar it appears preceded by #. - Description (optional): one sentence explaining what the channel is for, such as
Room guests' arrivals, departures and requests.The description appears in Browse channels next to the name. - Private channel (members only): the box is off by default and the channel is created as public. Turn it on to create a channel visible only to members.
Important: after creation a public channel can be made private, but the operation cannot be undone.
After creating it you can add members and set the channel topic.
Find channels and join one
Browse channels lists the public channels you have not yet joined. In the demo, Martin Ross is not part of #front-desk, so it appears in this list.
- Open Chat.
- In the sidebar press Browse channels. The Browse channels window opens, with the text «Public channels in this workspace you haven't joined yet.»
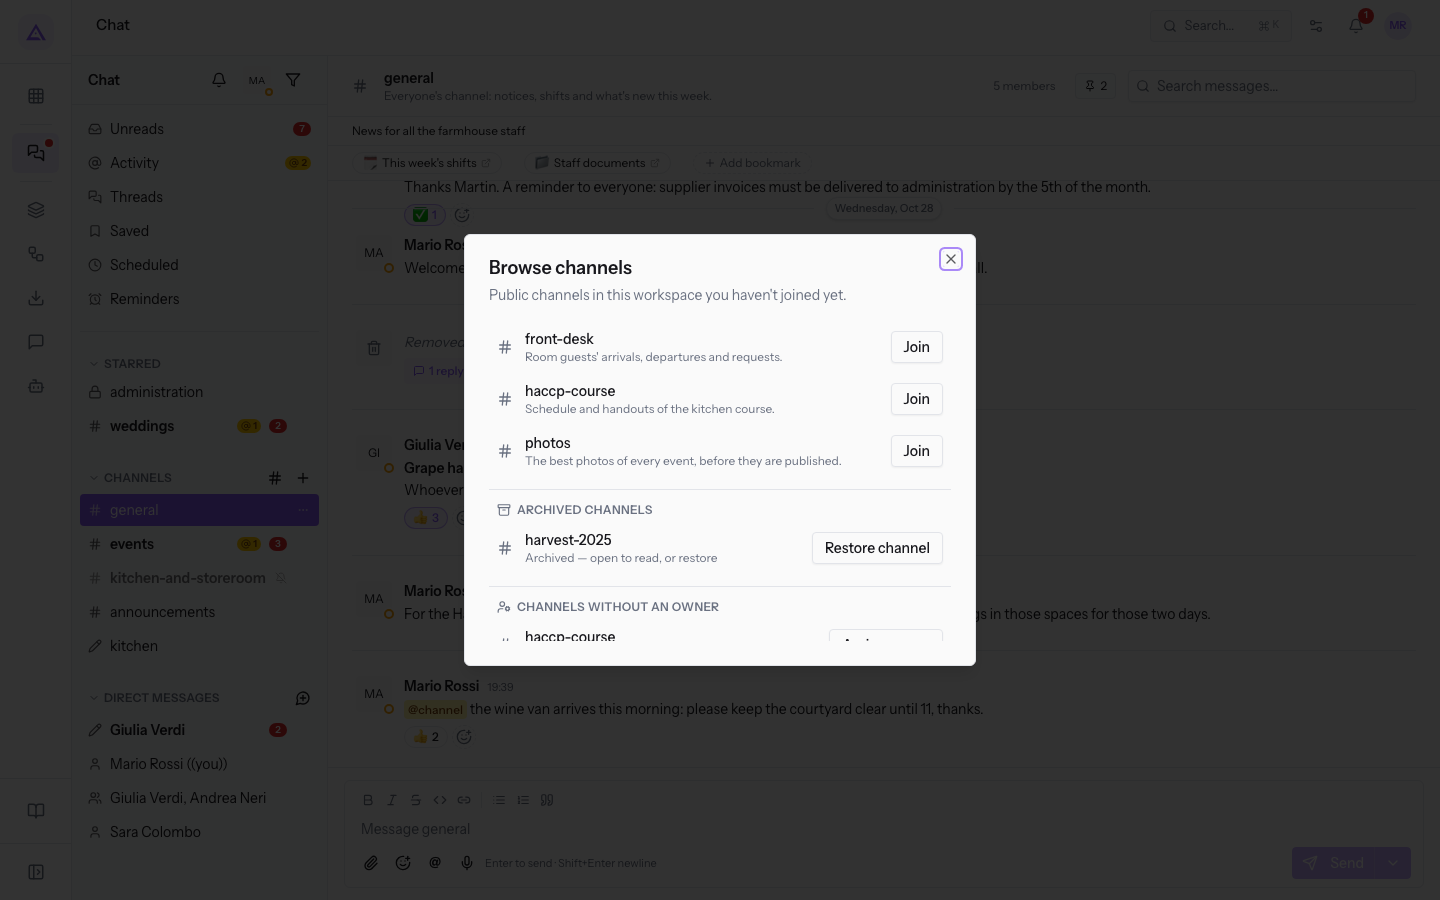
- Choose how to proceed:
- to enter the channel right away, press Join on its row;
- to read it before joining, press the channel name, for example
front-desk.
A channel opened without joining is in preview. At the bottom of the conversation the message «You're previewing this channel. Join to post and get notified.» appears. The header shows the name, the description and the number of members: on #front-desk 1 member.
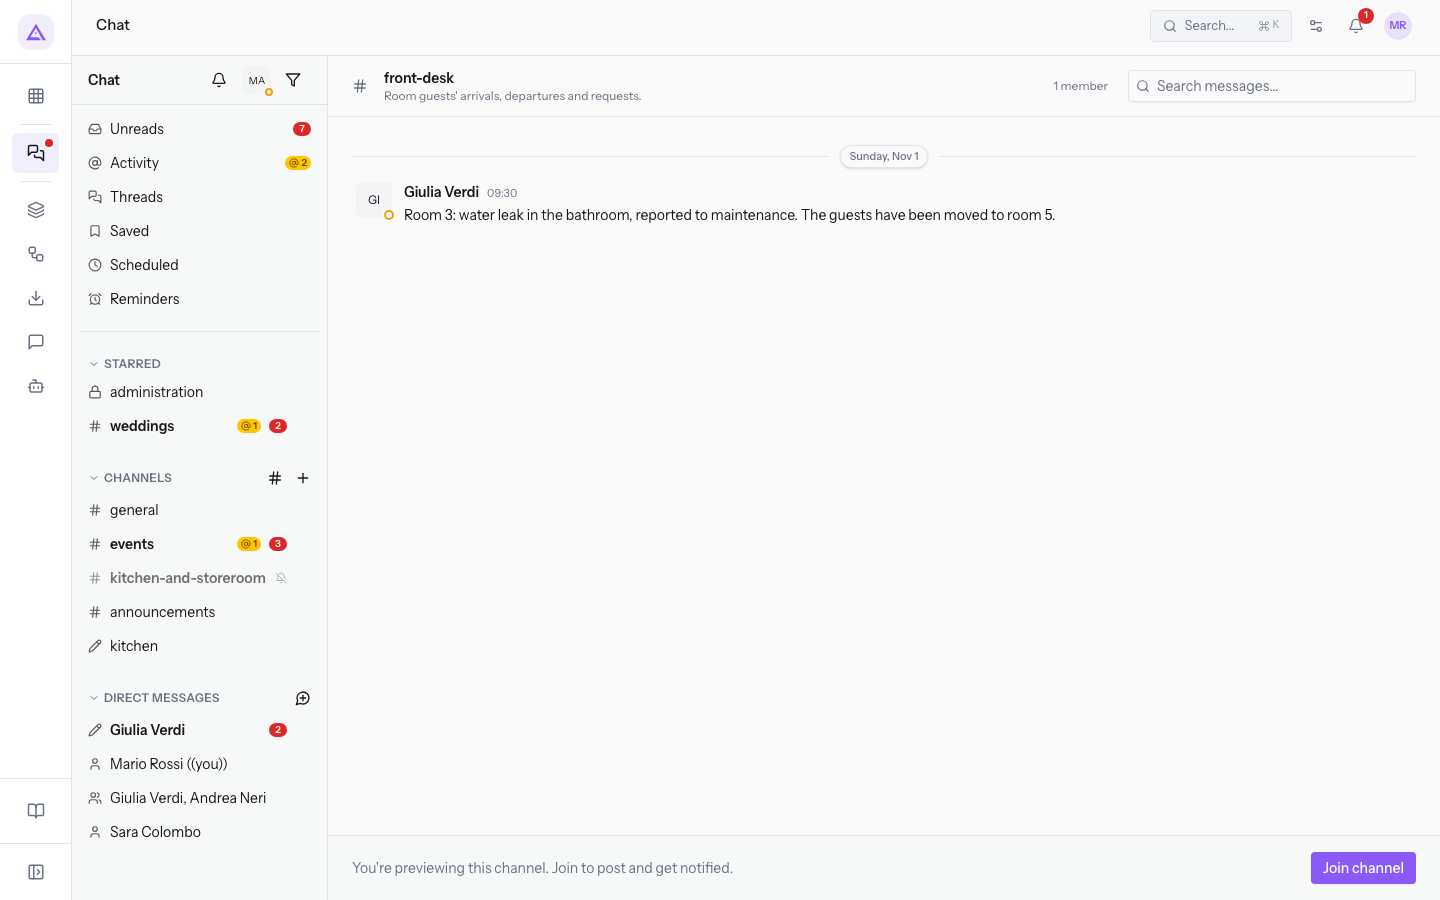
- To enter the channel from the preview, press Join channel. From then on you can write in the channel and receive notifications.
Read and restore an archived channel
An archived channel stays readable but nobody can write in it. In the Browse channels window, archived channels are listed in the Archived channels section, for example harvest-2025 with the text «Archived — open to read, or restore».
- Open Chat and press Browse channels.
- In the Archived channels section press the channel name to read it. The conversation opens with the message «This channel is archived. Its history is read-only.»
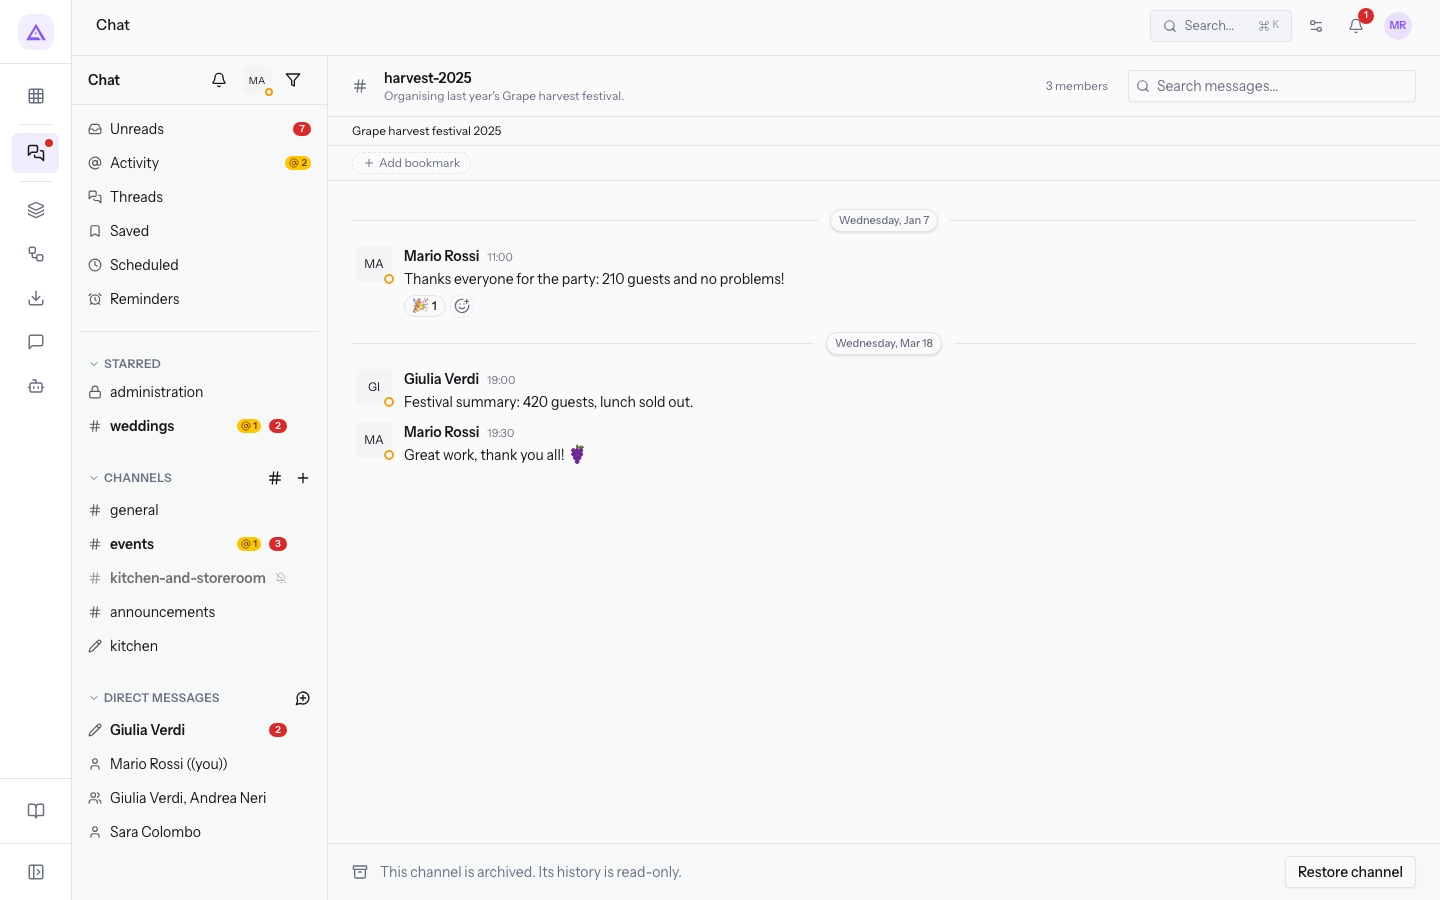
- To put the channel back in use, press Restore channel. The button appears on the channel's row in Browse channels and at the bottom of the archived conversation.
Note: restoring is up to a channel owner.
Leave a channel
When you no longer need a channel you can leave it.
- In the sidebar, hover over the channel and press Conversation options.
- Press Leave channel. The confirmation Leave this channel? opens.
- Confirm with Leave channel.
After leaving you stop receiving the channel's messages. You can rejoin a public channel you have left from Browse channels.
Decide who creates channels and who notifies everyone
The chat rules apply to the whole organization and are set in the Chat section of the defaults. If the options are off, the chat stays open to everyone: anyone creates channels and notifies an entire channel.
- Open the Organization page and press Defaults.
- Scroll down to the Chat section.
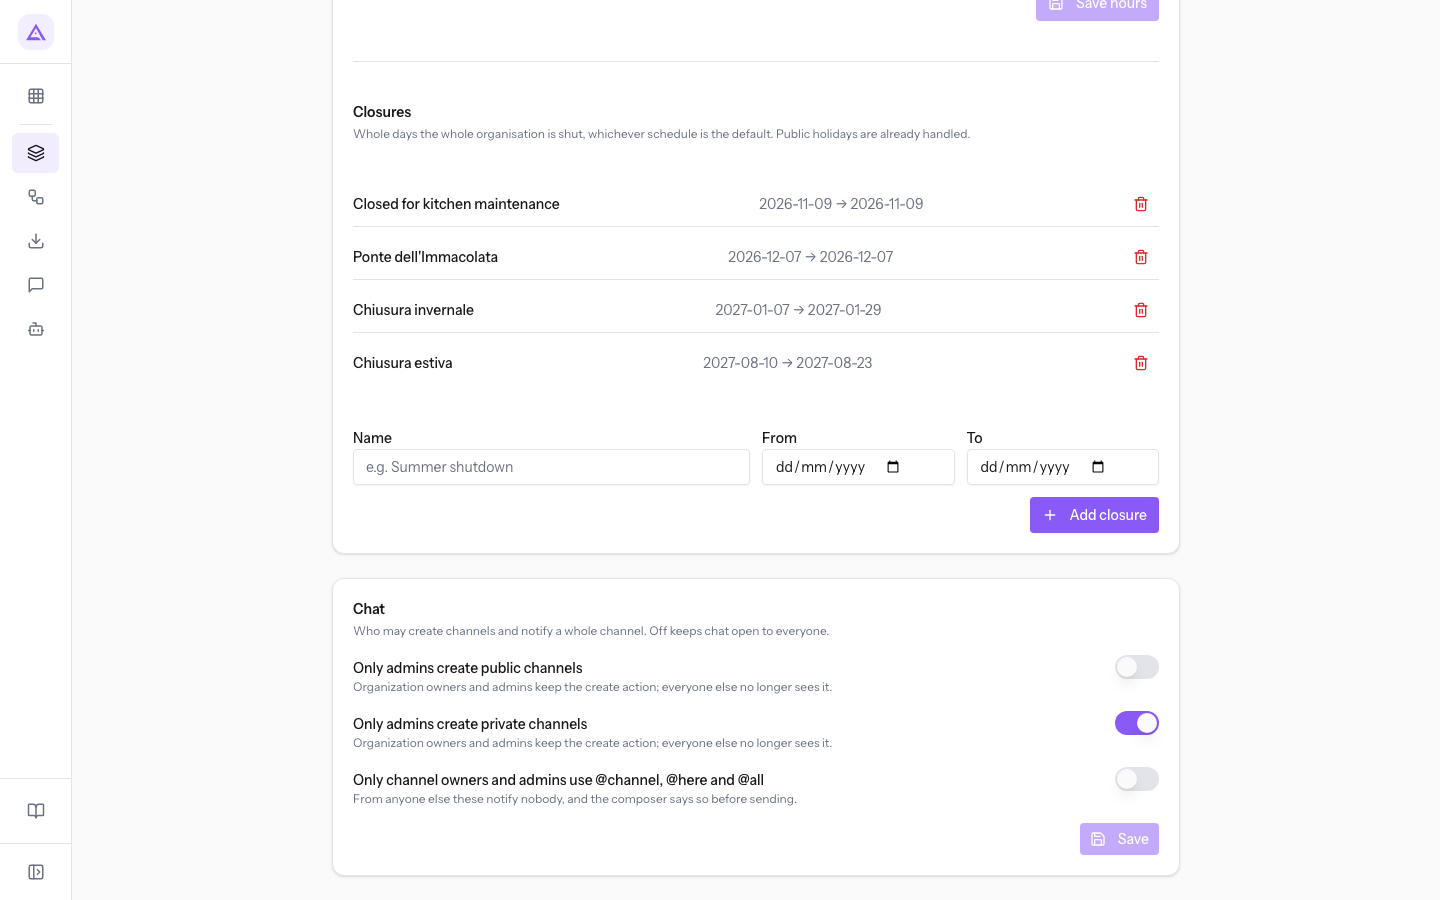
- Turn the options on or off and press Save.
The options in the section, all off in the demo:
- Only admins create public channels: if on, only administrators create public channels.
- Only admins create private channels: if on, only administrators create private channels.
- Only channel owners and admins use @channel, @here and @all: if on, notifications to the whole channel work only for channel owners and administrators. If anyone else uses them, they notify nobody, and before sending the composer shows «In this organization only channel owners and admins can notify everyone. @channel, @here and @all in your message will notify nobody.»
See it on your company, not on a slide deck.
In 30 minutes we map the software you use today.We show you how much work and how much margin Archimedes gives back.
Show me on my business →What industry are you in?
One tap — it lets us prepare the demo around your world.
What tools do you use today?
Pick the ones you recognise — or just type them. It helps us show you how they migrate.
Last step: your details.
We reply within one working day — and right after, if you like, you pick the demo slot yourself.
We couldn't send your request. Try again, or write to us at [email protected].
By sending, you agree to your data being processed so we can get back to you about the demo. Privacy notice.
Preview form — nothing is sent from this page.
Want to schedule the demo now?
Your call: book the slot you prefer yourself, or we'll call you to arrange it.
Live availability, 30 minutes, instant confirmation. The calendar opens in a new tab.
Lock in your slot ↗We'll get back to you within one working day — and we'll join the call already knowing your world.
The calendar is open in another tab: pick a slot and the demo is booked. Can't see it? Reopen it ↗
Preview page: nothing was sent.
Our calendar is live: take the slot that suits you and the demo is booked. 30 minutes, instant confirmation, no waiting.
Lock in your slot ↗