Messages and collaboration
All modules
Managing a channel: topic, members, notifications and archiving
Messages and collaboration · 7 of 15 · 6 min read
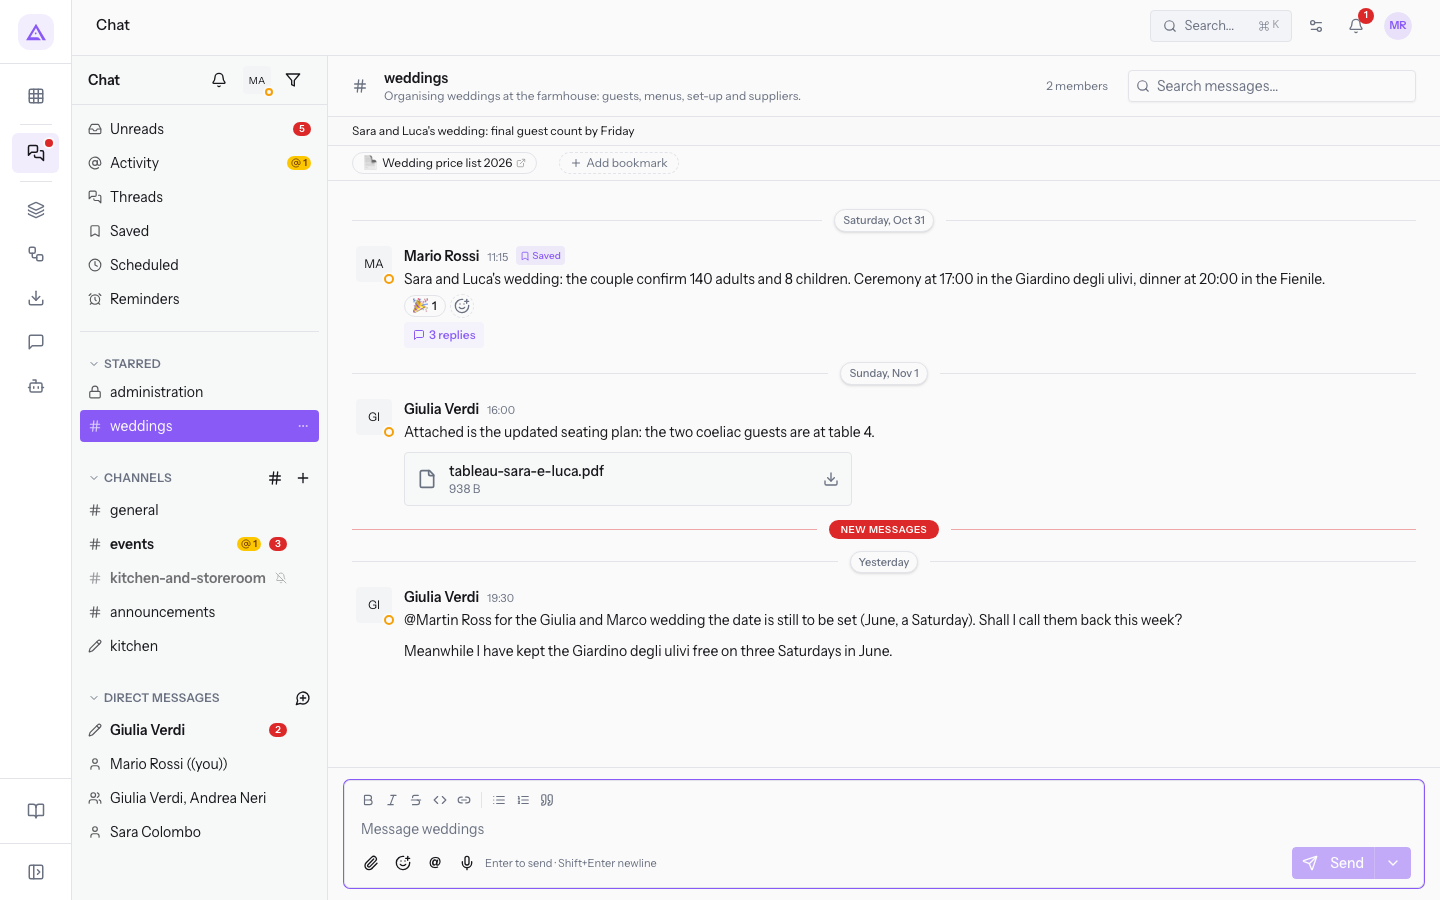
Each chat channel has a topic, bookmarks, members with a role, and its own settings. From here you choose which notifications to get, who can write, whether the channel is private, and when to archive it. In the demo the channel #weddings gathers the organization of weddings at the farmhouse.
Channel topic and bookmarks
The topic appears at the top of the channel and says what is being discussed right now. Below the topic is the bookmarks bar, with the links everyone in the channel needs.
To change the topic:
- In the sidebar, open the channel, for example #weddings.
- Press the topic text at the top of the channel: in #weddings it is
Sara and Luca's wedding: final guest count by Friday. - Type the new text in the field Set a topic for this channel… and press Save.
If a channel has no topic yet, Set a topic for this channel appears at the top, as in #harvest-2025.
To add a bookmark:
- In the bar below the topic, press Add bookmark. The Add a bookmark window opens.
- Fill in the fields and press Save.
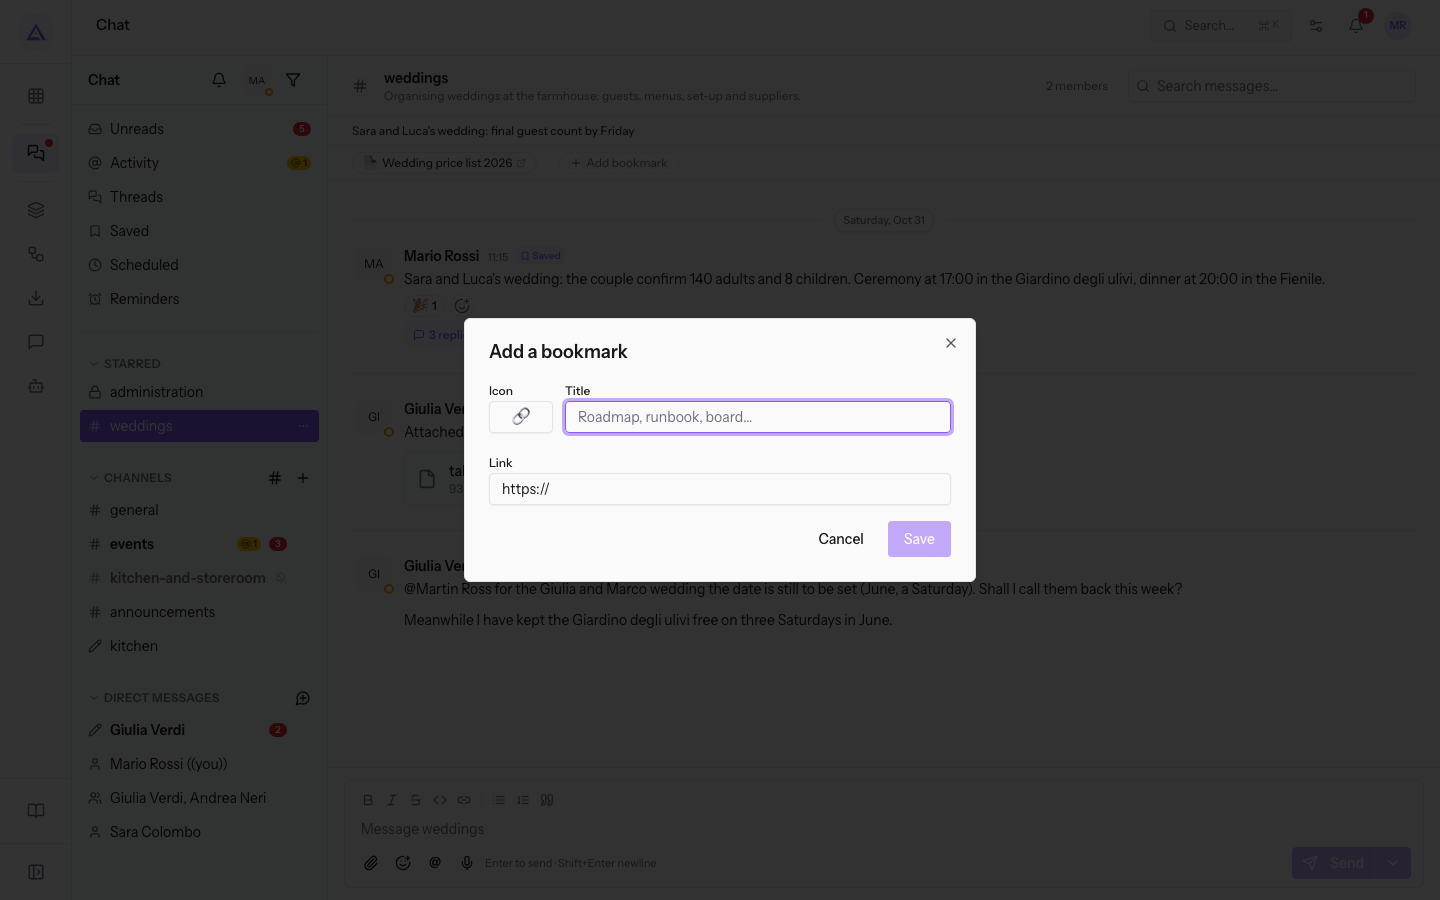
- Icon: the emoji shown next to the title. If you do not choose one, the field suggests 🔗.
- Title: the bookmark's name in the bar: in #weddings
Wedding price list 2026. - Link: the address the bookmark opens. The field starts with
https://.
Each bookmark in the bar has a Bookmark options button.
Opening the channel details
The details window gathers the channel's information, members, files and settings.
- Open the channel and press its name at the top, for example #weddings. Alternatively, in the sidebar, open Conversation options next to the channel and choose Channel details.
- Choose one of the tabs About, Members, Files and Settings. The number of members appears next to Members.
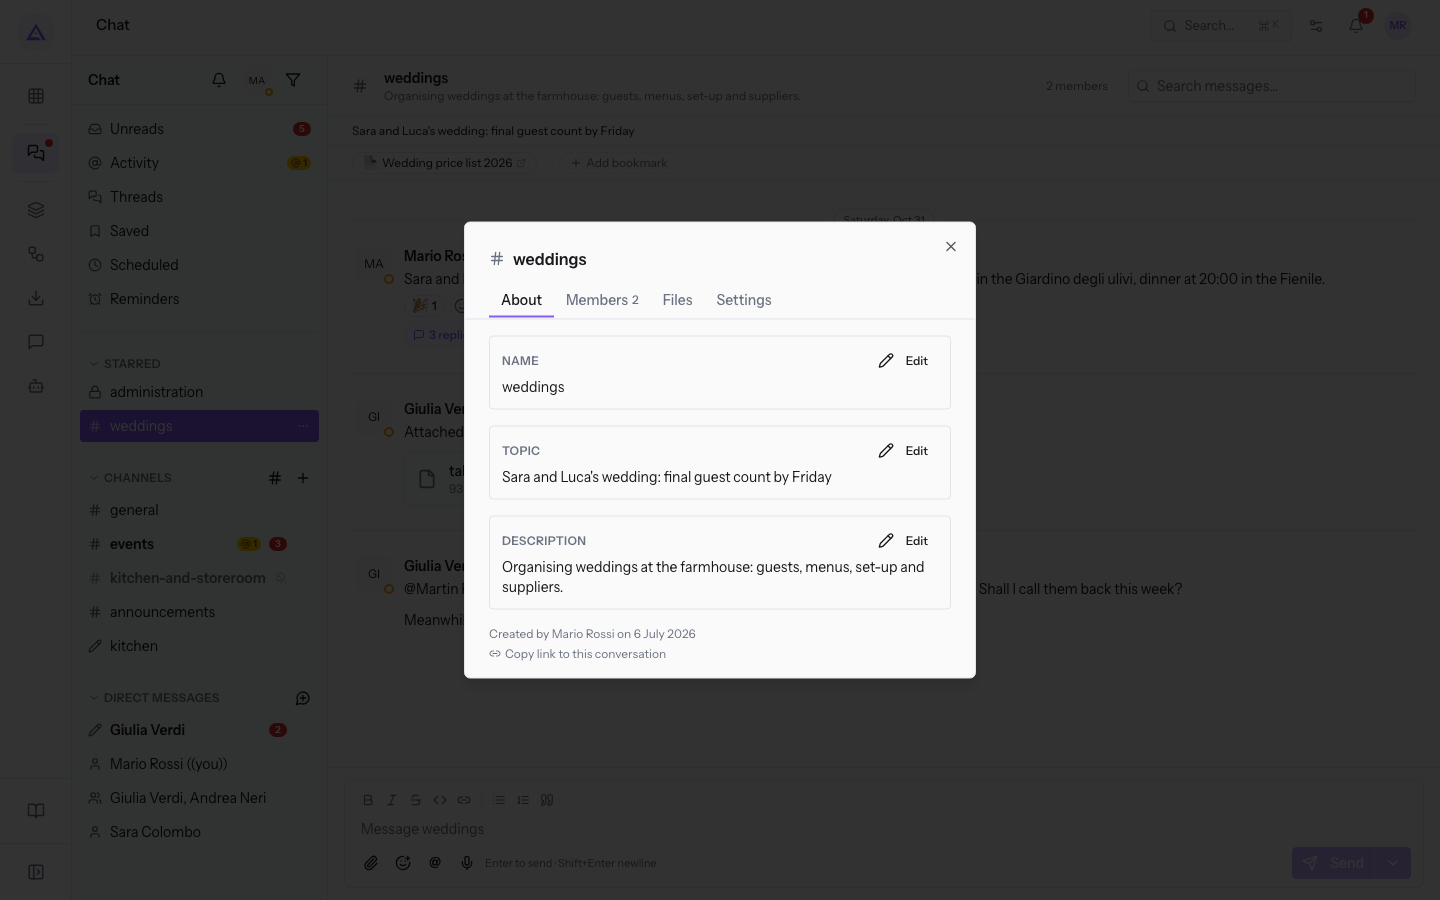
The About tab shows these details:
- Name: the channel's name. Press Edit to change it.
- Topic: the same text shown at the top of the channel. Edit opens the field What is this channel about right now?, with Cancel and Save.
- Description: the purpose of the channel; in #weddings it is
Organising weddings at the farmhouse: guests, menus, set-up and suppliers.Press Edit to change it.
The Copy link to this conversation button copies the channel's address, to paste into a message or document.
Managing members and their roles
Channel members have a role. Owners change anyone's role, archive the channel and hand it over. A channel can have more than one owner.
Before you start: only users with an account take part in the chat. Employees without an account cannot be added to a channel. In the demo, only Martin Ross and Julia Green have an account.
- Open the channel details and choose the Members tab.
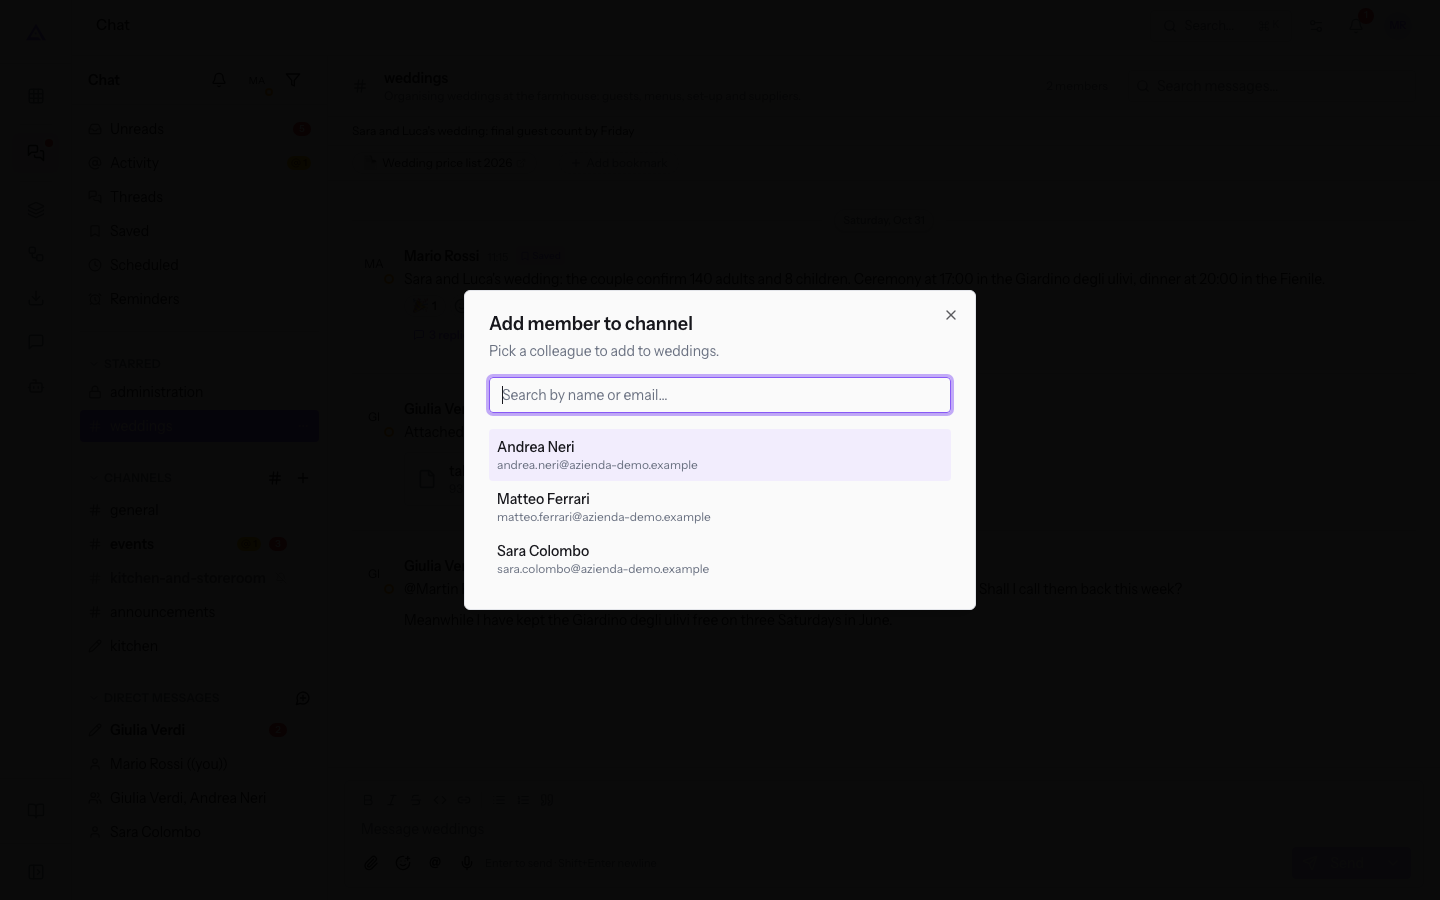
- To add a colleague, press Add people. The Add member to channel window opens.
- Search for the colleague in the field Search by name or email… and select them. If no colleague can be added, the window shows No matching users..
The list shows each member's name, email and role. In #weddings, Martin Ross, marked (you), is an owner.
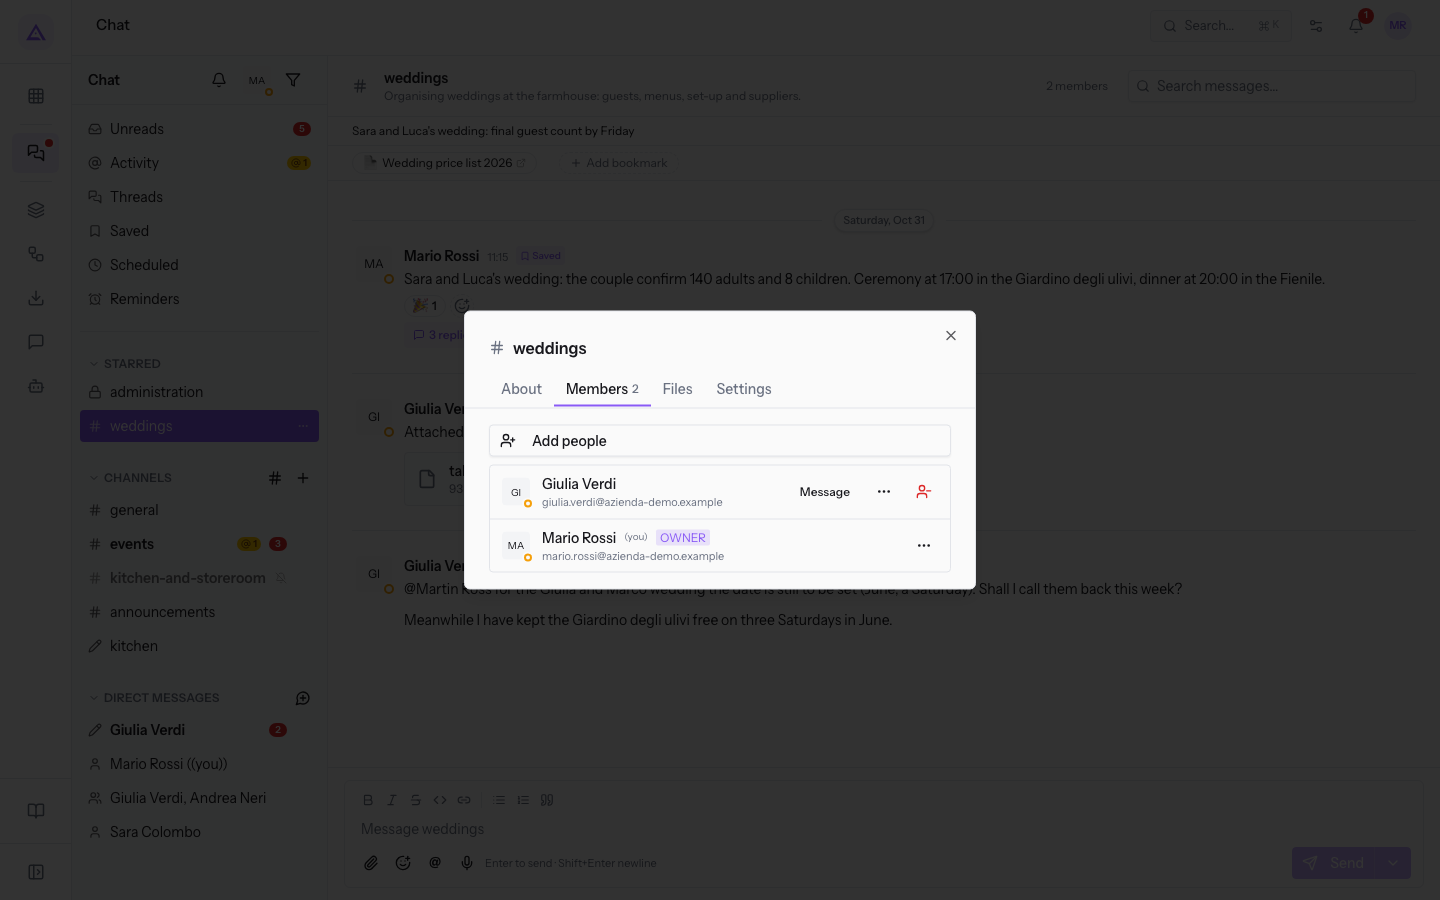
Each row has these commands:
- Message: opens a direct message with that colleague.
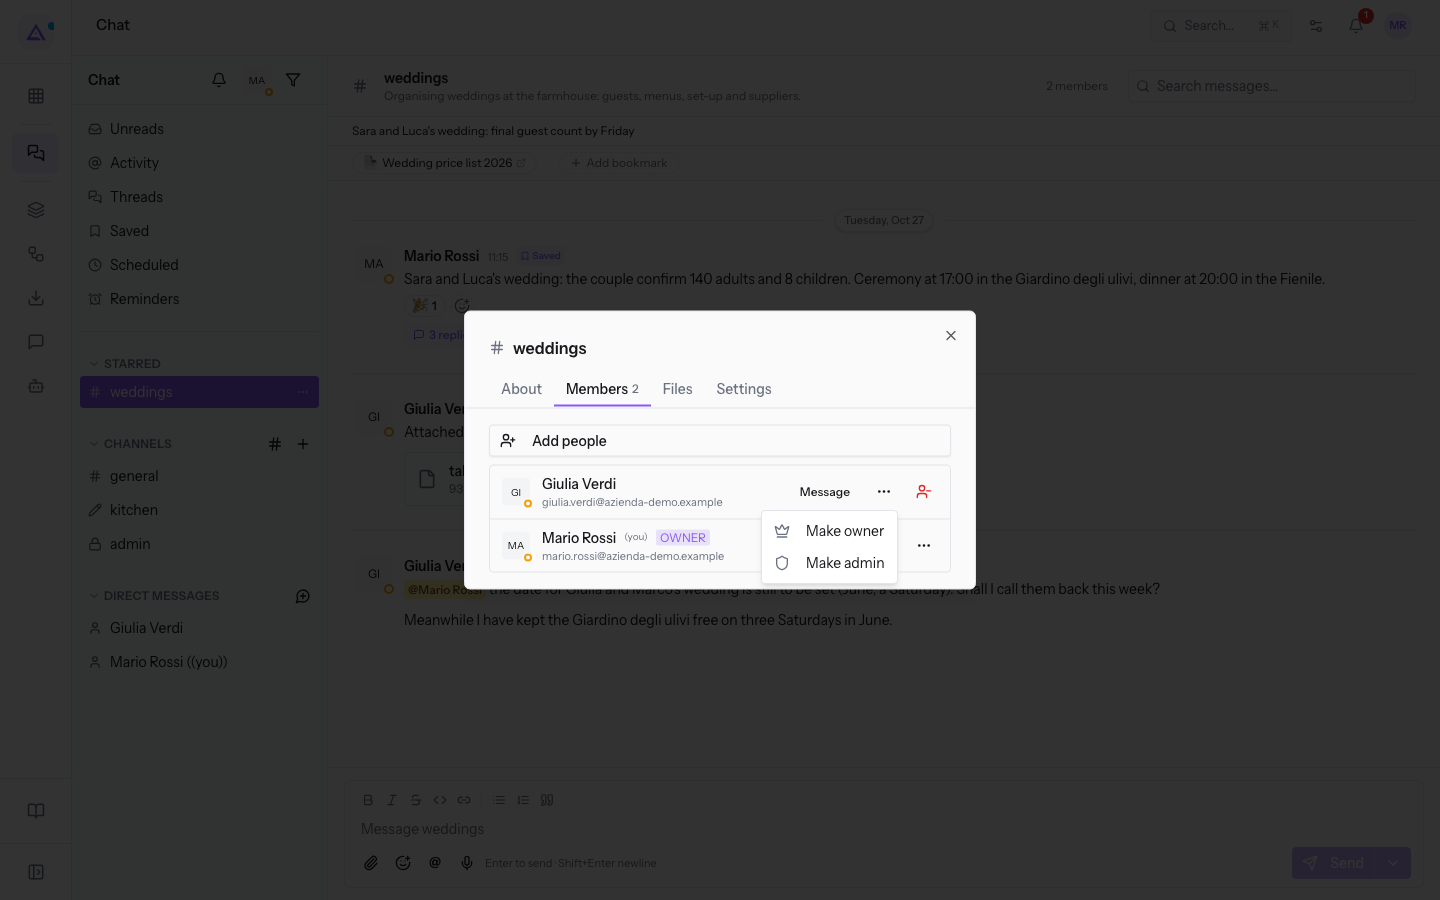
- Change role of Julia Green: opens the role menu for the member on that row. On your own row the command is Change role of yourself.
- Make owner: the member becomes an owner of the channel.
- Make admin: the member becomes an admin of the channel.
- Remove from channel: removes the member from the channel.
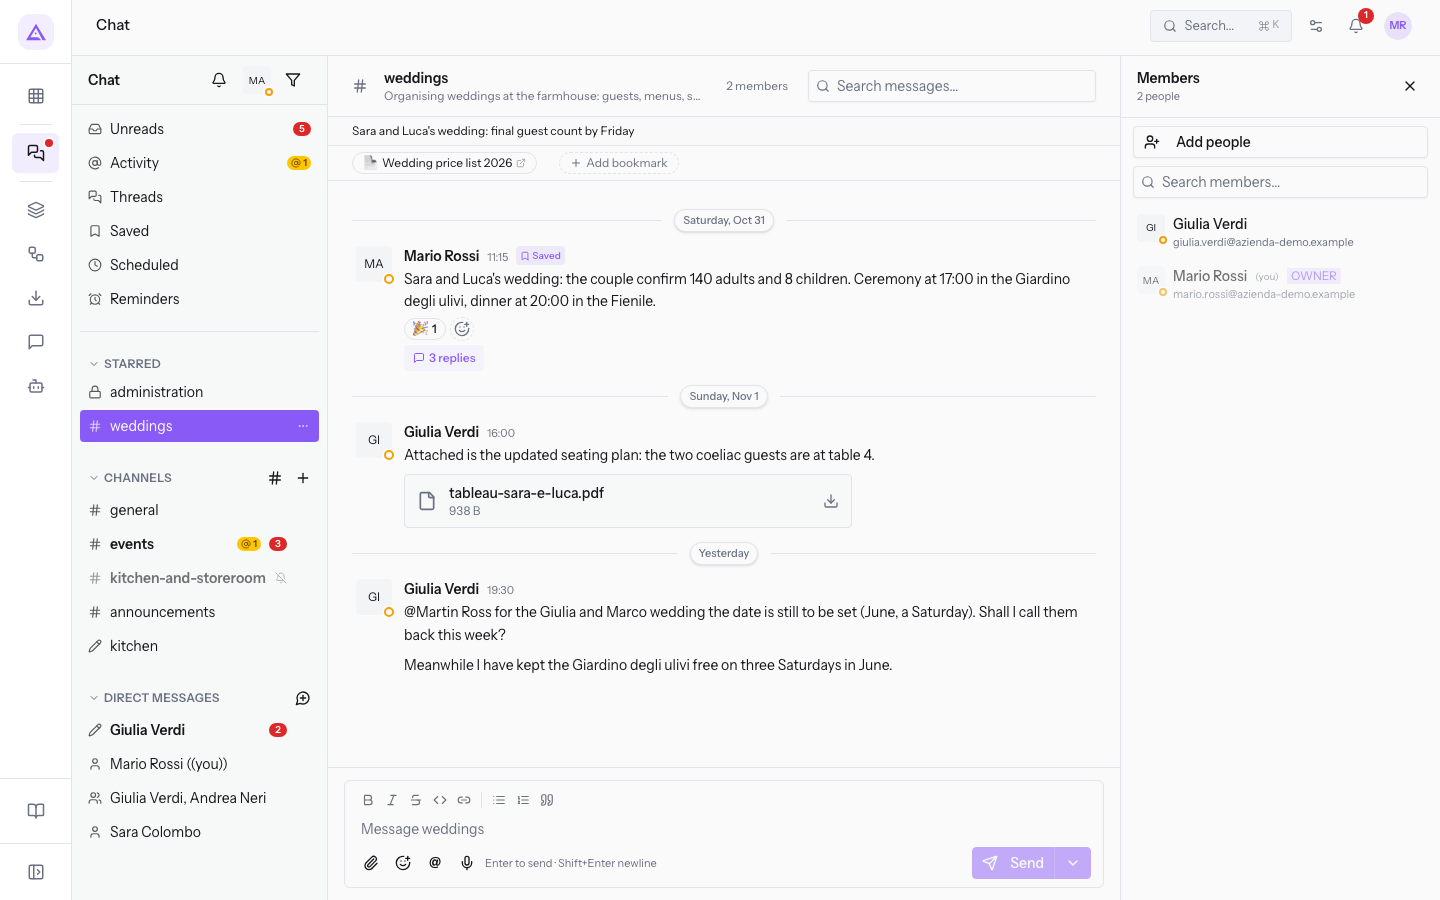
To see the members without opening the details, press the member count in the channel header, for example 2 members. The Members panel opens, with the field Search members….
Choosing notifications and who can write
The Settings tab sets which alerts you get from this channel and who can write in it. The notification choice applies only to you.
- Open the channel details and choose the Settings tab.
- In the notifications section, choose one of the options.
- In the next section, choose who can write in the channel.
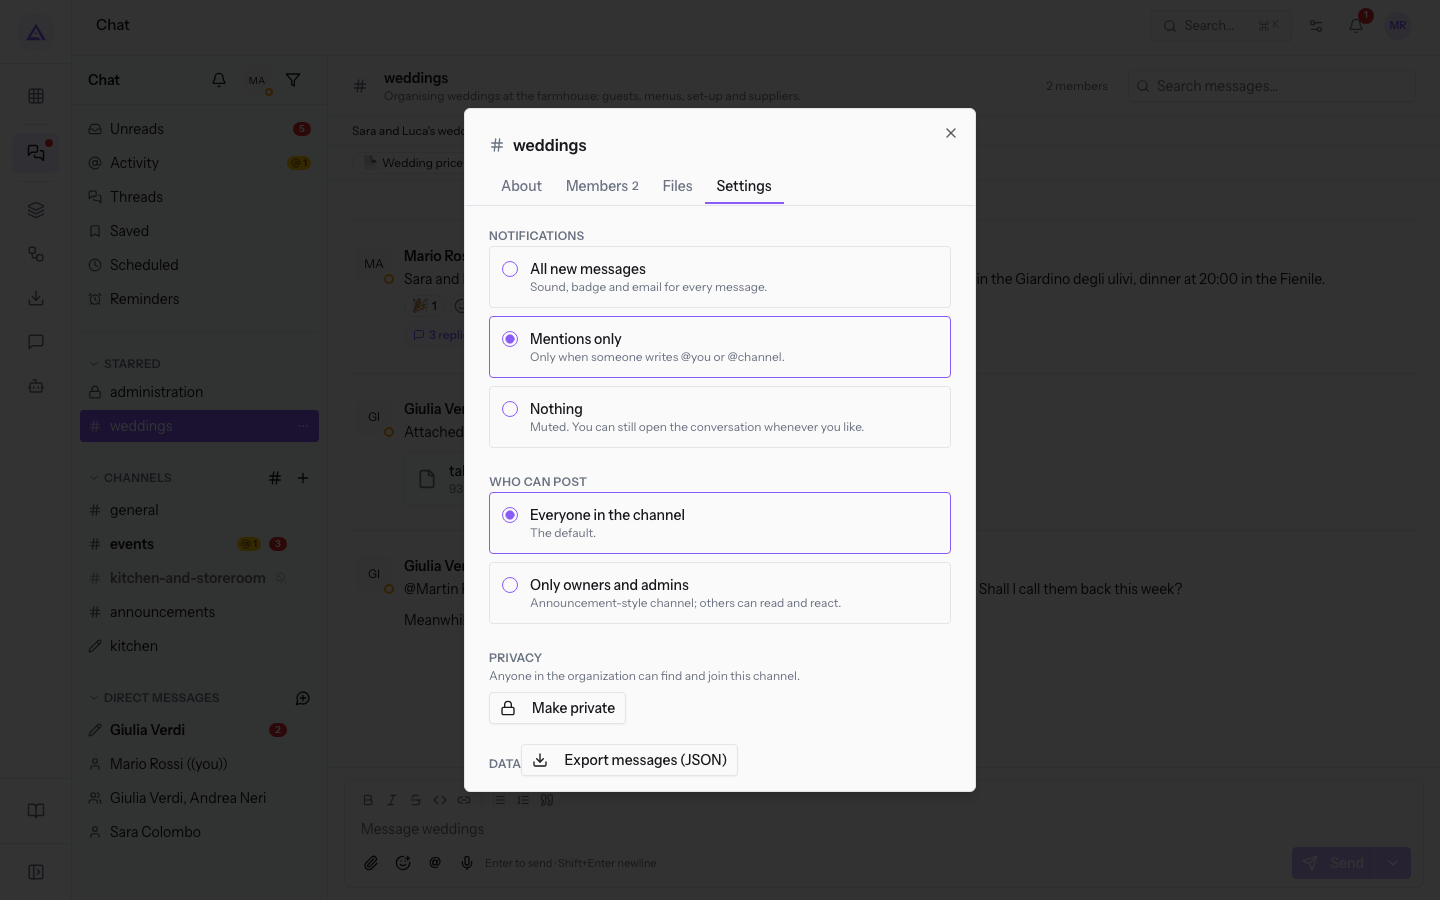
Notifications:
- All new messages: sound, badge and email for every message. Choose this option for channels you follow closely, for example #weddings.
- Mentions only: alerts you only when someone writes @you or @channel. Choose this option for very active channels you read when you have time.
- Nothing: the channel is muted. You can still open the conversation whenever you want.
Who can write:
- Everyone in the channel: all members can write. This is the default setting.
- Only owners and admins: the channel becomes an announcements-style channel. Other members read and react. Choose this option for a channel of official communications.
Making a channel private and exporting messages
A private channel is visible only to its members. In the Settings tab, the Make private button turns a public channel into a private one.
Important: making a channel private cannot be undone. People who are not members can no longer find it or join, and only members can add people. Those already inside stay and are notified.
If the channel should stay visible to the whole organization, keep it public. If the topic concerns only some people, as with #admin, make it private.
The Export messages (JSON) button, in the same tab, downloads the channel's messages to a JSON file.
Leaving or archiving a channel
At the bottom of the Settings tab, in the danger zone, are Leave channel and Archive channel.
- Leave a channel when you no longer need to follow it. The channel stays active for the other members. To rejoin a public channel you left, go to Browse channels. Leave channel is also in the Conversation options menu in the sidebar.
- Archive a channel when its topic is finished, for example a party that has already taken place. In an archived channel nobody can write. The history stays readable, and an owner can restore it.
Note: only owners can archive a channel.
Reading and restoring an archived channel
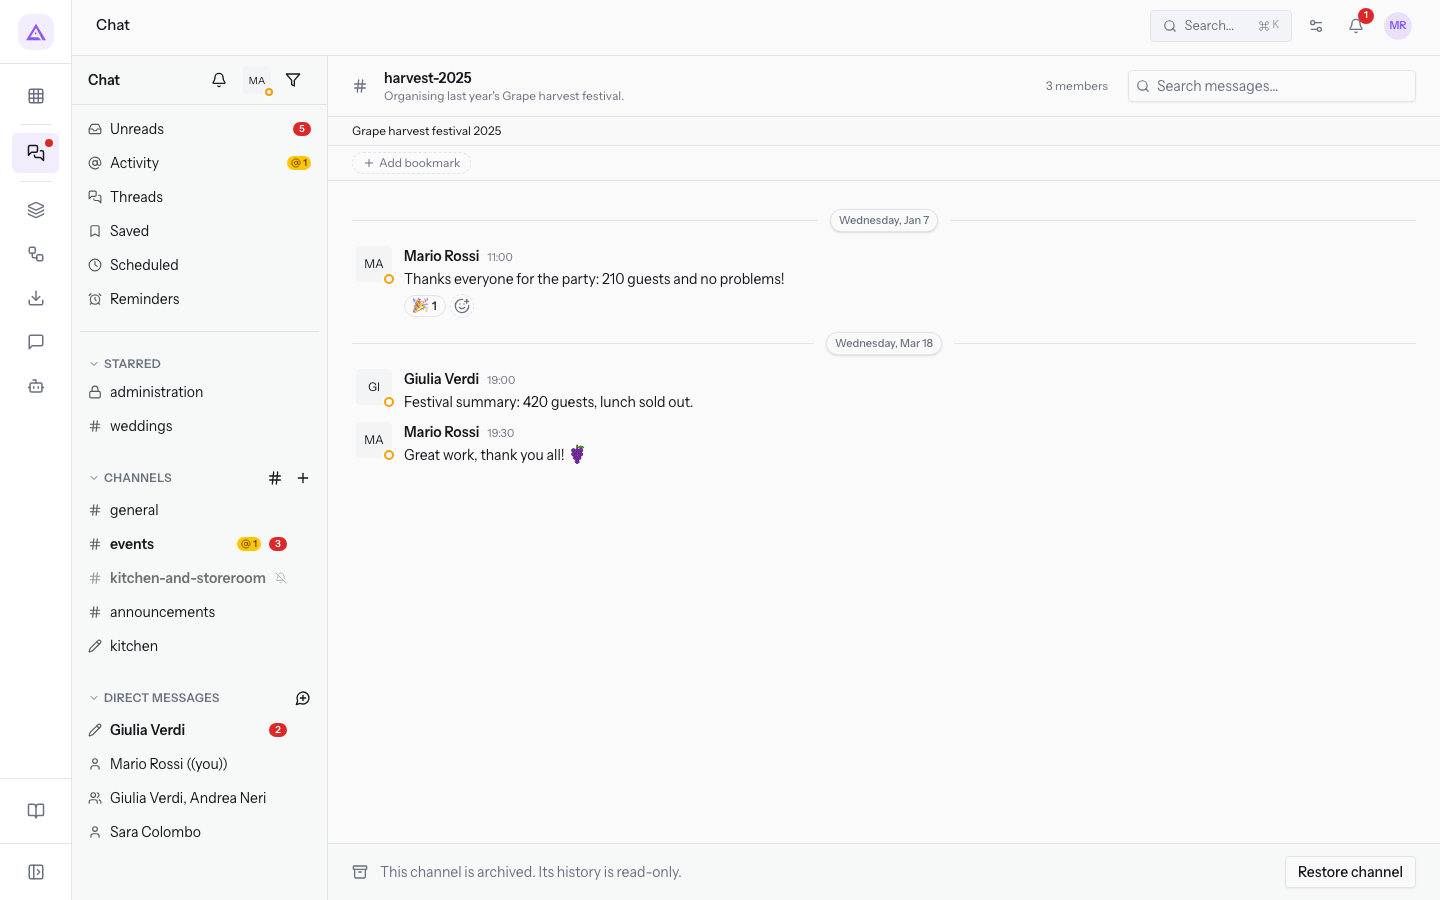
Archived channels are listed in Browse channels, in the archived channels section. In the demo #harvest-2025 appears with the text Archived — open to read, or restore.
- In the sidebar, press Browse channels.
- To read the channel, press its name, for example #harvest-2025. The channel opens in read-only mode, and Restore channel appears in place of the composer.
- To reactivate it, press Restore channel, either from the list or from the open channel. The channel returns to the active ones, and members can write again.
See it on your company, not on a slide deck.
In 30 minutes we map the software you use today.We show you how much work and how much margin Archimedes gives back.
Show me on my business →What industry are you in?
One tap — it lets us prepare the demo around your world.
What tools do you use today?
Pick the ones you recognise — or just type them. It helps us show you how they migrate.
Last step: your details.
We reply within one working day — and right after, if you like, you pick the demo slot yourself.
We couldn't send your request. Try again, or write to us at [email protected].
By sending, you agree to your data being processed so we can get back to you about the demo. Privacy notice.
Preview form — nothing is sent from this page.
Want to schedule the demo now?
Your call: book the slot you prefer yourself, or we'll call you to arrange it.
Live availability, 30 minutes, instant confirmation. The calendar opens in a new tab.
Lock in your slot ↗We'll get back to you within one working day — and we'll join the call already knowing your world.
The calendar is open in another tab: pick a slot and the demo is booked. Can't see it? Reopen it ↗
Preview page: nothing was sent.
Our calendar is live: take the slot that suits you and the demo is booked. 30 minutes, instant confirmation, no waiting.
Lock in your slot ↗