Point of Sale
All modules
Prepare dish options, fixed-price baskets, loyalty programs and gift cards
Point of Sale · 16 of 16 · 8 min read
In POS options you prepare what the till offers on top of single products: dish variant groups, fixed-price combos, loyalty programs and gift cards.
Before you start: the page is in the settings group of the menu, reserved for the point-of-sale manager.
Open Point of Sale › POS options. Each topic has a tab: Modifiers, Combos, Loyalty and Gift Cards.
Prepare dish variant groups
A variant group collects the options of a dish, such as a cooking preference or an extra. The group applies to the products you assign it to. At the till, pressing a product with variants opens the options window described in Taking a restaurant order with dish options.
The Modifiers tab lists for each group the selection type, the options and the number of linked products. The demo has two groups:
- Fresh pasta: Multi selection, with the options No garlic and Extra pecorino +€1.50, linked to 1 product.
- Polenta style: Single selection, with the options Soft and Grilled, linked to 1 product.
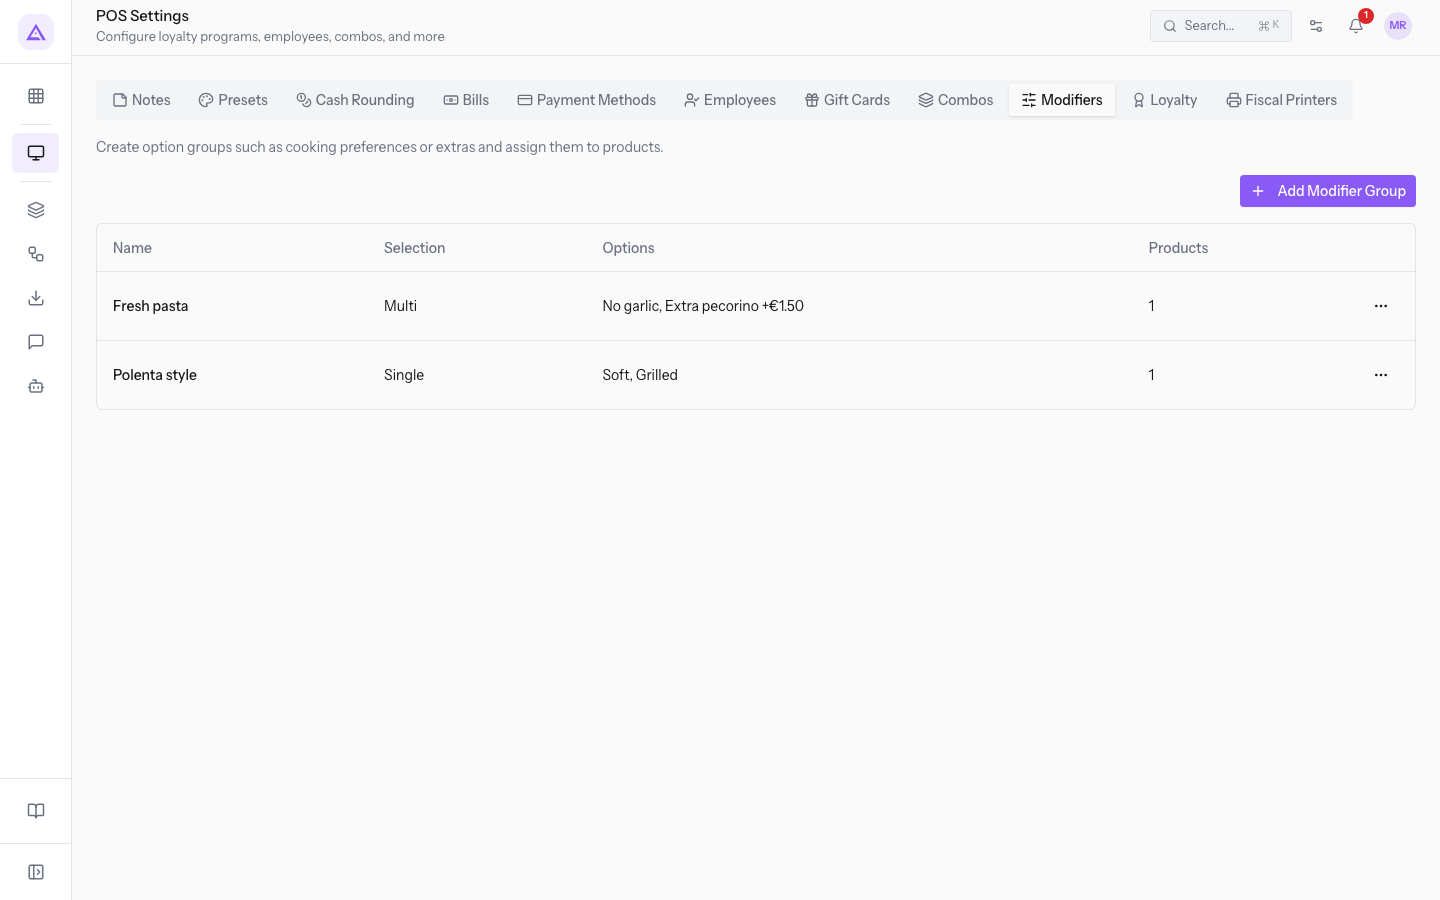
The selection type depends on how it is chosen at the counter:
- If the customer must indicate only one alternative, such as the polenta style, choose Single.
- If the customer can combine several extras, such as No garlic and Extra pecorino, choose Multi.
To create a group:
- In the Modifiers tab press Add Modifier Group. The New Modifier Group window opens.
- Fill in the group details and choose the Selection. With Multi the Maximum field is emptied.
- Enter the first option. For each of the others press Add Option.
- Tick the products the group applies to.
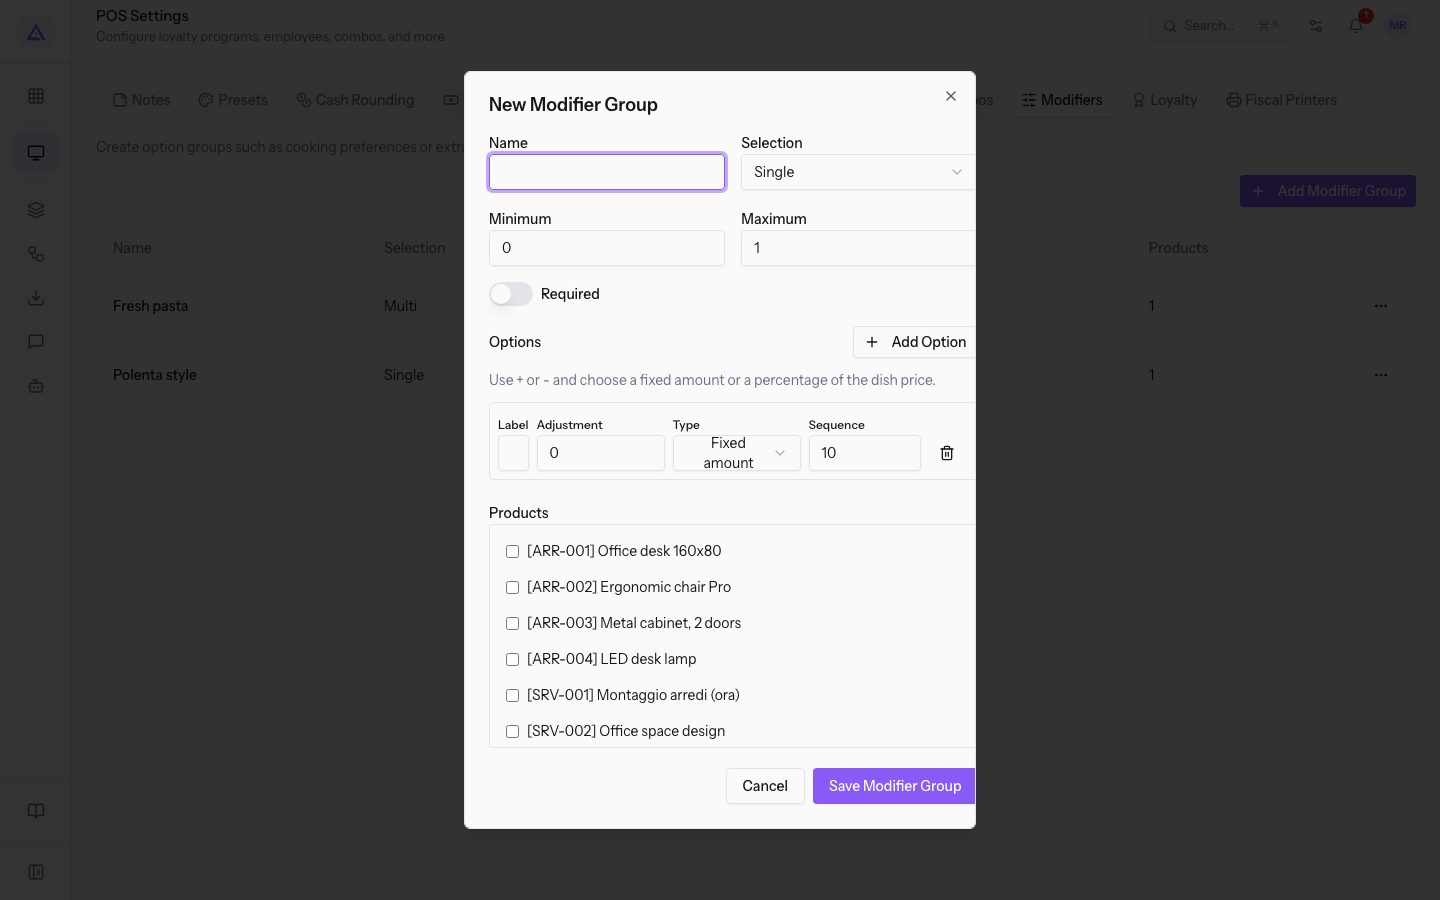
The group fields:
- Name: the name of the group. The field is required.
- Selection: indicates whether one option or several options are chosen. The proposed value is Single.
- Single: the Maximum field is 1.
- Multi: the Maximum field is empty and you can enter a value.
- Minimum: the minimum number of options to choose. The proposed value is 0.
- Maximum: the maximum number of options to choose.
- Required: marks the group as required. The switch is off by default.
The fields of each option:
- Label: the name of the option shown at the till. The field is required.
- Adjustment: how much the option changes the price of the dish. Use + or - to increase or reduce it. The proposed value is 0.
- Type: Fixed amount or Percentage of the dish price. The proposed value is Fixed amount.
- Sequence: the display order of the option. The proposed value is 10.
- Remove option: removes the option from the group.
Below the options is the product list, with a checkbox for each one. The list includes all products, even those the till does not sell, such as [MP-OLIVE] Olive da olio (kg).
To change or delete an existing group, use the menu at the end of its row.
Prepare a fixed-price combo
A combo is a set of products sold at a fixed price. Use it for a gift or a menu. The Combos tab lists for each combo the name, the price, the category, the Coperto, the number of components and the status.
The demo has the Farm gift basket: €45.00, category Gift baskets, 5 components, Active.
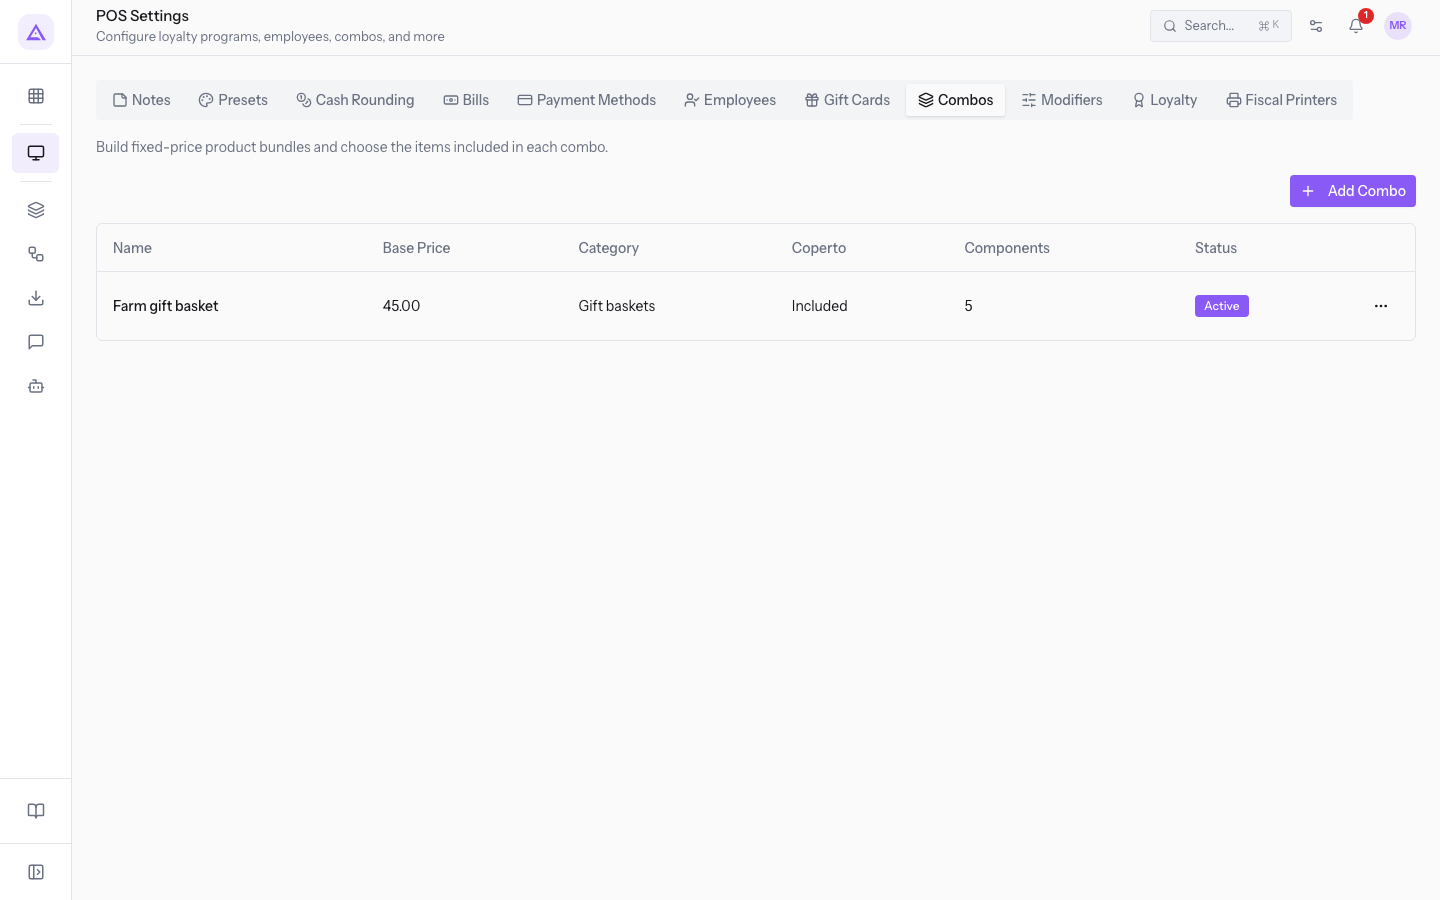
What the sale deducts depends on the components you mark as default:
- If the combo must always contain all components, leave the Default switch off on each one. When the combo is sold, all components are served and their stock is deducted.
- If some components are only alternatives, mark as default those to be sold. The sale is limited to those components.
To create a combo:
- In the Combos tab press Add Combo. The New Combo window opens.
- Fill in the combo details.
- Press Add component for each product in the combo and choose the product in Select a product.
- Mark as default the components to be sold, if the combo has alternatives.
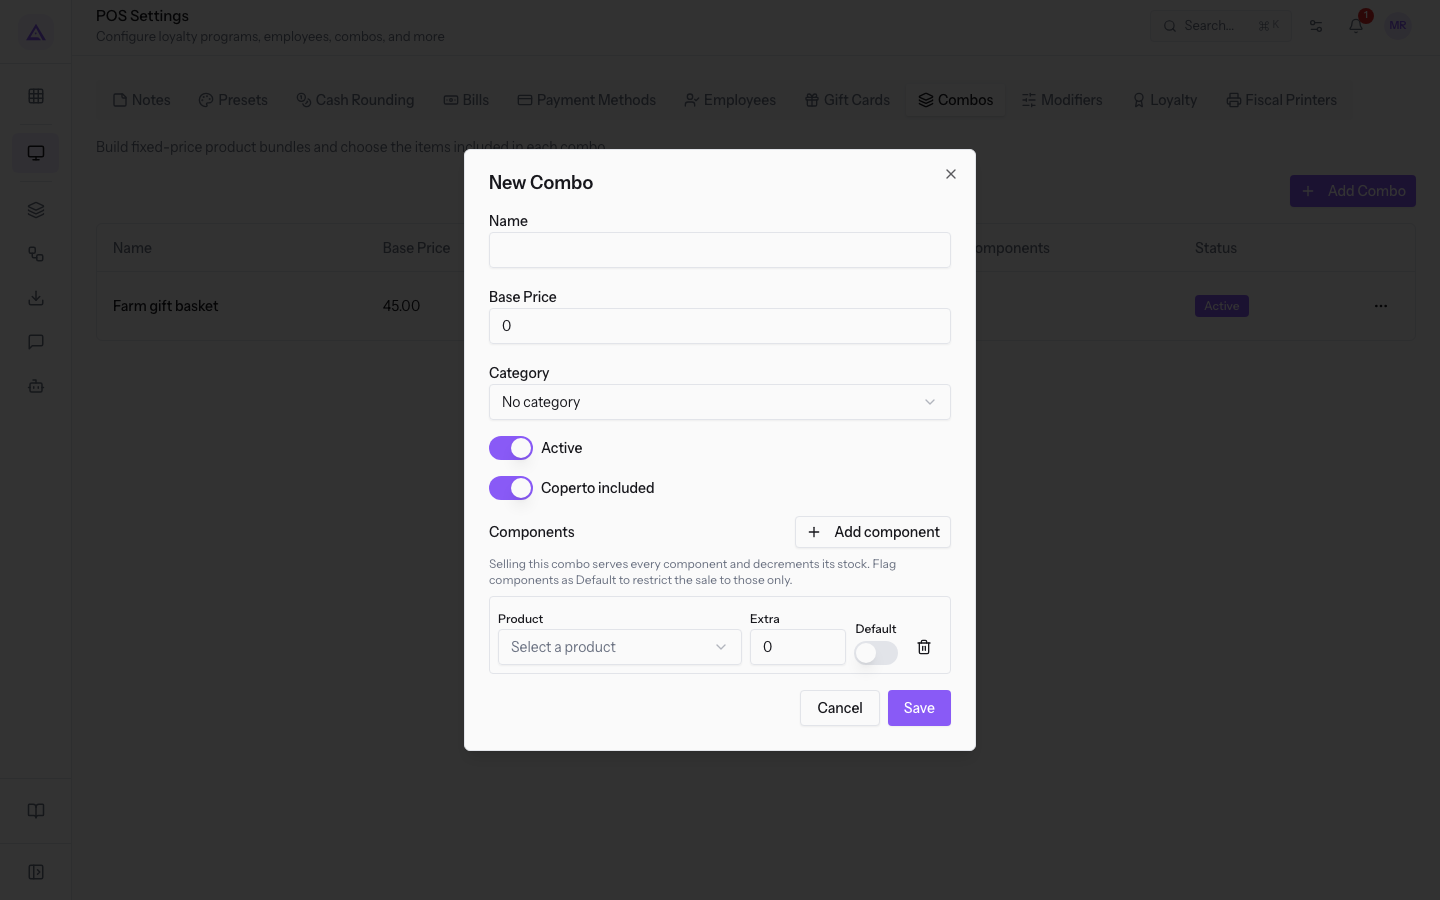
The combo fields:
- Name: the name of the combo. The field is required.
- Base Price: the fixed price of the combo. The proposed value is 0.
- Category: the POS category of the combo, chosen among those of the organization. The proposed value is No category.
- Active: the switch that indicates whether the combo is active. It is on by default.
- Coperto included: the switch that indicates whether the cover charge applies to the combo. It is on by default.
The fields of each component:
- Select a product: the product of the combo.
- Extra: the surcharge of the component. The proposed value is 0.
- Default: the switch that limits the sale to the marked components. It is off by default.
- Remove: removes the component from the combo.
To change or delete an existing combo, use the menu at the end of its row.
Set up a loyalty program or promotion
In the Loyalty tab you create loyalty rules and rewards based on purchases, points, products or discounts. For each program, the list shows the name, the type, the reward, the earn rule and the status. At the till, an available reward is applied as an order line.
The demo has three active programs: Friends of the farm of type Loyalty, Harvest promo of type Discount Code and Farm gift card.
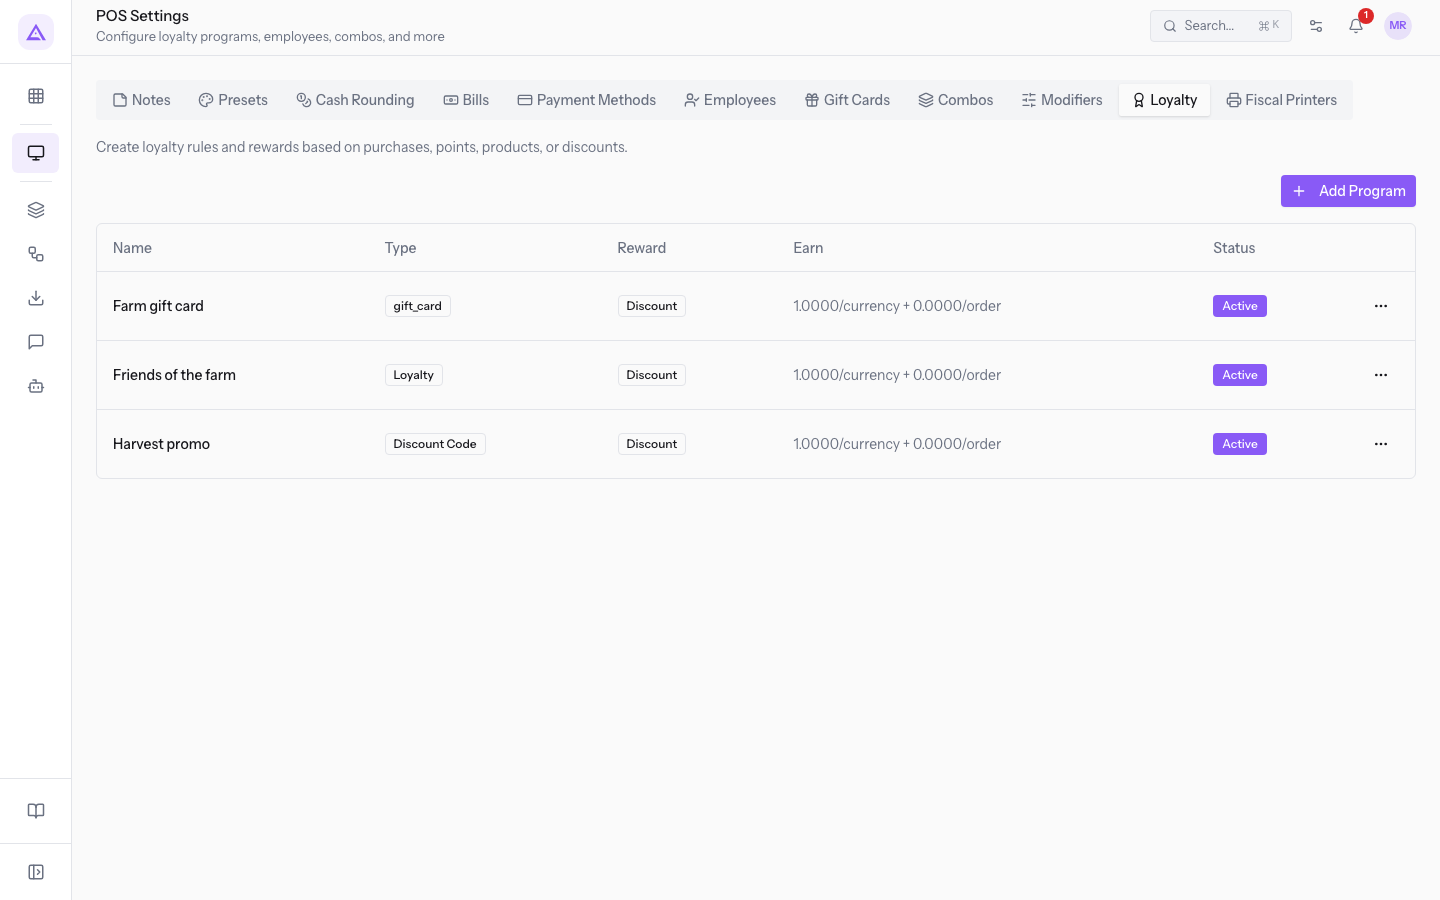
The main choice concerns the program type and the reward:
- If you want to reward customers who come back with cards and points, choose Loyalty. Friends of the farm earns 1 point per currency unit and its reward is a discount.
- If you want a discount tied to a code, choose Discount Code and the With Code trigger.
- If the reward is a product, choose Free Product. The window replaces the discount fields with the product choice.
To create a program:
- In the Loyalty tab, press Add Program. The New Loyalty Program window opens.
- Enter the Program Name and choose Type and Trigger. The Type and the Trigger do not change the fields in the window.
- Set the Earn Rules and the conditions.
- Choose the reward and, for a discount, its value and where it applies.
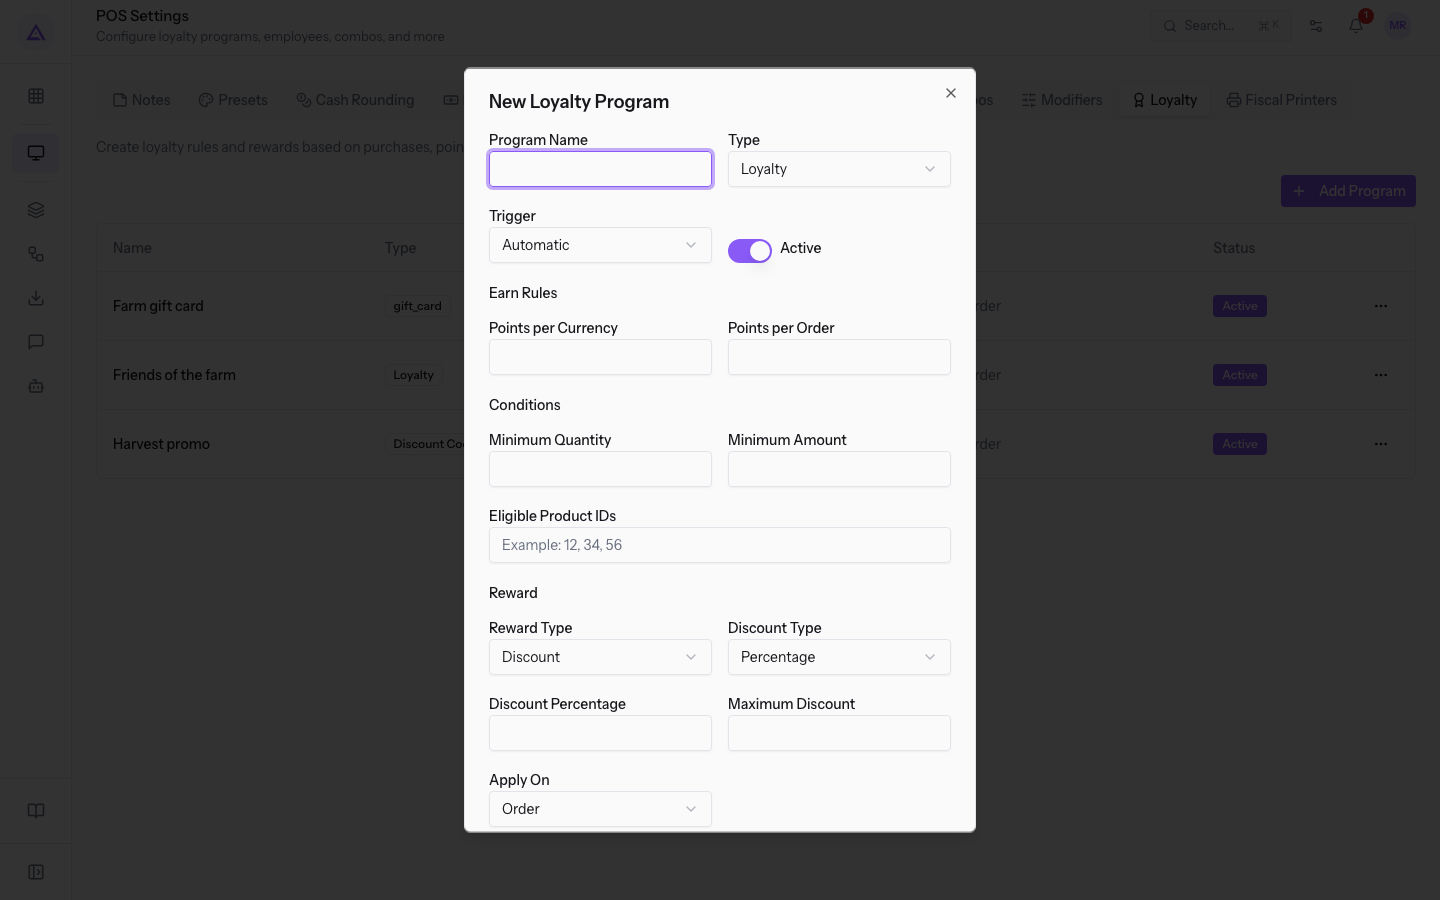
The program data:
- Program Name: the name of the program. The field is required.
- Type: the type of program. The proposed value is Loyalty. The options are Loyalty, Coupon, Promotion, Discount Code, Buy X Get Y and Next Order Coupon.
- Trigger: shows whether the program requires a code. The proposed value is Automatic.
- Automatic: the program does not require a code.
- With Code: the program requires a code.
- Active: the switch that shows whether the program is active. It is on by default.
The Earn Rules set how many points a purchase earns:
- Points per Currency: the points for each currency unit spent. The field is optional.
- Points per Order: the points for each order. The field is optional.
The conditions limit the program:
- Minimum Quantity: the minimum quantity required. The field is optional.
- Minimum Amount: the minimum amount required. The field is optional.
- Eligible Product IDs: the product identifiers, separated by commas, in the format
12, 34, 56. The field is optional.
Reward Type can be:
- Discount: the proposed value. It shows the Discount Type, the Discount Percentage, the Maximum Discount and where to apply it.
- Free Product: shows Select a product and the reward quantity, which is 1 if you do not change it.
- Free Shipping: has no other fields.
The discount fields:
- Discount Type: Percentage or Fixed Amount. The proposed value is Percentage.
- Discount Percentage: the percentage, from 0 to 100. With the Discount Type Fixed Amount, the field is called Fixed Amount and holds the amount.
- Maximum Discount: the cap on the discount.
- Apply On: where the discount applies. The proposed value is Order.
- Order: the discount applies to the order.
- Cheapest Product: the discount applies to the cheapest product.
- Specific Products: a second field appears for the product identifiers, in the format
12, 34, 56.
To change or delete an existing program, use the menu at the end of its row.
Manage gift cards
The Gift Cards tab is used to issue gift cards, check balances and deactivate cards that must no longer be used. At the top are the Create Gift Card and Check Balance panels, and below them the list of cards.
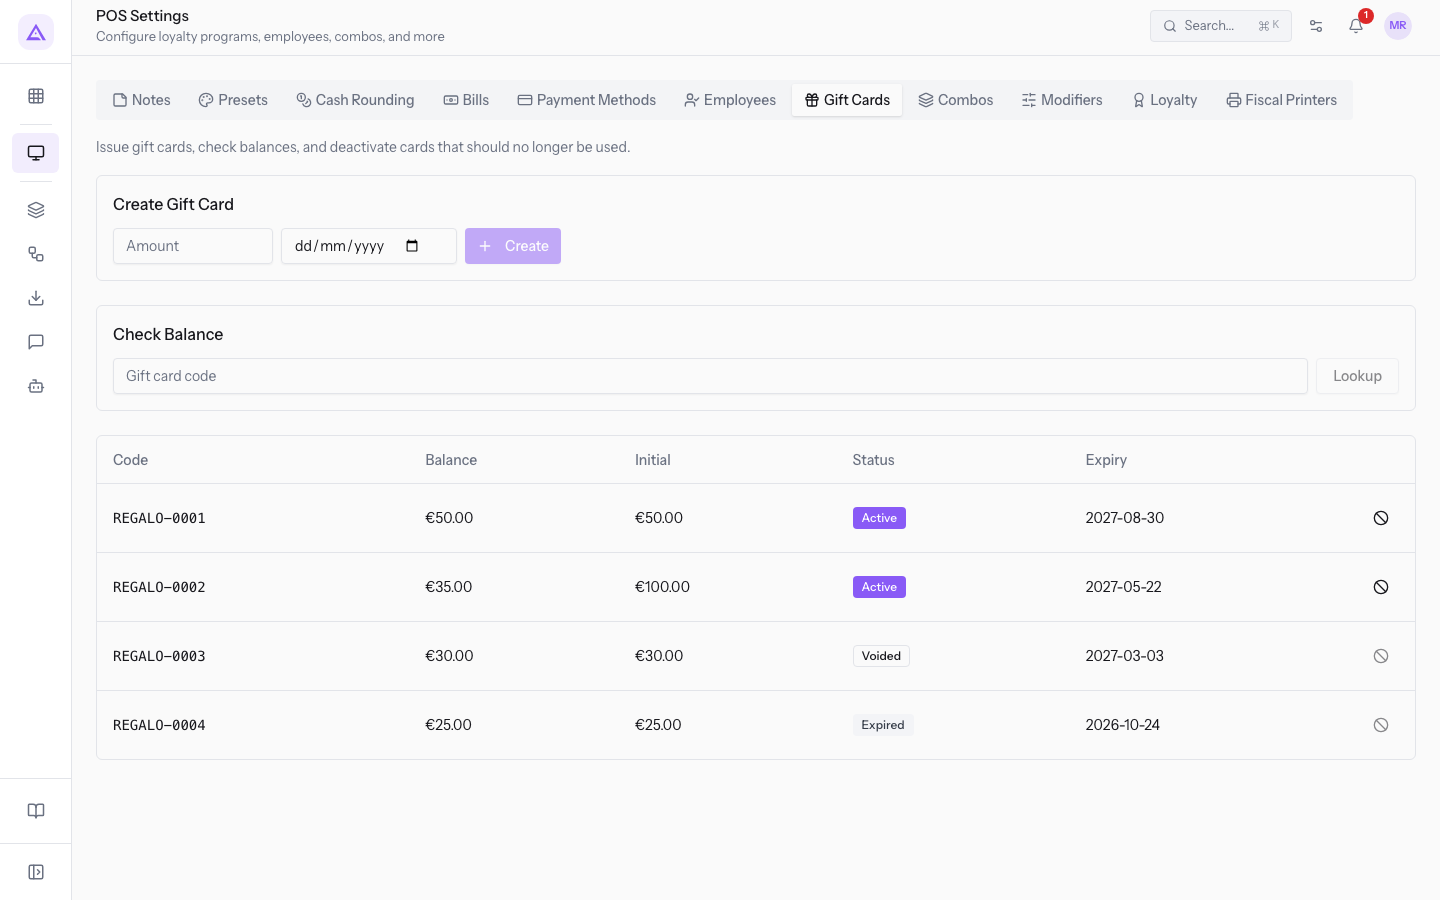
The list has these columns:
- Code: the code of the card.
- Balance: the amount still available.
- Initial: the amount the card was created with.
- Status: Active, Voided or Expired.
- Expiry: the expiry date. If the card has none, the column shows a dash.
In the demo, REGALO-0001 is Active, with a balance of €50.00 out of €50.00. REGALO-0002 is Active, with a balance of €35.00 out of €100.00. REGALO-0003 is Voided.
Create a gift card
The card code is assigned automatically: the panel has no field to enter it.
- In the Create Gift Card panel, enter the Amount. The Create button stays disabled while the field is empty.
- If the card must expire, enter the date in the field next to it. The field is optional.
- Press Create. A message shows the card code and the card appears in the list.
Check a balance
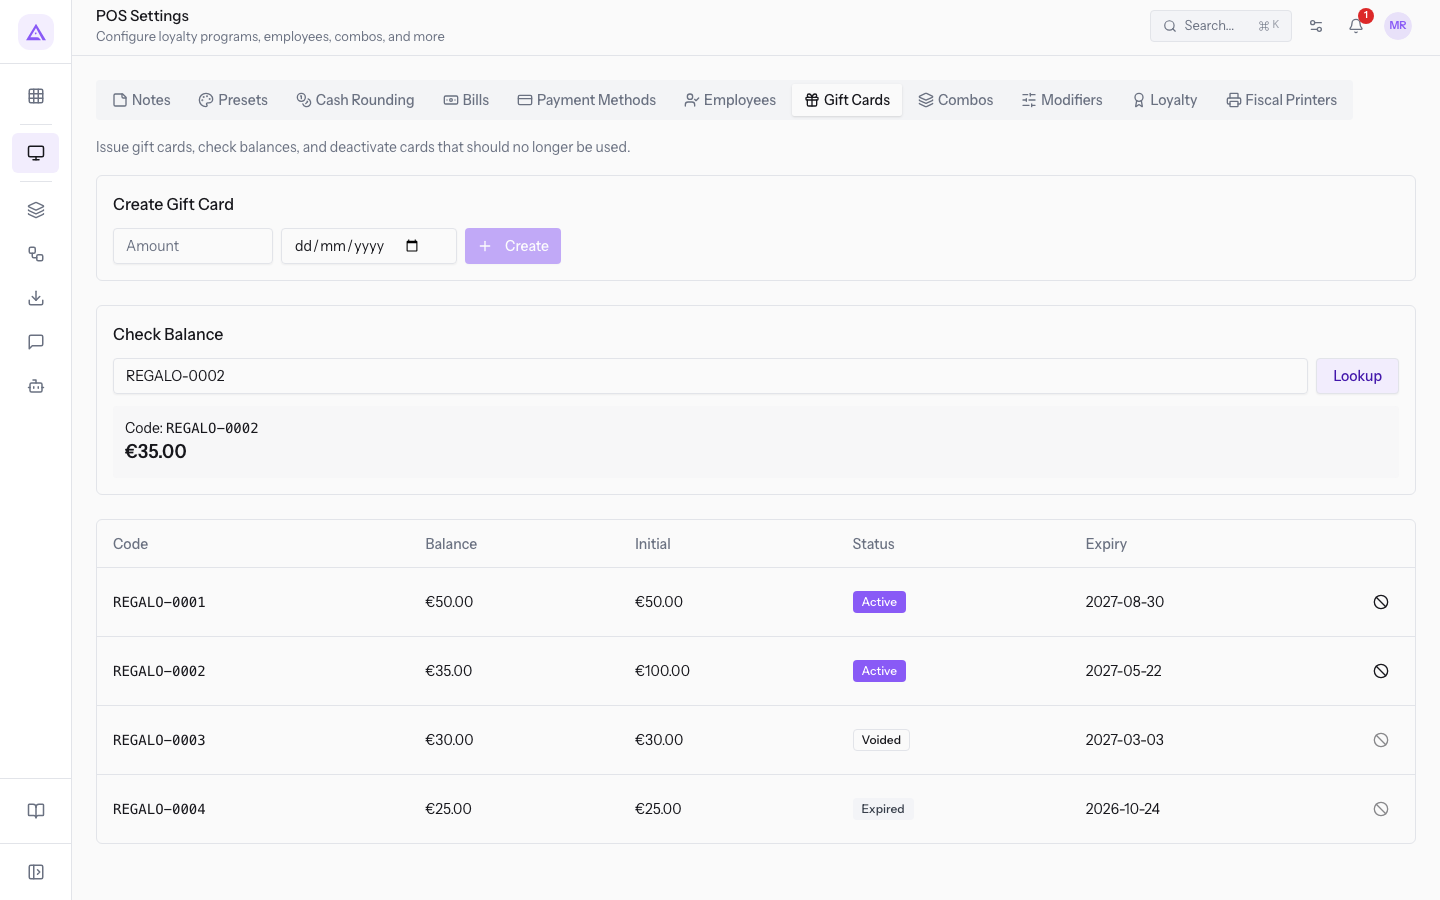
The check shows the balance of a card from its code.
- In the Check Balance panel, enter the Gift card code, such as
REGALO-0002. - Press Lookup. The code and the balance appear below the field.
Deactivate a gift card
Deactivate a card that must no longer be used. The command is available only on Active cards.
Important: the tab has no command to reactivate a card.
- Press the prohibited-sign icon at the end of the card's row.
- Confirm the request, which shows the card code.
The message Gift card deactivated appears.
See it on your company, not on a slide deck.
In 30 minutes we map the software you use today.We show you how much work and how much margin Archimedes gives back.
Show me on my business →What industry are you in?
One tap — it lets us prepare the demo around your world.
What tools do you use today?
Pick the ones you recognise — or just type them. It helps us show you how they migrate.
Last step: your details.
We reply within one working day — and right after, if you like, you pick the demo slot yourself.
We couldn't send your request. Try again, or write to us at [email protected].
By sending, you agree to your data being processed so we can get back to you about the demo. Privacy notice.
Preview form — nothing is sent from this page.
Want to schedule the demo now?
Your call: book the slot you prefer yourself, or we'll call you to arrange it.
Live availability, 30 minutes, instant confirmation. The calendar opens in a new tab.
Lock in your slot ↗We'll get back to you within one working day — and we'll join the call already knowing your world.
The calendar is open in another tab: pick a slot and the demo is booked. Can't see it? Reopen it ↗
Preview page: nothing was sent.
Our calendar is live: take the slot that suits you and the demo is booked. 30 minutes, instant confirmation, no waiting.
Lock in your slot ↗