Point of Sale
All modules
Setting up payment methods, cash denominations, till staff and quick notes
Point of Sale · 15 of 16 · 6 min read
The POS options prepare what the tills use during a sale. Here you set payment methods, cash denominations, rounding, till staff, quick notes and presets. For example, you can add a payment method, give access to a new cashier, or offer a quick note only at the Farm shop.
Before you start: the POS options are in the menu settings group, which only the point-of-sale manager can see.
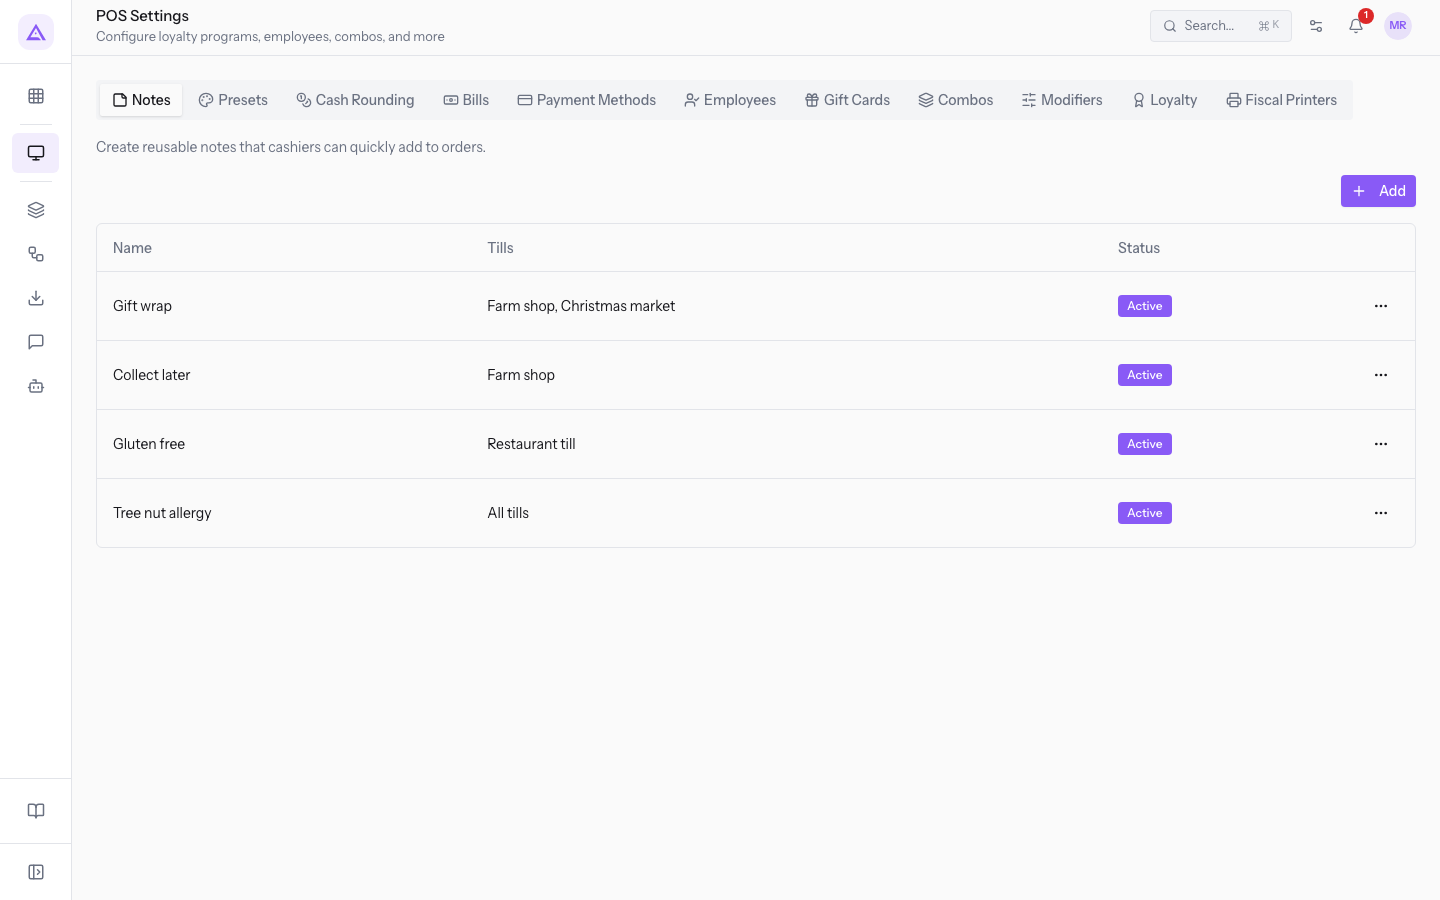
To open the page, go to Point of Sale › POS options. The settings are split into tabs: Notes, Presets, Cash Rounding, Bills, Payment Methods, Employees, Gift Cards, Combos, Modifiers, Loyalty and Fiscal Printers.
Payment methods
A payment method is a way the customer pays at the till. In the demo, the methods used are Cash, Card and Charge to room.
The method's type and journal decide where takings end up when the session closes:
- If the method records cash, choose the type Cash.
- If the customer pays by card or bank, choose the type Bank / Card.
- If you leave Default for type, cash goes to the cash journal and cards go to the bank journal. Choose another journal only if that method must end up in a different one.
Note: in the demo, the Card method corresponds to an external card POS. The amount is entered by hand at the till.
- Open the Payment Methods tab.
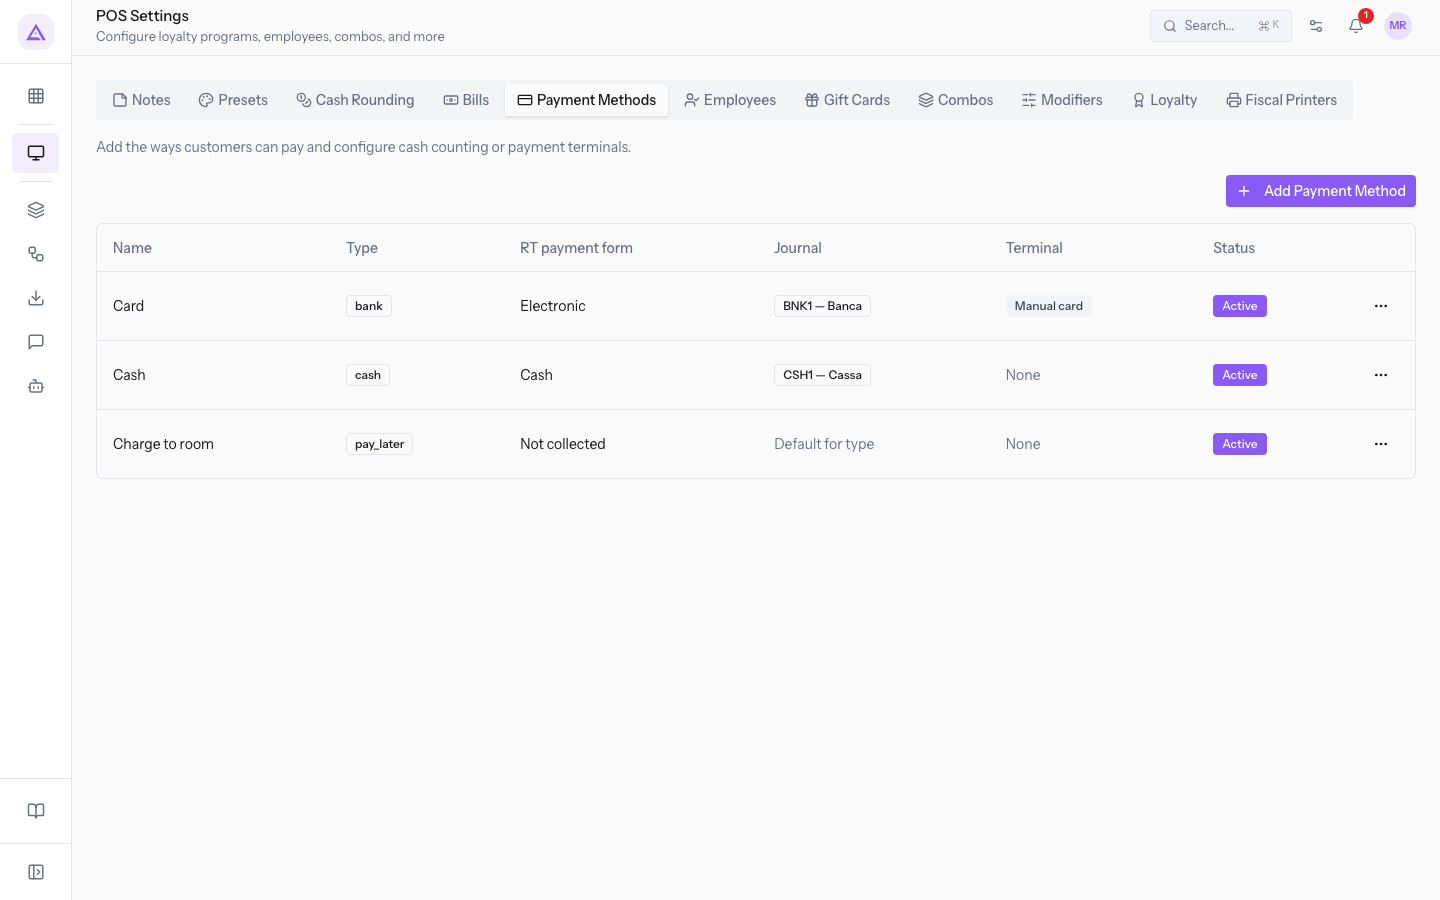
- Press Add Payment Method. The Create Payment Method window opens.
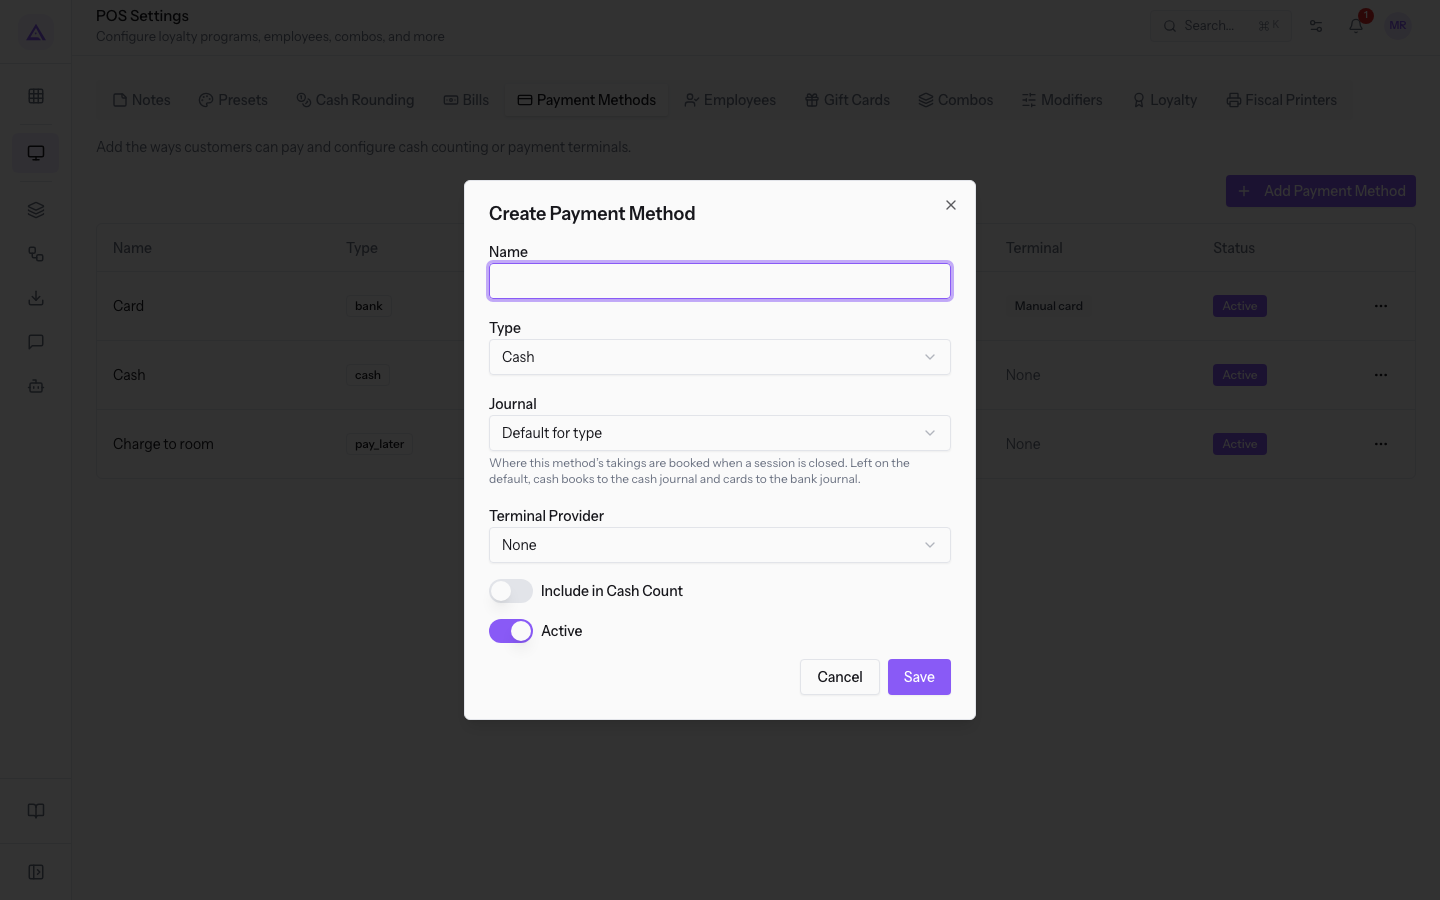
- Fill in the fields and press Save.
The fields in the window are:
- Name: the name staff see at the till, for example Charge to room.
- Type: the kind of payment.
- Cash: for cash money.
- Bank / Card: for card or bank payments.
- Pay Later: for payments the customer settles later.
- Meal vouchers - in arrivo: this option is in the list, but not yet available.
- Journal: the accounting journal where the method's takings go when the session closes. The default value is Default for type. Alternatively, you can choose one of the organization's journals, such as CSH1 — Cassa or BNK1 — Banca.
- Terminal Provider: the field is None. With the Bank / Card type, the entry becomes None (manual card): the amount paid by card is recorded by hand.
Cash denominations
Cash denominations are the coins and notes that staff count when they open and close the till. In the Bills tab, you can add the denominations to offer in the count. In the demo, denominations range from €0.50 to €100.
Cash rounding
Rounding adjusts the total to pay to an amount that can be given in coins. In the demo, the rounding is 5-cent rounding.
- Open the Cash Rounding tab.
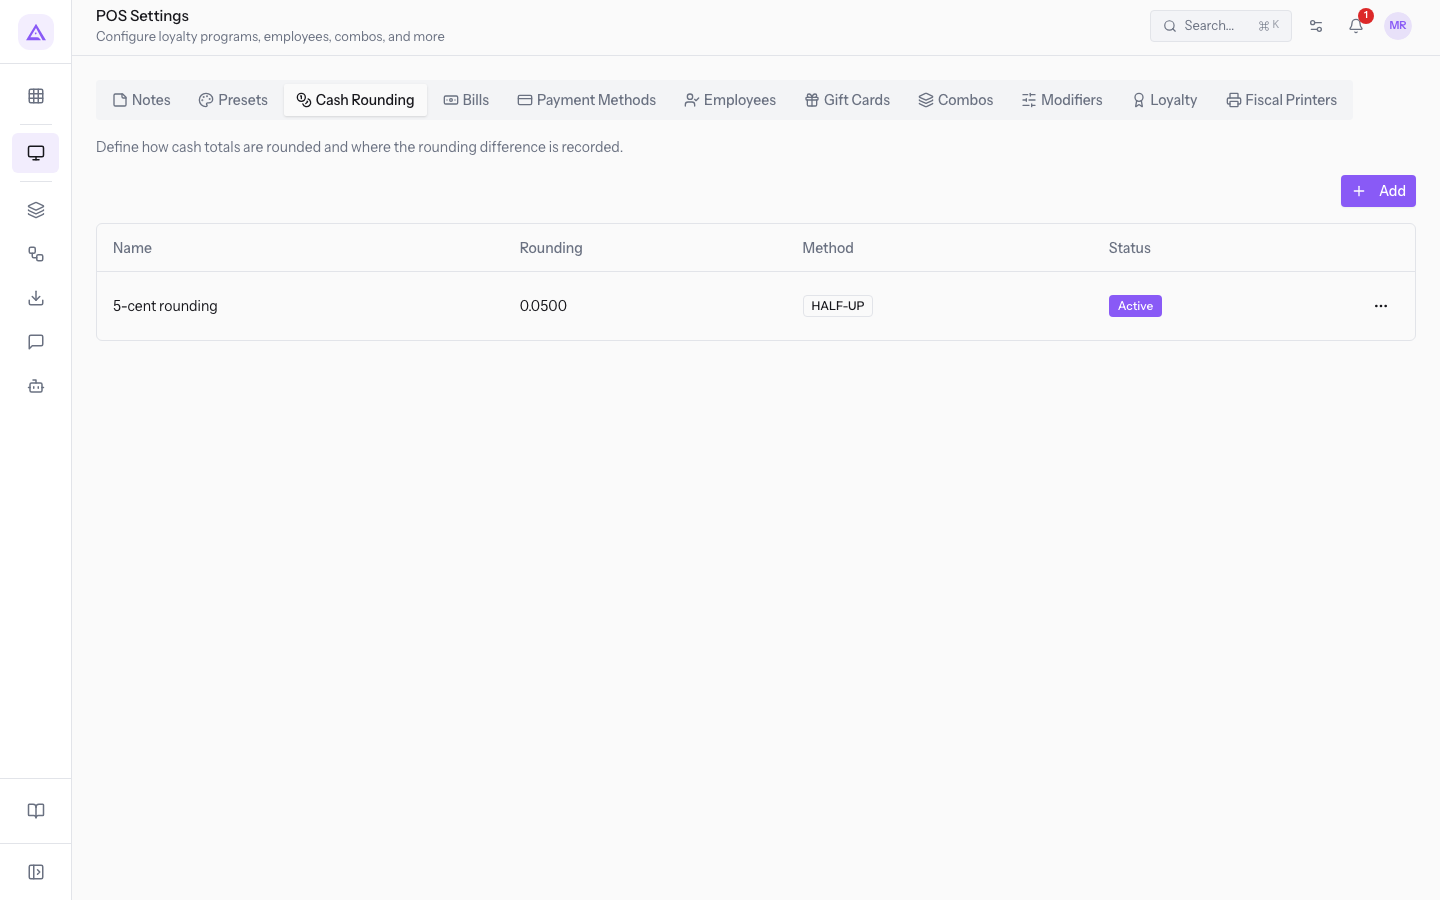
- Press Add. The Create window opens.
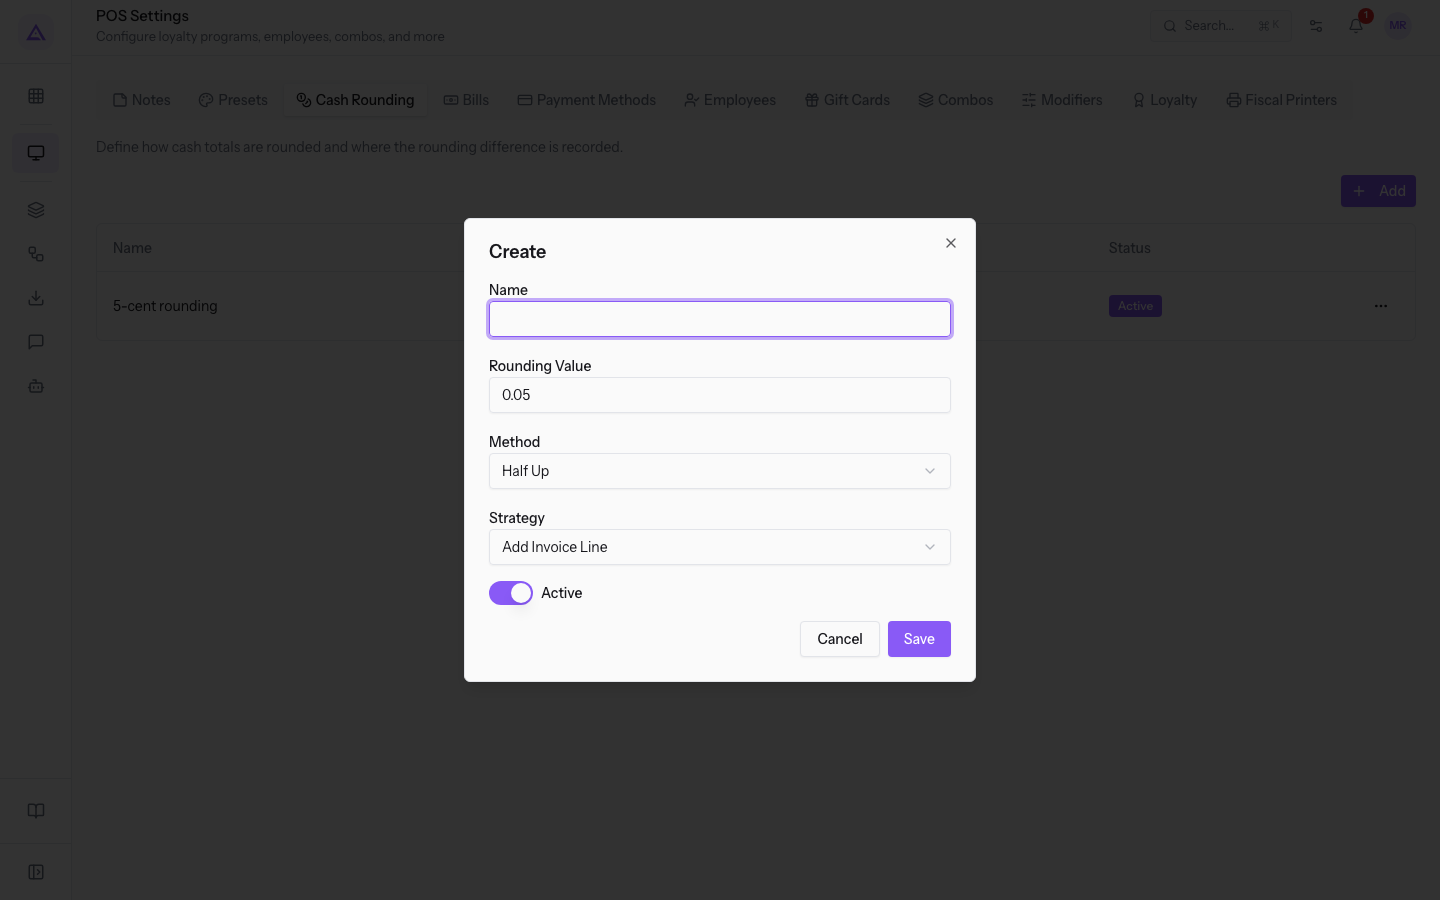
- Fill in the fields and press Save.
The fields in the window are:
- Name: the name of the rounding, for example
5-cent rounding. The field is required. - Rounding Value: the rounding step. The suggested value is
0.05. - Method: how rounding is done.
- Round Up: rounds up.
- Round Down: rounds down.
- Half Up: rounds to the nearest value. This is the suggested option.
- Strategy: how the rounding enters the document. The options are Add Invoice Line and Modify Biggest Tax.
- Active: the rounding is active. The toggle is on when you open the window.
Till staff
On the Employees tab, you add cashiers and managers and choose which tills each one works on. You can also give a PIN for switching users. In the demo, the till staff are Julia Green and Martin Ross, with the role Manager, and Sarah Colman, with the role Cashier. None of the three has a PIN.
Choose the role based on what the person must do at the till:
- If the person records orders and payments, choose Cashier.
- If they must also approve sensitive operations, choose Manager. Discounts above the threshold, refunds and cancellations ask for a manager's PIN, if the till requires it.
Note: the till asks for a PIN only if it is set up to. Without a PIN, opening, closing and cash movements do not record who made them. With a PIN, the person who opens and closes the till stays on record.
- Open the Employees tab.
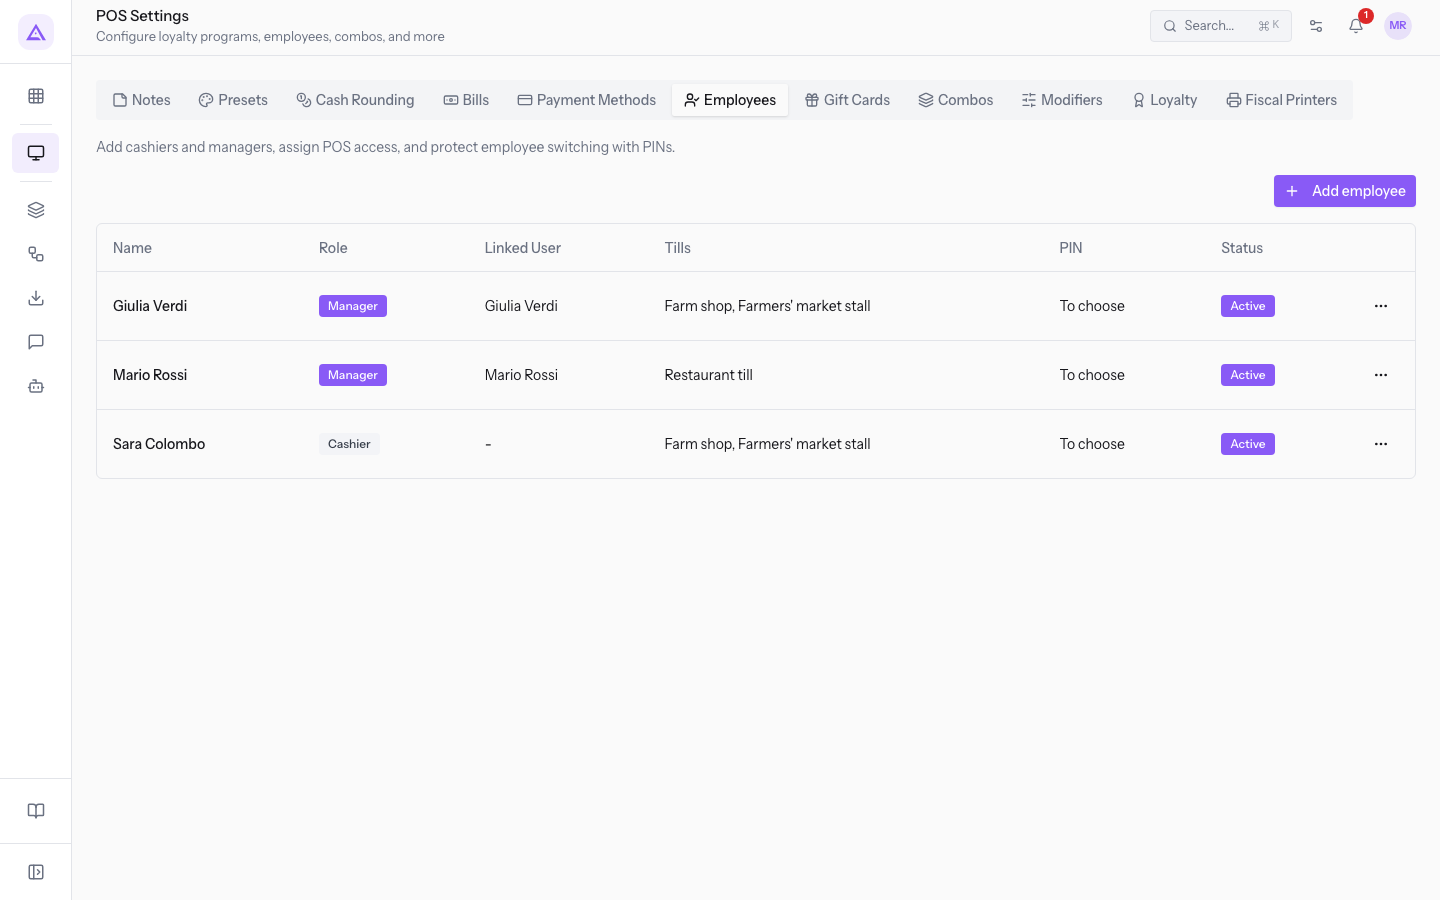
- Press Add employee. The New employee window opens.
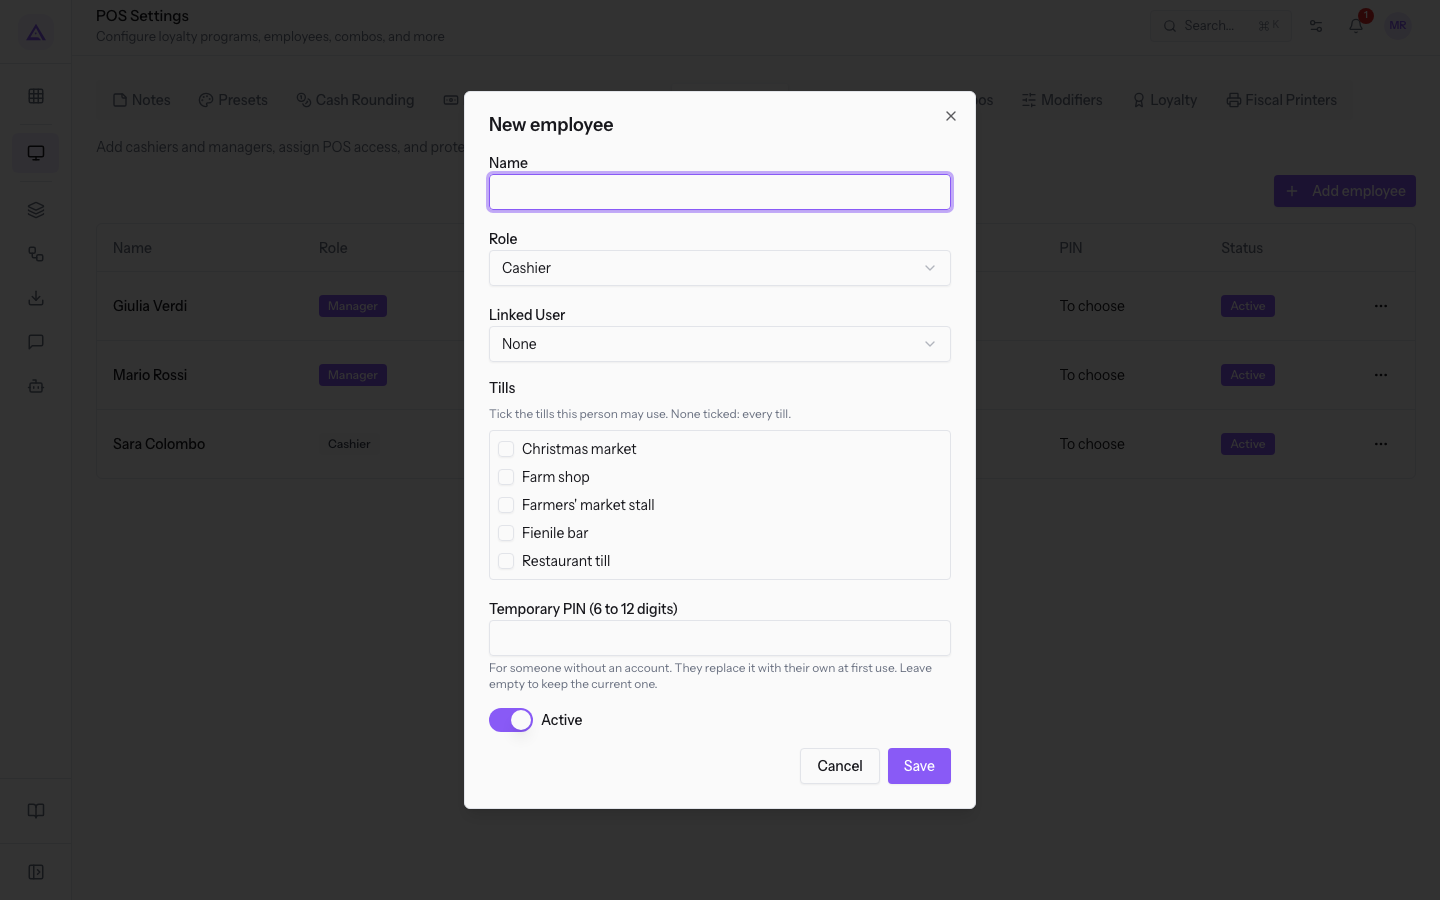
- Fill in the fields and press Save.
The fields in the window are:
- Name: the person's name. The field is required.
- Role: Cashier or Manager. The suggested value is Cashier.
- Linked User: the organization user who corresponds to the person, for example Julia Green. Choose None if the person has no access.
- Tills: tick the tills this person can work on. If you tick none, the person can work on all tills.
- Temporary PIN (6 to 12 digits): this field is not required. The first time the person uses the PIN, the till asks them to choose their own.
To change the details of a person already added, open the actions menu on their row. The menu contains:
- Edit: opens the window with the person's details.
- Reset PIN: the current PIN stops working immediately. The person chooses a new one the next time they use it, at the till with a manager's approval or in their own area.
- Deactivate: the person's PIN no longer works.
- Delete: removes the person from the till staff.
Quick notes
Quick notes are ready-made phrases that staff add to an order. You can offer a note on all tills or only on some.
Important: order notes, including allergies reported to the kitchen, are health data. They are deleted after thirty days, while the order remains.
- Open the Notes tab.
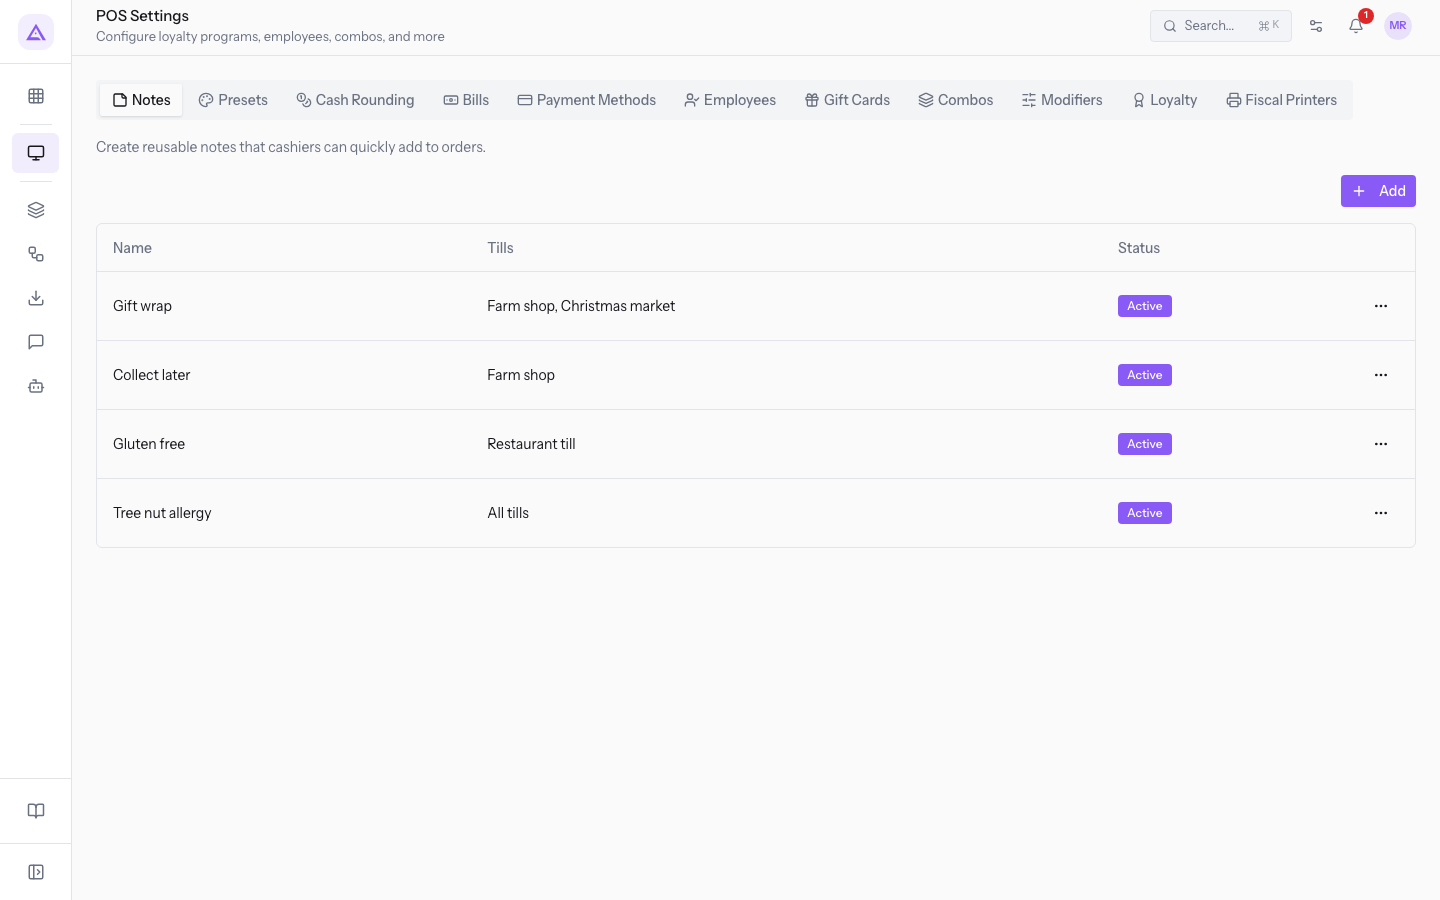
- Press Add. The Create window opens.
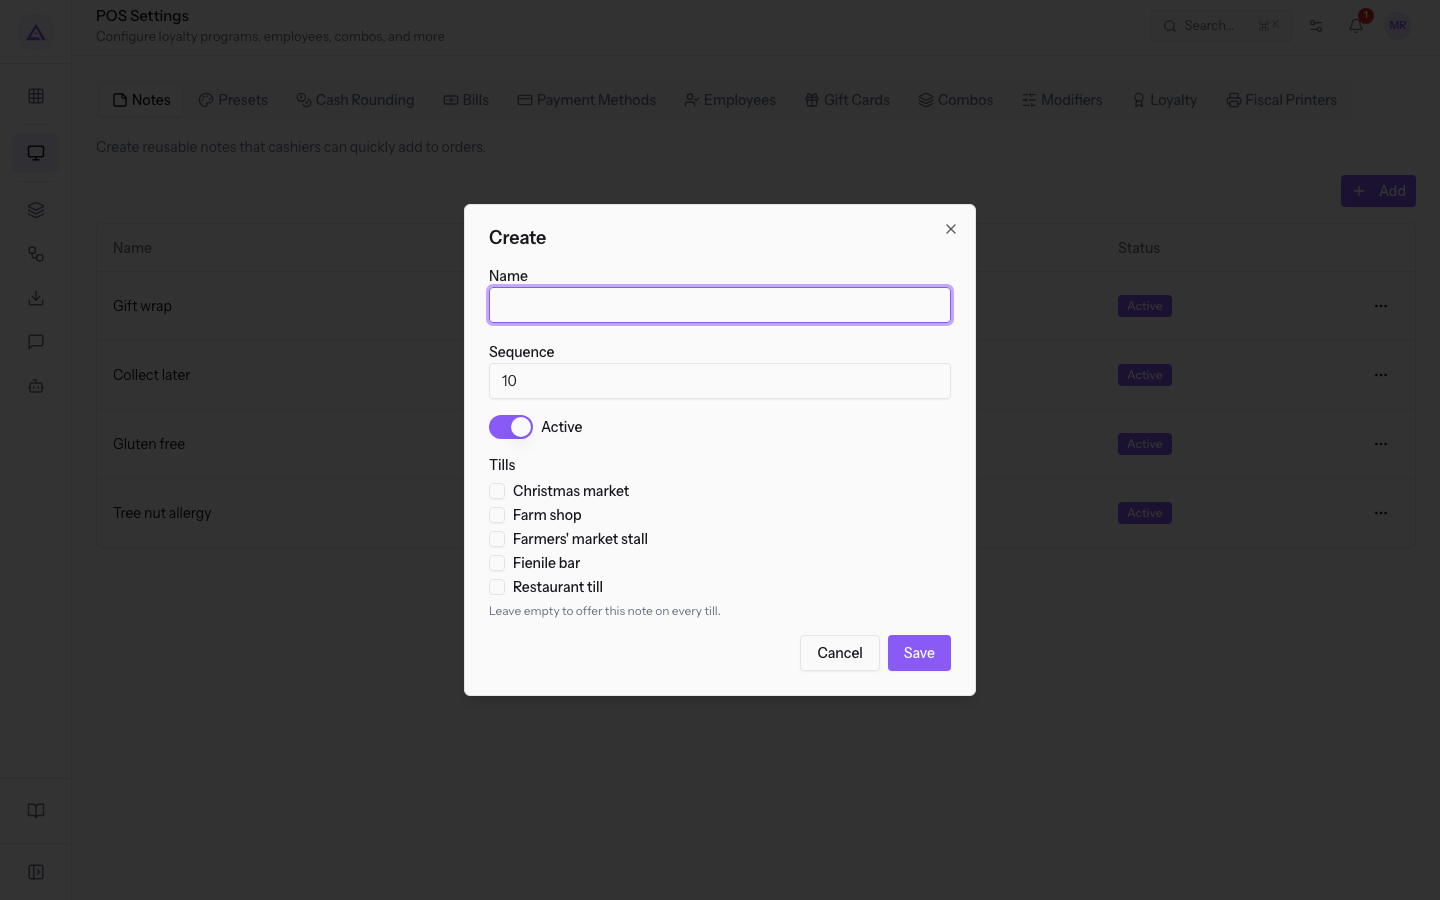
- Fill in the fields and press Save.
The fields in the window are:
- Name: the text of the note. The field is required.
- Sequence: the note's position in the list. The suggested value is
10. - Active: the note is offered at the till. The toggle is on when you open the window.
- Tills: the tills where the note is offered, for example Farm shop. If you tick none, the note is offered on all tills.
To use notes at the till, see the article «Apply discounts, notes and custom prices».
Presets
A preset is a way of serving the order at a till. In the demo, the Restaurant till has the presets At the table and Takeaway.
- Open the Presets tab.
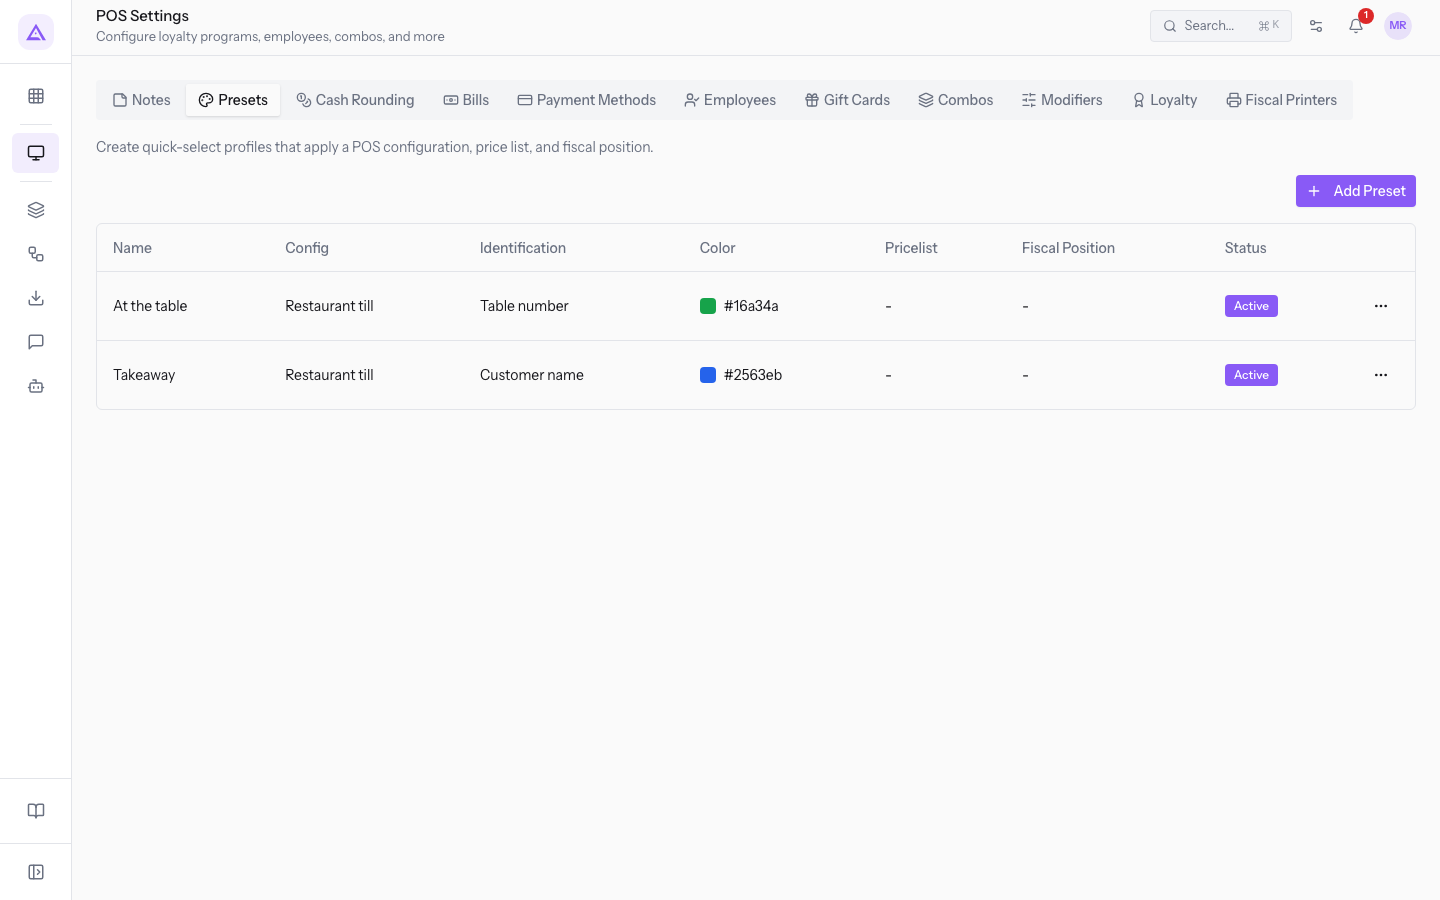
- Press Add Preset. The Create Preset window opens.
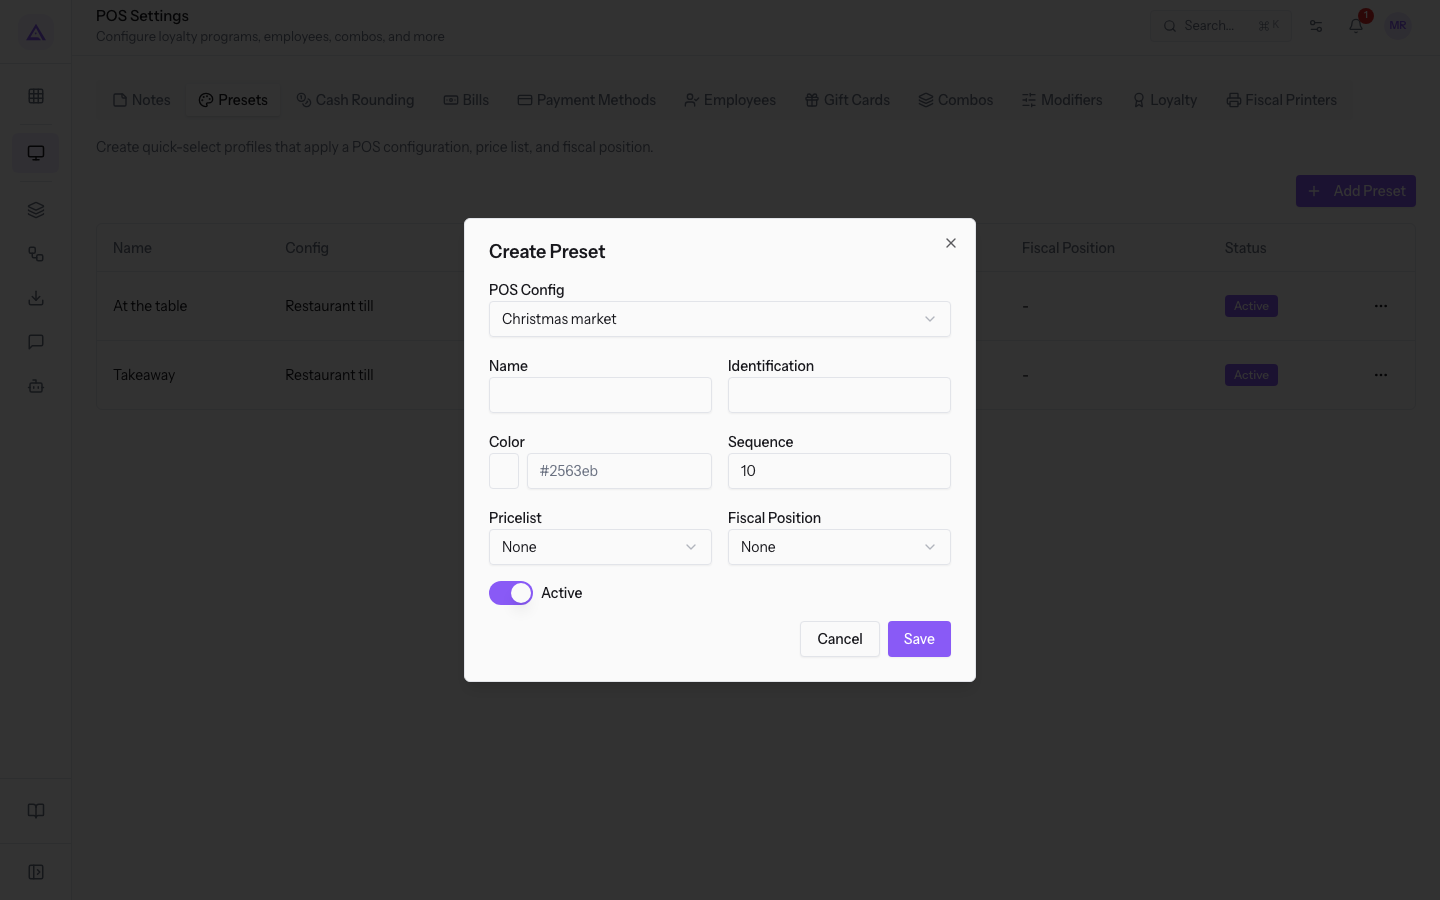
- Fill in the fields and press Save.
The fields in the window are:
- POS Config: the till where the preset is used.
- Name: the name of the preset, such as Takeaway.
- Identification: the suggested value is None.
- Color: the color of the preset at the till, written as a code, for example
#2563eb. - Sequence: the position of the preset among the till's presets.
See it on your company, not on a slide deck.
In 30 minutes we map the software you use today.We show you how much work and how much margin Archimedes gives back.
Show me on my business →What industry are you in?
One tap — it lets us prepare the demo around your world.
What tools do you use today?
Pick the ones you recognise — or just type them. It helps us show you how they migrate.
Last step: your details.
We reply within one working day — and right after, if you like, you pick the demo slot yourself.
We couldn't send your request. Try again, or write to us at [email protected].
By sending, you agree to your data being processed so we can get back to you about the demo. Privacy notice.
Preview form — nothing is sent from this page.
Want to schedule the demo now?
Your call: book the slot you prefer yourself, or we'll call you to arrange it.
Live availability, 30 minutes, instant confirmation. The calendar opens in a new tab.
Lock in your slot ↗We'll get back to you within one working day — and we'll join the call already knowing your world.
The calendar is open in another tab: pick a slot and the demo is booked. Can't see it? Reopen it ↗
Preview page: nothing was sent.
Our calendar is live: take the slot that suits you and the demo is booked. 30 minutes, instant confirmation, no waiting.
Lock in your slot ↗