Appointments
All modules
Opening an appointment and changing its status
Appointments · 4 of 16 · 5 min read
The appointment detail view shows date, time, location, assigned person, linked event, and contacts. From here you can advance the appointment — for example, confirm a site visit for a wedding, mark a video call as completed, or cancel a tasting.
The statuses of an appointment are Scheduled, Confirmed, Completed, Canceled, and No Show. A manually created appointment starts as Scheduled. An online booking arrives already Confirmed.
- If the meeting has been confirmed with the contact, choose Confirm.
- If the meeting has taken place, choose Complete.
- If the meeting will no longer take place, choose Cancel: the appointment remains on record and its time slot becomes available again.
- If the appointment was created by mistake — for example, a duplicate — choose Delete.
Opening the appointment detail view
The detail view opens from the appointments list.
- Open Appointments.
- Click List view.
- In the Search appointments... field, type the title — for example «Site visit for the Grape harvest festival». The list updates as you type.
- Click the appointment.
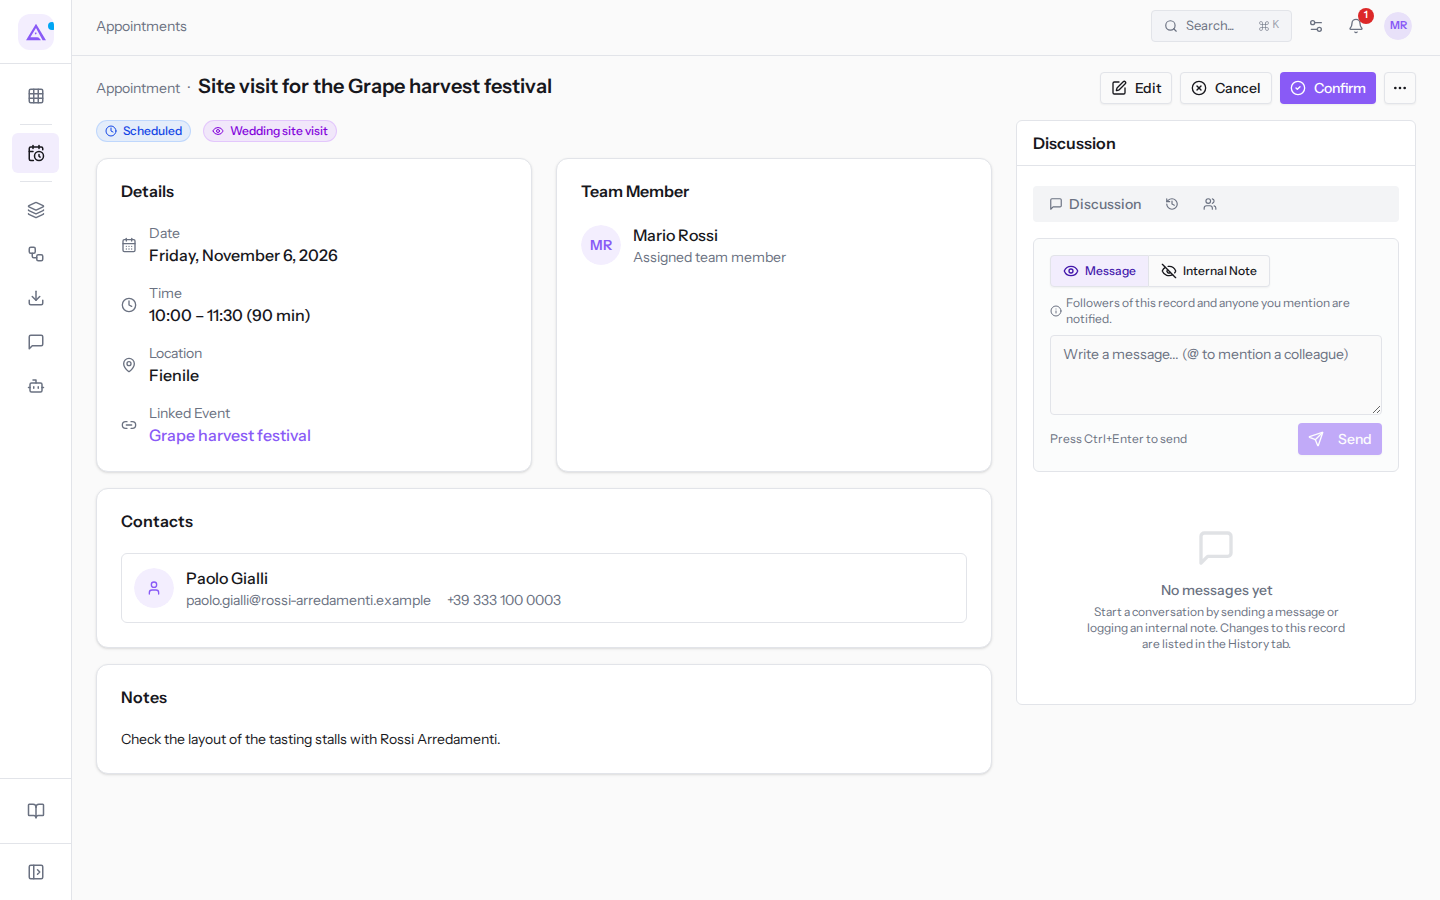
The detail view contains:
- The header: the title, status, and appointment type — for example Scheduled and «Wedding site visit». On the right are the action buttons, which change depending on the status, and the ⋯ (More actions) icon.
- Details: Date and Time — for example Thursday, November 5, 2026 from 10:00 to 11:30 — and, if provided, Location and Linked Event — for example «Grape harvest festival». Click the event to open it.
- Team Member: the primary assigned person. Other assigned people are shown in the Edit dialog.
- Contacts: the appointment's contacts, with email and phone number.
- Notes and, if present, Invitees.
- On the right, the Discussion column with the Discussion, History, and Followers tabs.
Actions by status
The buttons in the header depend on the appointment's status.
- Scheduled: Edit, Cancel, Confirm, and the More actions menu, which contains Complete, Add to my calendar, and Delete. For example «Site visit for the Grape harvest festival».
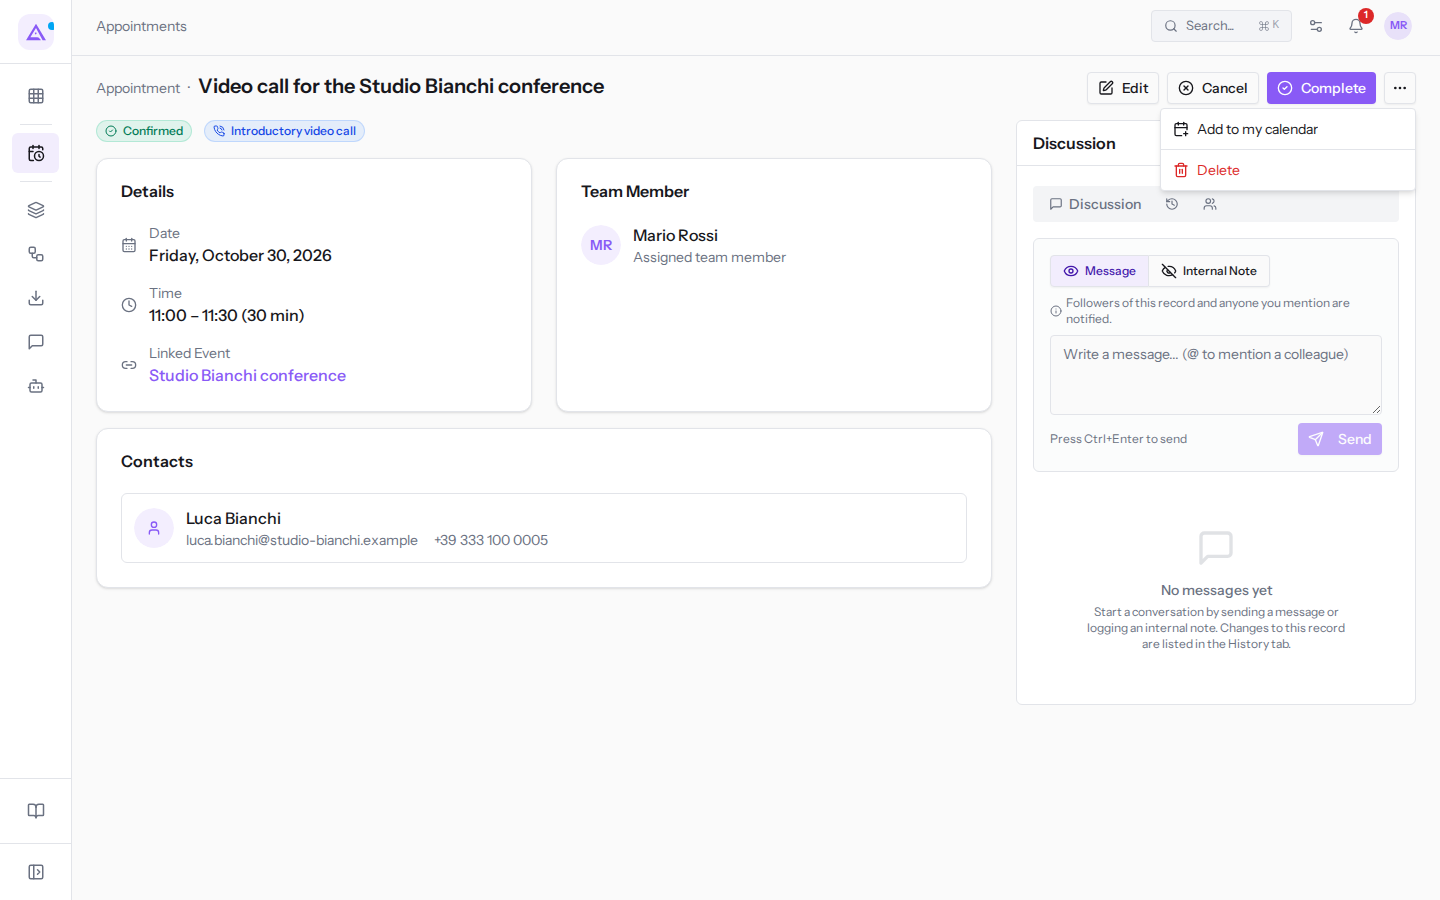
- Confirmed: Edit, Cancel, Complete, and the More actions menu, which contains Add to my calendar and Delete. For example «Video call for the Studio Bianchi conference».
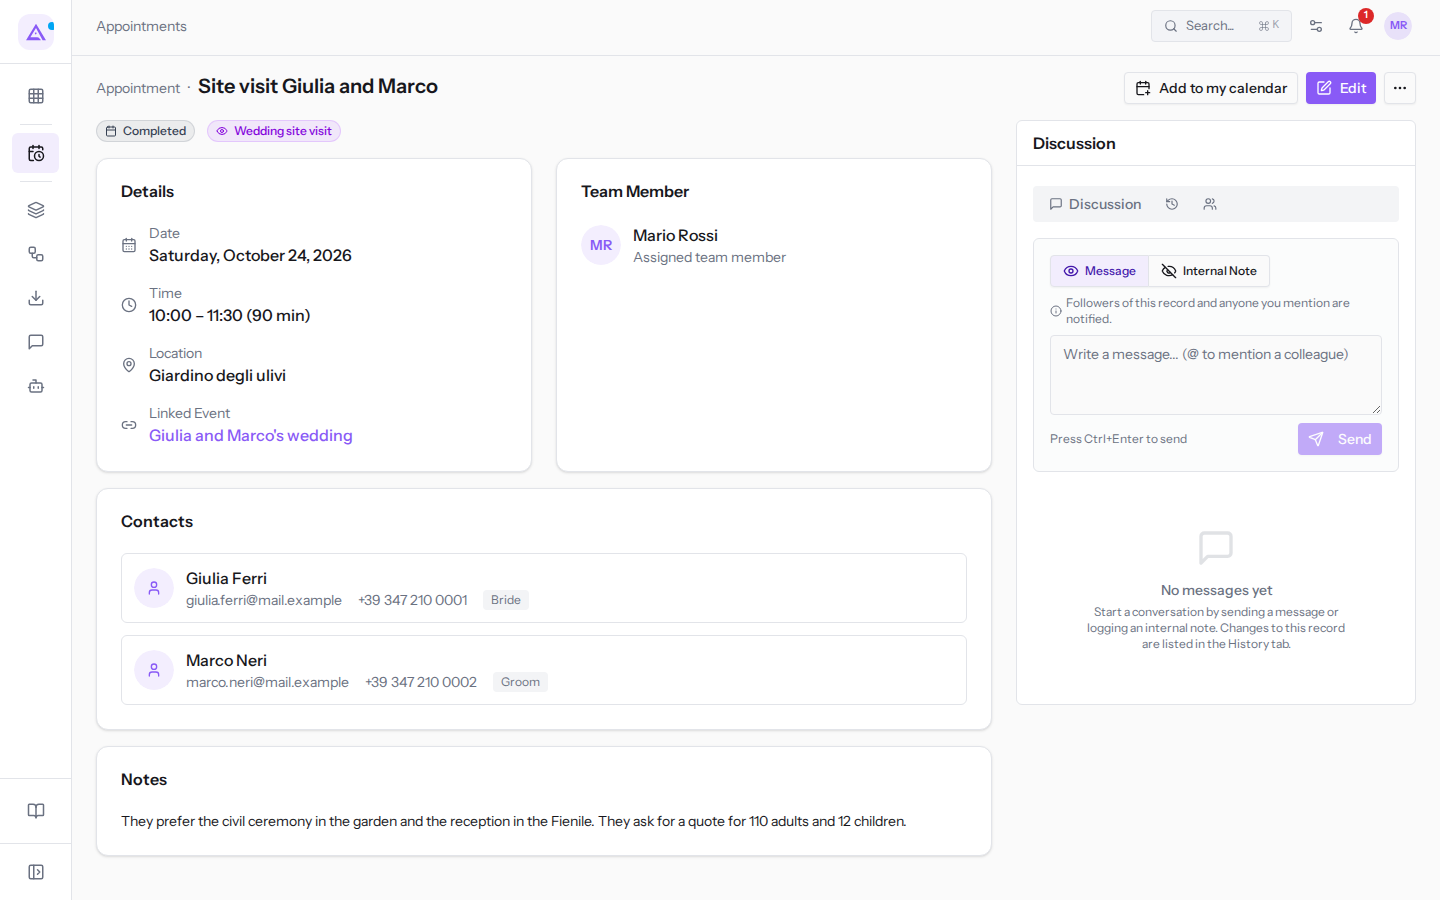
- Completed and Canceled: Add to my calendar, Edit, and the More actions menu, which contains Delete. For example «Site visit Giulia and Marco».
Note: a completed or canceled appointment no longer has buttons to change its status. Edit remains available.
Confirming an appointment
Confirm a scheduled appointment when the meeting has been agreed upon with the contact.
- Open the detail view of an appointment in Scheduled status — for example «Site visit for the Grape harvest festival».
- Click Confirm. The status becomes Confirmed and Complete appears in the header.
Completing an appointment
Complete a confirmed appointment after the meeting has taken place.
- Open the detail view of an appointment in Confirmed status — for example «Video call for the Studio Bianchi conference».
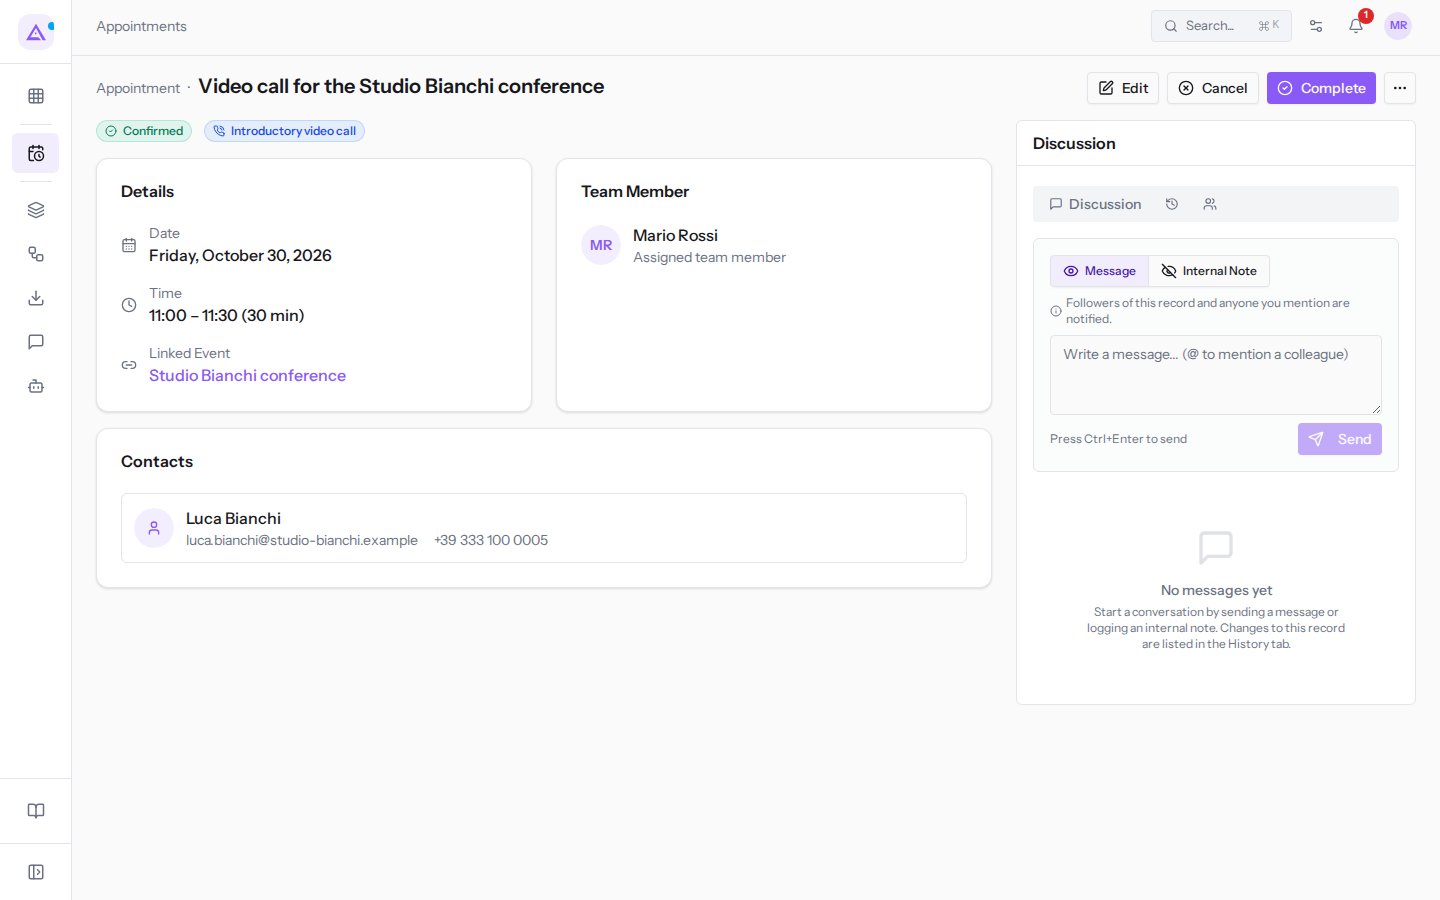
- Click Complete. The status becomes Completed.
A completed appointment shows only Add to my calendar, Edit, and More actions.
Canceling an appointment
Cancel a scheduled or confirmed appointment that will not take place. The appointment is not deleted: it remains with Canceled status and its time slot becomes available again in the assigned person's calendar.
- Open the appointment detail view.
- Click Cancel. The status becomes Canceled and the message Appointment status: Canceled appears.
You can also cancel an appointment from the list: in List view or Grid view, hover over the appointment, click the ⋯ (More actions) icon, and then click Cancel. When asked Cancel this appointment?, click Cancel appointment; clicking Keep it leaves everything unchanged.
Note: an appointment linked to a CRM meeting activity also updates that activity when it is canceled or completed.
Adding an appointment to your calendar
Add to my calendar downloads an .ics file with the appointment, which you can open in your calendar application.
- Open the appointment detail view.
- If the appointment is Scheduled or Confirmed, click the ⋯ (More actions) icon. In other statuses the button is already in the header.
- Click Add to my calendar.
Deleting an appointment
Delete an appointment only if it should not exist — for example, a duplicate. For a meeting that will not take place, use Cancel, which keeps the appointment on record.
Note: only administrators and Appointments module managers can delete appointments. Other users see the Delete option, but the deletion will fail.
- Open the appointment detail view.
- Click the ⋯ (More actions) icon, then click Delete.
- When asked Delete this appointment?, click Delete.
The appointment disappears from the calendar and all filters, but remains tracked in the appointment log — for example, a duplicate of «Site visit Giulia and Marco».
Discussion and history
In the Discussion column, to the right of the detail view, there are three tabs. The History and Followers tabs are shown as icons, next to Discussion.
- Discussion: choose Message or Internal Note, write the text, and click Send. With Message, followers and colleagues you mention with @ receive a notification.
- History: the appointment's changes, grouped by day.
- Followers: the people following the appointment.
See it on your company, not on a slide deck.
In 30 minutes we map the software you use today.We show you how much work and how much margin Archimedes gives back.
Show me on my business →What industry are you in?
One tap — it lets us prepare the demo around your world.
What tools do you use today?
Pick the ones you recognise — or just type them. It helps us show you how they migrate.
Last step: your details.
We reply within one working day — and right after, if you like, you pick the demo slot yourself.
We couldn't send your request. Try again, or write to us at [email protected].
By sending, you agree to your data being processed so we can get back to you about the demo. Privacy notice.
Preview form — nothing is sent from this page.
Want to schedule the demo now?
Your call: book the slot you prefer yourself, or we'll call you to arrange it.
Live availability, 30 minutes, instant confirmation. The calendar opens in a new tab.
Lock in your slot ↗We'll get back to you within one working day — and we'll join the call already knowing your world.
The calendar is open in another tab: pick a slot and the demo is booked. Can't see it? Reopen it ↗
Preview page: nothing was sent.
Our calendar is live: take the slot that suits you and the demo is booked. 30 minutes, instant confirmation, no waiting.
Lock in your slot ↗