Appointments
All modules
Scheduling a new appointment
Appointments · 3 of 16 · 6 min read
An appointment records a meeting with one or two contacts, for example a site visit for a wedding, a menu tasting, or an informational video call. You can create it from the full Schedule Appointment dialog or, quickly, directly from the calendar grid.
Which way to choose
The full dialog and the quick panel create the same appointment, but show different fields.
- If you need to specify the contact, a linked event, or a reminder, use the Schedule Appointment dialog.
- If you are already looking at the calendar and want to set the time slot as you see it, click on the time slot in the Calendar view. With More options you switch to the full dialog and carry the title, type, location, date, time, and notes with you.
A new appointment starts in the Scheduled state. It occupies the time of the primary assigned person: if it overlaps with another commitment of the same person, creation is rejected.
Creating an appointment from the full dialog
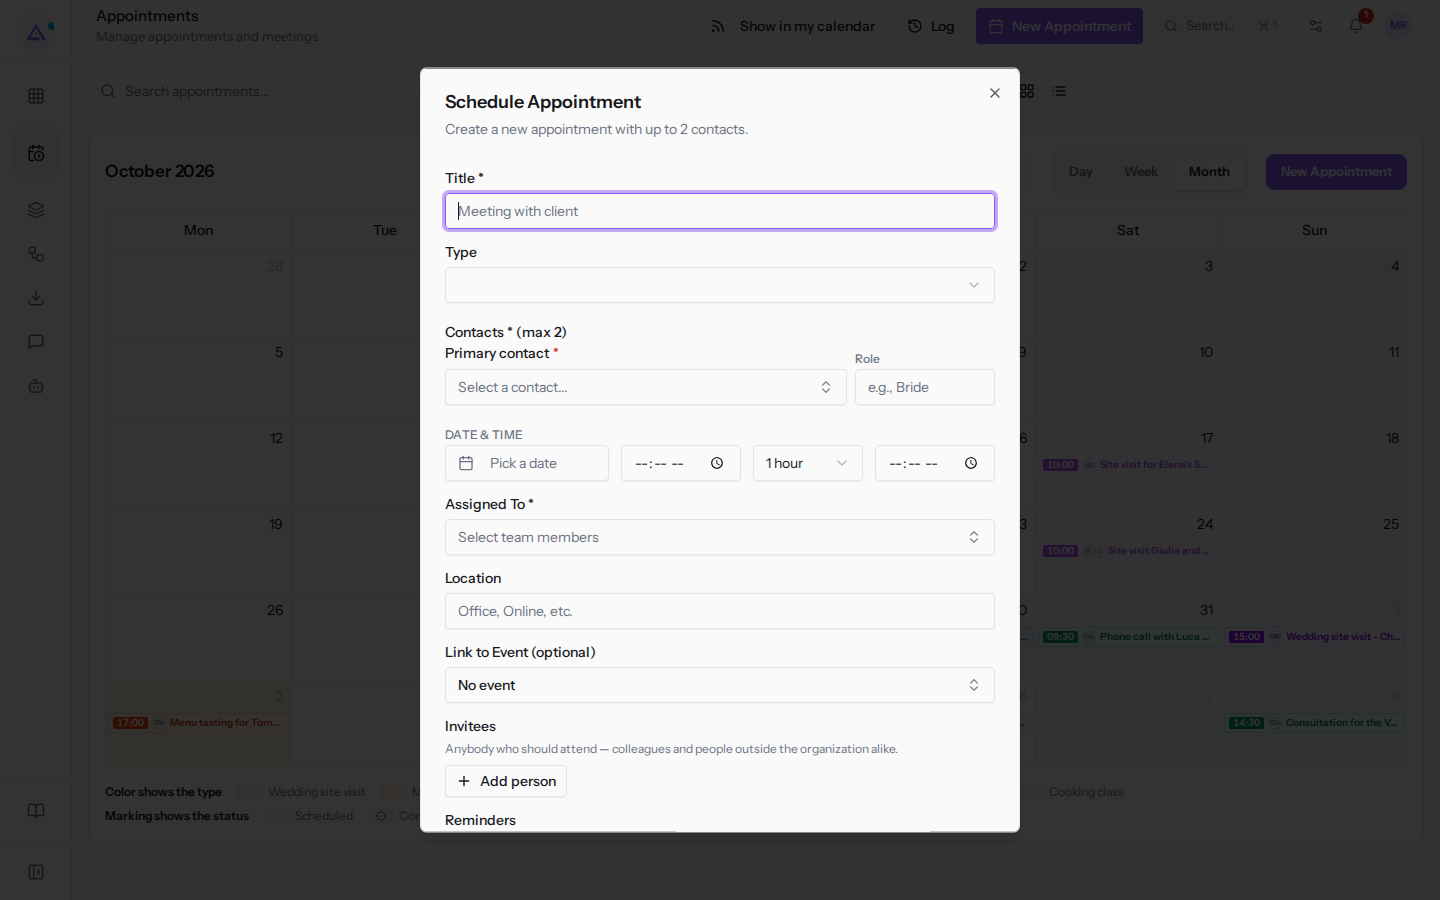
The Schedule Appointment dialog contains all appointment fields. It accepts at most 2 contacts.
- Open Appointments.
- Click New Appointment. The Schedule Appointment dialog opens, with the subtitle «Create a new appointment with up to 2 contacts.»
- Fill in the fields described below.
- Click Create Appointment. To close the dialog without saving, click Cancel.
If a required field is missing, the dialog stays open and shows the message Please fill in: followed by the missing data, for example Please fill in: Contact, Date, Start time.
Dialog fields
-
Title: the name of the appointment, for example
Video call with Luca Galli. The field is required. -
Type: the type of appointment. The options are the organization's types:
- Wedding site visit
- Menu tasting
- Introductory video call
- Guided farm tour
- Company events consultation
- Cooking class
On opening, the Default kind from the settings is already selected, for example Introductory video call.
-
Primary contact: the contact the appointment refers to. The menu lists contacts with email and phone number, for example Sara Conti. The field is required. You can search with Search contacts..., see more contacts with See more, or create one with Create new contact. The × icon (Clear selection) removes the selected contact.
-
Role: the field next to the contact, with the example e.g., Bride. The field is optional. Currently, the role entered here is not saved to the appointment.
-
Secondary contact (optional): appears only after the primary contact has been chosen. It also has a Role field, with the example e.g., Groom.
-
Date & Time: a row with four fields, in order: date, start time, duration, and end time.
-
Date: click Pick a date and choose the day from the calendar. The field is required.
-
Start time: the second field in the row. The field is required.
-
Duration: the third field in the row. The initial value is the Default length (minutes) from the settings, for example 1 hour. The options are:
- 30 min
- 1 hour
- 1.5 hours
- 2 hours
-
End time: the last field in the row. It is calculated from the start time and duration, but you can also enter it manually.
-
Assigned to: the people in the organization who will hold the appointment, for example Mario Rossi or Giulia Verdi. The field is required. The first person chosen is the primary one. After selection, the field shows how many people you have assigned, for example Assigned: 1, and next to each name the × icon to remove them, for example Remove Mario Rossi.
-
Location: where the meeting takes place, with the example Office, Online, etc. The field is optional.
-
Link to Event (optional): the event the appointment refers to. The initial value is No event. See the next section.
-
Invitees (with Add person) and Reminders: the invitees and reminders for the appointment. They are described in Inviting other people and scheduling reminders.
-
Notes: the free text for the appointment, with the example Any additional notes... The field is optional.
Linking the appointment to an event
Link the appointment to an event when the meeting is meant to help organize it, for example a tasting for Sara and Luca's wedding.
- In the Schedule Appointment dialog, click Link to Event (optional).
- Choose the event from the list. Each row shows the event's name, date, and customer, for example Grape harvest festival Oct 31, 2026 · Rossi Arredamenti S.r.l..
- To remove the selected event, click the × icon next to the field (Remove the linked event).
The list depends on the primary contact:
- If you have already chosen the primary contact, the list shows This contact's events. For example, with Sara Conti, Sara and Luca's wedding Nov 14, 2026 appears. For an event with a different customer, click Search all events.
- If you have not chosen the contact, the list shows All events.
After selection, the field shows the event's name and date, for example Grape harvest festival · Oct 31, 2026.
Creating an appointment from the calendar grid
In the Calendar view you can create an appointment starting from the time slot you see in the grid.
- Open Appointments and click Calendar view.
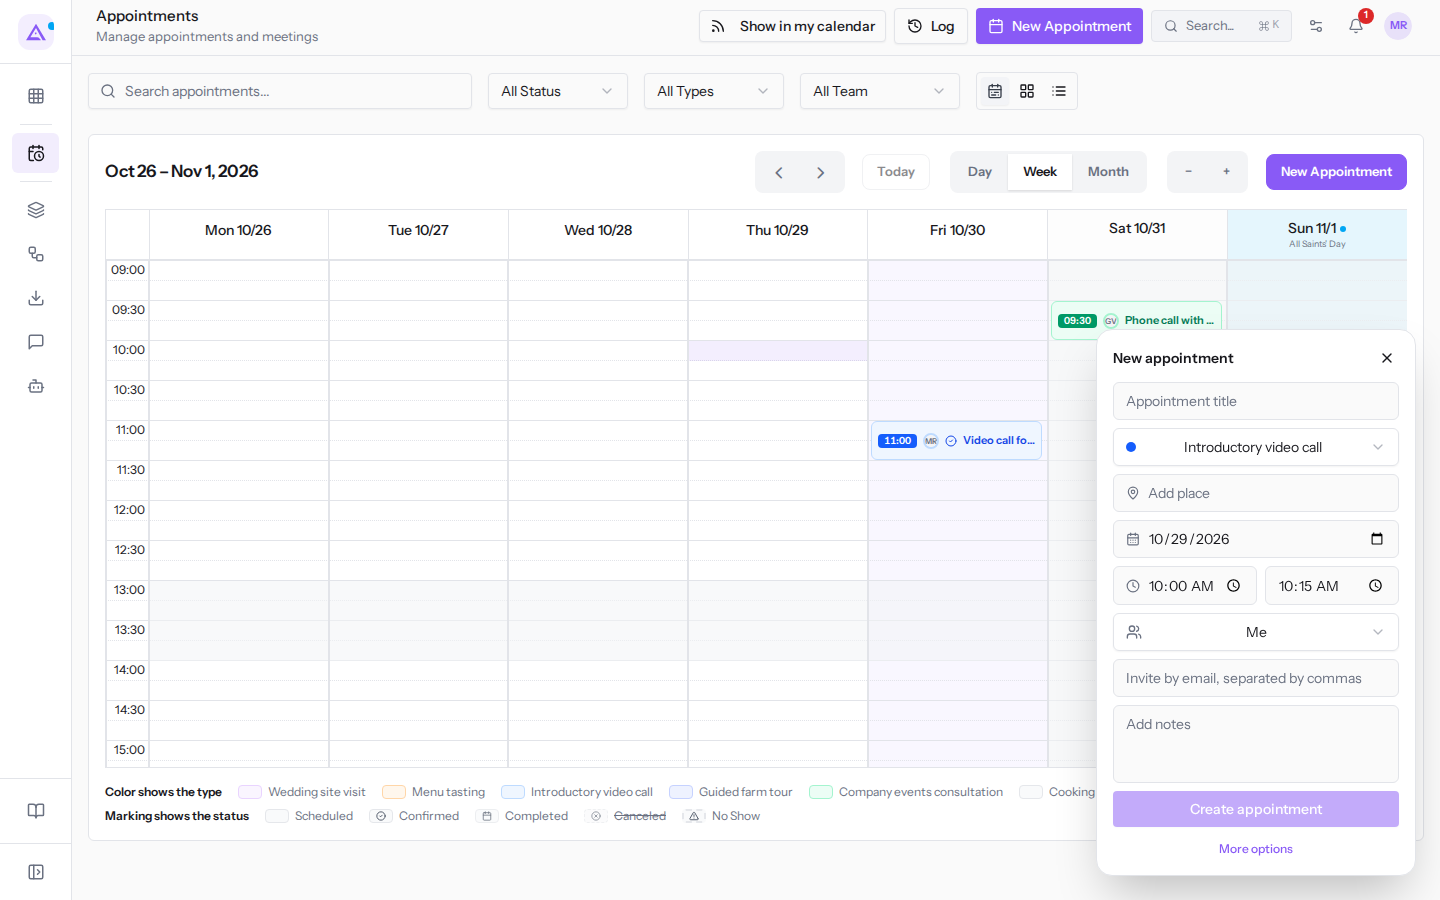
- Click the time slot where the appointment starts, for example 10:00, or drag the mouse from the start time to the end time. The New appointment panel opens, with the date and time already filled in. With a single click, the time covers a single grid slot, for example from 10:00 to 10:15.
- Fill in the fields and click Create appointment.
The panel fields have no label: from top to bottom they are as follows.
- Appointment title: the name of the appointment. The field is required.
- The appointment type: the same types as in the full dialog. On opening, the default type is selected, for example Introductory video call.
- Add place: where the meeting takes place.
- The date: the day of the selected slot.
- The start time and end time: the time of the selected slot.
- The assigned person: the initial value is Me. The other options are the people in the organization, for example Giulia Verdi and Mario Rossi.
- Invite by email, separated by commas: the email addresses of the people to invite.
- Add notes: the free text for the appointment.
The panel does not ask for the contact and does not have the fields for the linked event and reminders. To fill them in, click More options: the Schedule Appointment dialog opens with the title, type, location, date, time, and notes already entered.
Note: the addresses entered in Invite by email, separated by commas do not carry over to the full dialog, nor does the Me selection: after More options, add the invitees again and choose the people in Assigned to.
See it on your company, not on a slide deck.
In 30 minutes we map the software you use today.We show you how much work and how much margin Archimedes gives back.
Show me on my business →What industry are you in?
One tap — it lets us prepare the demo around your world.
What tools do you use today?
Pick the ones you recognise — or just type them. It helps us show you how they migrate.
Last step: your details.
We reply within one working day — and right after, if you like, you pick the demo slot yourself.
We couldn't send your request. Try again, or write to us at [email protected].
By sending, you agree to your data being processed so we can get back to you about the demo. Privacy notice.
Preview form — nothing is sent from this page.
Want to schedule the demo now?
Your call: book the slot you prefer yourself, or we'll call you to arrange it.
Live availability, 30 minutes, instant confirmation. The calendar opens in a new tab.
Lock in your slot ↗We'll get back to you within one working day — and we'll join the call already knowing your world.
The calendar is open in another tab: pick a slot and the demo is booked. Can't see it? Reopen it ↗
Preview page: nothing was sent.
Our calendar is live: take the slot that suits you and the demo is booked. 30 minutes, instant confirmation, no waiting.
Lock in your slot ↗