Attendance
All modules
Declaring hours worked without clocking in
Attendance · 5 of 16 · 5 min read
The Declared hours screen is for recording hours worked on days you did not clock in. You can declare several days of the same week, follow the approval, and withdraw a declaration that is still pending.
When to declare hours
A day is either clocked or declared, so the same hours are not counted twice. Choose based on what is already recorded for that day.
- If you did not clock in that day, declare the hours.
- If you already clocked in that day, you cannot declare it: the declaration is rejected on submit. To correct a time, use Attendance › My Attendance.
- If you declared a day, you cannot also clock it. If the declaration is still pending you can withdraw it; otherwise contact your manager.
Before you start: Declared hours must be among your recording modes. Otherwise, in place of the section, a message appears saying that declaring hours is not available and to contact the administrator. Recording modes are set in Attendance › Recording Modes.
The Declared hours screen
The screen contains the Declare a week section, for submitting hours, and the Declarations list, with what you have already submitted and its status. Anyone who can approve also sees the declarations of the people who report to them, and the Waiting for approval panel, with the Approve and Reject buttons.
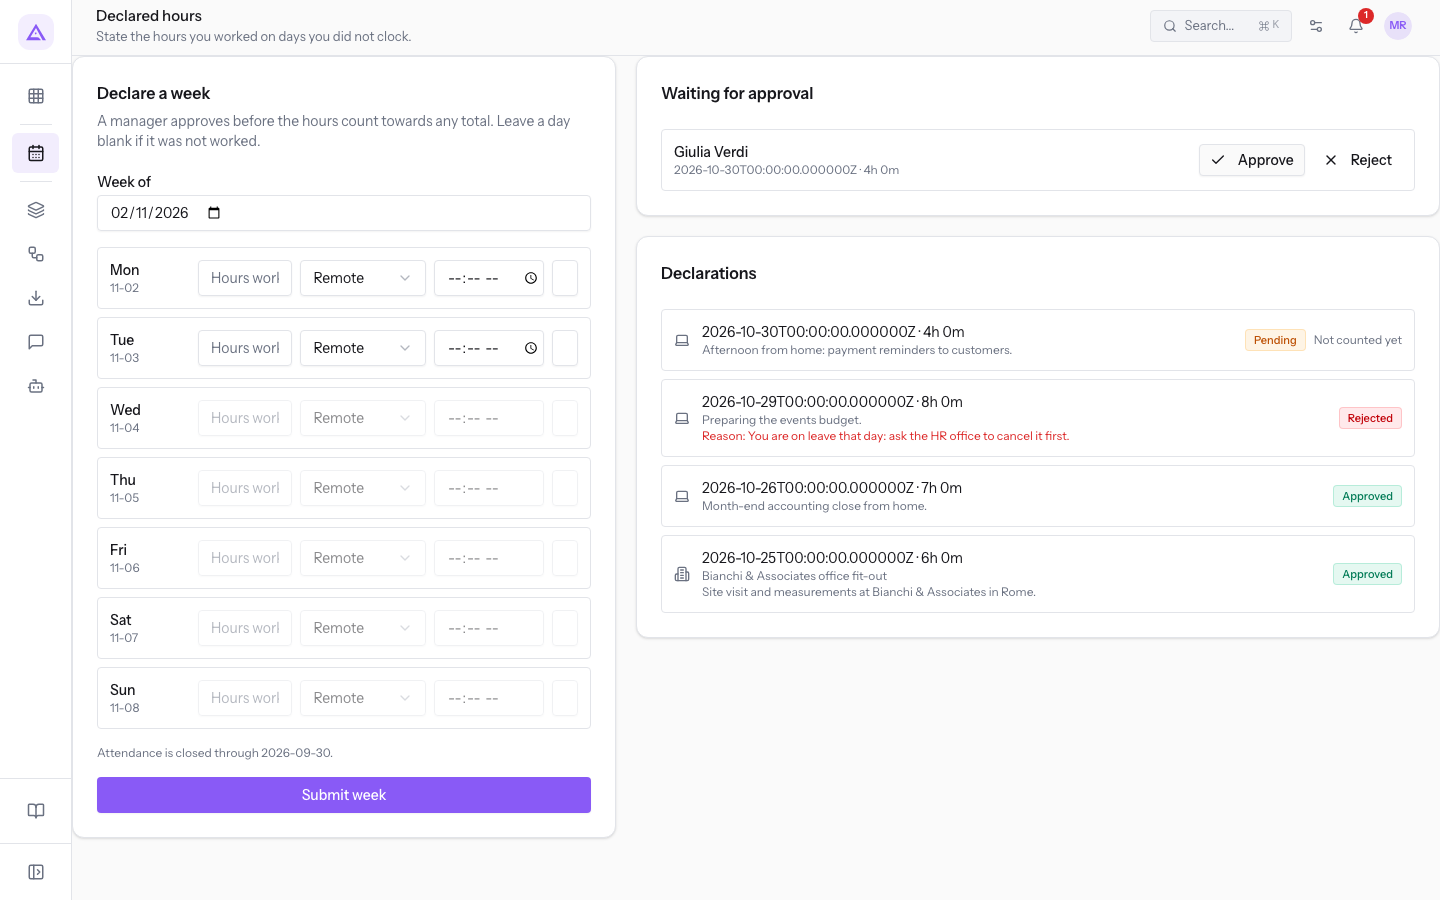
Note: the same panel is available in the personal time and attendance area of Human Resources, for those who have the module active and the Employee group.
Declaring a week
The section shows one row for each day of the chosen week and submits all the completed days together. A manager approves the hours before they are counted.
- Open Attendance › Declared Hours.
- In Week of choose a day of the week to declare. The section starts from the Monday of that week. If you change week, entered data that has not been submitted is cleared.
- Fill in the rows of the days worked and leave the others empty. An empty day creates no declaration.
- Press Submit week. Submitting requires hours for at least one day.
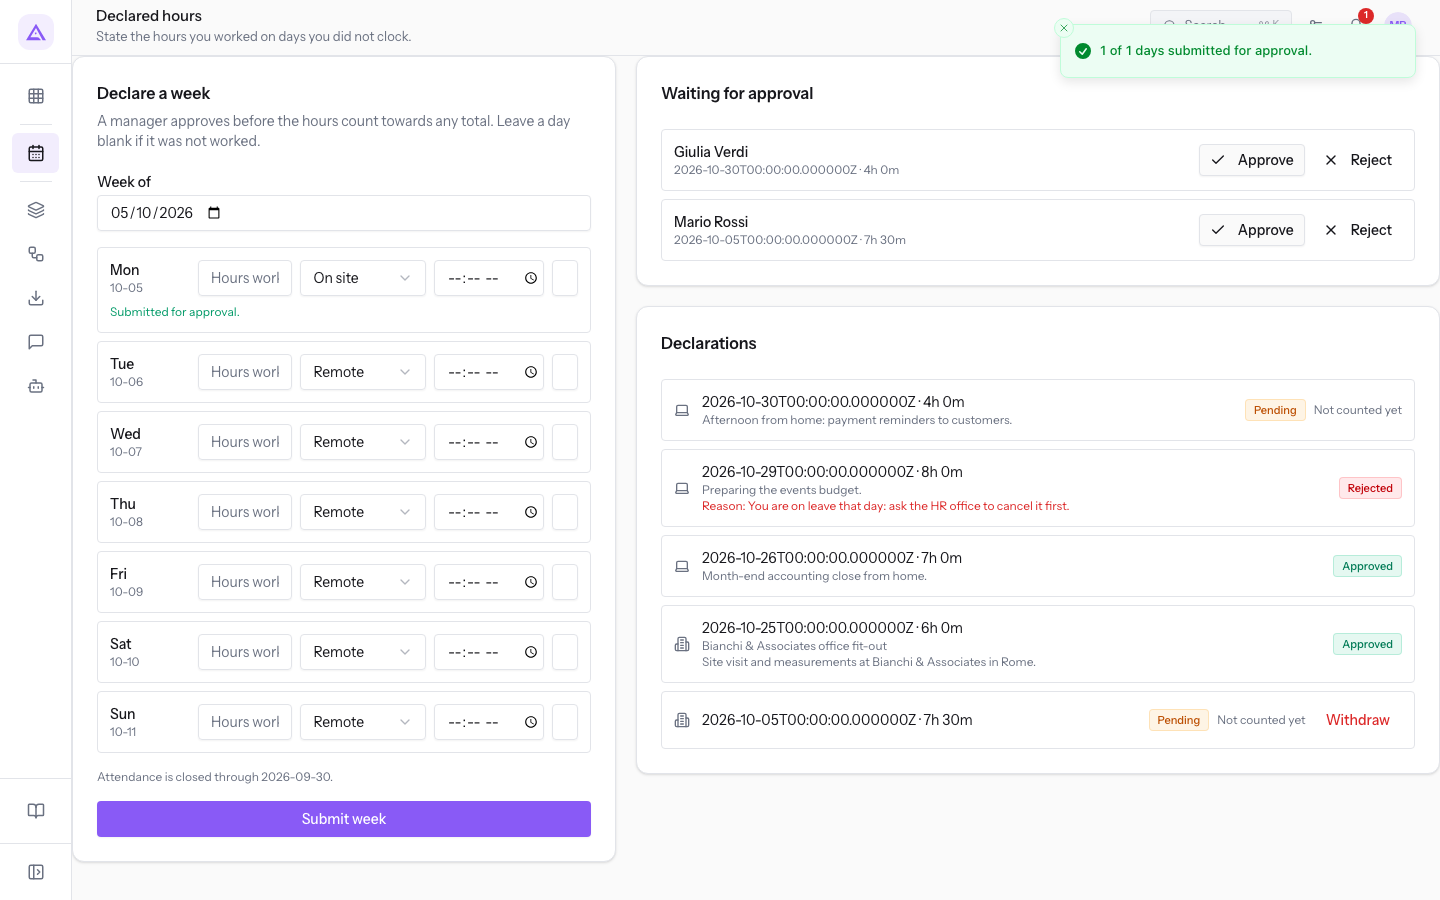
Fields of the section:
- Week of: the week to declare. On opening it is the current week. You cannot choose a future date.
Fields of each day:
- Hours worked: the hours worked on the day. The field is required to submit the day. Write decimals with a point: 7.5 for seven and a half hours.
- Remote or On site: where you worked that day. The initial value is Remote.
- Start time (optional): the time you started working.
- Note (optional): free text, shown on the declaration row.
Those with an active contractor contract, with the Projects module active, can also set Project (optional) and Task (optional) for each day.
Days you cannot declare
Some days cannot be submitted. The section blocks some of them before submission, and others are rejected after you press Submit week.
- Future days: the row cannot be filled in.
- Days in a closed period: above the Submit week button a notice appears with the attendance closing date, and rows up to that date cannot be filled in. The closed period is the one already delivered for payroll. To record a day in that period, the administrator must reopen it.
- Days already clocked: the day is not submitted and the row shows the result.
Checking the submission result
After Submit week, under each completed day its result appears. Submitted days are emptied. Days not submitted stay filled in, so you can correct them and submit again.
- Submitted for approval.: the day was submitted and appears in the Declarations list.
- Could not submit this day.: the day was not submitted. If the system gives a specific cause, the row shows that.
A notification summarises the submission, with 1 of 1 days submitted for approval. when one of one days was submitted. If some day did not pass, Some days could not be submitted — see details below. also appears. Valid days are submitted even if other days of the same week are rejected.
Following the status of declarations
The Declarations list shows for each row the day, the hours, the note and the status. A declaration counts in the totals only after approval.
- Pending: the manager has not decided yet. Next to the status Not counted yet appears and, on your own declarations, the Withdraw button. Giulia Verdi's 4 hours are in this state.
- Approved: the manager approved the hours. Giulia Verdi's 7 Remote hours are in this state.
- Rejected: the manager rejected the hours. Below the row a Reason appears with the explanation, such as «You are on leave that day: ask the HR office to cancel it first.» on Giulia Verdi's declaration.
If the declaration is linked to a project, the row shows its name and, if present, that of the task. Mario Rossi's Approved and On site declaration shows «Studio Bianchi office fit-out».
The declaration goes to the manager recorded in Human Resources, if active and with a login. Otherwise it goes to someone with authority over the whole organisation or to the Manager or Administrator group. Giulia Verdi's declarations go to Mario Rossi. Nobody approves themselves.
Withdrawing a declaration
Withdraw a declaration when you got the hours or the day wrong. Withdrawing frees the day, which you can declare again. You can only withdraw your own Pending declarations.
- In the Declarations list press Withdraw on the declaration's row.
- In the Withdraw this declaration? dialog press Withdraw to confirm, or Cancel to leave it pending.
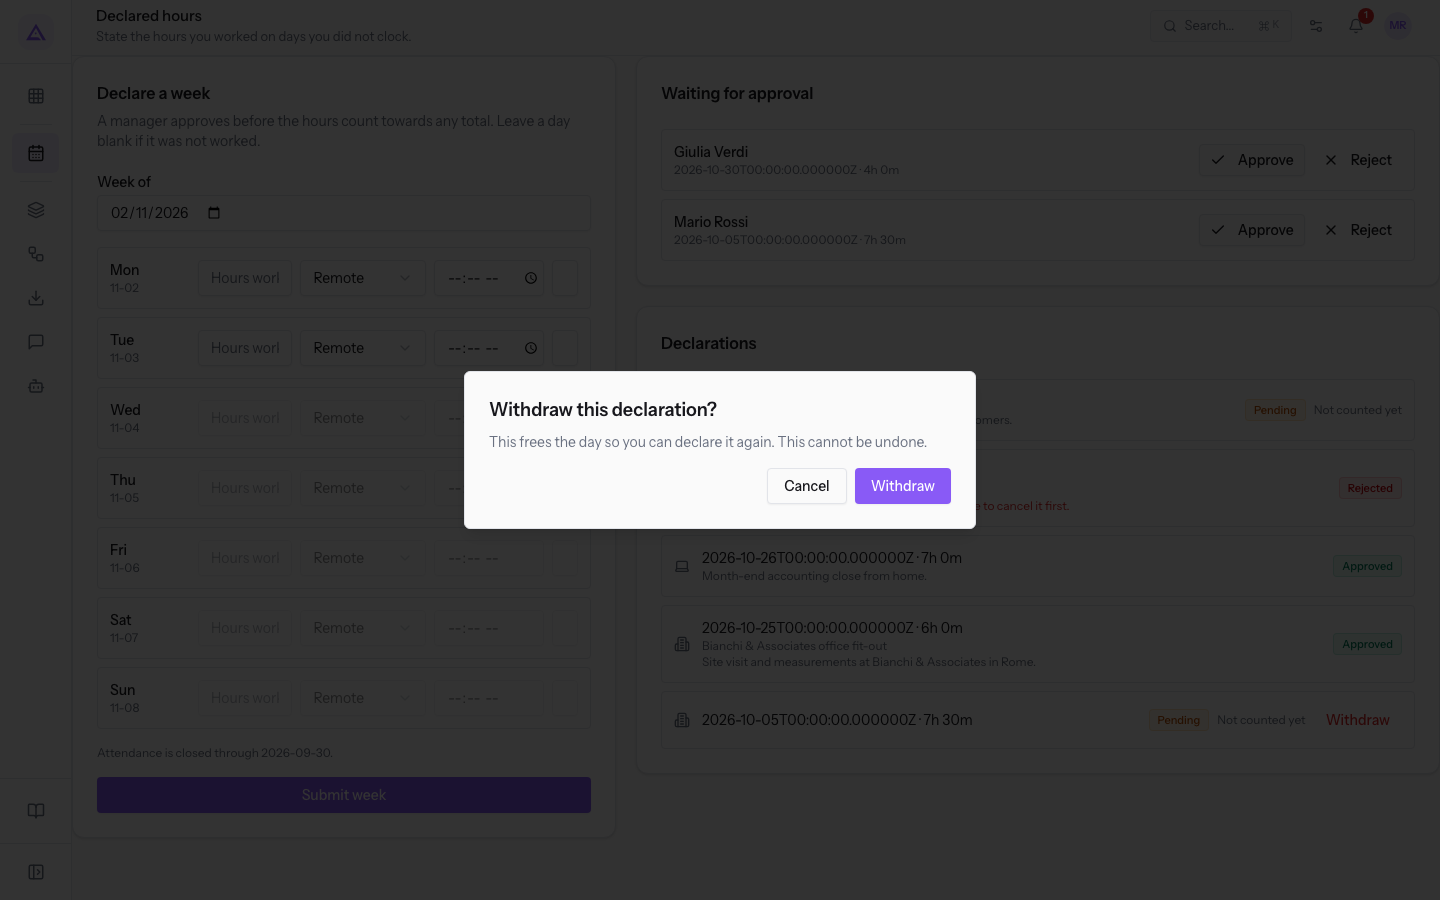
The message Declaration withdrawn. appears and the row leaves the list.
Important: withdrawal cannot be undone. To restore the hours you must declare the day again.
See it on your company, not on a slide deck.
In 30 minutes we map the software you use today.We show you how much work and how much margin Archimedes gives back.
Show me on my business →What industry are you in?
One tap — it lets us prepare the demo around your world.
What tools do you use today?
Pick the ones you recognise — or just type them. It helps us show you how they migrate.
Last step: your details.
We reply within one working day — and right after, if you like, you pick the demo slot yourself.
We couldn't send your request. Try again, or write to us at [email protected].
By sending, you agree to your data being processed so we can get back to you about the demo. Privacy notice.
Preview form — nothing is sent from this page.
Want to schedule the demo now?
Your call: book the slot you prefer yourself, or we'll call you to arrange it.
Live availability, 30 minutes, instant confirmation. The calendar opens in a new tab.
Lock in your slot ↗We'll get back to you within one working day — and we'll join the call already knowing your world.
The calendar is open in another tab: pick a slot and the demo is booked. Can't see it? Reopen it ↗
Preview page: nothing was sent.
Our calendar is live: take the slot that suits you and the demo is booked. 30 minutes, instant confirmation, no waiting.
Lock in your slot ↗