Attendance
All modules
Set up the entrance kiosk and employee PINs
Attendance · 13 of 16 · 7 min read
The Kiosks screen lets you create kiosks, which are the tablets at the entrance where employees clock in without signing in to the platform. You can also bind each kiosk to a tablet and manage employee PINs.
Before you start: managing kiosks requires the Administrator group of the Attendance module. The Door kiosk mode must be turned on in Attendance › Recording Modes. If it is off, the tablet shows The door kiosk is switched off.
The Kiosks screen
Attendance › Kiosks lists the organisation's kiosks and, below, the Employee PINs section.
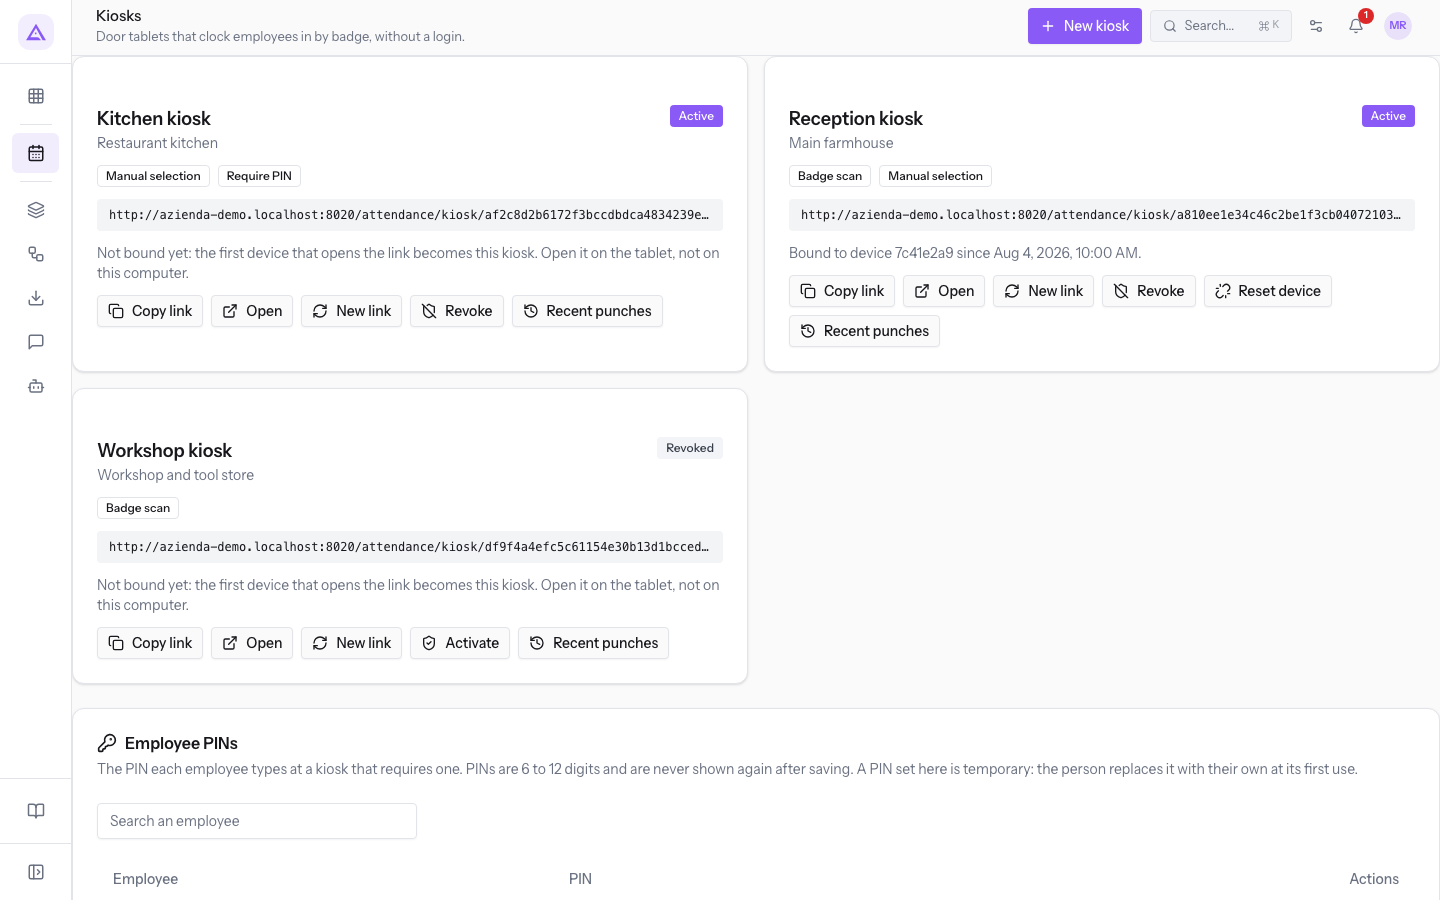
For each kiosk the screen shows:
- The name and the location.
- The status: Active or Revoked.
- The enabled methods: Badge scan, Manual selection, Require PIN.
- The kiosk link.
- The device: the ID of the bound device and the date it was bound, or Not bound yet: the first device that opens the link becomes this kiosk. Open it on the tablet, not on this computer.
- The buttons Copy link, Open, New link, Revoke or Activate, Reset device, and Recent punches.
A kiosk cannot be deleted. When you no longer need it, revoke it, so the punches it recorded keep their origin.
Choosing how employees identify themselves
The kiosk methods decide what the tablet shows and what the employee does to clock in.
- If employees have a badge and the tablet has a badge reader, turn on Badge scan.
- If employees do not have a badge, turn on Manual selection: the tablet shows the list of names.
- If you want to verify who clocks in, add Require PIN: after the badge or the name choice, the tablet asks for the PIN.
- If you want to offer both ways, turn on Badge scan and Manual selection: the tablet shows them side by side.
Important: with Manual selection and without Require PIN, choosing a name records the punch immediately, with no check on the person.
Creating a kiosk
Create one kiosk for each tablet. The location must already exist in Attendance › Locations.
-
In Attendance › Kiosks, press New kiosk.
-
Enter the name, choose the location, and turn on the methods. "Kitchen kiosk" uses the location
Restaurant kitchenwith Manual selection and Require PIN.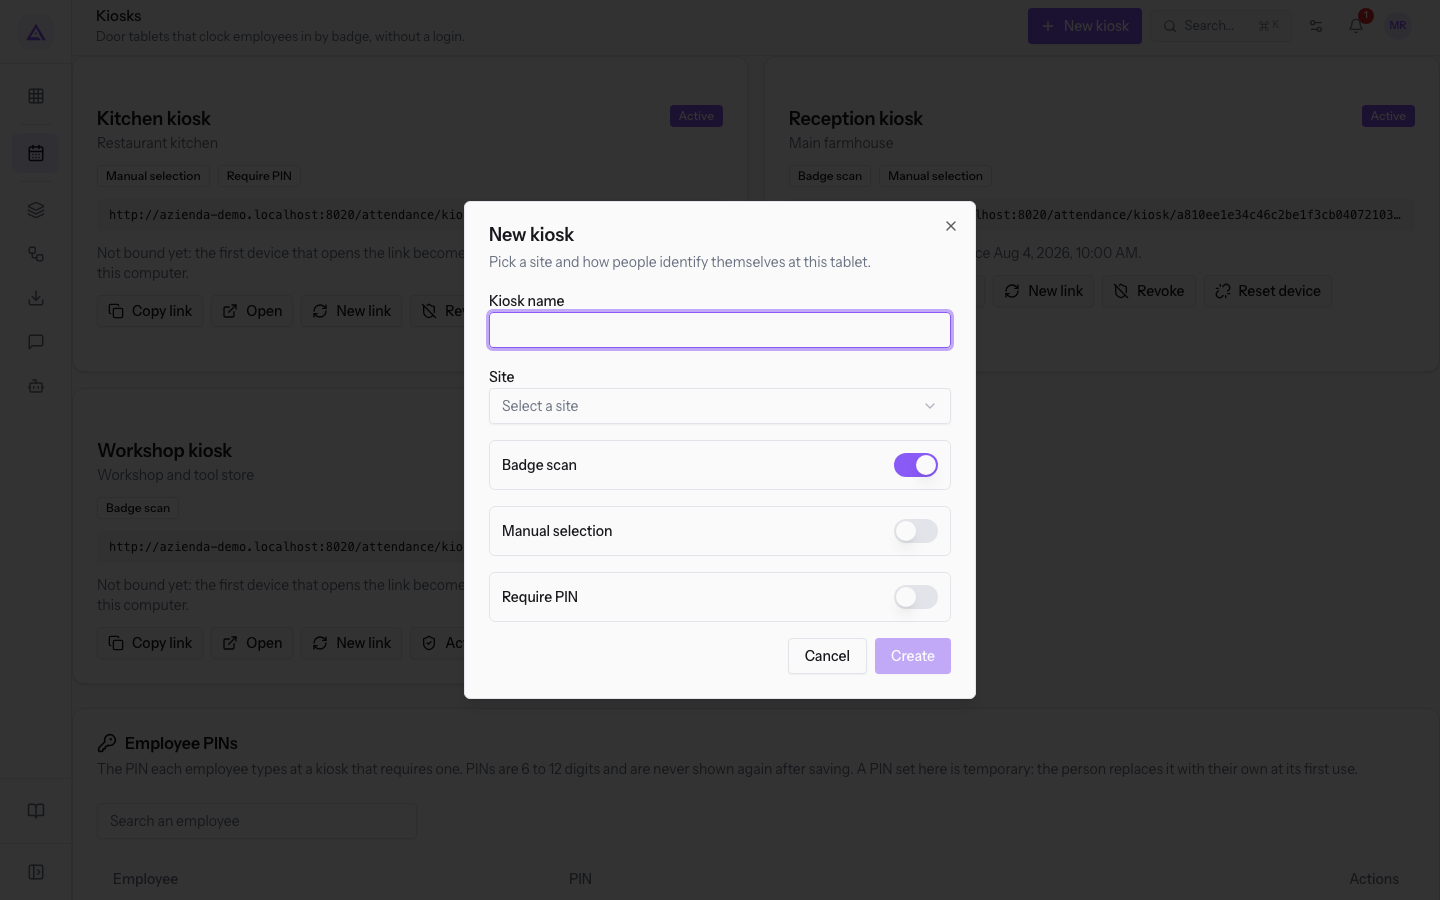
-
Press Create. The message Kiosk created. appears and the kiosk is added to the list.
The fields in the New kiosk window:
- Kiosk name: the name that identifies the kiosk on the screen and on the tablet. The field is required.
- Site: the work location of the kiosk. The tablet shows the location name at the top. The list includes inactive locations, such as
Pool bar. The field is required. - Badge scan: the tablet shows the Scan your badge area. The option is on when you open the window.
- Manual selection: the tablet shows the list of names, that is, the active employees assigned to the kiosk's location and those with no assignments. The option is off when you open the window.
- Require PIN: the employee types the PIN after the badge or the name choice. The option is off when you open the window.
Note: Create stays disabled while the name or the location is missing, or if both Badge scan and Manual selection are off. Require PIN alone is not enough.
Binding the kiosk to the tablet
The kiosk link is its credential: the tablet does not require a sign-in. The first device that opens the link becomes the kiosk.
- In the kiosk card, press Copy link. The message Kiosk link copied. appears.
- Open the link on the tablet.
- Check that the kiosk card shows the bound device and the binding date.
Important: Open opens the link on the device you are using. On a kiosk not yet bound, that device becomes the kiosk: press Open only if you are on the tablet.
After binding, the link works only on that tablet. Another device sees This kiosk is set up on another device and receives no kiosk data, not even the employee list.
Replacing the link, revoking, or resetting the device
These three commands have different effects on the tablet.
- If the link has reached someone who should not have it, use New link.
- If the kiosk must no longer record punches, use Revoke.
- If you change tablet, use Reset device.
Generating a new link
New link replaces the kiosk link and immediately blocks the current one.
- In the kiosk card, press New link. The message A new kiosk link was issued. appears.
- Press Copy link and open the new link on the tablet.
Important: New link acts without asking for confirmation. The tablet stops recording punches until you open the new link.
Revoking or reactivating a kiosk
Revoke sets the kiosk to Revoked and the tablet can no longer use the link. The tablet shows This kiosk link is invalid or has been revoked.
- In the kiosk card, press Revoke. The message Kiosk revoked. appears.
- To set the kiosk back to Active, press Activate, as on "Workshop kiosk". The message Kiosk activated. appears.
Note: Revoke and Activate also act without asking for confirmation.
Resetting the device
Reset device disconnects the tablet from the kiosk, without changing the kiosk. The button appears only on kiosks that are already bound.
- In the kiosk card, press Reset device. A confirmation window opens with the kiosk name and the text The tablet currently bound to this kiosk will stop working. The next device that opens the kiosk link becomes the kiosk.
- Confirm with Reset device. The message Kiosk device reset. appears.
- Open the link on the new tablet.
Checking the latest punches
Recent punches shows, below the kiosk card, the punches recorded by that kiosk, so you can check that the tablet is recording. The same button closes the list.
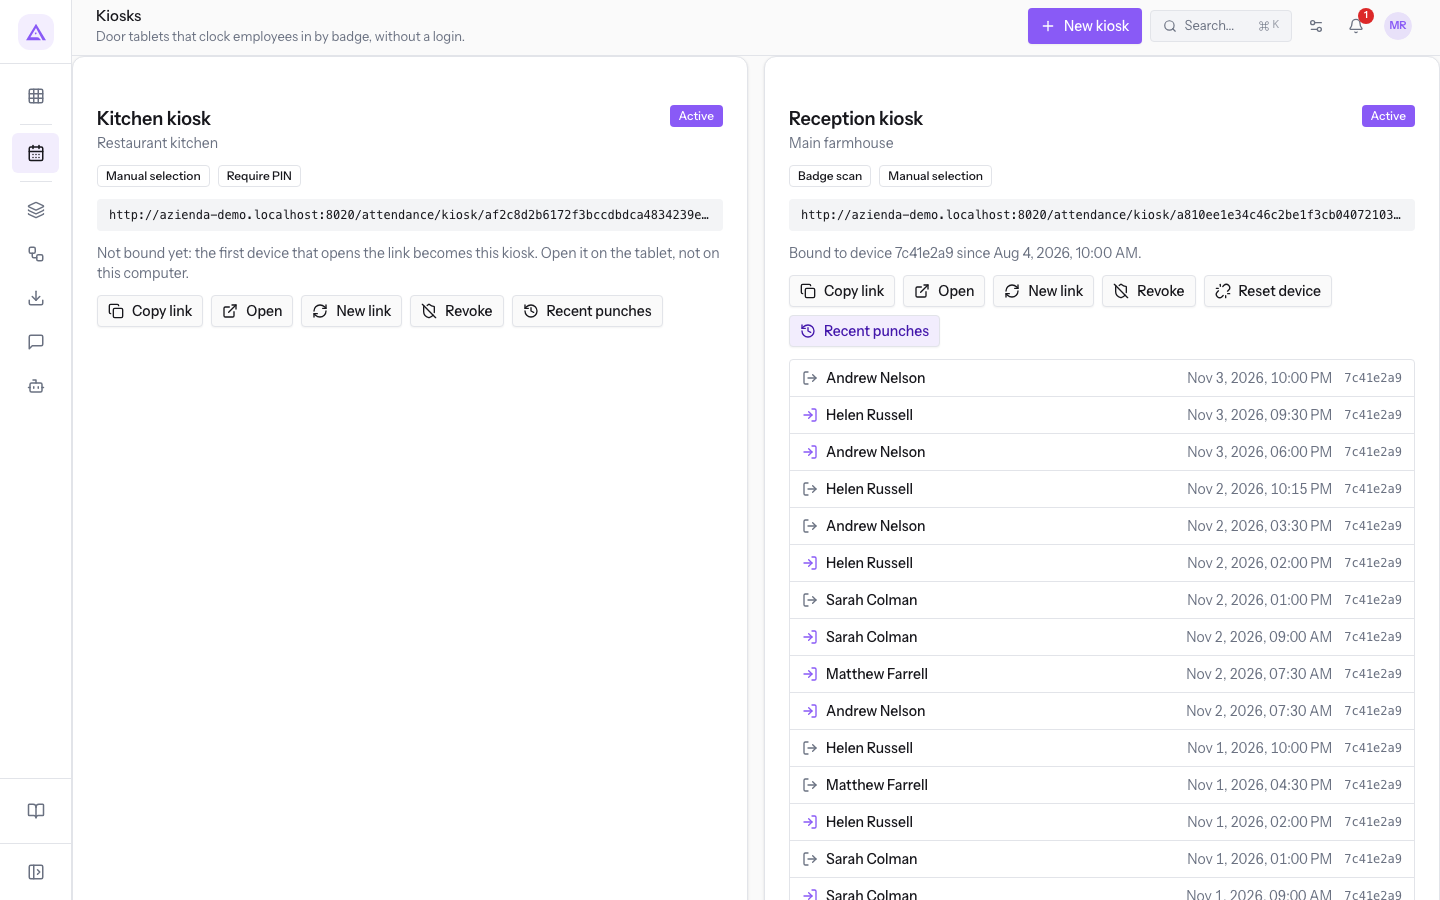
Each row shows a clock-in or clock-out icon, the employee name, the date and time, and the device ID. On a kiosk with no punches, the message No punches recorded at this kiosk yet. appears.
Setting an employee's PIN
The PIN is needed on kiosks with Require PIN. An employee without a PIN cannot clock in on these kiosks: the tablet shows No PIN set. Ask your administrator.
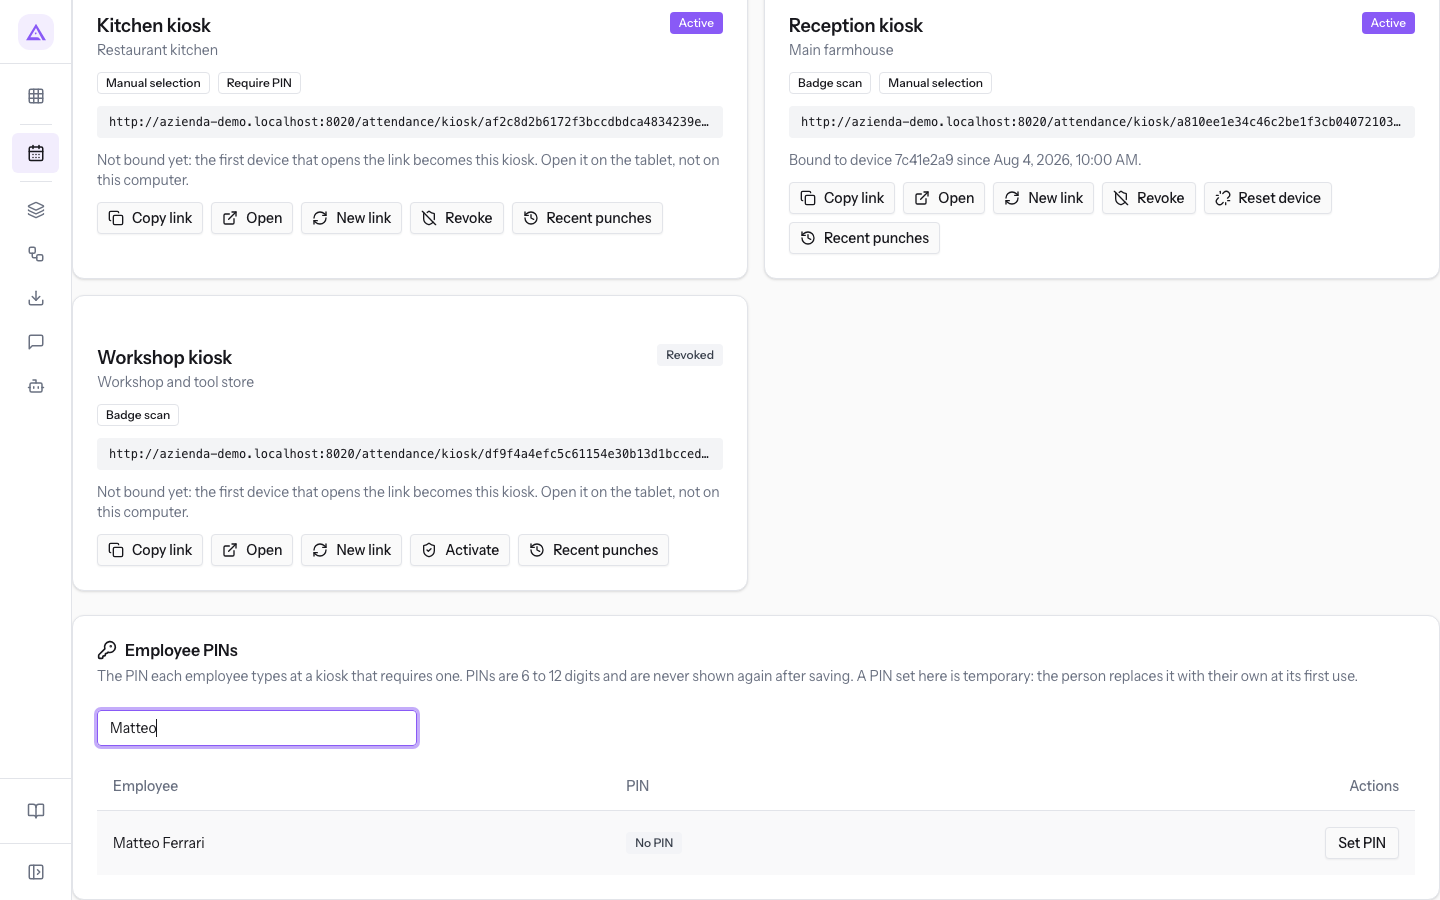
The Employee PINs section lists the employees, including those without a platform login, such as Andrea Neri. The Search an employee field filters the list. The columns are:
- Employee: the name.
- PIN: PIN set or No PIN. A temporary PIN shows PIN set, as Elena Russo's does.
- Actions: Set PIN for those without a PIN. Reset PIN and More actions for those who have one.
-
In Search an employee, type the name, then press Set PIN on the employee's row, as for Matteo Ferrari.
-
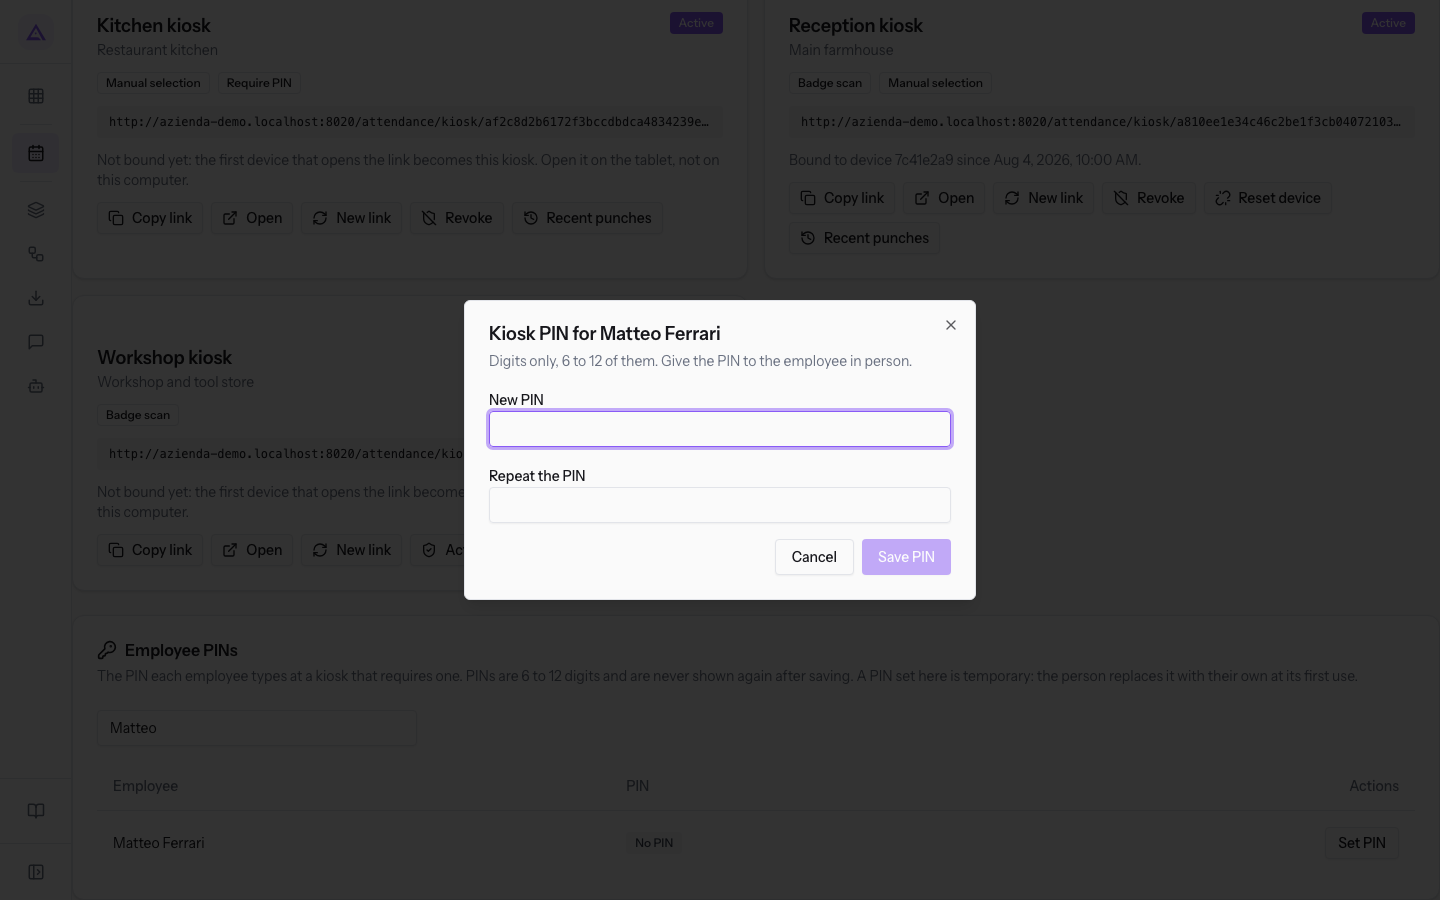
In the PIN window, which shows the employee's name, fill in the fields and press Save PIN. The message PIN saved. appears.
-
Tell the PIN to the employee in person.
The fields in the window:
- New PIN: digits only, from 6 to 12.
- Repeat the PIN: the same PIN. If the two values differ, the message The two PINs do not match. appears.
Note: after saving, the PIN is no longer shown. If the employee forgets it, set a new one with Reset PIN.
The PIN set here is temporary. On first use, the tablet asks the employee to type a new PIN twice, from 6 to 12 digits.
Resetting or removing a PIN
Reset the PIN when the employee has forgotten it. Remove it when the employee must no longer clock in on kiosks with Require PIN.
To reset the PIN:
- On the employee's row, press Reset PIN. The same PIN window opens.
- Fill in New PIN and Repeat the PIN, then press Save PIN. The new PIN is temporary.
To remove the PIN:
- On the employee's row, press More actions, then Remove PIN. A confirmation request opens with the employee's name and the text They will not be able to clock at kiosks that require a PIN until a new one is set.
- Confirm. The message PIN removed. appears and the row returns to No PIN.
See it on your company, not on a slide deck.
In 30 minutes we map the software you use today.We show you how much work and how much margin Archimedes gives back.
Show me on my business →What industry are you in?
One tap — it lets us prepare the demo around your world.
What tools do you use today?
Pick the ones you recognise — or just type them. It helps us show you how they migrate.
Last step: your details.
We reply within one working day — and right after, if you like, you pick the demo slot yourself.
We couldn't send your request. Try again, or write to us at [email protected].
By sending, you agree to your data being processed so we can get back to you about the demo. Privacy notice.
Preview form — nothing is sent from this page.
Want to schedule the demo now?
Your call: book the slot you prefer yourself, or we'll call you to arrange it.
Live availability, 30 minutes, instant confirmation. The calendar opens in a new tab.
Lock in your slot ↗We'll get back to you within one working day — and we'll join the call already knowing your world.
The calendar is open in another tab: pick a slot and the demo is booked. Can't see it? Reopen it ↗
Preview page: nothing was sent.
Our calendar is live: take the slot that suits you and the demo is booked. 30 minutes, instant confirmation, no waiting.
Lock in your slot ↗