Attendance
All modules
Choosing how people record their hours
Attendance · 16 of 16 · 6 min read
The Recording Modes screen sets the ways people can record their working time: in-app clock, declared hours, the workplace QR code and the door kiosk. From here you set the rule that applies to everyone, and the exceptions for each person.
The Recording Modes screen
Before you start: the Attendance › Recording Modes screen is reserved for administrators of the Attendance module.
The screen shows two panels: Everyone holds the general rule, People who differ holds the people who follow a different rule. Next to the title, a label shows where the rule in force comes from: the organisation, when it has a saved rule, otherwise the system setting.
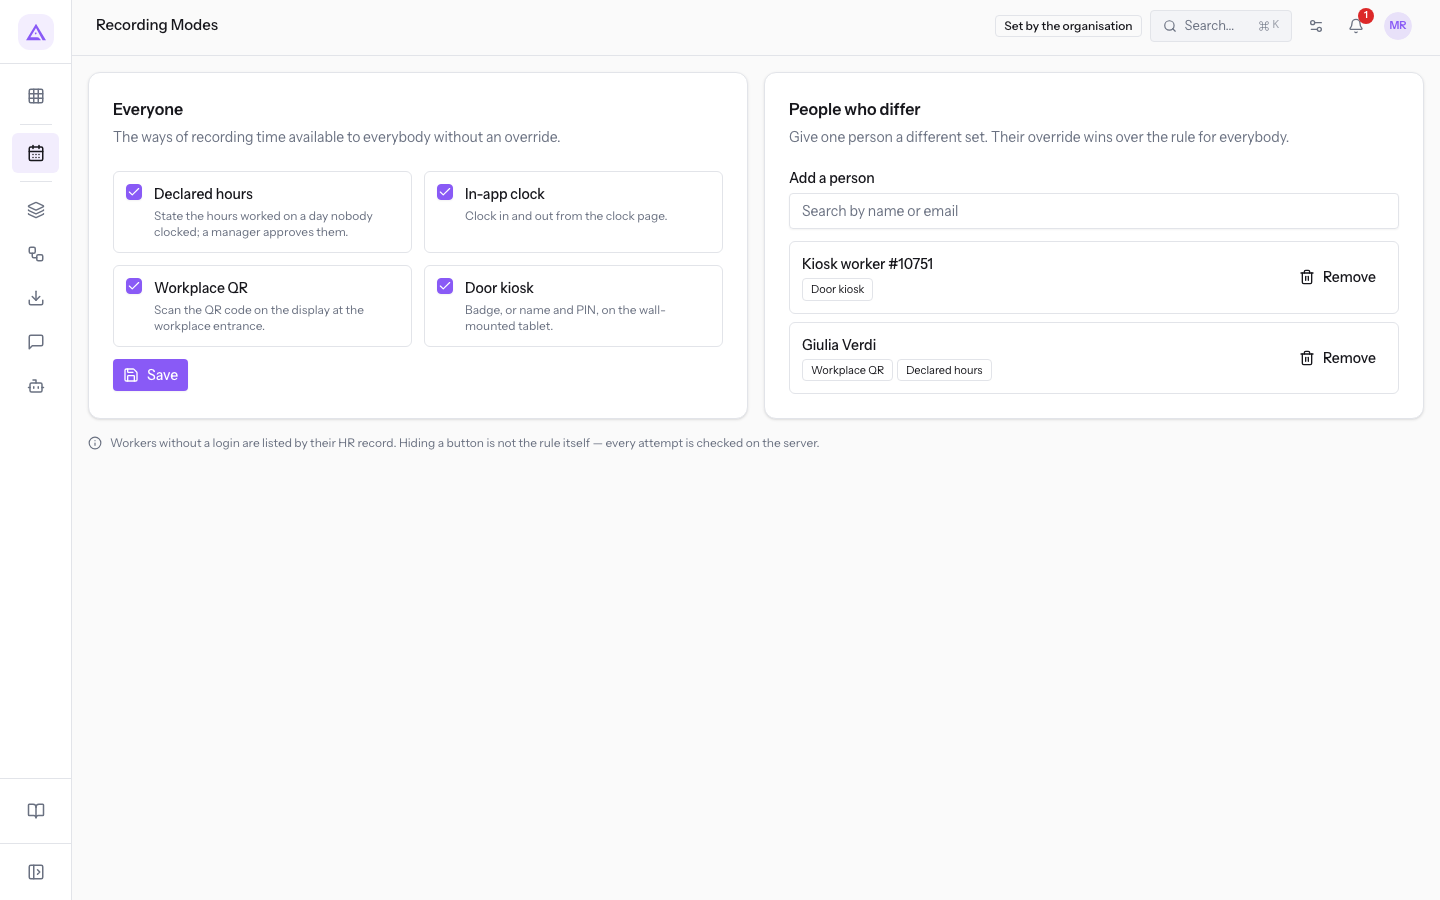
In the demo organisation, everyone can use all four modes. Giulia Verdi can only use the workplace QR code and declared hours. Ahmed Benali, who has no login, can only use the kiosk, and in the list he appears as Kiosk worker #6368.
At the top of the screen, up to two notices can appear:
- Nobody has chosen how this company records time: nobody has confirmed the organisation's modes. The notice cannot be dismissed and only goes away when you save the Everyone panel. The text changes depending on the situation:
- Until a choice is saved here, every way of recording time is permitted for everyone — the in-app clock, declared hours, the workplace QR code and the door kiosk. There is no rule yet.
- Attendance was switched on with a starting point, not a decision: declared hours and the in-app clock are permitted, the workplace QR code and the door kiosk are not. Nobody has confirmed that is right for this company. The starting rule is active but has not been confirmed.
- Some people can still clock from anywhere: this appears when people with the Employee group can use the in-app clock and are not assigned to a location that verifies presence. The notice lists the names of the people concerned and links to the Attendance › Locations screen.
Which mode to leave on
Each mode is a checkbox, in the Everyone panel and in the exceptions. Leave on only the ways that are actually in use.
- Declared hours: the person declares the hours worked on a day with no clock-in, and a manager approves them. If a person does not clock in on some days, leave this mode on.
- In-app clock: the person clocks in and out from the clock screen. The button does not appear for someone assigned to a location that requires the QR code.
- Workplace QR: the person scans the QR code on the display at the location entrance. If you want clocking to happen in front of the display, leave this mode on and set up the location in Attendance › Locations.
- Door kiosk: the person uses the badge, or name and PIN, at the kiosk. If you have workers without a platform login, leave this mode on: they clock at the kiosk.
Important: a person assigned to a location that requires the QR code, with only In-app clock enabled, cannot clock in. The clock screen offers them no button. Also assign them Workplace QR.
Note: a day is either clocked or declared. Someone who declared the hours for a day cannot also clock that day and must contact their manager.
Setting the modes for everyone
The Everyone panel defines the modes available to anyone without an exception.
- In the Everyone panel, select the modes in use and clear the others.
- Press Save. The screen confirms with Saved. and the Nobody has chosen how this company records time notice disappears.
Important: at least one mode must stay on. If you clear them all, the save is refused with Keep at least one way of recording time.
Adding an exception for a person
An exception gives a person a different set of modes and takes priority over the general rule. If a person must use fewer ways than others, or ways that the Everyone panel does not include, create an exception.
- In the People who differ panel, under Add a person, type at least two characters of the name or email. The search lists people with a platform login: workers without a login do not appear.
- Choose the person from the list. Under the field, the four modes and the Save button appear.
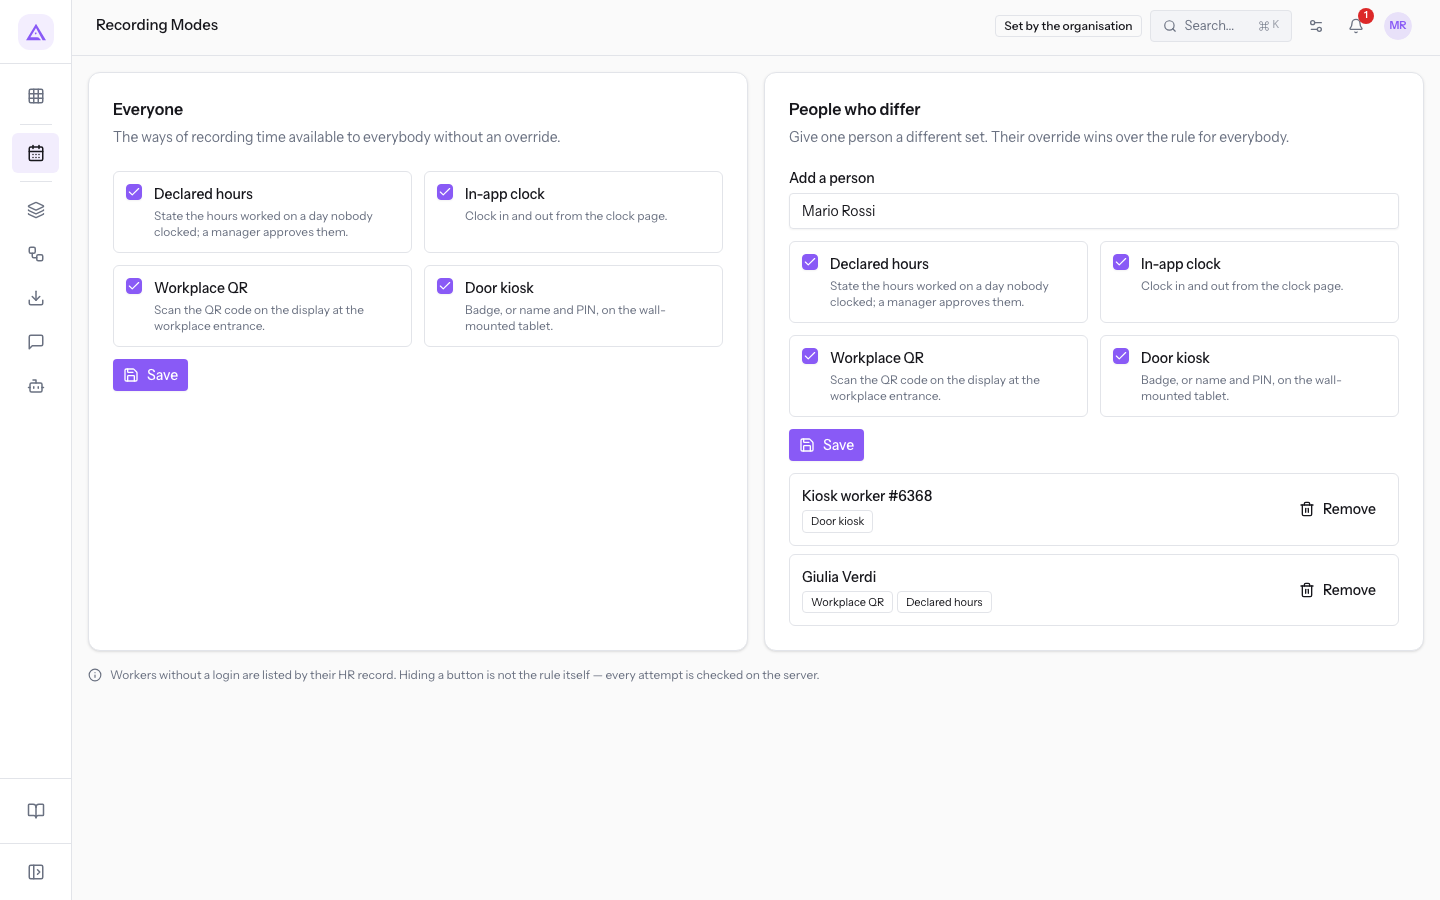
- Clear the modes the person must not use: for Giulia Verdi, Workplace QR and Declared hours remain. The checkboxes all appear selected even if the person already has an exception, so they do not show the modes saved earlier.
- Press Save. The person appears in the panel's list with their modes.
An exception also requires at least one mode to be on. If none remain, Keep at least one way of recording time. appears.
Note: at the bottom of the screen the text Workers without a login are listed by their HR record. Hiding a button is not the rule itself — every attempt is checked on the server. appears.
Removing an exception
Each exception is a row with the person's name, their modes and a Remove button. When there are none, the panel shows Nobody has an override yet.
Remove deletes the exception immediately, with no confirmation request, and the person follows the Everyone panel again.
What changes on other screens
The modes decide what each person can use. The rule does not depend on which buttons are visible: the system checks every attempt, so hiding a button is not enough to forbid a mode. A way that is not allowed is refused with This way of recording time is not available to you. Ask your administrator.
- Attendance › Clock In/Out: without In-app clock, the notes field and the Clock In and Clock Out buttons disappear. Without Workplace QR, the QR code scan button disappears. If neither is left, the screen shows a notice in place of the buttons.
- Attendance › Declared Hours: without Declared hours, the Declare a week section is replaced by Declaring hours is not available to you. Ask your administrator.
- Kiosk screen: without Door kiosk, the person's clocking is refused with This badge cannot be used at a kiosk. If a person must clock only at the kiosk, create an exception with this mode alone.
Note: the modes say how a person records time, the locations say where. A person assigned to a location can only clock in at the assigned locations and is checked against each one. A person not assigned to any location can clock anywhere the recording modes allow.
See it on your company, not on a slide deck.
In 30 minutes we map the software you use today.We show you how much work and how much margin Archimedes gives back.
Show me on my business →What industry are you in?
One tap — it lets us prepare the demo around your world.
What tools do you use today?
Pick the ones you recognise — or just type them. It helps us show you how they migrate.
Last step: your details.
We reply within one working day — and right after, if you like, you pick the demo slot yourself.
We couldn't send your request. Try again, or write to us at [email protected].
By sending, you agree to your data being processed so we can get back to you about the demo. Privacy notice.
Preview form — nothing is sent from this page.
Want to schedule the demo now?
Your call: book the slot you prefer yourself, or we'll call you to arrange it.
Live availability, 30 minutes, instant confirmation. The calendar opens in a new tab.
Lock in your slot ↗We'll get back to you within one working day — and we'll join the call already knowing your world.
The calendar is open in another tab: pick a slot and the demo is booked. Can't see it? Reopen it ↗
Preview page: nothing was sent.
Our calendar is live: take the slot that suits you and the demo is booked. 30 minutes, instant confirmation, no waiting.
Lock in your slot ↗