Attendance
All modules
Set the time calculation rules
Attendance · 15 of 16 · 5 min read
The Attendance Settings screen decides how hours are counted and how a session is treated: rounding, break, overtime, limits, and missing clock-outs. The rules apply to the whole organisation, and a single location can override them.
What the screen shows
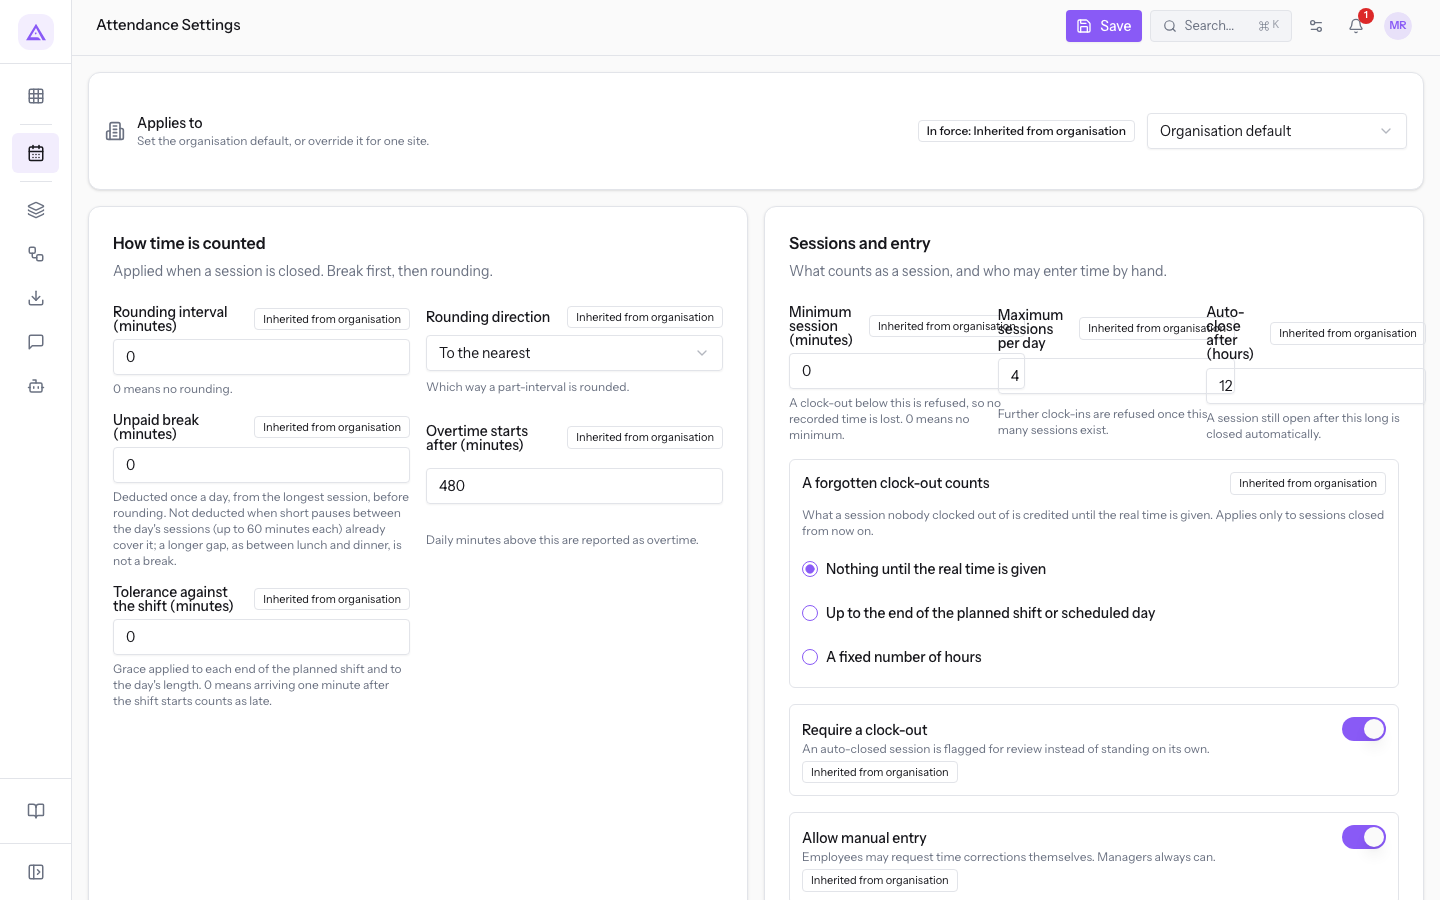
The Attendance Settings screen opens from Attendance › Attendance rules. At the top is Applies to, which shows who the displayed values apply to. Below it are the sections How time is counted and Sessions and entry.
Important: a change to a rule applies to sessions closed from the day it is made. Sessions that were already closed keep their recorded totals and the overtime threshold they were closed with.
Choosing where the rules apply
The scope decides whether you change the value for the whole organisation or for a single location.
Before you start: setting up attendance rules requires the Administrator group of the Attendance module.
- If a value applies to the whole organisation, choose Organisation default.
- If a location needs its own values, choose that location: saving creates an exception for that location only.
- If a location does not need its own values, do not save anything on the location: it stays on the organisation default.
- In Applies to, choose Organisation default or a location. The list includes all locations, even an inactive one such as Pool bar.
- Read In force to see where the displayed values come from.
- Edit the fields and press Save. The message Settings saved appears.
The fields in this part of the screen are:
- Applies to: the selector with Organisation default and the locations.
- In force: where the values come from. It can show:
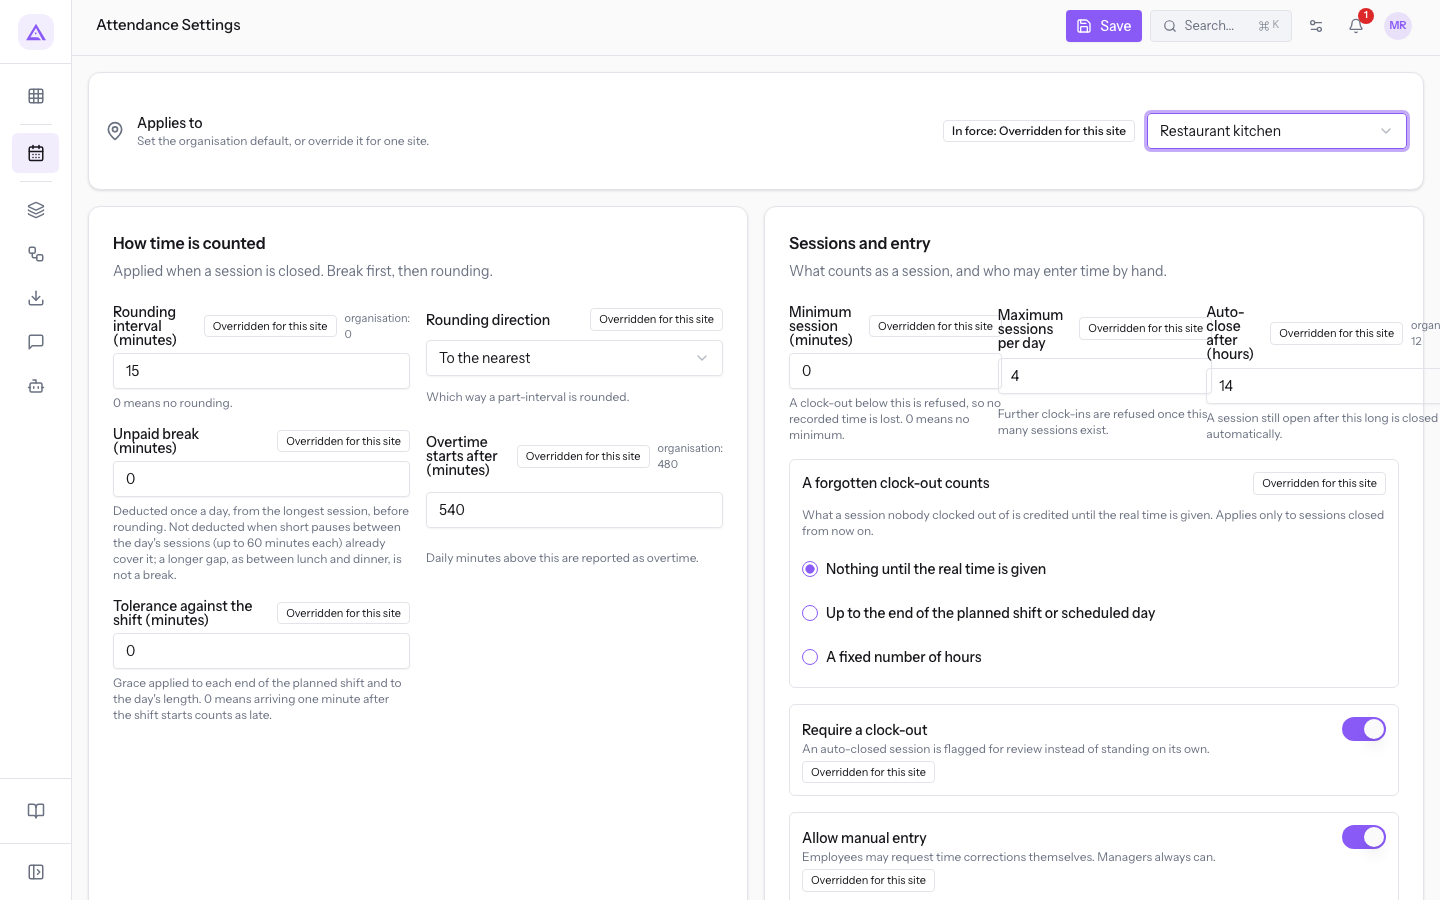
- Overridden for this site: the location has its own exception. Restaurant kitchen is in this state.
- Inherited from organisation: the values come from the organisation default. Main farmhouse is in this state.
- System default: the values come neither from the location nor from the organisation, but from the system.
On a location without an exception, the text This site has no settings of its own and follows the organisation default. Saving here creates an override for this site. appears.
Next to each field, a label shows where that individual value comes from. On a field overridden by the location, the organisation value is also shown: for Overtime starts after (minutes) on Restaurant kitchen, the text is "organisation: 480".
| Field | Organisation default | Restaurant kitchen |
|---|---|---|
| Overtime starts after (minutes) | 480 | 540 |
| Auto-close after (hours) | 12 | 14 |
| Rounding interval (minutes) | 0 | 15 |
Setting how time is counted
The How time is counted section applies when a session is closed: first the break, then the rounding.
- If you want to count the exact time of sessions, leave Rounding interval (minutes) at 0.
- If you count time in blocks, set the block and choose the Rounding direction: Restaurant kitchen uses 15 minutes.
Choose the scope, set the fields, and press Save. The fields in this section are:
- Rounding interval (minutes): the size of the rounding. 0 means no rounding.
- Rounding direction: the direction in which a partial interval is rounded.
- To the nearest: to the nearest interval.
- Up: to the next interval up.
- Down: to the next interval down.
- Unpaid break (minutes): the break deducted once a day from the longest session, before rounding. It is not deducted if the short breaks between the day's sessions, up to 60 minutes each, already cover it. A longer gap, such as between lunch and dinner, does not count as a break.
- Overtime starts after (minutes): the daily threshold. Minutes beyond this threshold are recorded as overtime.
- Tolerance against the shift (minutes): the margin applied to each end of the planned shift and to the length of the day. With 0, arriving one minute after the shift starts counts as late.
Setting sessions and entry
The Sessions and entry section decides what counts as a session and who can enter time manually.
Choose the scope, set the fields, and press Save. The fields in this section are:
- Minimum session (minutes): the duration below which a clock-out is rejected, so recorded time is not lost. 0 means no minimum.
- Maximum sessions per day: once this number is reached, later clock-ins are rejected. A manager can still record the service as an adjustment.
- Auto-close after (hours): the period after which a session still open is closed automatically. The field also accepts half hours.
- A forgotten clock-out counts: how much time is credited to a session with no clock-out. The choice is described in the section "Deciding how much a missing clock-out is worth".
- Require a clock-out: if on, an automatically closed session is flagged for review instead of standing on its own as valid.
- Allow manual entry: if on, employees can request adjustments on their own. Managers can always do so.
Deciding how much a missing clock-out is worth
A forgotten clock-out counts sets what is credited to a session with no clock-out until the real time is entered. This choice is separate from Auto-close after (hours), which only decides when the session is closed.
- If you do not want to credit hours before the adjustment, choose Nothing until the real time is given.
- If you want to credit the time planned for the person, choose Up to the end of the planned shift or scheduled day.
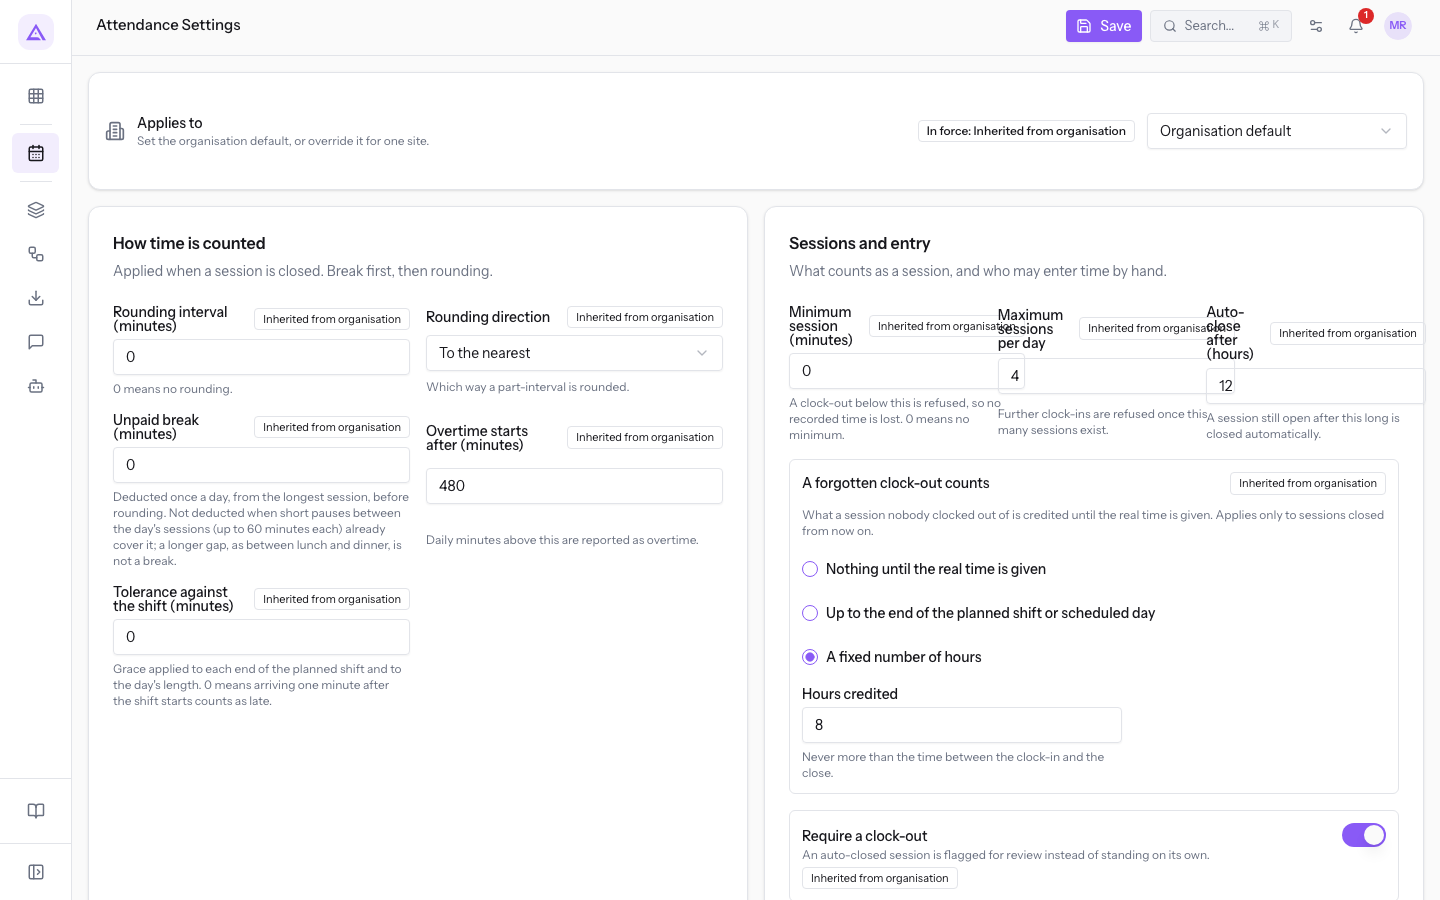
- If you want to always credit the same hours, choose A fixed number of hours.
-
In A forgotten clock-out counts, select one of the three choices.
-
If you chose A fixed number of hours, fill in Hours credited.
-
Press Save.
Hours credited appears only with A fixed number of hours. The suggested value is 8, and the credited time never exceeds the time between clock-in and closing.
Note: the choice applies only to sessions closed from now on.
See it on your company, not on a slide deck.
In 30 minutes we map the software you use today.We show you how much work and how much margin Archimedes gives back.
Show me on my business →What industry are you in?
One tap — it lets us prepare the demo around your world.
What tools do you use today?
Pick the ones you recognise — or just type them. It helps us show you how they migrate.
Last step: your details.
We reply within one working day — and right after, if you like, you pick the demo slot yourself.
We couldn't send your request. Try again, or write to us at [email protected].
By sending, you agree to your data being processed so we can get back to you about the demo. Privacy notice.
Preview form — nothing is sent from this page.
Want to schedule the demo now?
Your call: book the slot you prefer yourself, or we'll call you to arrange it.
Live availability, 30 minutes, instant confirmation. The calendar opens in a new tab.
Lock in your slot ↗We'll get back to you within one working day — and we'll join the call already knowing your world.
The calendar is open in another tab: pick a slot and the demo is booked. Can't see it? Reopen it ↗
Preview page: nothing was sent.
Our calendar is live: take the slot that suits you and the demo is booked. 30 minutes, instant confirmation, no waiting.
Lock in your slot ↗