Accounting
All modules
Set up accounting: chart of accounts, journals and opening balances
Accounting · 3 of 17 · 8 min read
The Accounting settings hold the accounts, journals and other structures that journal entries rely on. From here you prepare the chart of accounts, set up journals such as Customer Invoices, Bank or Cash, and record the accounting position at the start date.
Accounting settings
All the basic structures are on a single page, split into tabs.
- Open Accounting › Settings.
- Choose the tab you want to work on.
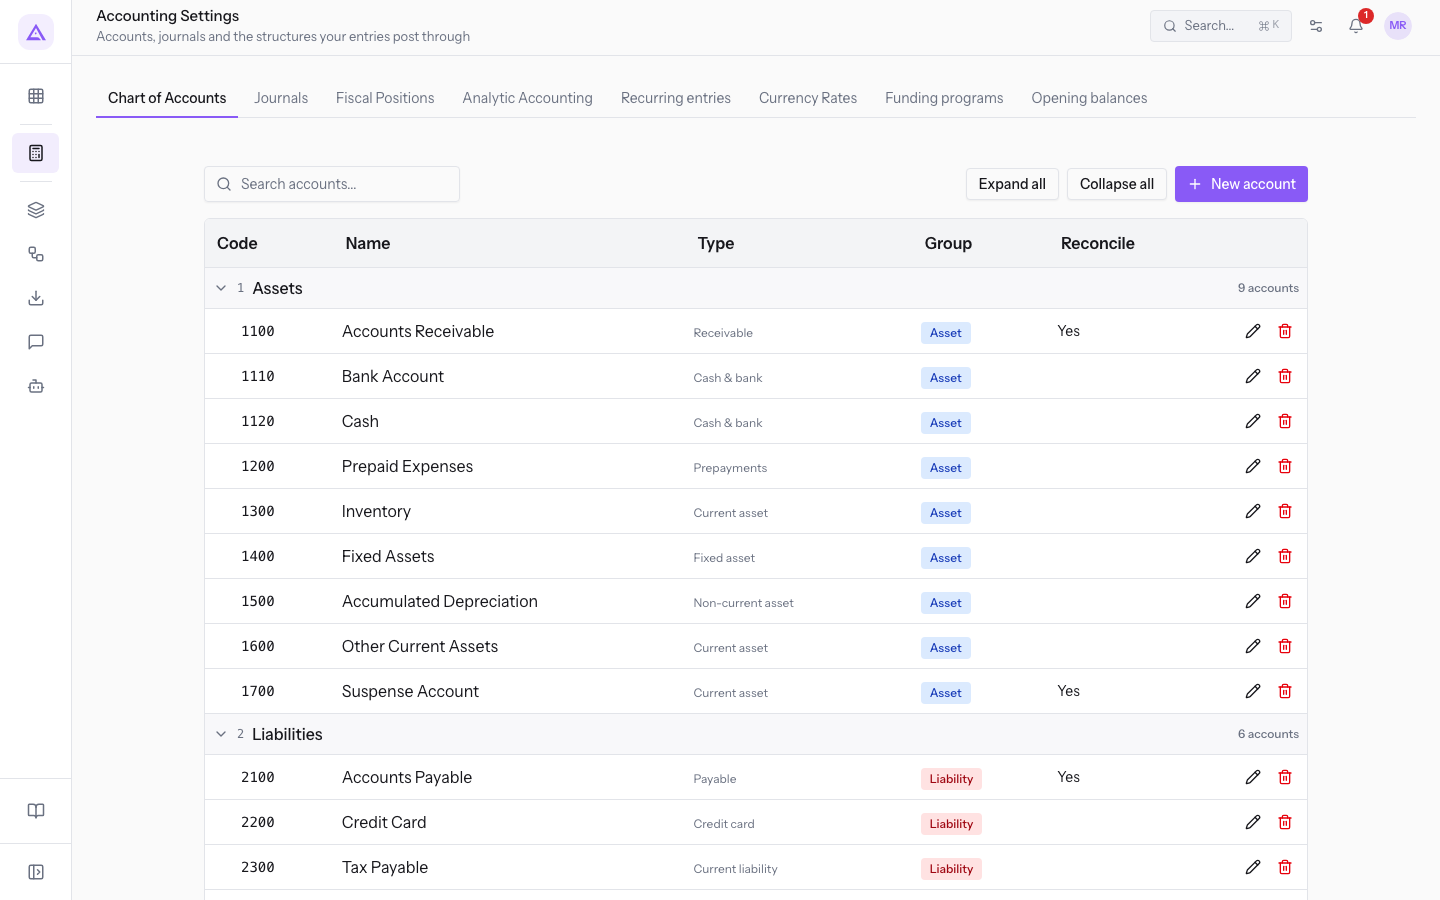
The tabs are:
- Chart of Accounts: the list of accounts, described on this page.
- Journals: the accounting journals, described on this page.
- Fiscal Positions, Analytic Accounting, Recurring entries, Currency Rates, Funding programs: the other structures, described in their own articles.
- Opening balances: the accounting position at the start date, described on this page.
The page opens on the Chart of Accounts tab.
The chart of accounts
The chart of accounts is the list of accounts used in journal entries. Each account has a code, a name, a type and a group. The type and group decide in which section of the reports the account appears: Balance Sheet or Profit & Loss. The demo accounts include 1110 Bank Account, 2300 Tax Payable and 4100 Product Sales.
- Open Accounting › Settings and choose the Chart of Accounts tab.
- Search for an account by code or name in the Search accounts... field.
- Use Expand all and Collapse all to open or close all the groups.
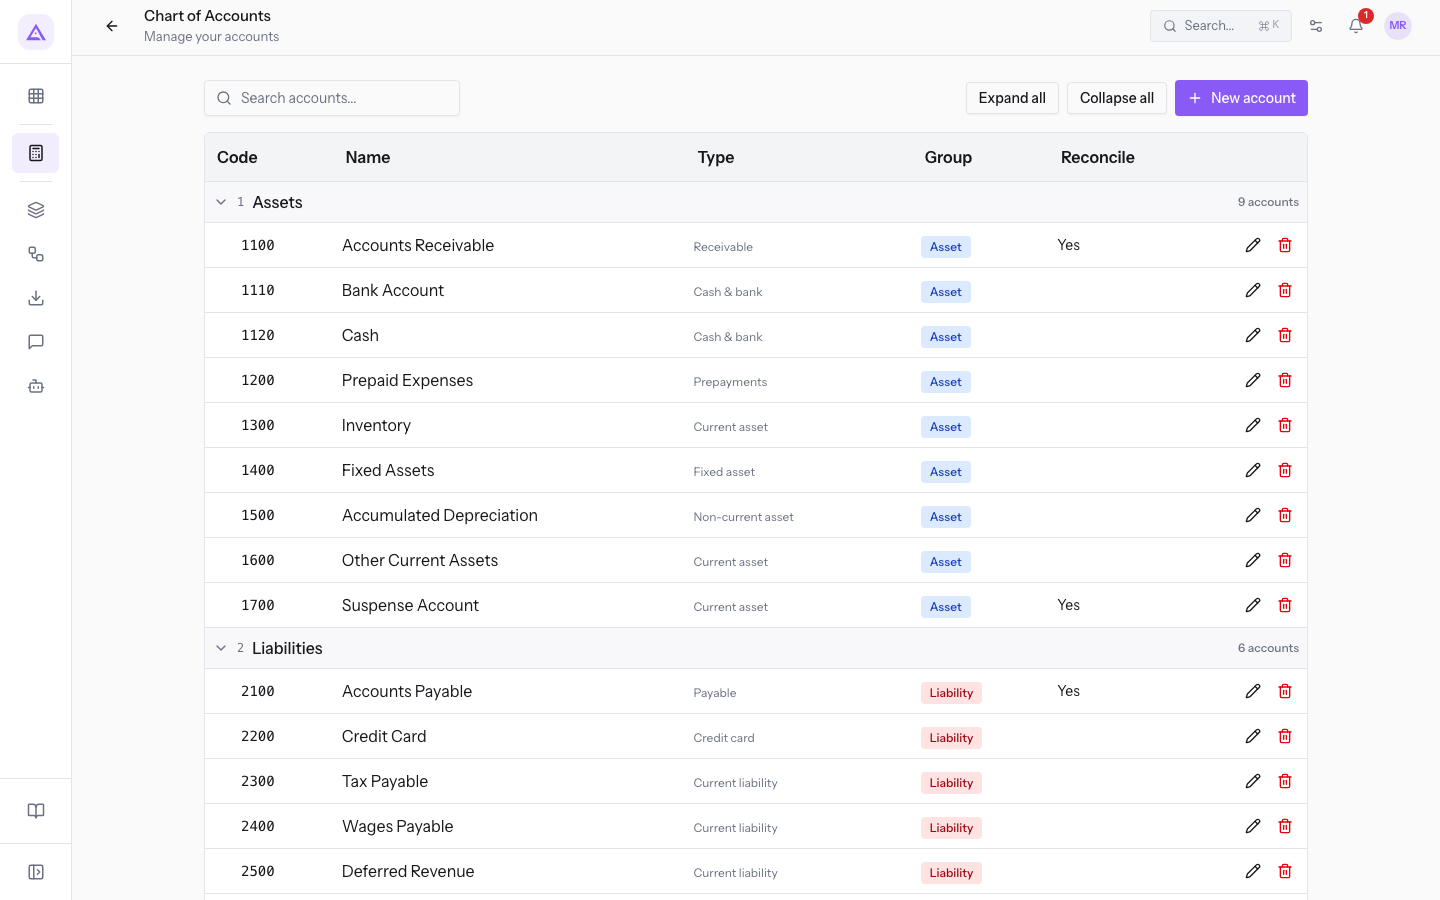
Accounts are grouped by group. The header of each group shows how many accounts it contains, for example 1 Assets with 9 accounts. For each account the list shows the columns Code, Name, Type, Group and Reconcile. For instance, account 1100 Accounts Receivable is of type Receivable and in the group Asset.
Creating an account
Create an account when you need one the chart of accounts does not have yet.
- In the Chart of Accounts, press New account.
- Fill in the fields in the New account dialog.
- Press Save.
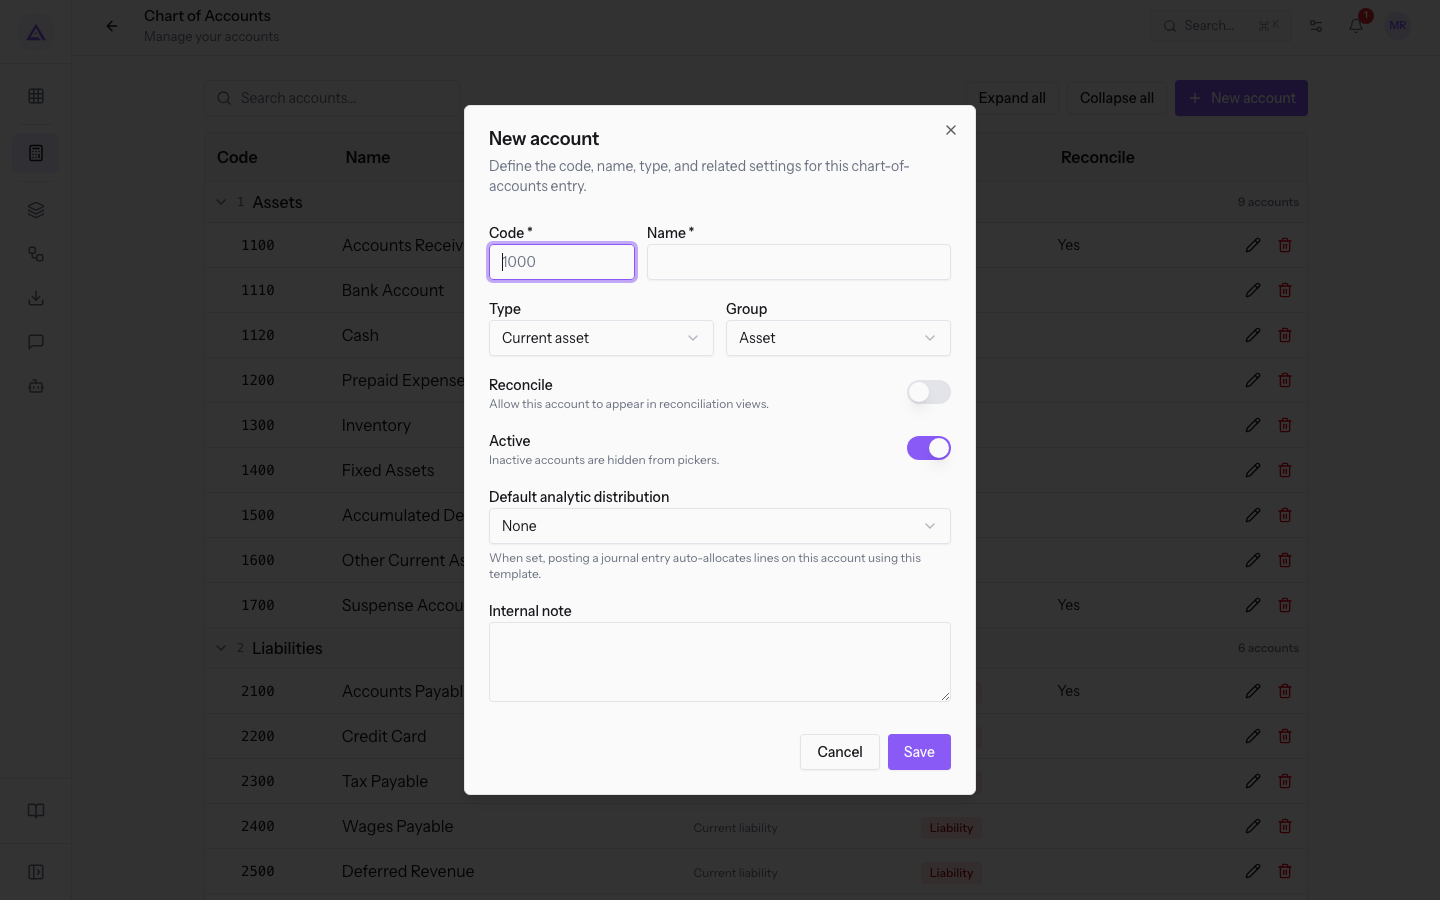
The dialog fields:
- Code: the account code, for example
1110. The field is required. - Name: the account name, such as
Bank Account. The field is required. - Type: the nature of the account. The proposed value is Current asset. The options are:
- Receivable, Cash & bank, Current asset, Non-current asset, Prepayments, Fixed asset;
- Payable, Credit card, Current liability, Non-current liability;
- Equity, Current-year earnings;
- Income, Other income, Expense, Depreciation, Cost of revenue;
- Off-balance.
- Group: the section of the financial statements the account belongs to. The proposed value is Asset. The options are Asset, Liability, Equity, Income, Expense, Off-balance.
- Reconcile: makes the account reconcilable, meaning its open lines can be matched, such as an invoice and its payment. It is off for a new account.
- Active: the account can be used. It is on for a new account.
- Default analytic distribution: the analytic template that allocates the lines posted on this account. The proposed value is None.
- Internal note: free text for whoever manages the accounting.
If the account holds customer receivables or supplier payables to be matched with payments, turn on Reconcile: in the demo, account 1100 Accounts Receivable is reconcilable. If the account only collects costs or revenues, leave it off.
Editing or deleting an account
You can correct the name, type and group of an existing account from the Edit account dialog.
- On the account's row, press Edit.
- Change the fields to correct. They are the same as in the New account dialog.
- Press Save.
In the Edit account dialog the Code field is locked, because renaming it would break saved reports. To change it, press the padlock next to the field and unlock the code.
Important: if you change the type of an account that already has entries, those entries are reclassified and move to the report section of the new type.
To delete an account, press Delete on its row and confirm in the Delete account? dialog.
Tip: to stop using an account without deleting it, turn off Active in the Edit account dialog.
The account page
Opening an account from the chart of accounts shows its totals and movements. The page shows the account's Total debit and, for each movement, the Running Balance.
Journals
Journals group journal entries by type of operation. The demo journals include Customer Invoices, Vendor Bills, Bank, Cash and Miscellaneous Operations. Each journal has a default account, which is used to account for invoices and payments.
- Open Accounting › Settings and choose the Journals tab.
- Filter the list with the All, Sales, Purchase, Bank, Cash, Miscellaneous tabs, or search in the Search journals... field.
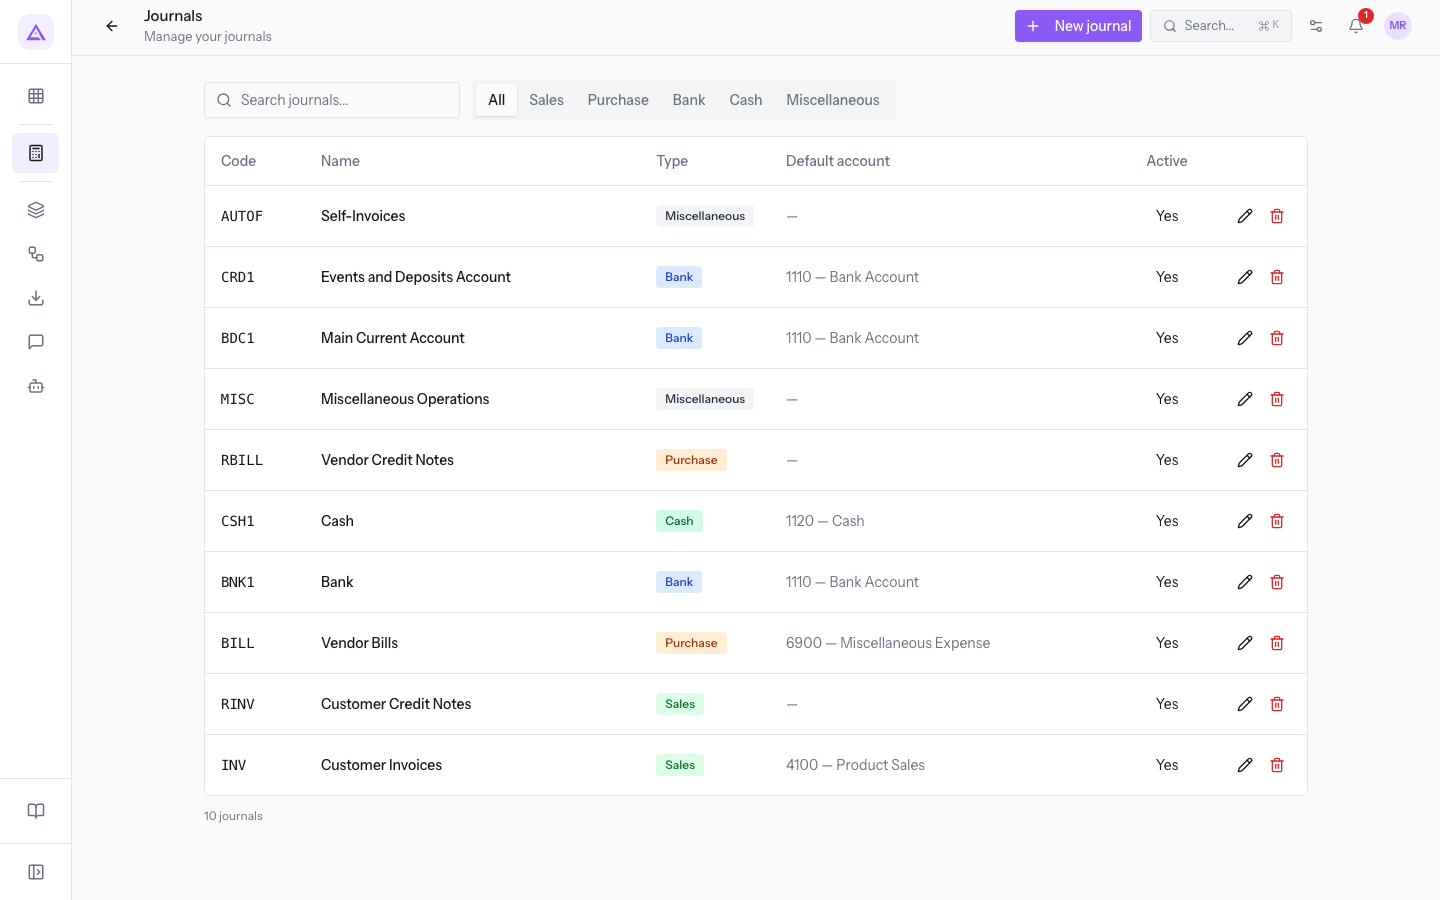
The list shows the columns Code, Name, Type, Default account and Active. For example, journal AUTOF Self-Invoices is of type Miscellaneous, has no default account and is active. Each row has the Edit and Delete commands.
Creating a journal
Create a journal when you need a separate numbering, for example for a second bank current account.
- In the Journals tab, press New journal.
- Fill in the fields in the New journal dialog.
- Press Save.
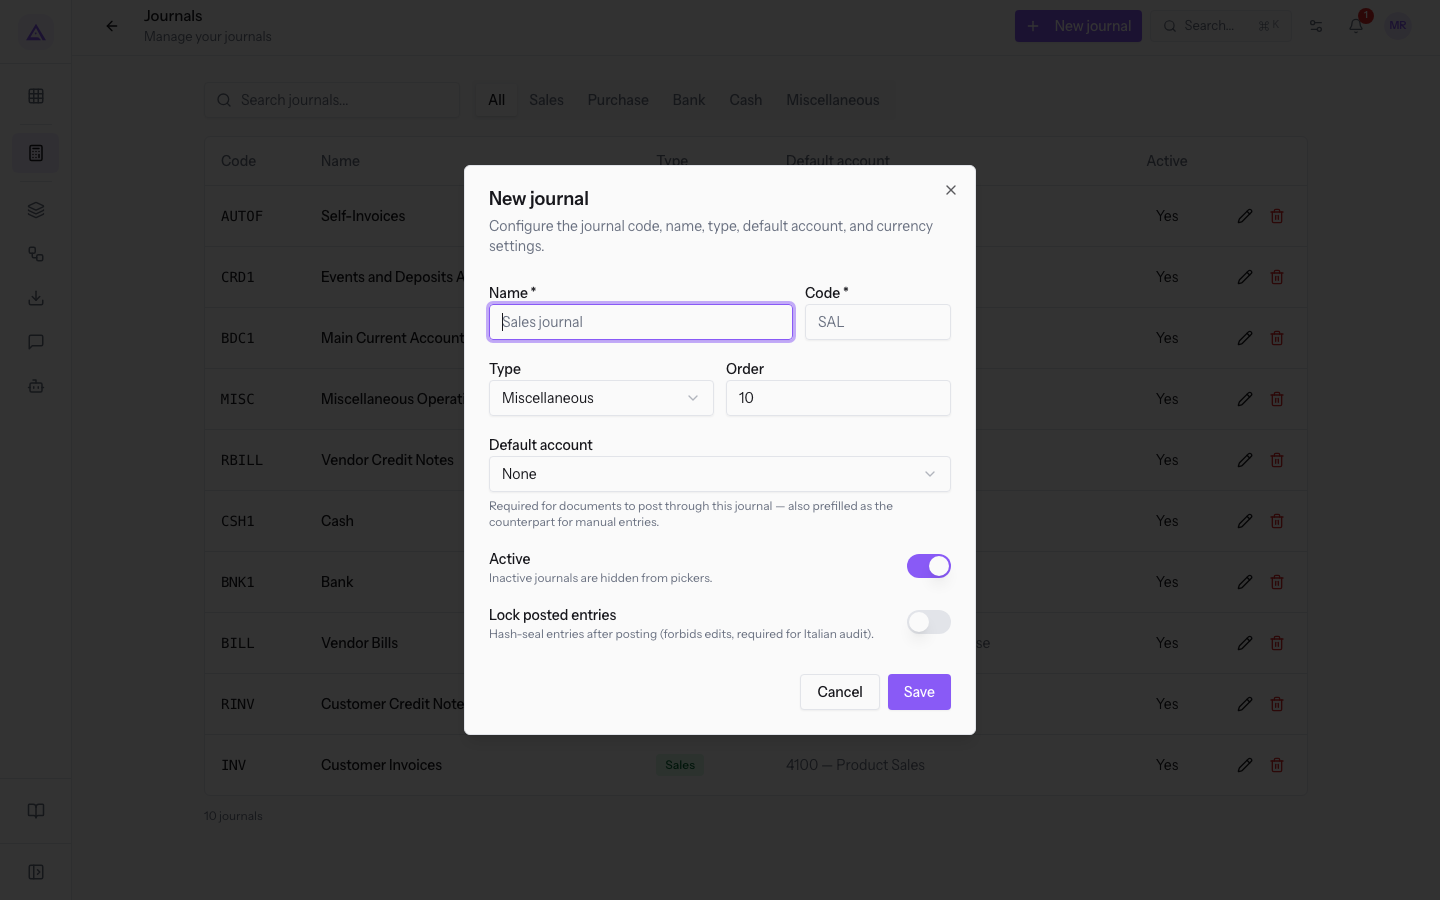
The dialog fields:
- Name: the journal name, such as
Sales journal. The field is required. - Code: the short journal code, such as
SAL. The field is required. - Type: the type of operations in the journal. The proposed value is Miscellaneous. The options are Sales, Purchase, Cash, Bank, Miscellaneous.
- Order: the position of the journal in the list.
- Default account: the account used to account for the documents in the journal. The proposed value is None. It is needed so that the journal's documents can be accounted for.
- Active: the journal can be used. It is on for a new journal.
- Lock posted entries: seals journal entries after posting, which forbids edits. It is required for Italian audit.
With the Bank type the dialog shows a second account selection field, besides Default account.
Important: if a journal has no default account, accounting for invoices on that journal stops. For Sales, Purchase, Bank and Cash journals always choose a Default account.
Opening balances
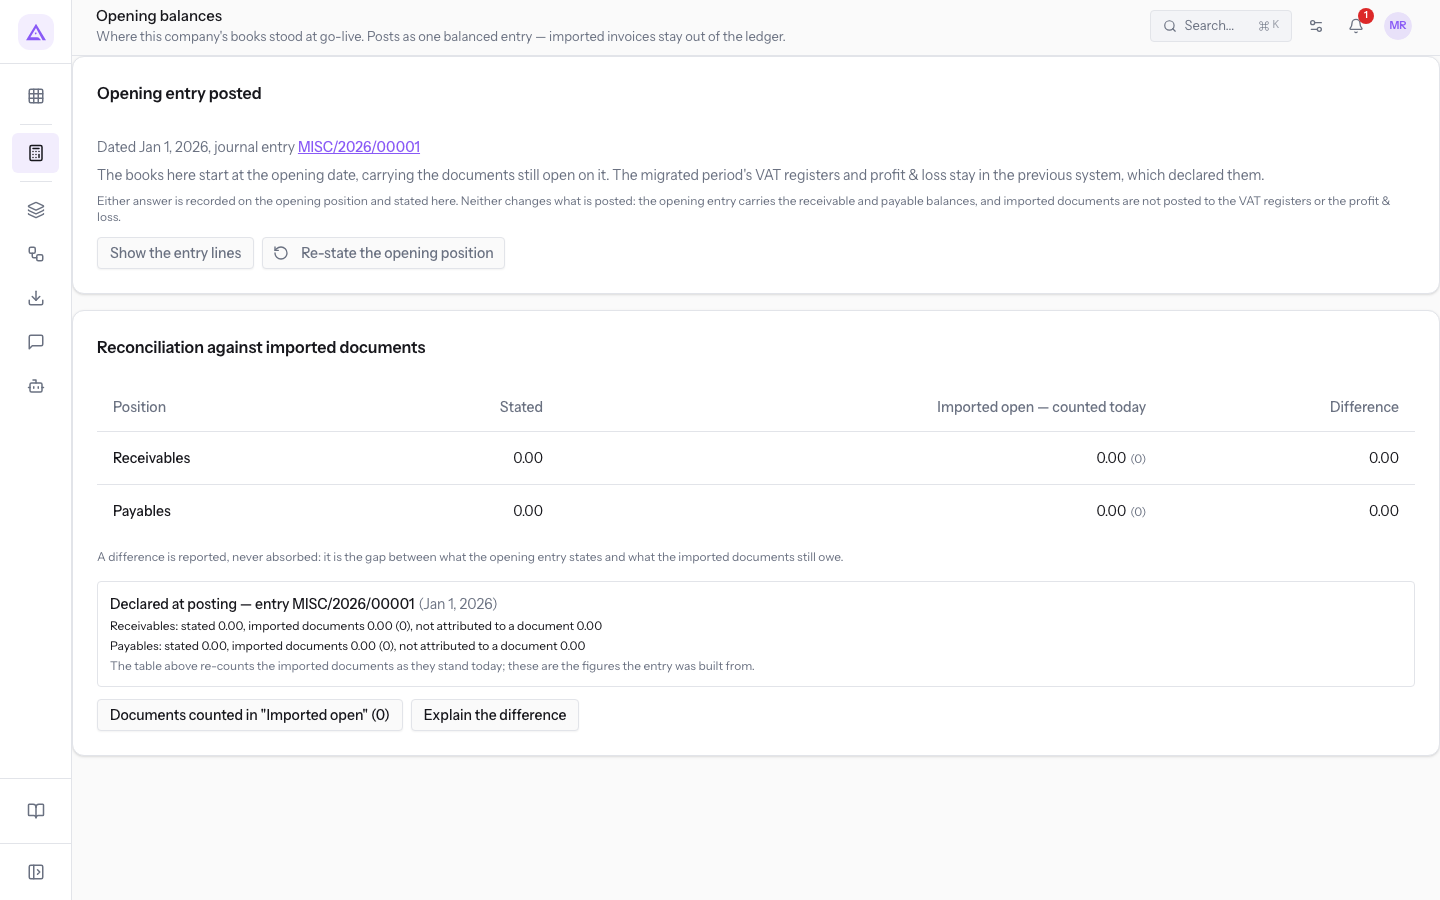
The opening balances record the accounting position at the start date. They are recorded as a single balanced journal entry; imported invoices stay out of the general ledger. In the demo the entry is MISC/2026/00001, "Opening balances at 1 January".
- Open Accounting › Settings and choose the Opening balances tab.
- Enter the Opening date.
- Enter one line for each account with its balance in Debit or Credit.
- Check that the entry shows Balanced. Until debit and credit match, the page shows Not balanced.
- To save your work and resume later, press Save draft.
- When the position is complete, press Post opening entry.
After posting, the page shows the Opening entry posted notice with the entry number. With Show the entry lines you see the posted lines, with Hide the entry lines you close them.
Note: the VAT credit carried over from the previous system does not go into the opening position. Enter it in the Opening VAT credit (go-live) field of the VAT settings. The VAT settlement for the period containing that date deducts it only once; the opening position must carry the same credit on the VAT settlement account.
Important: before posting the opening entry, the accountant decides whether the VAT registers and the profit and loss of the migrated period stay in Archimedes or remain in the previous system. The choice does not change what gets accounted for: the opening entry carries the receivable and payable balances, and imported documents are not posted to the VAT registers or to the profit and loss.
Reconcile the opening entry with the imported documents
The opening entry states what you were owed and what you owed at the opening date. The receivable and payable lines can be filled in from the imported documents; the counterpart for the difference, usually the opening equity, you add yourself.
After posting, the page compares the entry with the imported documents still open:
- Documents counted in "Imported open" (0): opens the list of imported documents considered open at the opening date; the number in brackets is their count.
- Explain the difference: shows the gap between what the opening entry states and what the imported documents still show as owed.
The difference is always shown, never absorbed. If the entry reports receivables or payables that no imported document accounts for, the schedule shows them on their own line, Opening position — not attributed to a document.
Re-state the opening position
A posted opening entry is not edited. If it needs correcting, you re-state it: the entry is reversed at the opening date, so it no longer counts in accounting, and the position goes back to draft to be corrected and posted again.
- On the Opening balances tab, press Re-state the opening position.
- Write the Reason (required).
- Press Reverse and reopen.
- Correct the lines and press Post opening entry.
The reversal and the reopening are both written to the audit log.
Note: if the opening entry was reversed or withdrawn outside this page, accounting has no opening position and the page says so with This opening position no longer counts. Reopen it as a draft to correct and post it again.
Documents issued before accounting
A separate page lists issued documents that have no journal entry: those issued before accounting was enabled, or left behind by an import that could not record them. From this page you can post them to accounting.
See it on your company, not on a slide deck.
In 30 minutes we map the software you use today.We show you how much work and how much margin Archimedes gives back.
Show me on my business →What industry are you in?
One tap — it lets us prepare the demo around your world.
What tools do you use today?
Pick the ones you recognise — or just type them. It helps us show you how they migrate.
Last step: your details.
We reply within one working day — and right after, if you like, you pick the demo slot yourself.
We couldn't send your request. Try again, or write to us at [email protected].
By sending, you agree to your data being processed so we can get back to you about the demo. Privacy notice.
Preview form — nothing is sent from this page.
Want to schedule the demo now?
Your call: book the slot you prefer yourself, or we'll call you to arrange it.
Live availability, 30 minutes, instant confirmation. The calendar opens in a new tab.
Lock in your slot ↗We'll get back to you within one working day — and we'll join the call already knowing your world.
The calendar is open in another tab: pick a slot and the demo is booked. Can't see it? Reopen it ↗
Preview page: nothing was sent.
Our calendar is live: take the slot that suits you and the demo is booked. 30 minutes, instant confirmation, no waiting.
Lock in your slot ↗