CMS
All modules
Configure the client area: sign-in and portal home
CMS · 17 of 17 · 5 min read
The client area is the portal where your organization's clients sign in with their own credentials. On the Client area screen you decide how the sign-in page looks and which sections clients see on the home, for example a statement of account, quotes to sign, or bookings.
Before you configure the client area
The screen has two tabs: Sign-in for the portal sign-in page and Home for the home that the client sees after signing in. Each tab has its own save button.
Before you start: the Client area item is visible only to organization administrators and requires the Contacts module. If Contacts is not active, the item does not appear and the portal is not available.
- If you want to change how the page where clients enter their credentials looks, use the Sign-in tab.
- If you want to change what clients see after signing in, use the Home tab.
Open the client area
- In the CMS menu, open the Settings group and press Client area.
- The screen opens on the Sign-in tab. Press Home to switch to the home configuration.
Configure the sign-in page
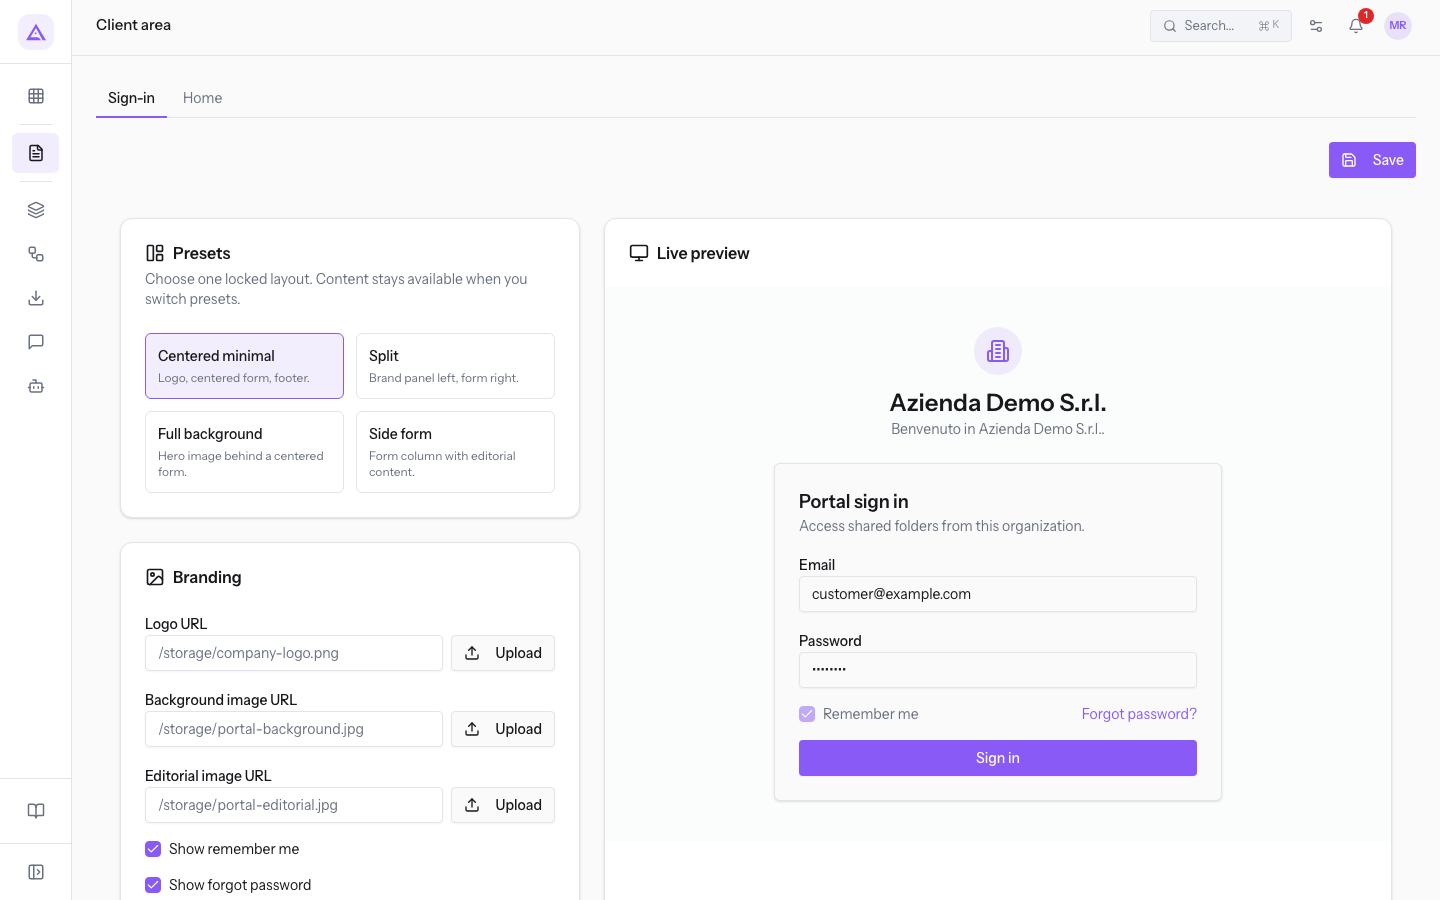
The Sign-in tab shows a preview of the sign-in page with the organization name (for example Azienda Demo S.r.l.), the title Portal sign in and the Sign in button.
- Open Client area and stay on the Sign-in tab.
- Choose a preset.
- Upload the images with the Upload buttons.
- Write the page texts in each language, switching between the EN, IT and DE tabs.
- Turn Show remember me and Show forgot password on or off.
- Press Save.
Presets
A preset is a fixed layout for the sign-in page. The content you entered stays available when you change preset, so you can try several layouts without losing texts and images.
- Centered minimal: logo, centered sign-in form and footer.
- Split: brand panel on the left, sign-in form on the right.
- Full background: hero image behind a centered sign-in form.
- Side form: column with the sign-in form and editorial content.
Choose the preset based on the content you want to show:
- If you want to show only the logo and the form, choose Centered minimal.
- If you want an image behind the form, choose Full background.
- If you want editorial content next to the form, choose Side form.
Images and texts
The sign-in page images are uploaded one at a time, each with its own Upload button.
The sign-in page texts are written separately for each language, in the EN, IT and DE tabs. The text editor supports bold, italic, underline, strikethrough and links.
Sign-in form options
- Default login language: the language the sign-in page opens in for first visitors, before they choose one.
- Show remember me: shows the Remember me option in the sign-in form. It is on in the demo.
- Show forgot password: shows the forgot password link in the sign-in form. It is on in the demo.
Note: the look of the sign-in page is configured here, separately from the look of the public site described in Customizing the site's look: brand, top bar and badge.
Configure the portal home
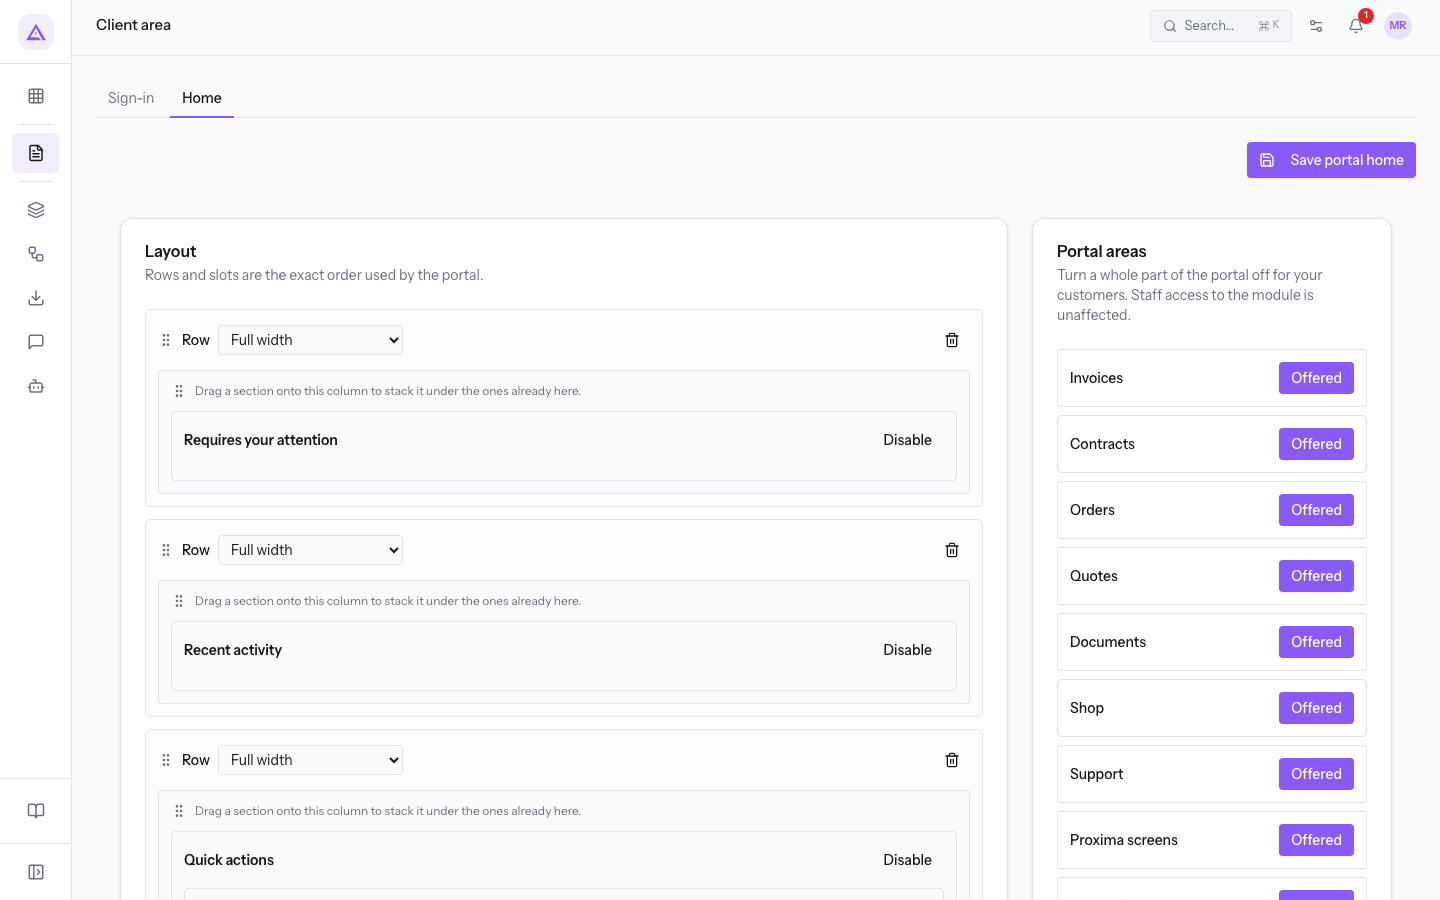
The Home tab defines the home that the client sees after signing in. The home is made of rows; each row has a layout and contains one or more sections. Rows and slots appear in the portal in exactly the order you arrange them.
- Open Client area and press Home.
- For each row, choose the Row layout.
- To add a row, press Add row. To remove it, press Remove row.
- Drag a section from Available sections into a column of the row.
- Fill in the section settings.
- Press Save portal home.
Portal areas
The Portal areas panel lists the parts of the portal offered to clients, for example Invoices, Contracts, Orders, Quotes, Documents, Shop and Support. Next to each area, the button shows its status: Offered when the area is offered, Hidden when it is not. Press the button to remove the whole area from clients. As the panel says, staff access to the module does not change.
Row layouts
The Row layout field decides how the row divides the space.
- Full width: the value of the demo rows.
- Two columns.
- Three columns.
- Main column + side rail.
- Side rail + main column.
To change the order of rows use Drag row; to move a section use Drag section.
Available sections
The Available sections list collects the sections you can put on the home. Each section is dragged into a column.
- Presentation content: Welcome banner, Introductory content, Image, Video, Media and text, Call to action.
- Client data: Key figures, Statement of account, Next appointment, Contracts to sign, Quotes to sign, Featured folders, Featured documents, Upload requests, From our shop, My tickets, My bookings, Supplier file.
An active section is marked Enabled. Use Disable to switch it off and Enable to switch it back on.
Section settings
The fields change depending on the section.
- Title: the section title.
- Quick actions: appears only in some sections.
- Selection: how the records to show are chosen. The available option is Use criteria. It appears in sections that list records.
- Order: the order of the records.
- Newest first: the default value.
- Oldest first.
- Record count: how many records to show. The default value is
5. - Presentation: how the records are shown. It appears only in some sections.
- Compact list: the default value.
- Table.
Important: changes to the home are saved only with Save portal home. The Save button on the Sign-in tab does not save the home.
See it on your company, not on a slide deck.
In 30 minutes we map the software you use today.We show you how much work and how much margin Archimedes gives back.
Show me on my business →What industry are you in?
One tap — it lets us prepare the demo around your world.
What tools do you use today?
Pick the ones you recognise — or just type them. It helps us show you how they migrate.
Last step: your details.
We reply within one working day — and right after, if you like, you pick the demo slot yourself.
We couldn't send your request. Try again, or write to us at [email protected].
By sending, you agree to your data being processed so we can get back to you about the demo. Privacy notice.
Preview form — nothing is sent from this page.
Want to schedule the demo now?
Your call: book the slot you prefer yourself, or we'll call you to arrange it.
Live availability, 30 minutes, instant confirmation. The calendar opens in a new tab.
Lock in your slot ↗We'll get back to you within one working day — and we'll join the call already knowing your world.
The calendar is open in another tab: pick a slot and the demo is booked. Can't see it? Reopen it ↗
Preview page: nothing was sent.
Our calendar is live: take the slot that suits you and the demo is booked. 30 minutes, instant confirmation, no waiting.
Lock in your slot ↗