CMS
All modules
Customizing the site's look: brand, top bar and badge
CMS · 16 of 17 · 5 min read
The Appearance screen collects the visual settings shared by the public site, the client portal and the shop. From here you set the brand colors, fonts and logo, a notice bar at the top of pages, and a WhatsApp badge. For example, you can use the bar for a seasonal notice and the badge for quick requests.
Before you start: the Appearance item is visible only to organization administrators, including people who belong to the CMS groups.
To open the screen, go to CMS › Appearance. The tabs are Brand, Header & footer, Top bar and Badge. This guide describes Brand, Top bar and Badge.
Choosing the customization mode
The Customization mode field on the Brand tab decides where colors, fonts and the logo come from. The screen says: "Use one branding mode across every selected customer surface."
- Builder: you set colors, typography and the logo from this tab's controls. This is the demo's value.
- Code: the Developer theme field appears. The color and typography controls are locked, with the message "These controls are locked in Code mode. Manage colors and typography in the developer theme." Replacing the logo is also locked: in this mode the default logo is managed in Organization Profile.
If you manage the look from this screen, choose Builder. If a developer has prepared a theme, choose Code and name it in Developer theme.
Setting the brand
On the Brand tab you define colors, fonts and the logo, and choose the areas to apply them to.
- Go to CMS › Appearance and open the Brand tab.
- In Customization mode, leave Builder selected.
- Set the colors, typography and logo.
- In Apply to, select the areas.
- Check the result in Live preview.
- Press Save brand.
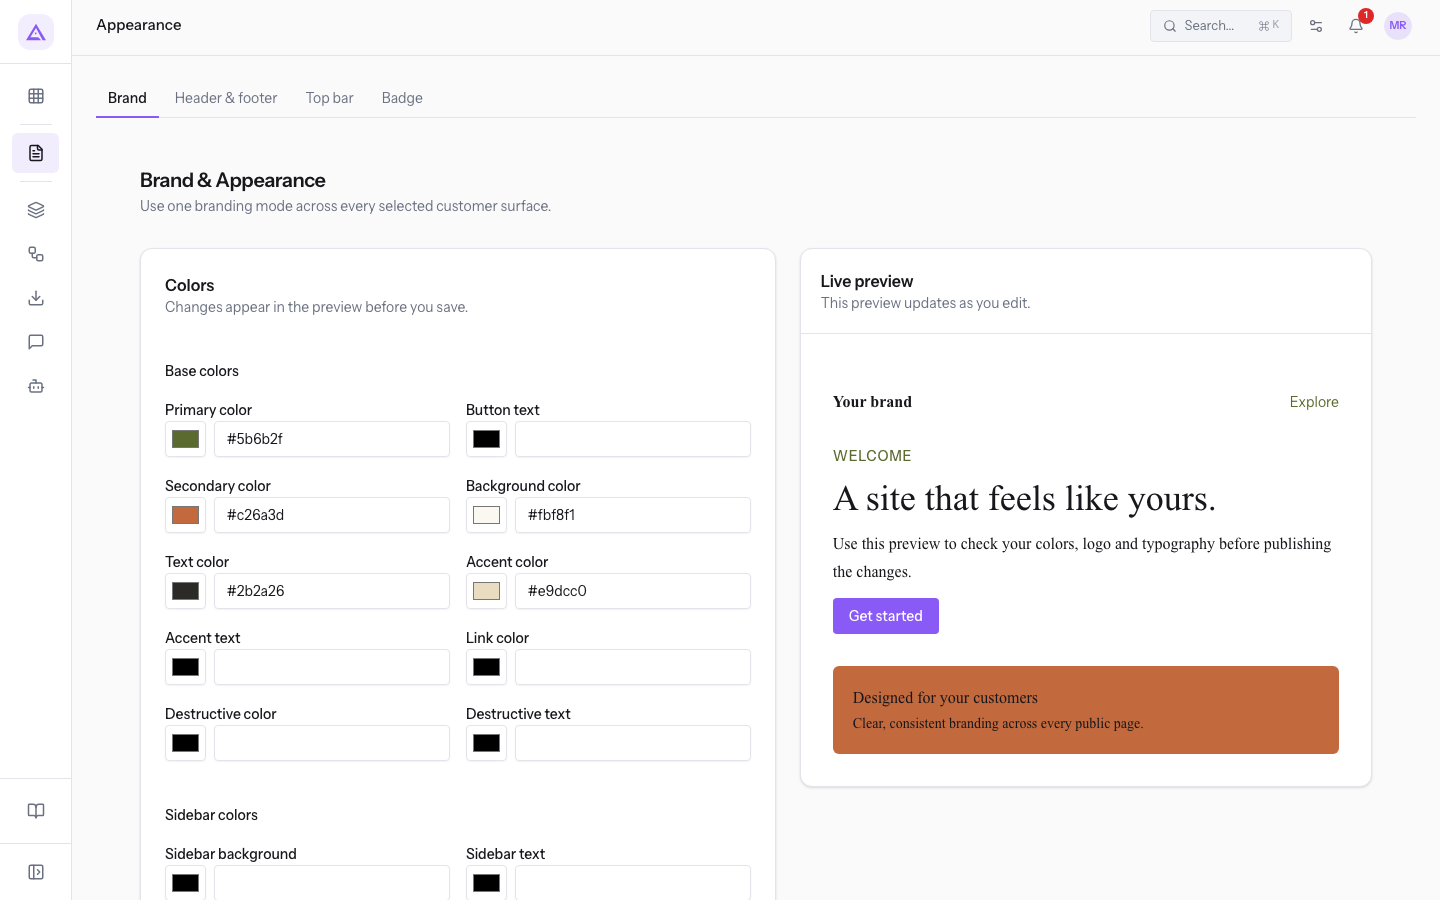
Colours
Each color has a picker and a field where you type the hexadecimal code. The colors are split into three groups.
Base colors:
- Primary color: in the demo
#5b6b2f, olive green. - Button text: the text color on buttons.
- Secondary color: in the demo
#c26a3d, terracotta. - Background color: in the demo
#fbf8f1. - Text color: in the demo
#2b2a26. - Accent color and Accent text: in the demo the accent color is
#e9dcc0. - Link color.
- Destructive color and Destructive text.
Sidebar colors: Sidebar background, Sidebar text, Sidebar primary, Sidebar primary text, Sidebar accent, Sidebar accent text, Sidebar border, Sidebar focus ring.
Portal chrome: Portal header, Portal header text, Portal footer, Portal footer text.
Typography
- Heading font: the font used for headings.
- Body font: the font used for body text.
For both fields the choices are Cormorant, Inter, Playfair Display, Montserrat and Libre Baskerville.
Replacing the site logo
Press Upload logo to replace the site logo. In Code mode replacement is locked, and the default logo is managed in Organization Profile.
Apply to
Select the areas that follow the brand:
- Public Site: active in the demo.
- Client Portal: not active in the demo. The portal is configured in Configure the client area: sign-in and portal home.
- Shop: active in the demo.
Tip: use Live preview to check colors, logo and typography before saving.
Showing the top bar
The top bar is a strip with a message that appears at the top of pages in the areas you select. You can add a link.
- Go to CMS › Appearance and open the Top bar tab.
- Turn on Show the topbar on the selected customer-facing pages in the Status section to show the bar.
- In Apply to, select the areas.
- Write the message for each language.
- Press Save at the top right of the tab.
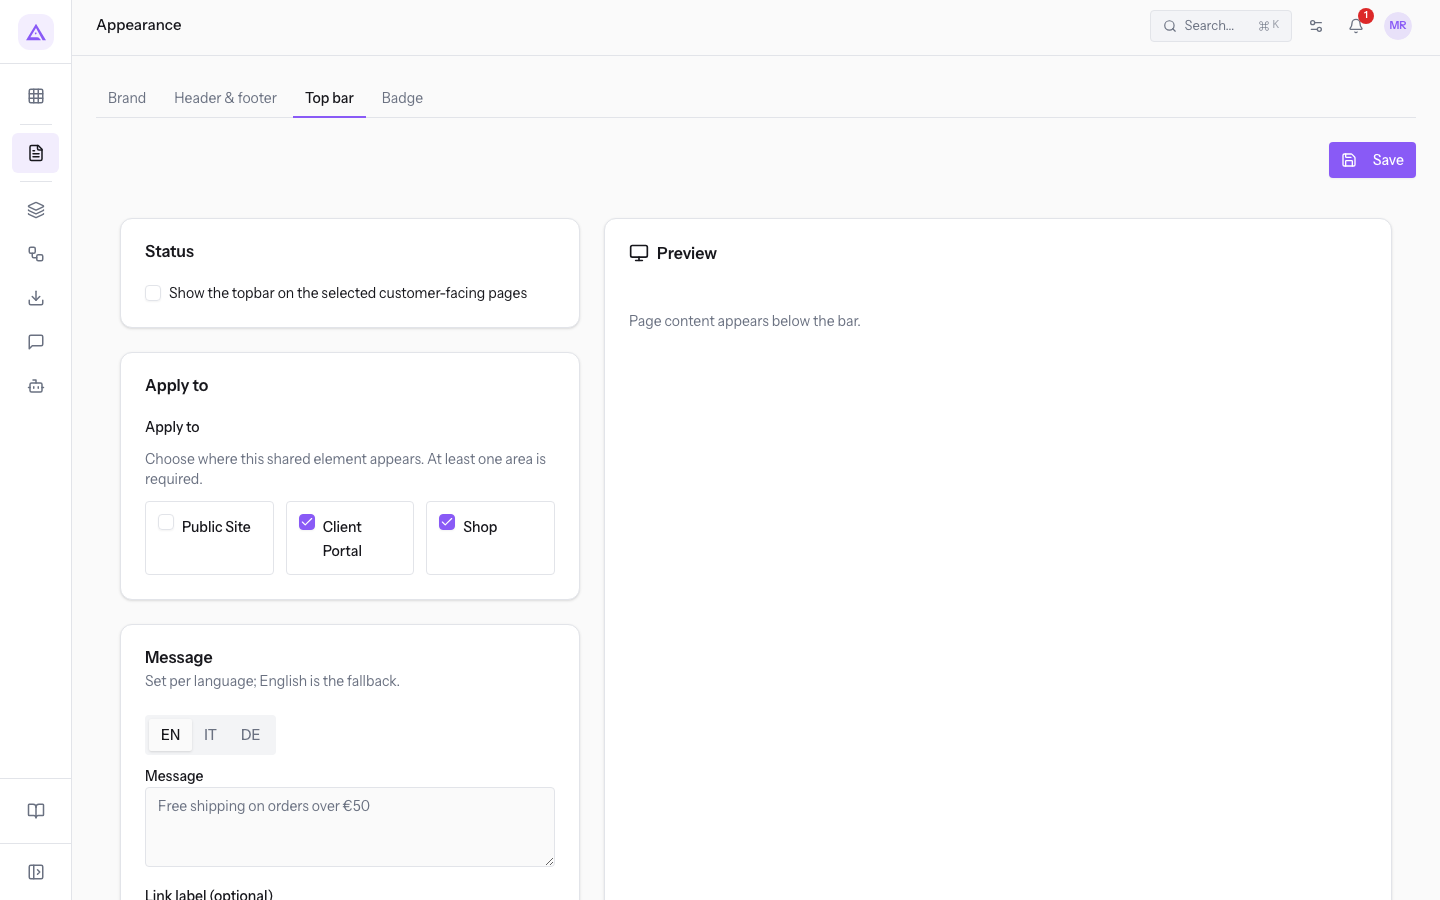
The tab's fields:
- Status: the option that shows or hides the bar. In the demo it is off.
- Apply to: Public Site, Client Portal, Shop. In the demo Client Portal and Shop are selected.
- Message: the bar's text. The EN, IT and DE tabs let you write it in each language.
- Link label (optional) and Link URL (optional): the link text and its address, which can be a site path or a full external address.
- Dismissal: an option that lets visitors close the bar. In the demo it is on.
Showing the WhatsApp badge
The WhatsApp badge is a fixed button that opens a WhatsApp chat with the organization's number.
- Go to CMS › Appearance and open the Badge tab.
- Turn on Show the WhatsApp badge on the selected customer-facing pages to show the badge.
- Enter the WhatsApp number.
- In Apply to, select the areas.
- Fill in the message, the tooltip and the position.
- Press Save at the top right of the tab.
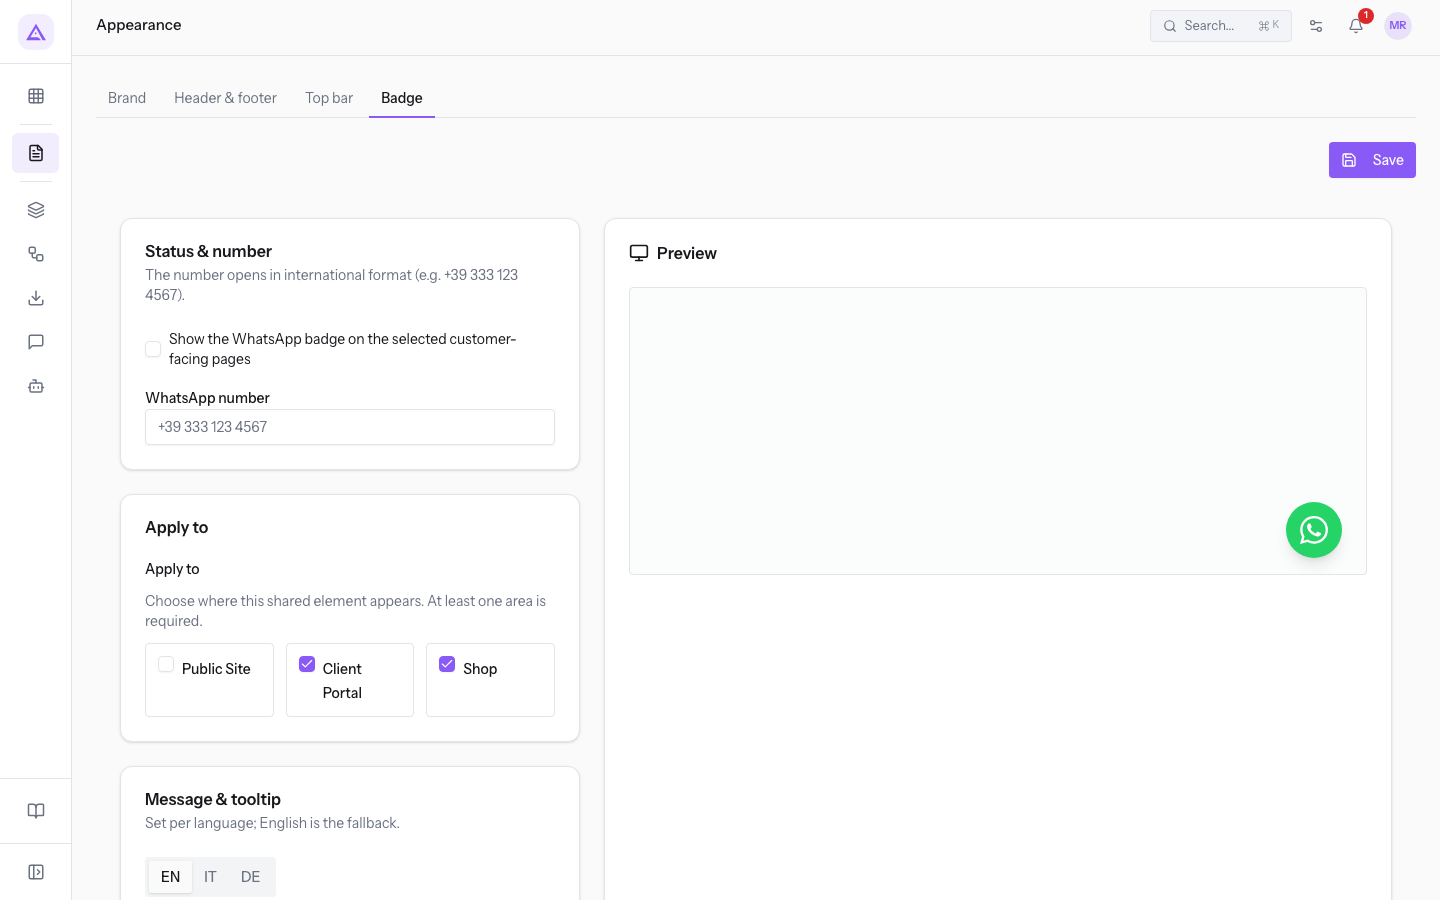
The tab's fields:
- Status & number: the option that shows or hides the badge, off in the demo.
- WhatsApp number: the number to contact, in international format, for example
+39 333 123 4567. - Apply to: Public Site, Client Portal, Shop. In the demo Client Portal and Shop are selected.
- Pre-filled chat message: the text already written in the chat that opens. The EN, IT and DE tabs let you write it in each language.
- Hover tooltip: the text that appears when you hover over the badge.
- Position: bottom right or bottom left of the page.
Note: clicks on the WhatsApp badge are one of the goals counted by site statistics, if statistics are on.
See it on your company, not on a slide deck.
In 30 minutes we map the software you use today.We show you how much work and how much margin Archimedes gives back.
Show me on my business →What industry are you in?
One tap — it lets us prepare the demo around your world.
What tools do you use today?
Pick the ones you recognise — or just type them. It helps us show you how they migrate.
Last step: your details.
We reply within one working day — and right after, if you like, you pick the demo slot yourself.
We couldn't send your request. Try again, or write to us at [email protected].
By sending, you agree to your data being processed so we can get back to you about the demo. Privacy notice.
Preview form — nothing is sent from this page.
Want to schedule the demo now?
Your call: book the slot you prefer yourself, or we'll call you to arrange it.
Live availability, 30 minutes, instant confirmation. The calendar opens in a new tab.
Lock in your slot ↗We'll get back to you within one working day — and we'll join the call already knowing your world.
The calendar is open in another tab: pick a slot and the demo is booked. Can't see it? Reopen it ↗
Preview page: nothing was sent.
Our calendar is live: take the slot that suits you and the demo is booked. 30 minutes, instant confirmation, no waiting.
Lock in your slot ↗