Projects
All modules
Configure project and task stages
Projects · 15 of 17 · 6 min read
Stages are the columns that projects and tasks move through on boards, such as Backlog or Cancelled. In Projects › Settings you define the stages shared across the entire organisation: the order, who is responsible for them, whether they close work, how they appear on the board, and what is required to leave them.
How stages work
Stages are divided into two lists, Project phases and Task phases. A stage can belong to one list only or to both.
- If the stage is only for the project board, choose Projects only.
- If the stage is only for tasks within a project, choose Tasks only.
- If projects and tasks go through the same steps, choose Projects and tasks: the stage appears in both lists and is marked as shared in each.
A stage marked as Closed concludes work with an outcome. If you move a task to a closing stage with a completed outcome, the task becomes Done, as if you had closed it yourself. If the stage has a cancelled outcome, the task becomes Cancelled. The module signals this before proceeding.
A stage and a project's status are two different things. Stages specific to a single project are managed from that project's board, not from the settings.
Note: Projects › Settings appears in the menu only to the Project Manager group. For other module users, stages are read-only.
Viewing stages
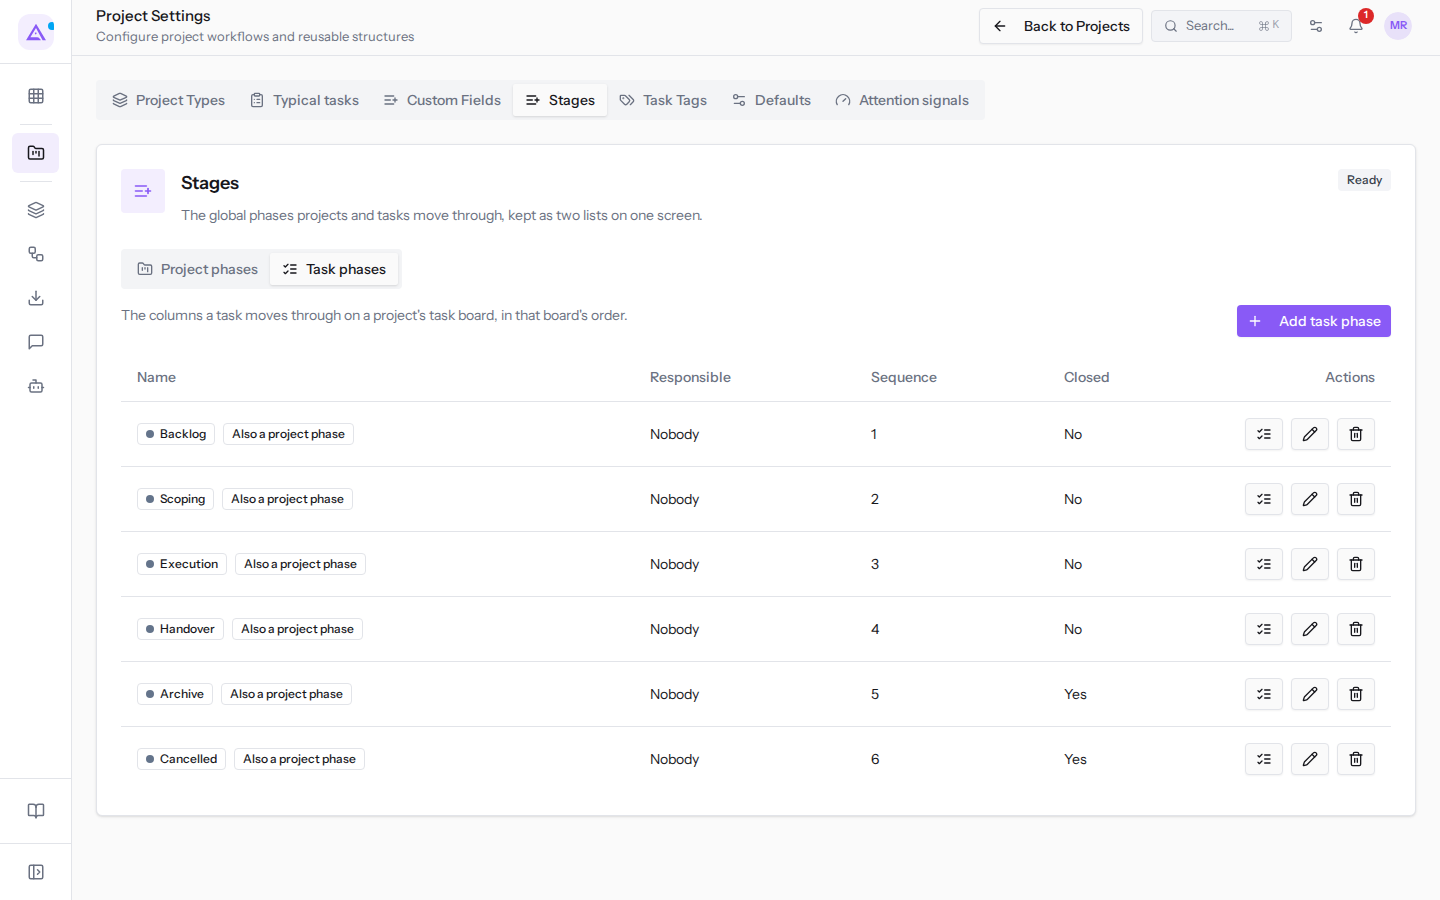
The Stages tab lists project stages and task stages, each with buttons to edit it, delete it, and view its typical tasks.
- Go to Projects › Settings.
- Open the Stages tab.
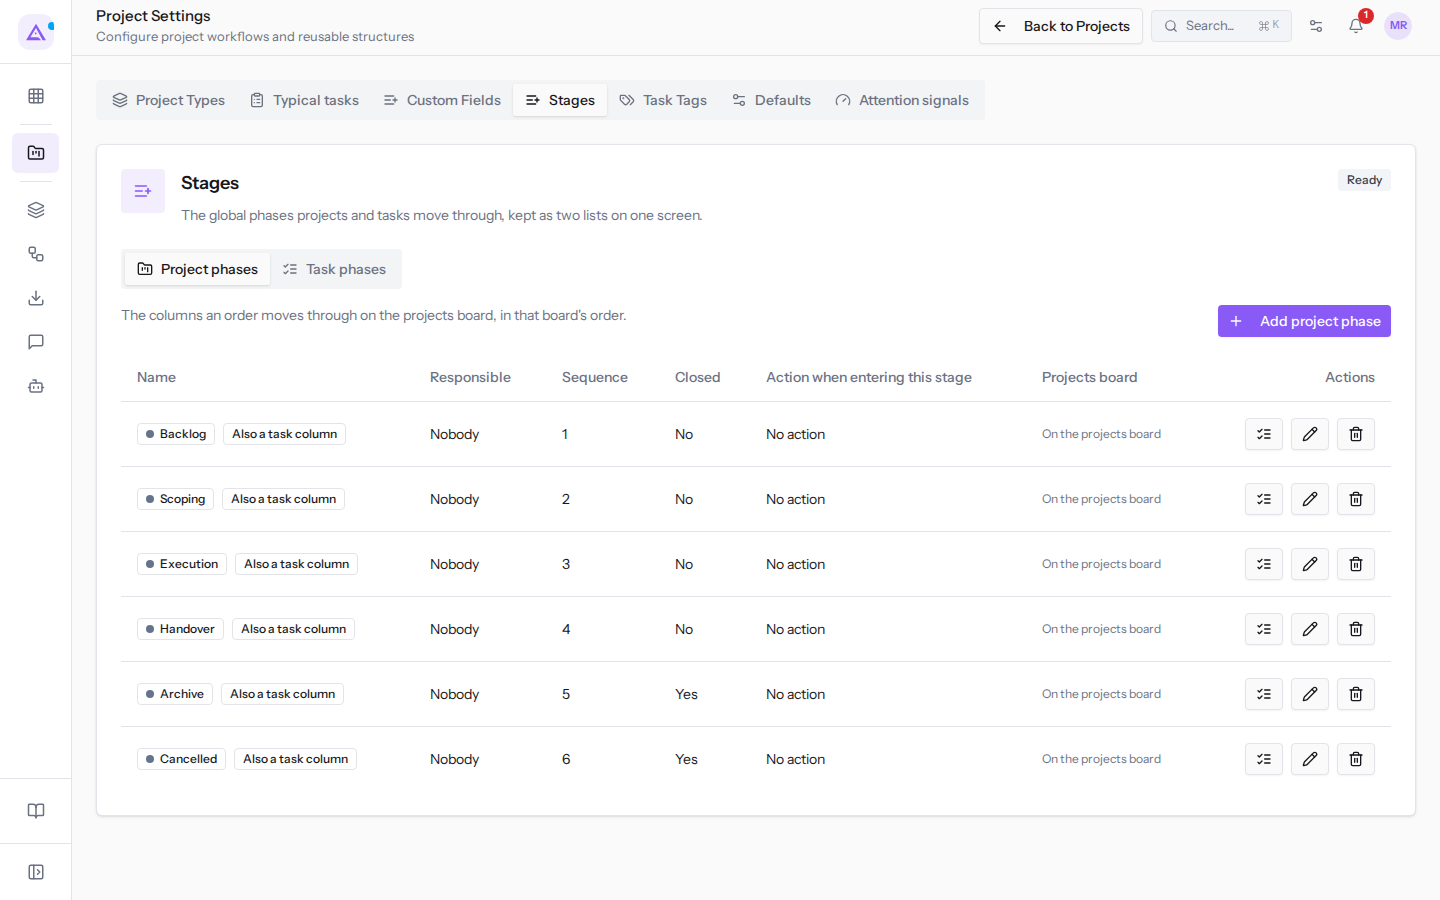
- Choose Project phases or Task phases to switch between lists.
The first stage is Backlog, with Sequence 1, and the last is Cancelled. Backlog is available in Projects and tasks.
Adding or editing a stage
The dialog is the same for both a new stage and an existing one.
- In the Stages tab, choose Project phases or Task phases.
- Click Add project phase or Add task phase. To change an existing stage, use the edit button on its row instead: this opens the Edit Stage dialog.
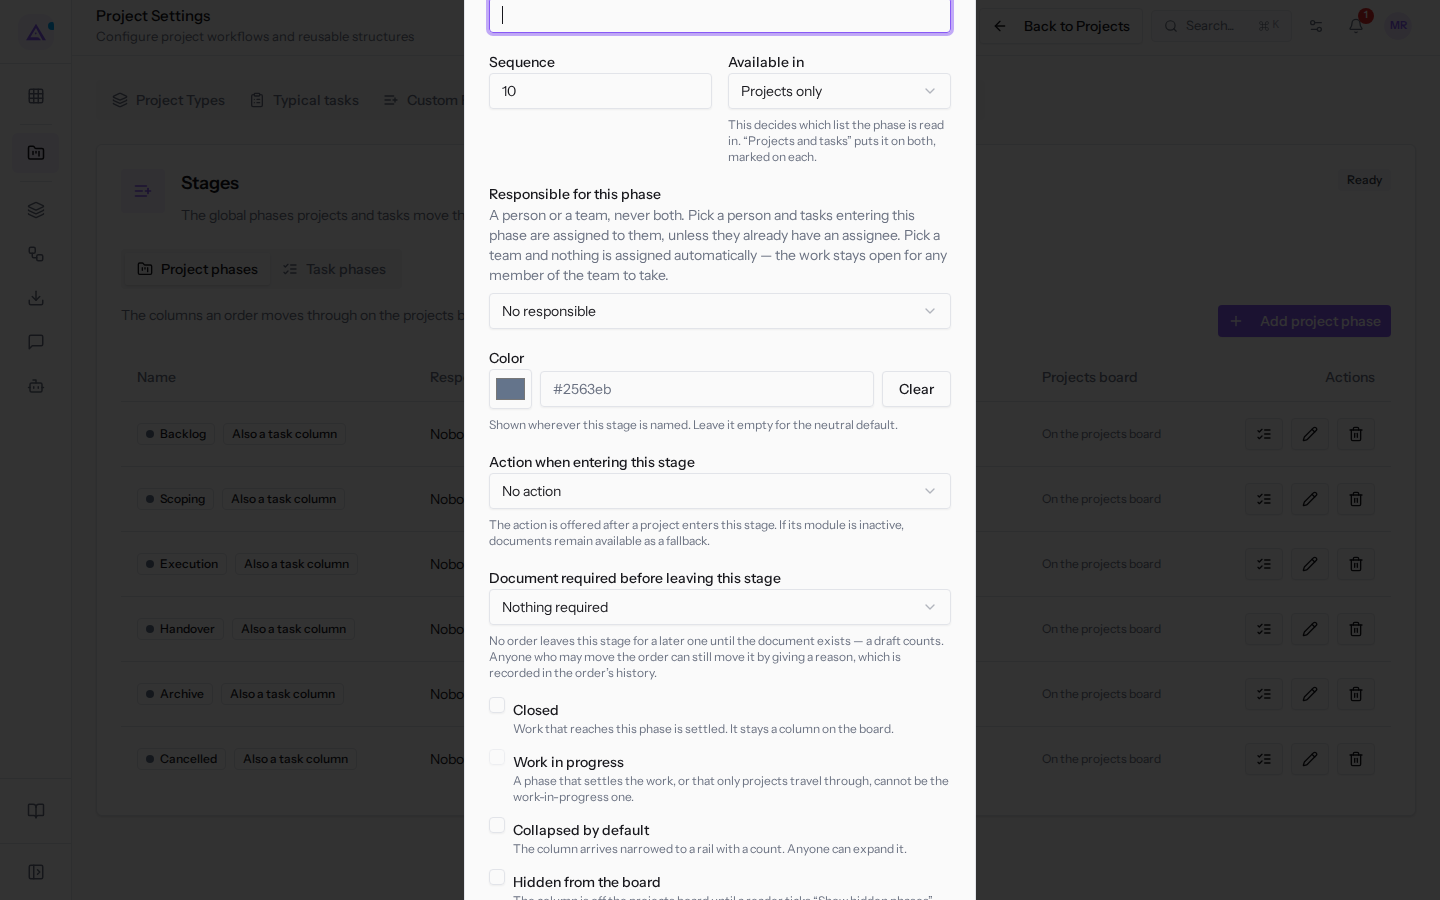
- Fill in the fields described below.
- Click Save Stage. To exit without saving, click Cancel.
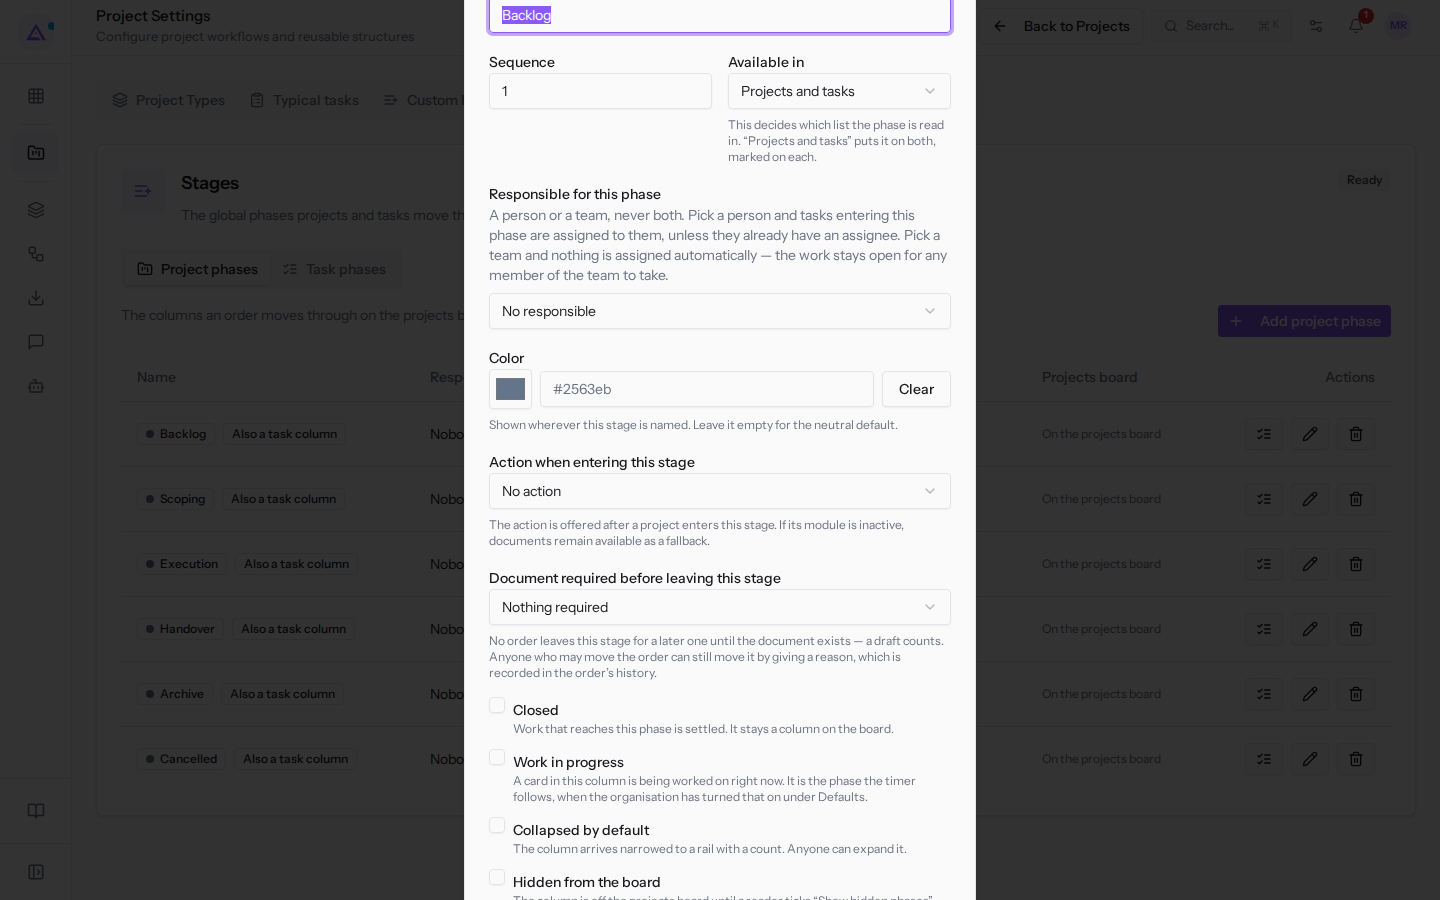
The dialog fields:
- Stage name: the name of the column on the board, for example
Backlog. - Sequence: the position of the stage in the list. For a new stage the suggested value is
10. - Available in: determines which list the stage appears in.
- Projects only: this is the suggested value when adding a project stage.
- Tasks only.
- Projects and tasks: adds the stage to both lists.
- Responsible for this phase: a person or a team, never both. If you choose a person, tasks that enter the stage without an assignee are assigned to them. If you choose a team, nothing is assigned, and a member of the team picks the task up. For example Mario Rossi or Assembly crew. The suggested value is No responsible.
- Color: the colour of the stage. For a precise value, type it in Color hex, for example
#64748b. - Action when entering this stage: a document to prepare when the project enters the stage.
- No action: the suggested value.
- Create quotation.
- Create invoice.
- Document required before leaving this stage: a document that must exist before the project can move to the next stage. See the next section.
- Closed: the stage concludes work. When you select this, the What this phase settles work at field appears.
- Done: the suggested value.
- Cancelled.
- Work in progress: a card in this column is being worked on at that moment. This is the stage the timer tracks, if the organisation has enabled the option in the default settings.
- Collapsed by default: the stage column appears collapsed on the board.
- Hidden from the board: the stage column does not appear on the project board until someone enables Show hidden phases.
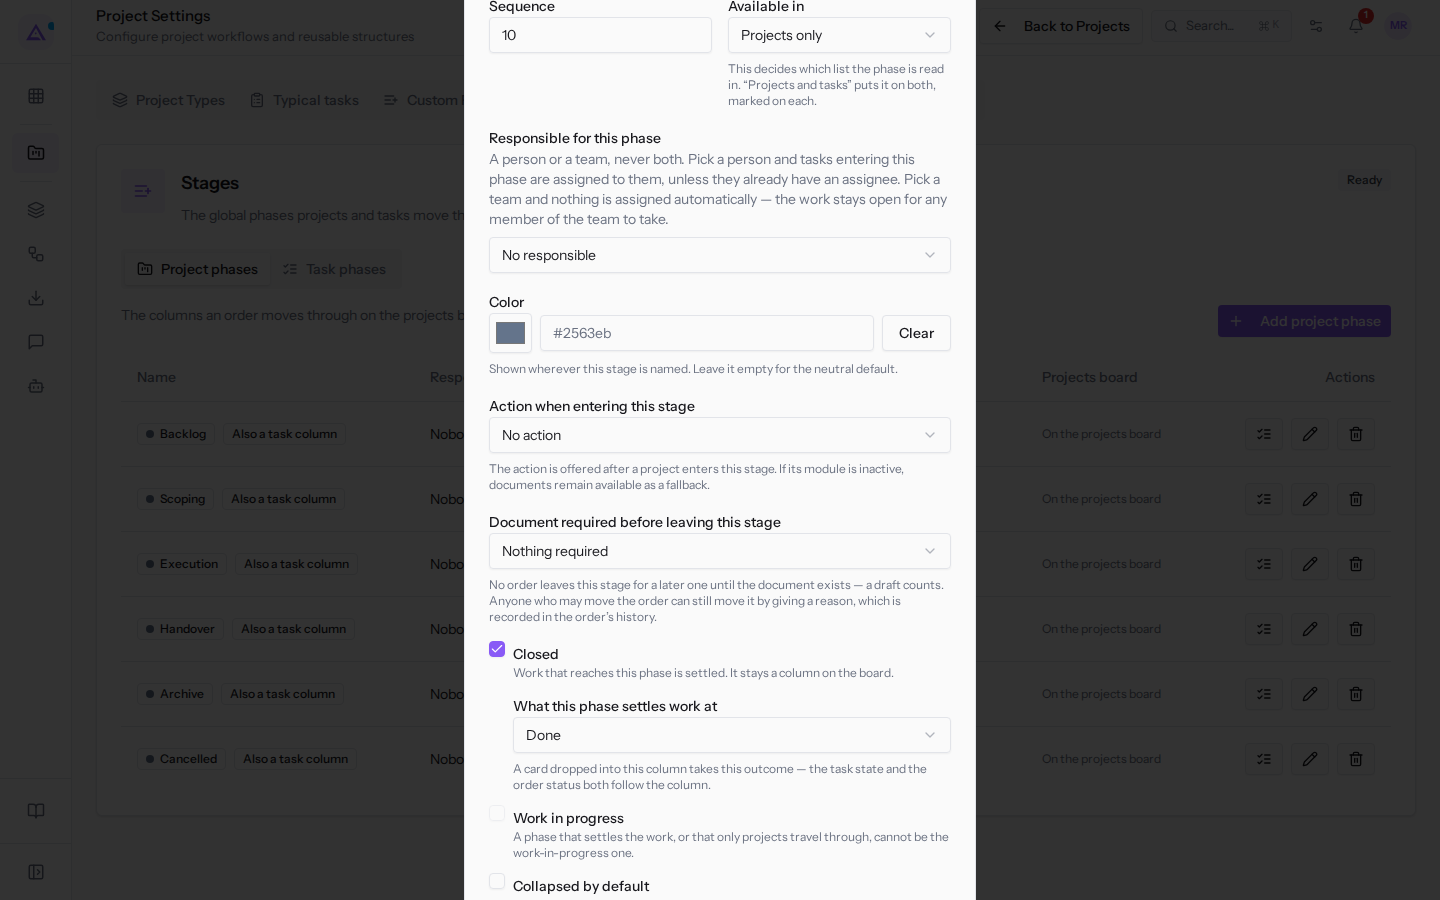
Important: a stage that concludes work, or that only projects go through, cannot be the in-progress stage.
Note: with the timer active, moving a task out of an in-progress stage stops all running timers on it and records their hours. Moving it between two in-progress stages stops nothing.
Requiring a document to leave a stage
The required document holds the project in the stage until the quotation or invoice exists. A draft is enough, unless you require a specific status. This applies only to project stages.
If someone moves the project anyway, the This phase is holding the order dialog appears. They write the reason in Why is the order moving without it? and press Move it anyway, or Leave it where it is. The reason and their name remain in the history.
-
In the stage dialog, open Nothing required and choose the document.
- Nothing required: the stage has no exit requirements.
- A quotation must exist.
- An invoice must exist.
-
Choose the status the document must have. For a quotation the options are:
- Any state — it only has to exist: the suggested value.
- The quotation has been sent.
- The customer has accepted the quotation.
For an invoice the options are Any state — it only has to exist, The invoice has been posted, and The invoice has been paid.
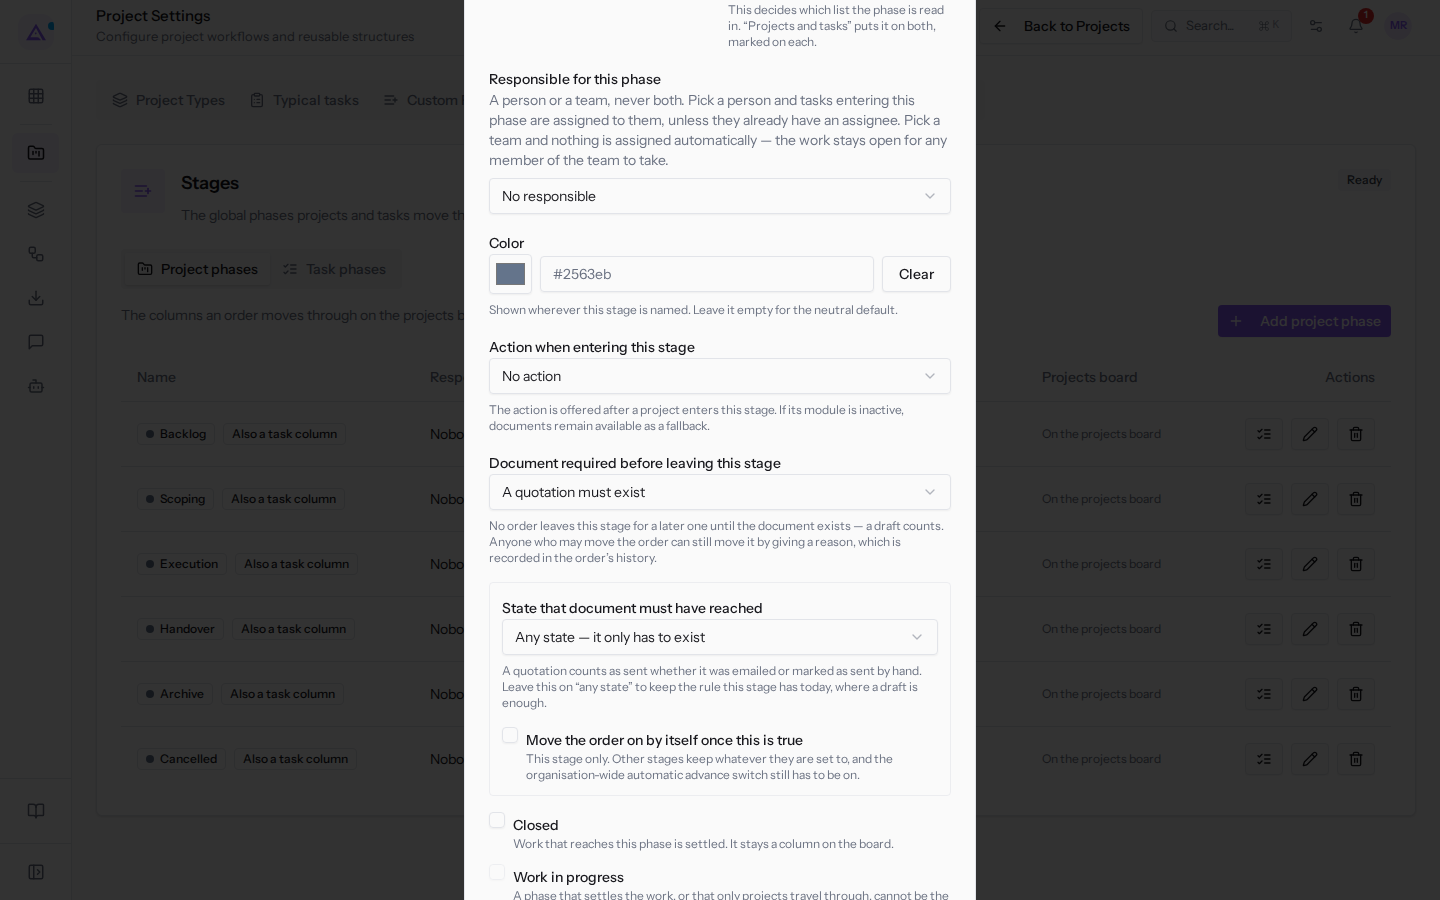
- Optional: select Move the order on by itself once this is true. The checkbox only appears after you have chosen a document and only works if automatic advancement is enabled in the default settings.
- Click Save Stage.
Note: if automatic advancement is enabled in the default settings, the automation never closes a project on your behalf. It stops before a stage that closes it and before leaving a stage that is missing its required document. Moving a project manually always takes precedence.
Note: if the module needed for the document is not active, the action is not available. In that case, attach external documents to the project.
When to use a hidden or collapsed stage
Both options only change how the column appears on the board, not where the projects are.
- If the stage is rarely used and you want to remove it from the board, for example an archive stage or
Cancelled, choose Hidden from the board. Those who need it can reveal it with Show hidden phases. - If you want the column to remain on the board but take up less space, choose Collapsed by default.
- If the stage is part of everyday work, leave both options disabled.
To move projects between stages, see Moving projects between stages in the Kanban; to review their history, see Retracing a project's history.
See it on your company, not on a slide deck.
In 30 minutes we map the software you use today.We show you how much work and how much margin Archimedes gives back.
Show me on my business →What industry are you in?
One tap — it lets us prepare the demo around your world.
What tools do you use today?
Pick the ones you recognise — or just type them. It helps us show you how they migrate.
Last step: your details.
We reply within one working day — and right after, if you like, you pick the demo slot yourself.
We couldn't send your request. Try again, or write to us at [email protected].
By sending, you agree to your data being processed so we can get back to you about the demo. Privacy notice.
Preview form — nothing is sent from this page.
Want to schedule the demo now?
Your call: book the slot you prefer yourself, or we'll call you to arrange it.
Live availability, 30 minutes, instant confirmation. The calendar opens in a new tab.
Lock in your slot ↗We'll get back to you within one working day — and we'll join the call already knowing your world.
The calendar is open in another tab: pick a slot and the demo is booked. Can't see it? Reopen it ↗
Preview page: nothing was sent.
Our calendar is live: take the slot that suits you and the demo is booked. 30 minutes, instant confirmation, no waiting.
Lock in your slot ↗