Projects
All modules
Create and organize project tasks
Projects · 7 of 17 · 7 min read
Tasks are the work of a project, divided by phase. From a project's record you can create them, move them between phases, filter them, and bulk-add the tasks of a project type. For example the site visit, the furniture order, the installation, a periodic check-in with the client.
Three ways to create a task, depending on what you need:
- If the work is one of the usual tasks for a phase, add it from the Kanban by choosing a typical task: the name and settings come from the catalogue.
- If you need a deadline, assignee, priority, milestone, or recurrence, use New Task.
- If you need to add all the tasks of a project type, use Add task block.
The task Kanban
The Kanban tab shows the project's tasks in columns, one per phase.
- Open Projects › All Projects and choose the project, for example
Studio Bianchi office fit-out. - Open the Kanban tab.
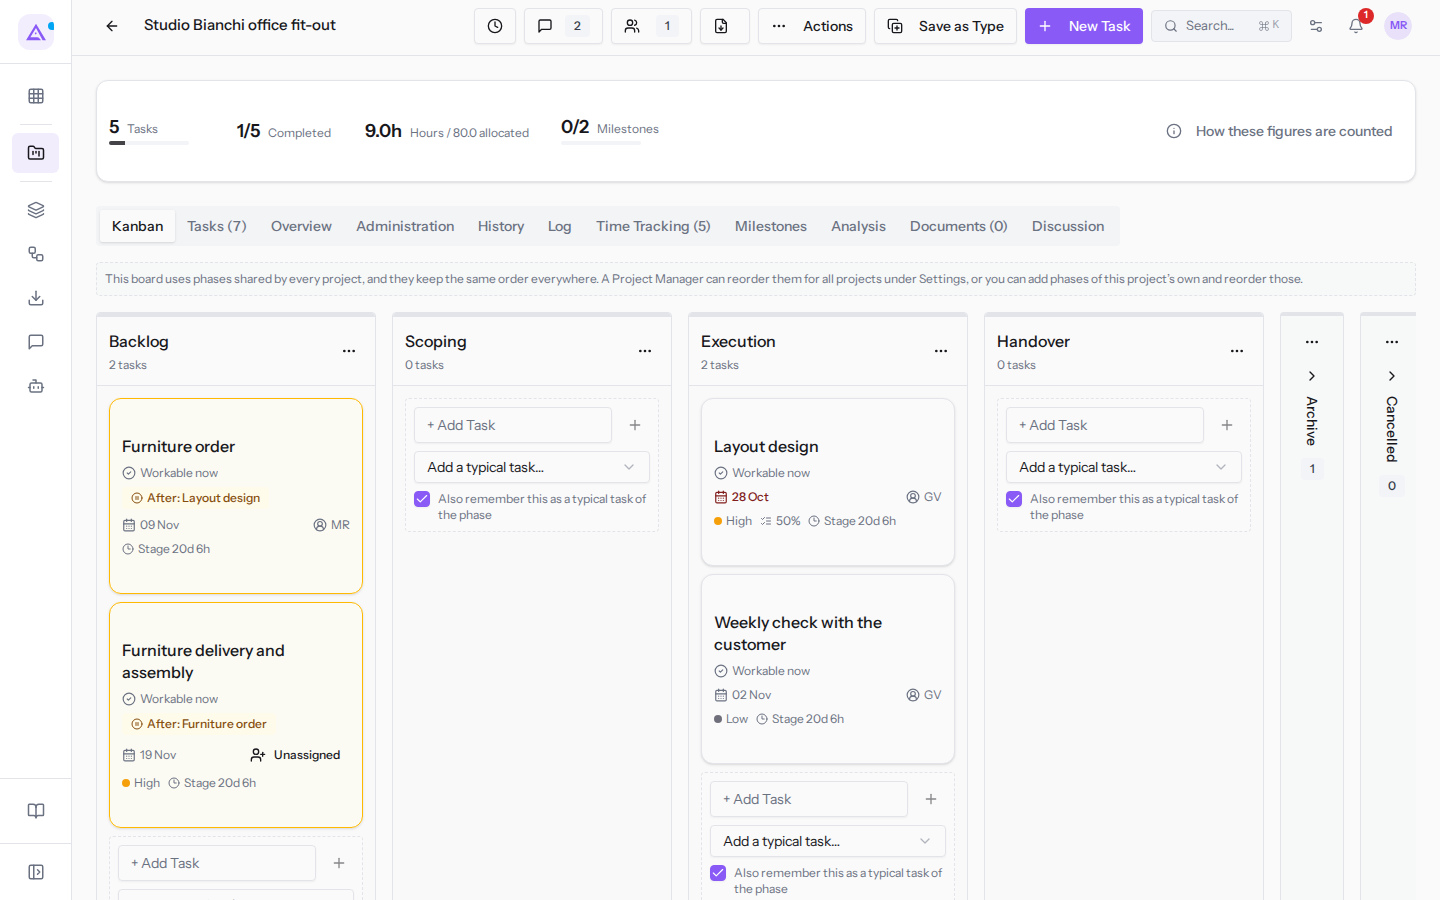
In Studio Bianchi office fit-out the columns are Backlog, Scoping, Execution and Handover; Archive and Cancelled are collapsed on the right side. Each task card shows:
- the task name, for example
Furniture order; - when it becomes workable, for example Workable now;
- the task it depends on, for example
Dopo: Layout design; - the deadline, or No deadline;
- the assignee's initials, or Unassigned.
Adding a task from a column
At the bottom of each column you can add a task in that phase.
- In the phase column, type the task name in the + Add Task field and press Enter, or use the + button next to the field.
- Alternatively, open the Typical task of the phase list and choose one of the typical tasks for that phase. For example in the Backlog column choose
Site inspection and measurements. - The chosen task appears immediately in the column, Unassigned and with No deadline.
The fields:
- + Add Task: the name of the new task.
- Typical task of the phase: the list of typical tasks associated with the column's phase. The initial value is Add a typical task….
- Also remember this as a typical task of the phase: if checked (it is by default), the name typed is added to the phase's typical tasks.
Note: the list of typical tasks is set up in the module settings. See Prepare project types and typical tasks.
Adding a column
A project can have its own phases, which are added from its board rather than from the settings.
- In the Kanban tab, go to the far right.
- Type the name of the new phase in the + Add a Column field, for example
Collaudo, and press Enter or the + button.
Moving a task between phases
The column a task is in determines its status. To change phase, drag the task card to another column.
What happens based on the destination column:
- If you move it to a phase marked as closing, the task moves to Done status, as if you had closed it yourself.
- If you move it to a rejected phase, the task moves to Cancelled status.
Before closing the task, the confirmation Close this task? appears. Press Move and close to confirm the move and closure.
Important: closing a task does not close its sub-tasks. Unfinished sub-tasks remain open.
The task grid
The Tasks tab lists the project's tasks in a grid. The number in brackets next to the tab name counts tasks and sub-tasks: 7 for Studio Bianchi office fit-out (5 tasks and 2 sub-tasks).
- In the project record, open the Tasks tab.
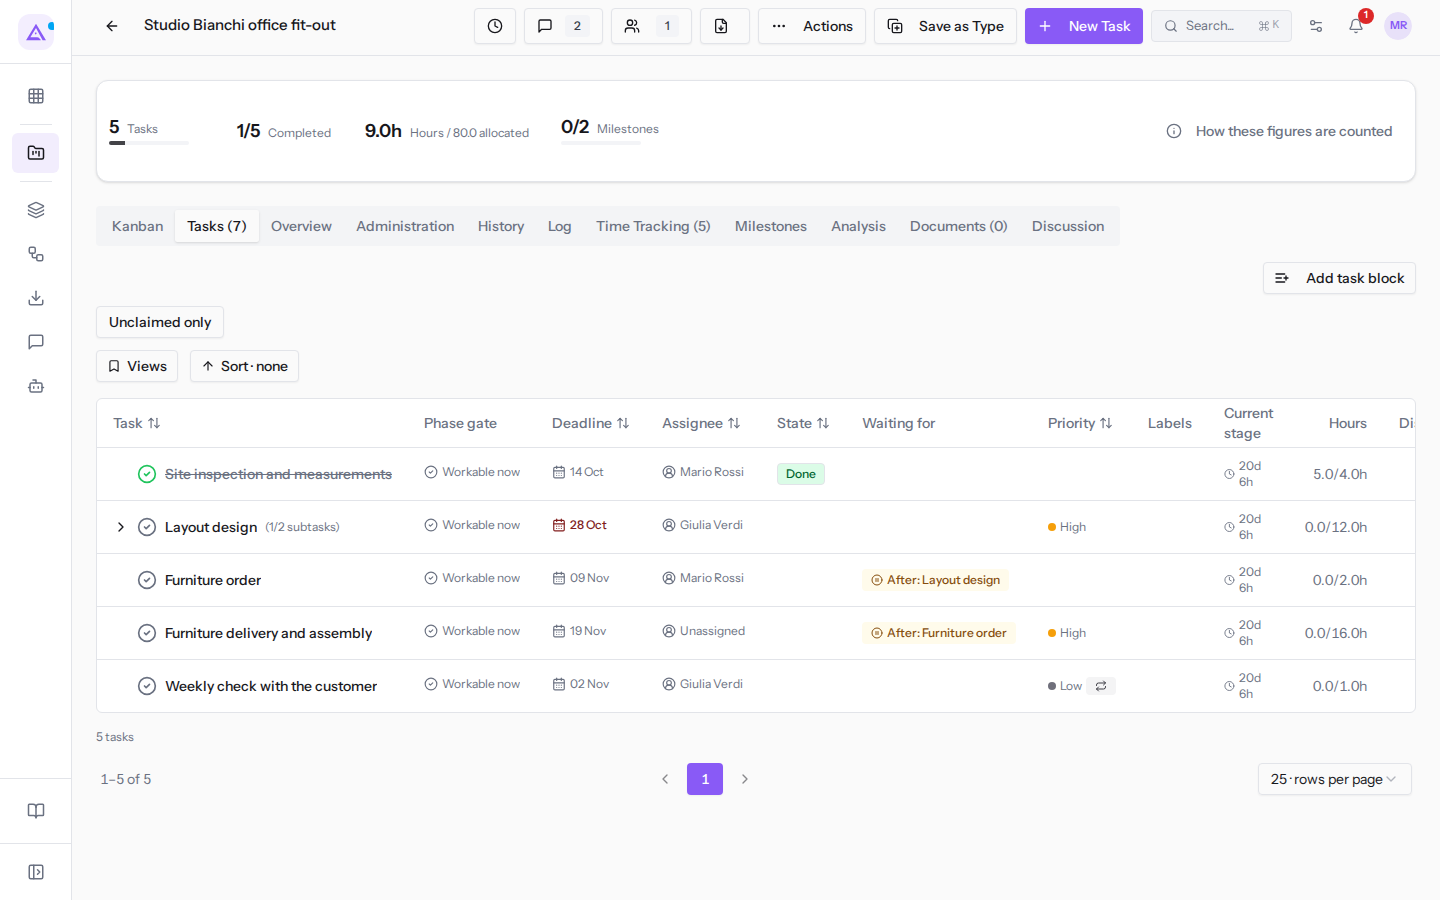
The columns:
- Task: the task name. With Show sub-tasks you see the sub-tasks, with Add Sub-task you add one.
- Phase gate: the phase from which the task becomes workable.
- Deadline: the date by which the task must be completed.
- Assignee: who is responsible for the task.
- State: the task's state.
- Waiting for: what the task is waiting for.
- Priority: the task's priority.
- Labels: the task's tags.
- Current stage: how long the task has been in its current phase, for example
19d 21h. - Hours: the task's hours.
- Discussion: the messages on the task.
Grid tools:
- Unclaimed only: shows only the tasks that no one has taken on yet. In
Studio Bianchi office fit-outFurniture delivery and assemblyremains. - Sort by Task, Sort by Deadline, Sort by Assignee, Sort by State, Sort by Priority: sort the grid.
- Add column: shows or hides columns, including from the other available fields. Reset columns returns to the initial columns.
- Rows per page: how many tasks to show per page.
Adding a task block
A block adds to the project all the tasks of a project type, with labels, planned hours, dependencies, and sub-tasks. Use it on an already open project, when you need all the work of a project type.
- In the Tasks tab, press Add task block.
- In the Add a block of tasks dialog, choose the project type in the Task block field, for example
Office fit-out · 4 attività. - Press Add task block.
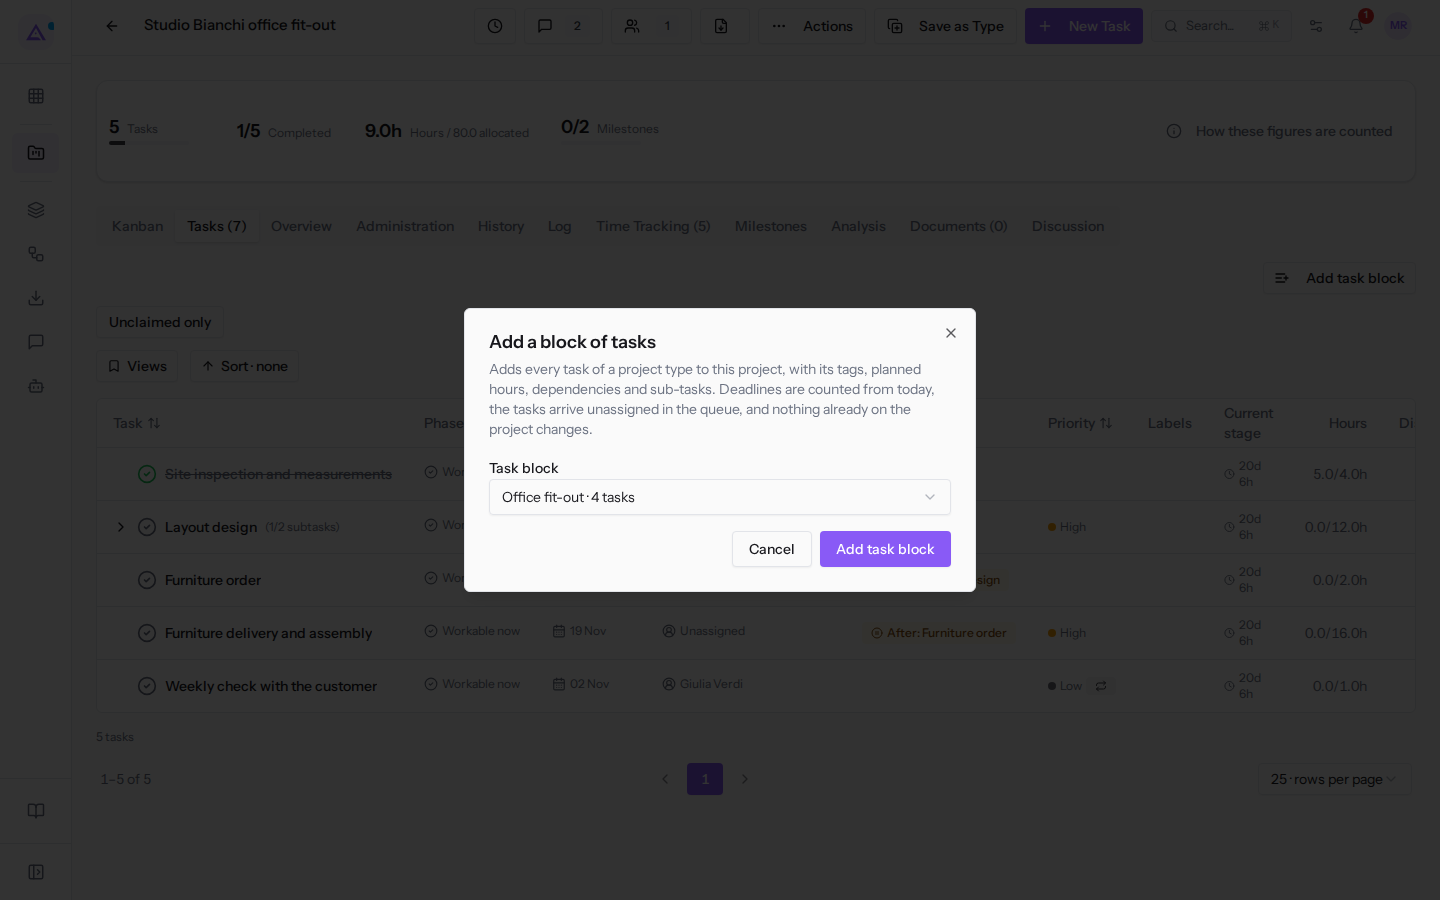
- Task block: the project type to copy tasks from. Each entry indicates how many tasks it contains.
What happens automatically:
- deadlines are calculated from today;
- tasks arrive unassigned, in queue;
- nothing already in the project is modified.
Creating a task with New Task
The New Task dialog collects all the data for a task at once.
- In the project record, press New Task.
- Fill in Task name and the other fields you need.
- Press Create Task. Cancel closes the dialog without creating anything.
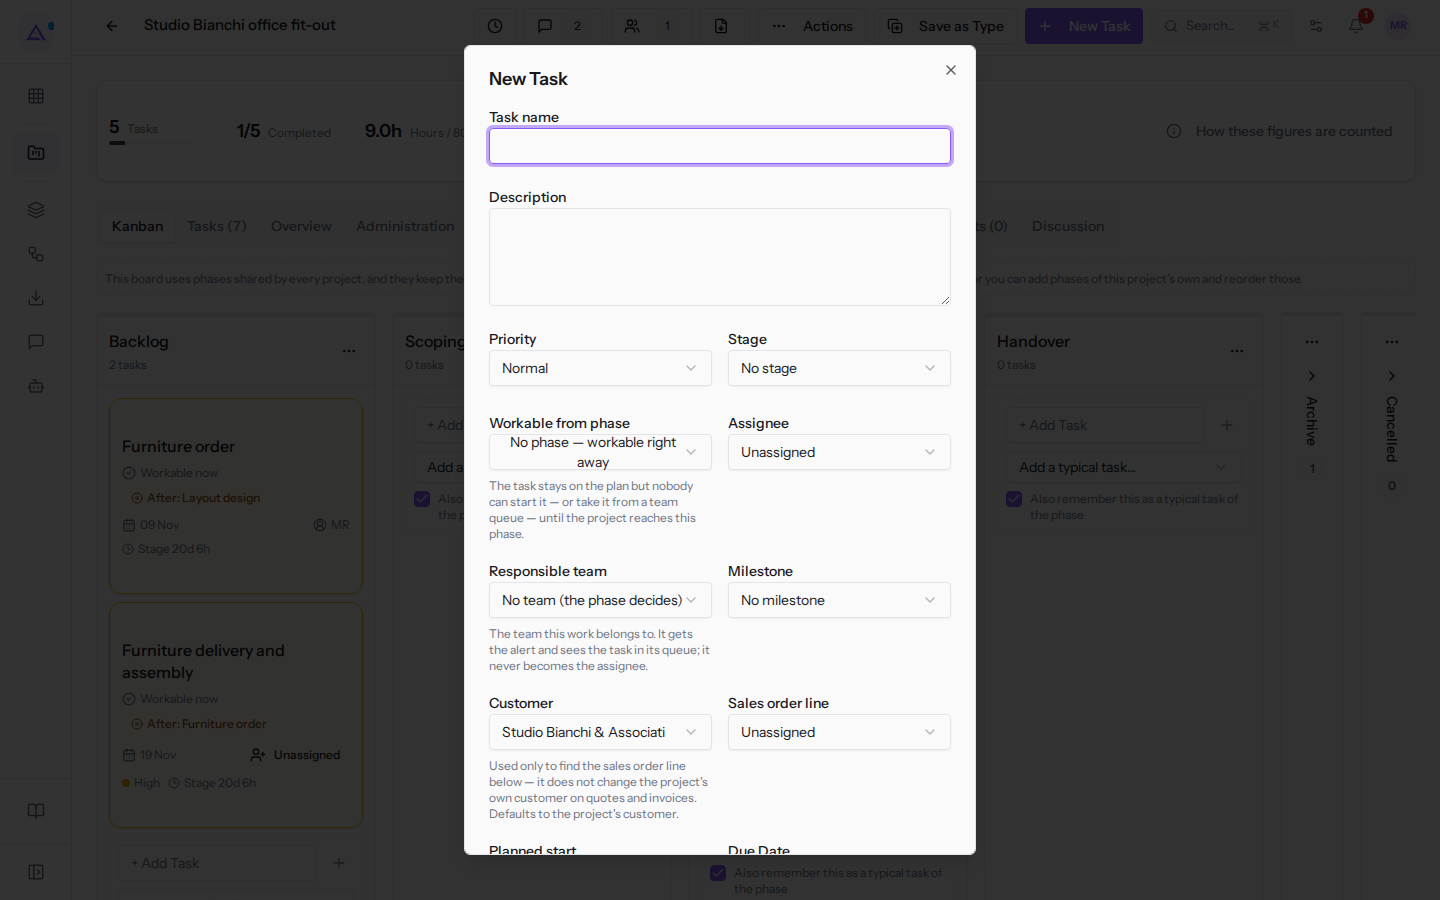
The fields:
- Task name: the task title. This field is required.
- Description: the text explaining the work.
- Priority: the initial value is Normal.
- Low
- Normal
- High
- Urgent
- Stage: the Kanban column in which to place the task. The initial value is No stage; the other options are the project's phases.
- Workable from phase: the phase from which the task can be worked on. The initial value is No phase — workable right away.
- Assignee: who is responsible for the task. The initial value is Unassigned.
- Responsible team: the team to assign the task to, for example
Assembly crew. The initial value is No team (the phase decides). - Milestone: the project milestone to link the task to, for example
Design approvedorFurniture delivered. The initial value is No milestone. - Customer: automatically filled with the project's client, for example
Studio Bianchi & Associati. - Sales order line: the sales order line to link the task to, for example
S00003 — Office space design. The initial value is Unassigned. - Planned start: the date on which the work should start.
- Due Date: the date by which the task must be completed.
- Planned hours: the planned hours for the task.
- Recurrence: checkbox that makes the task recurring. See the following section.
- Tags: the task's tags, to be chosen in Add tag....
If you choose an Assignee you assign the task to a specific person. If you leave it Unassigned and choose a Responsible team, the task remains unclaimed, like Furniture delivery and assembly for the Assembly crew.
Create a recurring task
A recurring task repeats at regular intervals, for example Weekly check with the customer, which repeats every week.
- In the New Task dialog, select Recurrence.
- Choose the frequency, specify how many units apart the repetition should be, and, if needed, the end date.
- Press Create Task.
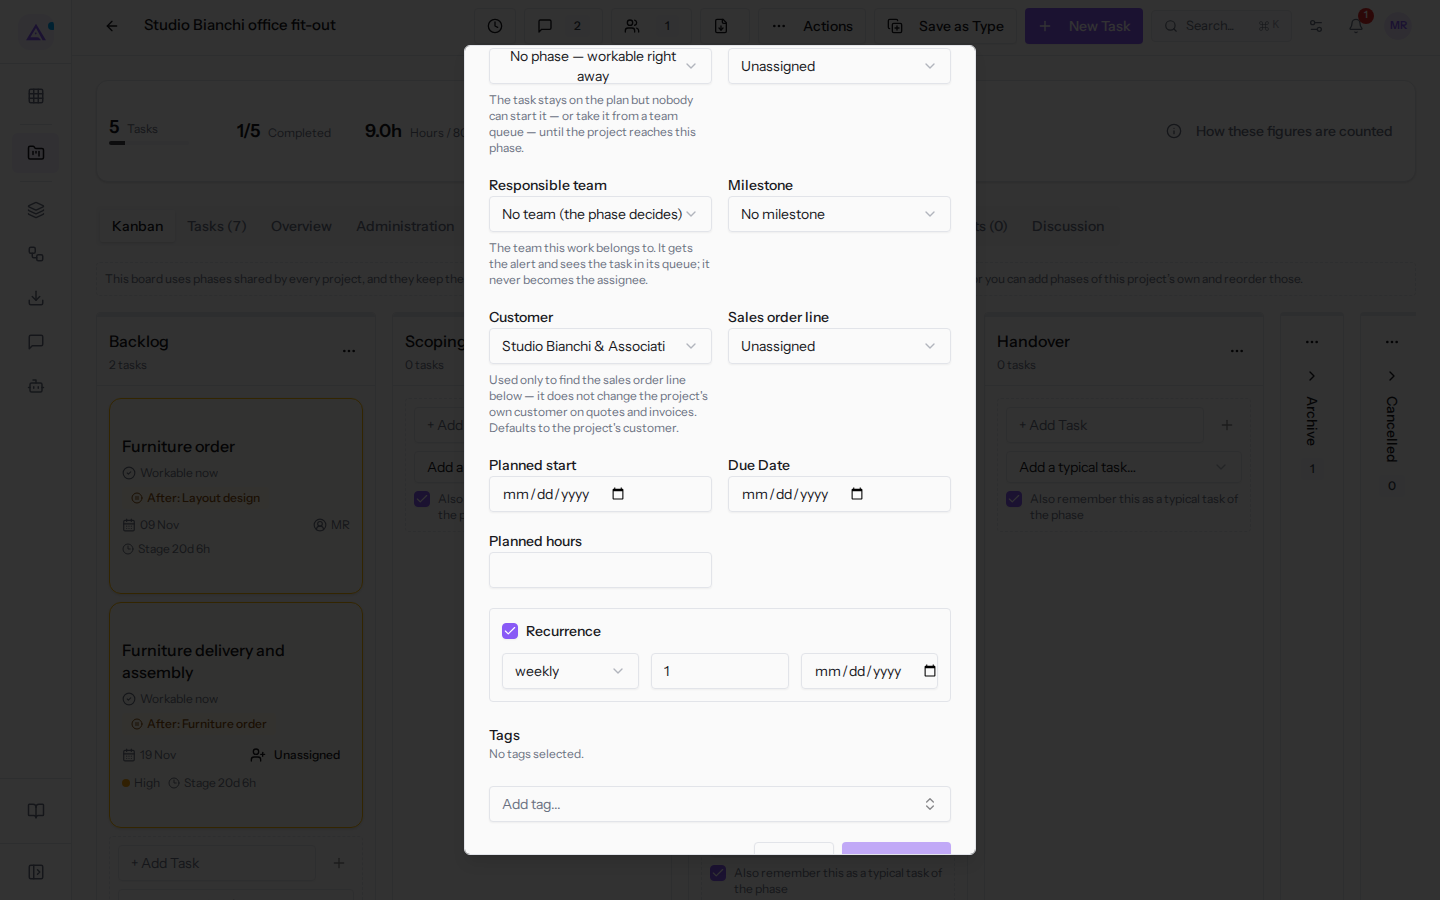
The fields that appear when you select Recurrence:
- the frequency: the dropdown with the repetition unit, daily, weekly or monthly. The initial value is weekly.
- the numeric field next to the frequency: how many units apart the task repeats. The default value is
1. - the date field on the right: the date on which the repetition stops.
To work on an already created task, with assignees, sub-tasks, and dependencies, open its card from the Kanban board or the grid.
See it on your company, not on a slide deck.
In 30 minutes we map the software you use today.We show you how much work and how much margin Archimedes gives back.
Show me on my business →What industry are you in?
One tap — it lets us prepare the demo around your world.
What tools do you use today?
Pick the ones you recognise — or just type them. It helps us show you how they migrate.
Last step: your details.
We reply within one working day — and right after, if you like, you pick the demo slot yourself.
We couldn't send your request. Try again, or write to us at [email protected].
By sending, you agree to your data being processed so we can get back to you about the demo. Privacy notice.
Preview form — nothing is sent from this page.
Want to schedule the demo now?
Your call: book the slot you prefer yourself, or we'll call you to arrange it.
Live availability, 30 minutes, instant confirmation. The calendar opens in a new tab.
Lock in your slot ↗We'll get back to you within one working day — and we'll join the call already knowing your world.
The calendar is open in another tab: pick a slot and the demo is booked. Can't see it? Reopen it ↗
Preview page: nothing was sent.
Our calendar is live: take the slot that suits you and the demo is booked. 30 minutes, instant confirmation, no waiting.
Lock in your slot ↗