Projects
All modules
Viewing and editing a project record
Projects · 6 of 17 · 6 min read
A project record brings together on a single page the figures, details, administrative documents, and people following a project, for example setting up an office or furnishing new premises. From here you edit the project data, decide who can see it, and issue quotes and invoices.
To open it, select a project from the list or the project board, for example Studio Bianchi office fit-out.
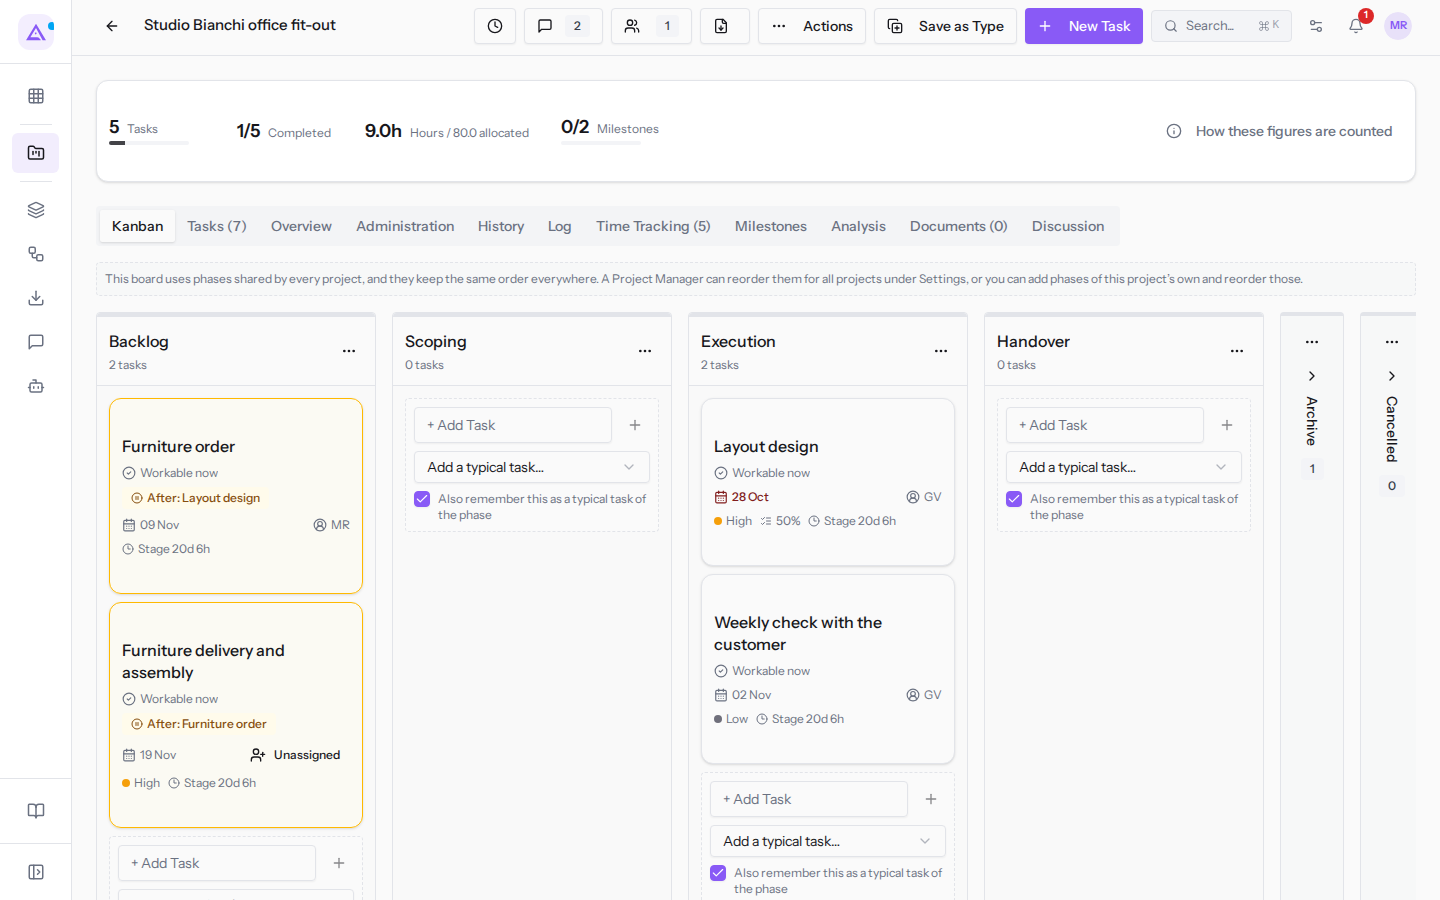
The project header and figures
At the top of the record you find the project name, four icon buttons (Log Time, Discussion, Followers and Export: the name appears when you hover over them), the Actions, Save as Type and New Task buttons, and a row of figures.
- Tasks: the number of tasks in the project. On
Studio Bianchi office fit-outit is 5. - Completed: completed tasks out of the total, for example 1/5.
- Hours: hours logged against hours allocated, for example 9.0h out of 80.0 allocated.
- Milestones: milestones reached out of the total, for example 0/2.
Select How these figures are counted to read the calculation rule: cancelled tasks are excluded from the task count, the completion percentage, and the total planned hours.
Note: if the Use milestones on projects option is disabled in settings, the Milestones tab and its figure in the row do not appear. Nothing is deleted, and re-enabling the option brings everything back as it was.
Below the header there are the Kanban, Tasks, Overview, Administration, History, Log, Time Tracking, Milestones, Analysis, Documents and Discussion tabs. A count appears next to Tasks, Time Tracking and Documents.
The Overview tab
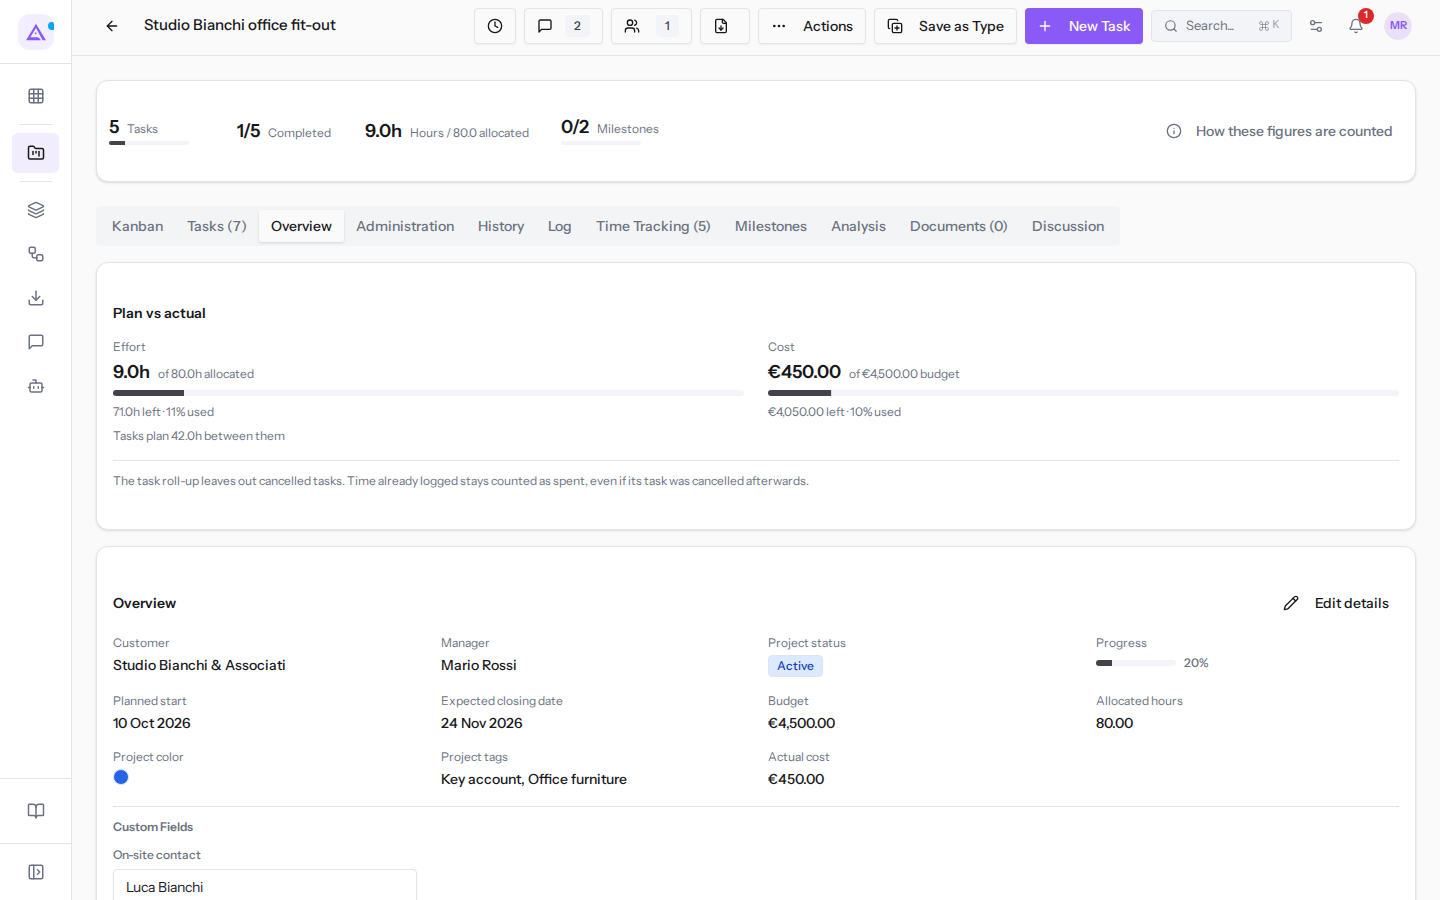
The Overview tab summarises the project plan and data.
- Open the project and select the Overview tab.
- Read the Plan vs actual, Overview and Custom Fields sections.
- To change the data, select Edit details: the Edit Project dialog opens, described further on.
The sections contain:
- Plan vs actual: compares what was planned with what was consumed, for Effort in hours and for cost. The panel appears only if the Show the plan-vs-actual panel on projects option is enabled. Hours, allocated hours, and budgets are recorded regardless, and attention triggers continue to fire: the option only decides whether the panel appears.
- Overview: the project details, including progress, Actual cost, Budget, Allocated hours, Planned start, Expected closing date and Privacy.
- Custom Fields: the values of project fields defined for the organisation, for example
On-site contact.
Note: hours are included in the project counts only after approval.
Custom fields and the panel option are configured in the module settings: see Adding custom fields and setting default values.
The Administration tab
The Administration tab shows the steps for the project quote and invoice, in the QUOTATION and INVOICE sections.
- Open the project and select the Administration tab.
- To issue the quote, select Create quotation.
- To issue the invoice, select Create basic invoice.
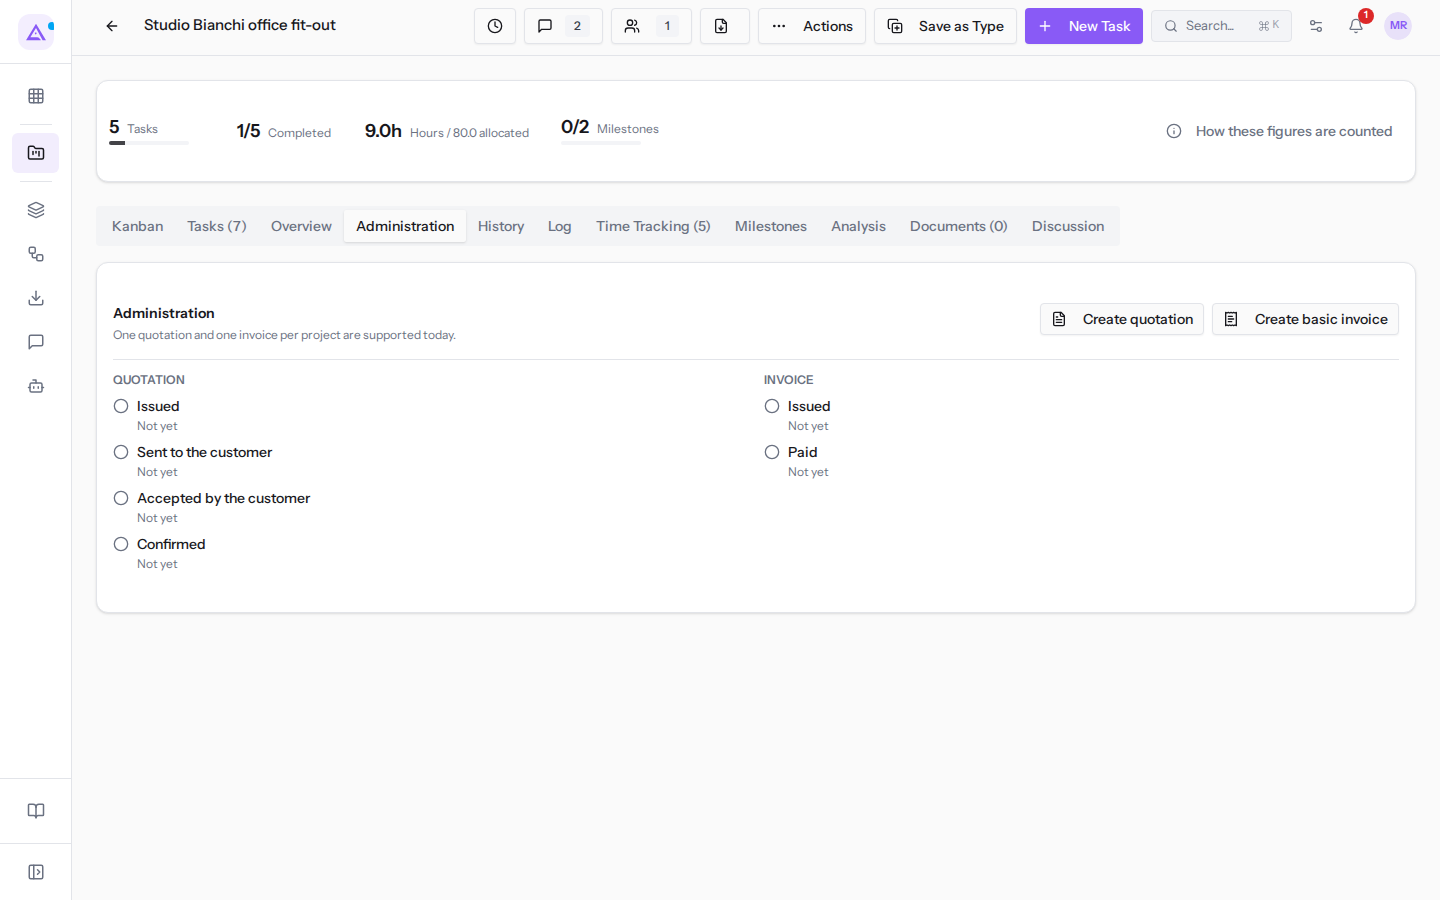
Important: the project must have a customer. If one is missing, the module asks you to add one before issuing an invoice.
Note: currently only one quote and one invoice per project are supported. If the Invoicing module is not active for the organisation, the invoice status is unknown; the same applies to the quote without the Sales module.
The Actions menu
The Actions menu in the header contains operations on the whole project.
- Edit Project: opens the dialog with all the project data.
- Task fields: shows the catalogue of task fields. Task fields are defined once for the whole organisation; to change them select Manage in Project Settings.
- Delete Project: deletes the project, after a confirmation prompt.
Important: deleting a project is reserved for module managers. Module users can edit a project but cannot delete it.
Editing a project
The Edit Project dialog contains all the project data.
- Open the project, select Actions and then Edit Project, or select Edit details in the Overview tab.
- Edit the fields.
- Select Save Project. To exit without saving, select Cancel.
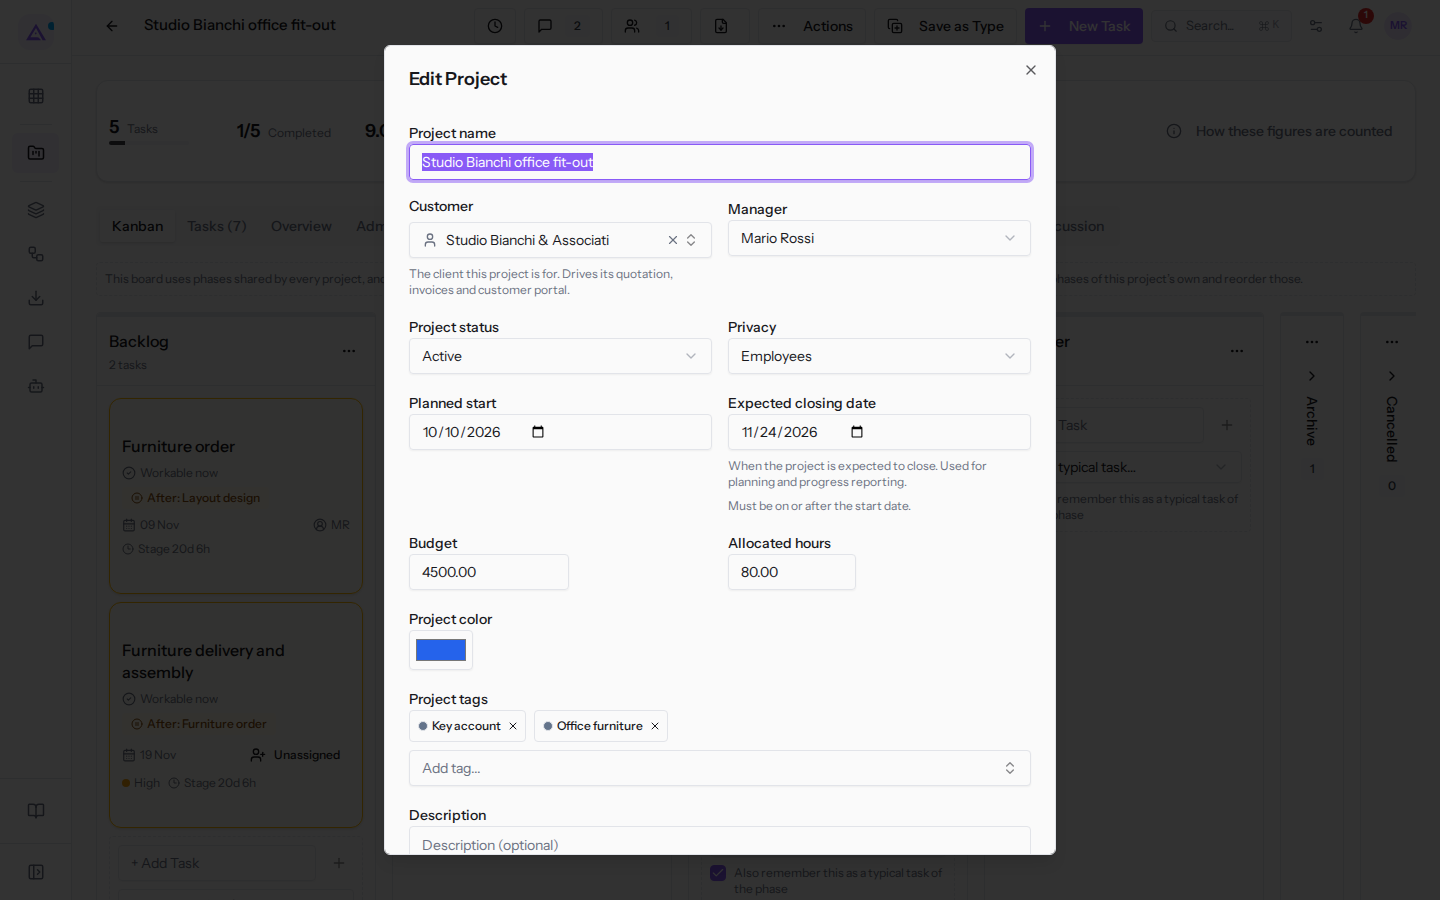
The dialog fields:
- Project name: the project title, for example
Studio Bianchi office fit-out. - Customer: the customer for the project, for example
Studio Bianchi & Associati. Determines quotes, invoices, and the customer portal. To remove it click the × in the field. - Manager: the person managing the project. The options are users and No manager.
- Project status: the project status, distinct from the stage.
- Active: the project is in progress.
- On Hold: the project is on hold, for example
Fienile renovation. - Done: the project is complete.
- Cancelled: the project is no longer going ahead.
- Privacy: who can open the project. The options are described in the following section.
- Planned start: the planned start date, for example 8 October 2026.
- Expected closing date: the planned end date, for example 22 November 2026.
- Budget: the expected amount for the project, for example
4500.00. - Allocated hours: the expected hours for the project, for example
80.00. - Project color: the colour with which the project appears, for example
#2563eb. - Project tags: type in Add tag... to add a tag; to remove one click the × next to its name.
- Description: free text about the project.
Choosing visibility
Visibility decides who can open the project. The Privacy field offers three options.
- Followers: the project is visible only to followers. An internal follower can open a project with this visibility.
- Employees: the project is visible to all internal users who have access to the module. This is the default, for example for
Studio Bianchi office fit-out. - Portal: the project is also accessible to customer contacts with portal access who follow it.
If the project concerns only a few people, choose Followers and add them as followers. If the customer needs to follow the project from the portal, choose Portal and add their account as a follower.
Managing followers
Followers are the people following the project. Following a project only controls visibility and does not trigger any notifications.
- In the project header, select Followers. The dialog shows the current visibility, for example Employees, and the existing followers.
- In Select a user, choose the person, for example
Mario Rossi. - Select Add follower.
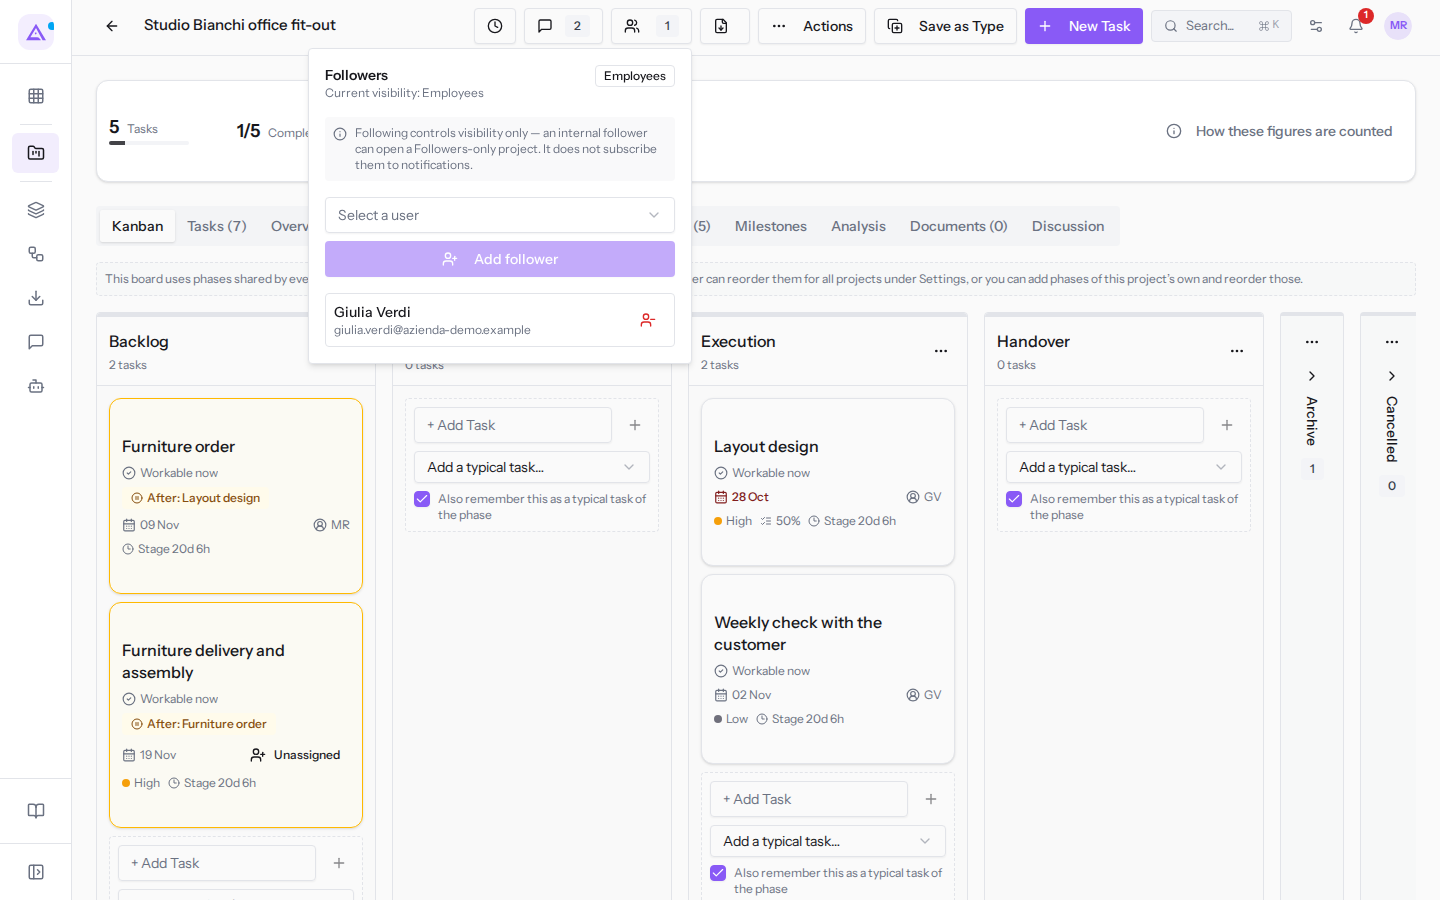
Among the followers you can add internal users and the customer's portal accounts, listed as Customer / portal accounts (grants portal access). Adding a customer/portal account grants them access to the Portal for this project.
To remove a follower, click the removal icon next to their name, for example next to Giulia Verdi.
See it on your company, not on a slide deck.
In 30 minutes we map the software you use today.We show you how much work and how much margin Archimedes gives back.
Show me on my business →What industry are you in?
One tap — it lets us prepare the demo around your world.
What tools do you use today?
Pick the ones you recognise — or just type them. It helps us show you how they migrate.
Last step: your details.
We reply within one working day — and right after, if you like, you pick the demo slot yourself.
We couldn't send your request. Try again, or write to us at [email protected].
By sending, you agree to your data being processed so we can get back to you about the demo. Privacy notice.
Preview form — nothing is sent from this page.
Want to schedule the demo now?
Your call: book the slot you prefer yourself, or we'll call you to arrange it.
Live availability, 30 minutes, instant confirmation. The calendar opens in a new tab.
Lock in your slot ↗We'll get back to you within one working day — and we'll join the call already knowing your world.
The calendar is open in another tab: pick a slot and the demo is booked. Can't see it? Reopen it ↗
Preview page: nothing was sent.
Our calendar is live: take the slot that suits you and the demo is booked. 30 minutes, instant confirmation, no waiting.
Lock in your slot ↗