Projects
All modules
Working on a task: assignees, sub-tasks, and dependencies
Projects · 8 of 17 · 7 min read
The task card brings together all the work on a single project task: who is carrying it forward, what phase it is in, sub-tasks, dependencies, instructions, attachments, and the discussion. For example, use it to follow a site visit, a space layout project, or a furniture order.
To open it, go to Projects › All Projects, open a project, for example Studio Bianchi office fit-out, choose the Tasks tab, and click the task name, for example Layout design. To return to the project, click its name at the top, above the task title.
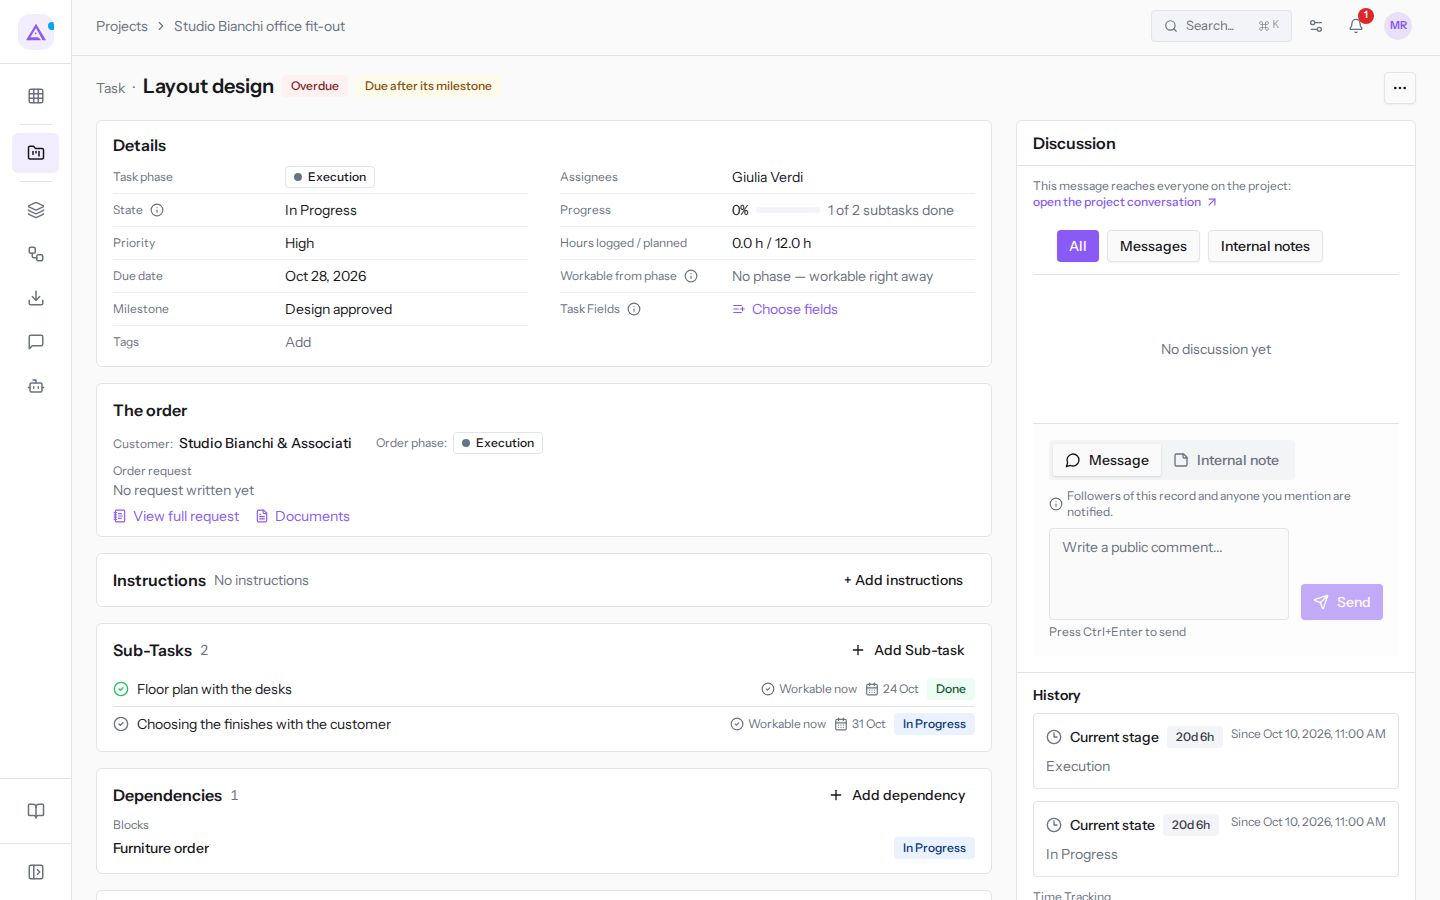
The task summary
At the top the card shows the task name and any alerts about it. Layout design shows Overdue and Due after its milestone. A task waiting on another shows the name of that task, for example Dopo: Layout design on Furniture order.
The Details section contains:
- Task phase: the project phase the task is in, for example Execution. Click the value to choose another phase: Backlog, Scoping, Execution, Handover, Archive and Cancelled.
- State: the work state, for example In Progress. The field is read-only and follows the phase (see Task states and phases).
- Priority: the task priority, for example
High. - Due date: the due date, for example
Oct 26, 2026. - Milestone: the linked milestone, for example
Design approved. If the task is due after the milestone, the Due after its milestone alert appears. - Tags: click Add to add one. Tags come from the organisation's shared catalogue.
- Assignees: the people assigned to the task, for example
Giulia Verdi. - Progress: the percentage and completed sub-tasks, for example
1 of 2 subtasks done. - Hours logged / planned, for example
0.0 h / 12.0 h. - Workable from phase: the phase from which the task becomes workable. The value
No phase — workable right awaymeans work can start immediately. With a phase specified, the task remains in the plan but no one can start it or pick it from a team queue until the project reaches that phase. - Task Fields: use Choose fields to select which of the organisation's task fields this task carries. A required field must be filled in before completing the task, but does not block saving.
Assignees and roles
A task can have multiple assignees, each with a role. Use the Reviewer role for whoever checks the work and Assignee for whoever does it.
- In the Details section, click an assignee's name, for example
Giulia Verdi. - For each assignee, choose a role in Assignee role:
- Assignee
- Reviewer
- To add a person, select them in Select assignee, for example
Mario Rossi, choose the role from the list below, and click Add assignee. - To remove a person, click the X next to their role (Remove assignee).
- Click Done.
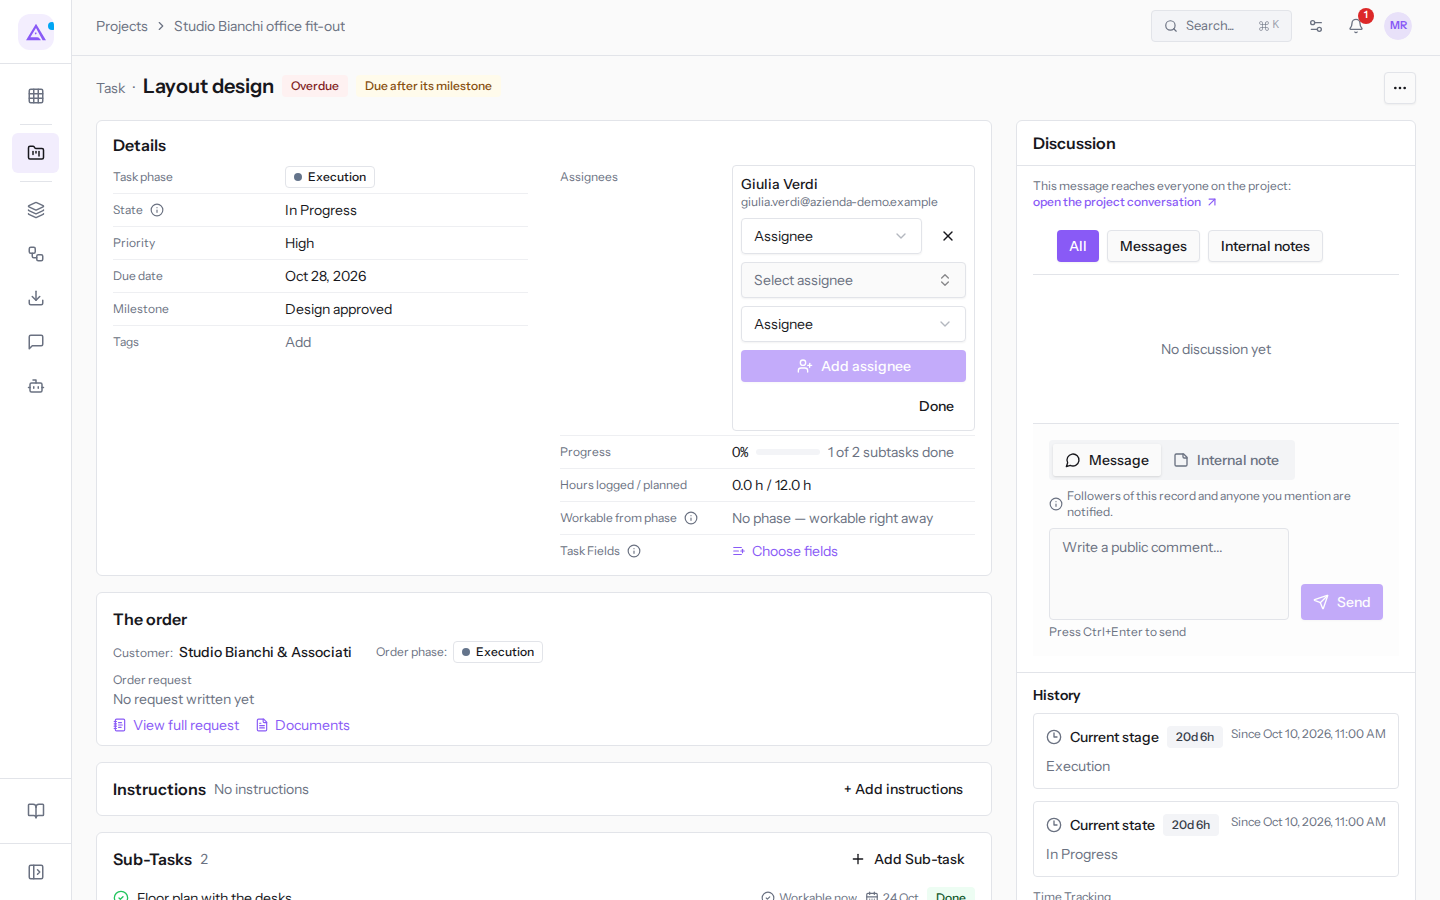
Note: with multiple assignees, the task's remaining hours are divided equally among them in reports.
Claiming, starting, and completing
At most one of these buttons appears in the top right, depending on your position on the task; on a colleague's task, none appears.
- Claim: appears on a task no one has claimed, for example
Furniture delivery and assembly. The task becomes yours and nothing else changes. - Start: appears on a task that is yours, for example
Furniture orderfor Mario Rossi. Starting it starts your timer. - Complete: closes a task you have worked on as finished. It moves the task to the phase that closes work as completed, as does dragging the card.
- Release: in the More actions menu (the three-dot button at the top right), removes you from the task's assignees.
Important: completing a task does not close its sub-tasks. If any are still open, the module lists them before closing.
Task states and phases
The State cannot be changed manually: it follows the phase. An open phase means In Progress; the other statuses are Changes Requested (for example on Furniture proposal), Approved, Done, and Cancelled. A phase marked as a closing phase ends the work with that phase's outcome. To change the status, move the task to another phase.
- In the Details section, click the Task phase value.
- Choose the new phase.
What happens depending on the chosen phase:
- If you choose a phase marked as a closing phase, the task becomes Done, as if you had closed it yourself. The module alerts you before proceeding.
- If you choose a phase marked as not accepted, the task becomes Cancelled, not Done.
- A task waiting on open dependencies stays where it is until they are closed, and only a closing phase can complete it.
To configure phases and their outcomes, see the module settings documentation.
Timer
The timer records the time you spend on a task.
- Click the three-dot button at the top right (More actions).
- Click Start Timer. The option is not there when Start is available, which already starts the timer. The Timer started message appears.
- To stop it, reopen the same menu and click Stop Timer.
Note: if the organisation has enabled the option that starts the timer when a task enters the working phase, moving a task you own into that phase, including with Start, starts your timer. Moving it out of that phase stops all running timers and records their hours. No timer is stopped at the end of the day.
Note: logged hours only count after approval.
Sub-tasks
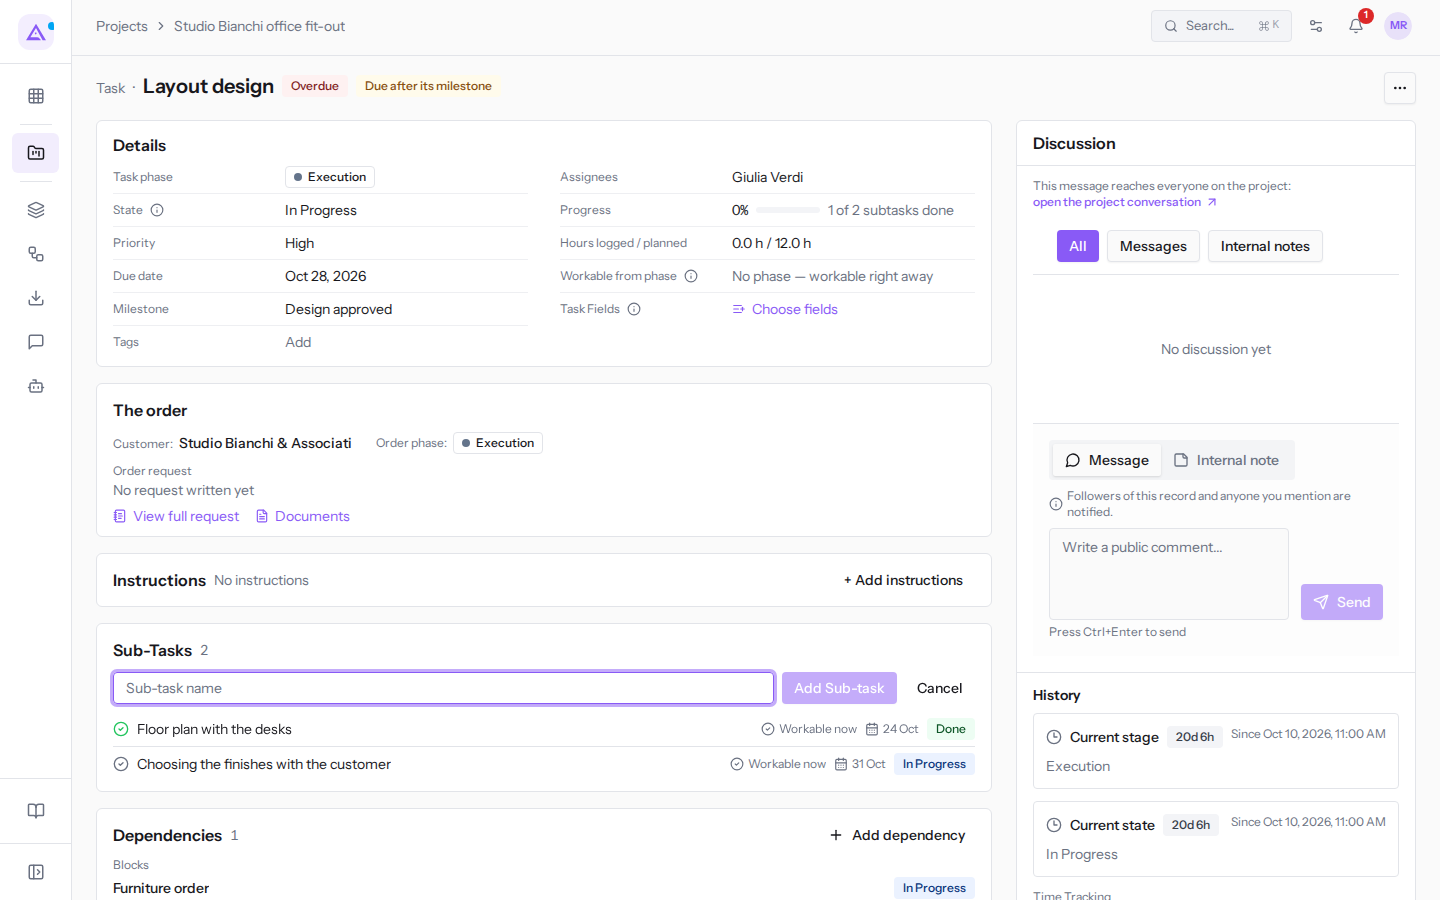
Sub-tasks divide a task into steps. The Sub-Tasks section lists them with the phase from which they are workable, the date, and the status. On Layout design, Floor plan with the desks is Done and Choosing the finishes with the customer is In Progress.
- In the Sub-Tasks section, click Add Sub-task.
- Fill in Sub-task name, for example
Electrical systems check. - Click Add Sub-task next to the field. To cancel, click Cancel.
Dependencies
A dependency indicates that a task can only start when another is completed or cancelled. While dependencies are open, the task cannot advance.
The Dependencies section has two lists:
- Depends on: the tasks this task is waiting for.
Furniture orderdepends onLayout design. - Blocks: the tasks waiting on this one.
Layout designblocksFurniture order.
- In the Dependencies section, click Add dependency.
- In Select dependency, choose a project task, for example
Site inspection and measurements. - The dependency is added as soon as you choose the task; to cancel, click Cancel.
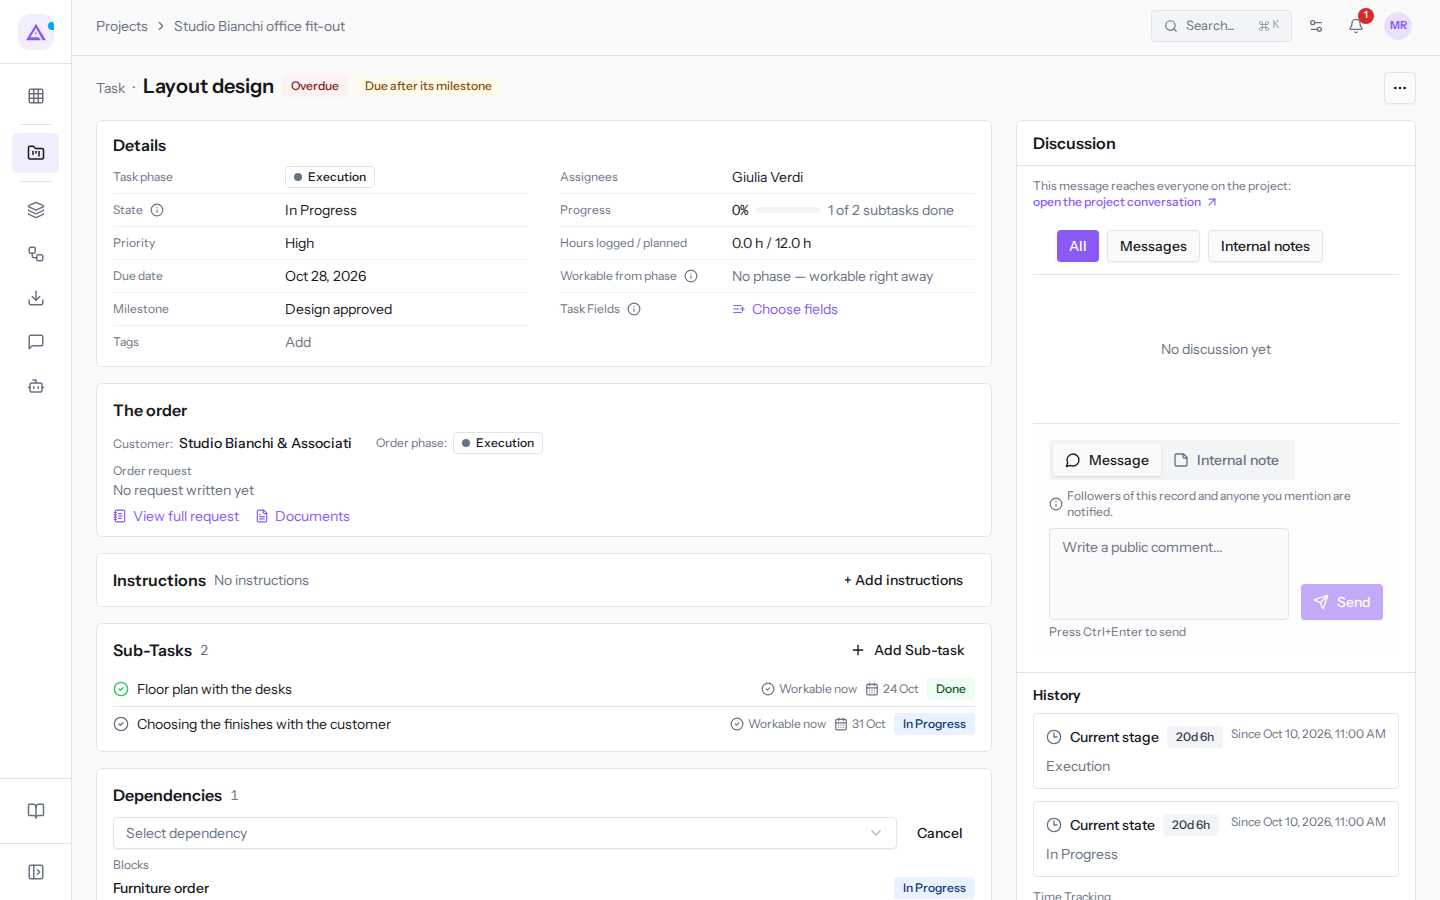
To remove a dependency, click the X next to the task (Remove dependency).
Important: if a dependency cannot be met in the phase order, the module alerts you but allows the change. Correct or remove the dependency afterwards.
Instructions and attachments
Instructions describe how to carry out the task.
- In the Instructions section, click + Add instructions.
- Fill in Description (optional).
- Click Save Task, or Cancel to discard.
In the Attachments section, click Upload attachment to add a file to the task.
Discussion and history
The Discussion section collects messages about the task. Task messages are part of the project's single conversation.
- Choose the Message or Internal note tab.
- Type your text in the field below the tabs.
- Click Send.
Filter messages with All, Messages, and Internal notes. The link to the project conversation opens the full discussion, described in Retracing a project's history.
The History section shows the task's changes.
Delete a task
Deletion is reserved for the Project Manager group.
- Click the three-dot button at the top right (More actions).
- Click Delete Task and confirm.
See it on your company, not on a slide deck.
In 30 minutes we map the software you use today.We show you how much work and how much margin Archimedes gives back.
Show me on my business →What industry are you in?
One tap — it lets us prepare the demo around your world.
What tools do you use today?
Pick the ones you recognise — or just type them. It helps us show you how they migrate.
Last step: your details.
We reply within one working day — and right after, if you like, you pick the demo slot yourself.
We couldn't send your request. Try again, or write to us at [email protected].
By sending, you agree to your data being processed so we can get back to you about the demo. Privacy notice.
Preview form — nothing is sent from this page.
Want to schedule the demo now?
Your call: book the slot you prefer yourself, or we'll call you to arrange it.
Live availability, 30 minutes, instant confirmation. The calendar opens in a new tab.
Lock in your slot ↗We'll get back to you within one working day — and we'll join the call already knowing your world.
The calendar is open in another tab: pick a slot and the demo is booked. Can't see it? Reopen it ↗
Preview page: nothing was sent.
Our calendar is live: take the slot that suits you and the demo is booked. 30 minutes, instant confirmation, no waiting.
Lock in your slot ↗