Projects
All modules
Prepare project types and typical tasks
Projects · 16 of 17 · 7 min read
A project type is the reusable template for a kind of work: it contains the predefined tasks, roles, and milestones. Each time that work comes up again, you create a new order from a type — for example, setting up an office or furnishing a new location. Typical tasks are a catalogue of tasks linked to a phase. The module suggests them when you add a task to a column.
Note: Projects › Settings appears in the menu only to the Project Manager group. For module users, project types are read-only.
Which tool to use:
- If a job repeats with the same tasks, in the same order, and with the same teams, prepare a project type.
- If you only need a list of tasks to suggest when adding a task to a phase, use typical tasks.
- If a project is already open, you can add the task block from a type to it. Deadlines are calculated from today and the tasks arrive unassigned, in the team queue. Nothing already in the project is modified.
The Project Types tab
The tab lists the organisation's project types and the buttons to manage them.
- Open Projects › Settings.
- Click the Project Types tab.
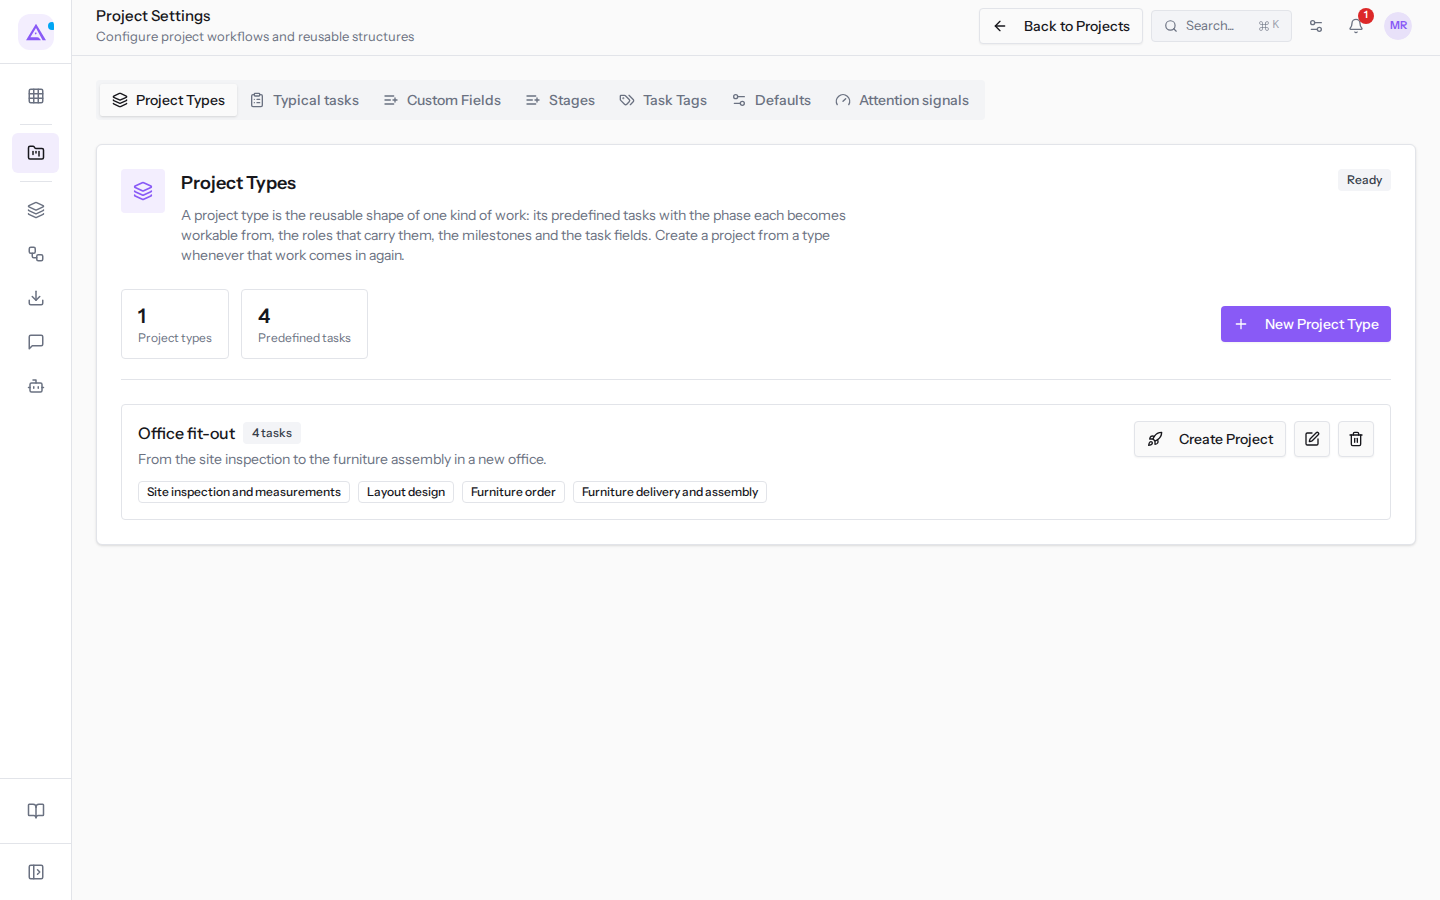
For example, there is the Office fit-out type, with the description From the site inspection to the furniture assembly in a new office. It contains four predefined tasks:
Site inspection and measurements, in the Backlog phase.Layout design.Furniture order.Furniture delivery and assembly, with the Responsible teamAssembly crew.
In this tab you will find the following buttons:
- New Project Type: opens the form to create a type.
- Create Project: creates a new order from that type.
- Edit project type: opens the same form with the type's data.
- Delete project type: deletes the type.
Creating a project type
The type form defines the template details and the tasks to create in new projects.
- In the Project Types tab, click New Project Type. The Create Project Type dialog opens.
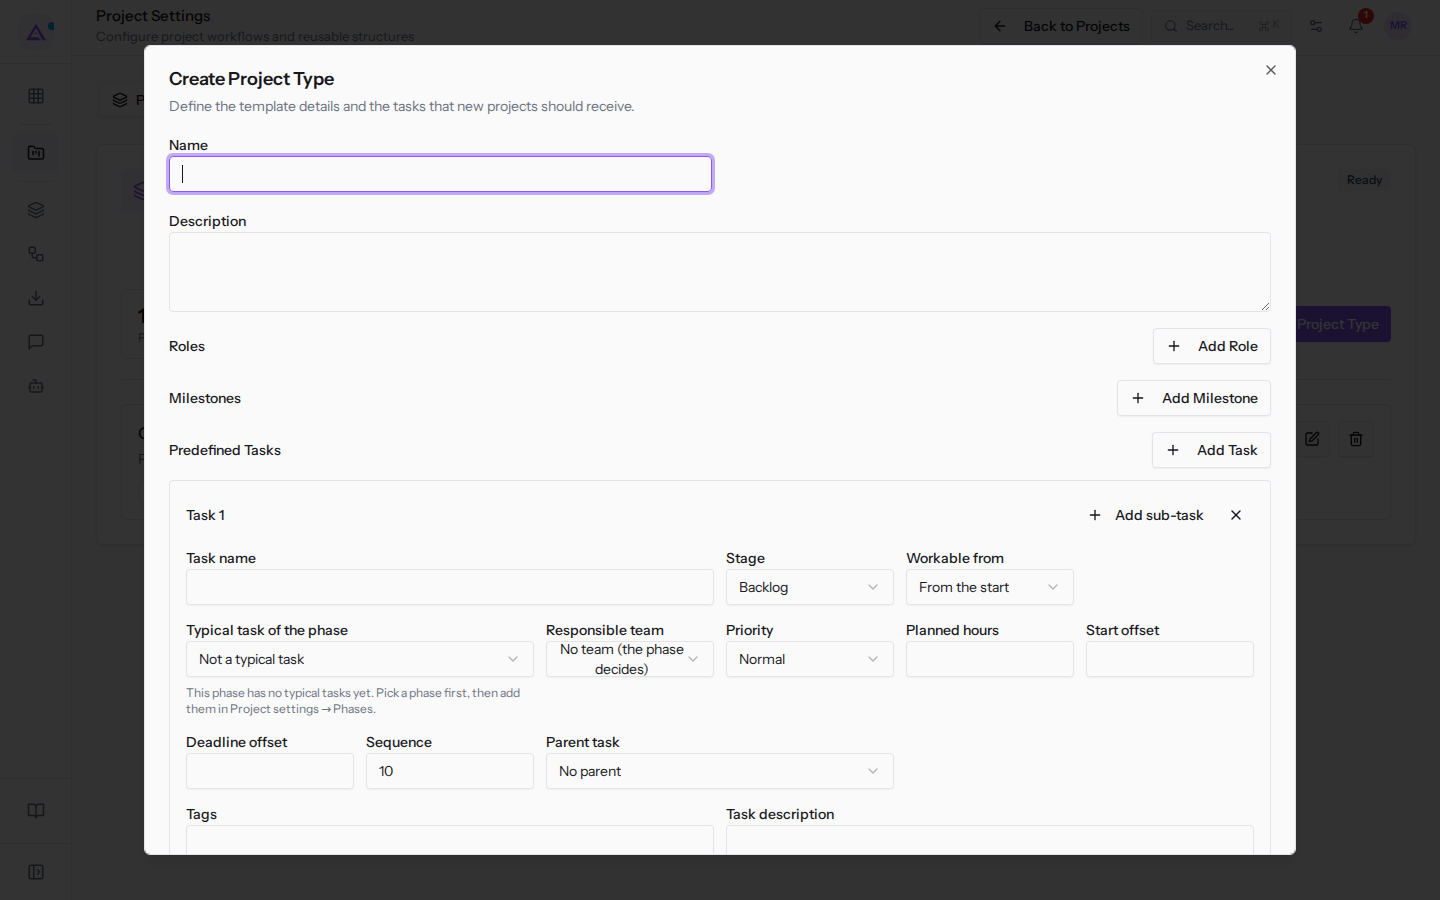
- Fill in Name and Description.
- In the Roles section, click Add Role for each role. Use Remove role to remove it.
- In the Milestones section, click Add Milestone for each milestone. Use Remove milestone to remove it.
- In the Predefined Tasks section, press Add Task for each task and fill them in as described in Predefined tasks.
- Click Save. To exit without saving, click Cancel.
Dialog fields:
- Name: the name of the type, for example
Office fit-out. The Create Project from Type dialog also suggests it as the name of the new project. - Description: the text that explains the type.
- Roles: for each role you specify the name and sequence.
- Milestones: for each milestone you specify the name.
To change an existing type, click Edit project type. The Edit Project Type dialog has the same fields, already filled in.
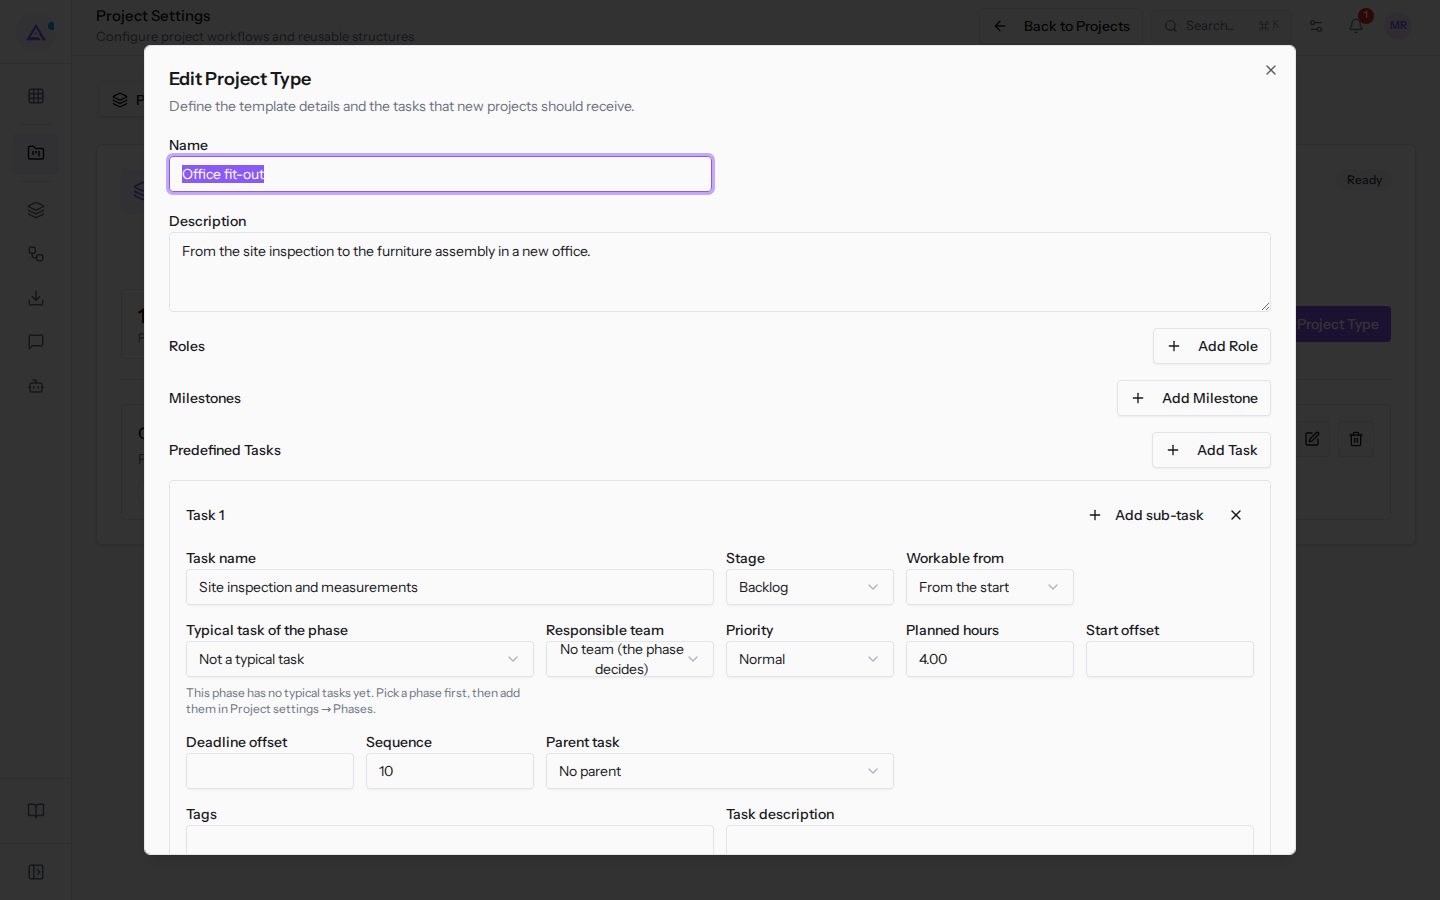
Predefined tasks
Each predefined task becomes a task in the project created from the type. For each one you specify the phase from which it becomes workable and who carries it out.
- Press Add Task and fill in Task name.
- To add a step to the task, click Add sub-task and fill in Sub-task name.
- To see all the fields of a sub-task, click More options. To collapse them, click Fewer options.
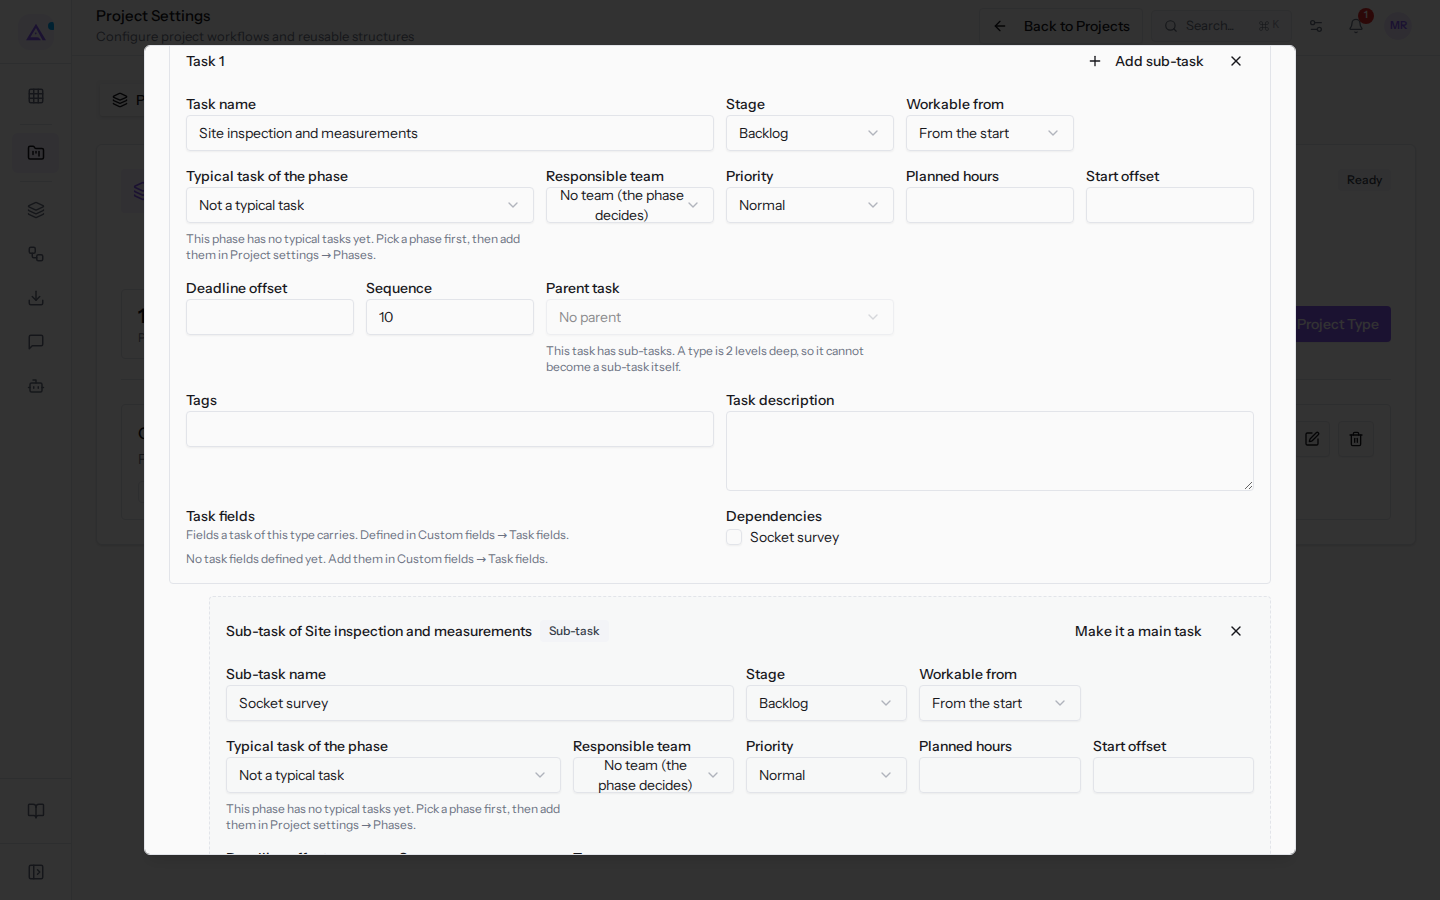
- To turn a sub-task into a standalone task, click Make it a main task.
Predefined task fields:
- Task name: for example
Site inspection and measurements. - Phase: the column in which the task is created. The initial value is Backlog. The options are First column and the task phases.
- Workable from: the phase from which the task becomes workable. The initial value is From the start. The other options are the task phases.
- Typical task of the phase: links the task to an entry in the typical tasks catalogue. The initial value is Not a typical task.
- Responsible team: the team that carries out the task.
- No team (the phase decides): the initial value.
- A team in the organisation, for example Assembly crew.
- Priority: the initial value is Normal. The options are Low, Normal, High and Urgent.
- Parent task: the task of which this is a step. The initial value is No parent. The options are the other tasks in the type, for example
Layout design. - Planned hours: the estimated hours.
- Start offset and Deadline offset: how many days after the project start the task begins and is due.
- Tags, Task description and Task fields: the tags, text and custom fields the task carries with it.
- Dependencies: the other tasks in the type that must finish before this one.
To remove a task from the type, press the X next to its title.
Creating a project from a type
The new project receives the predefined tasks from the type.
- In the Project Types tab, click Create Project on the type, for example
Office fit-out. The Create Project from Type dialog opens.
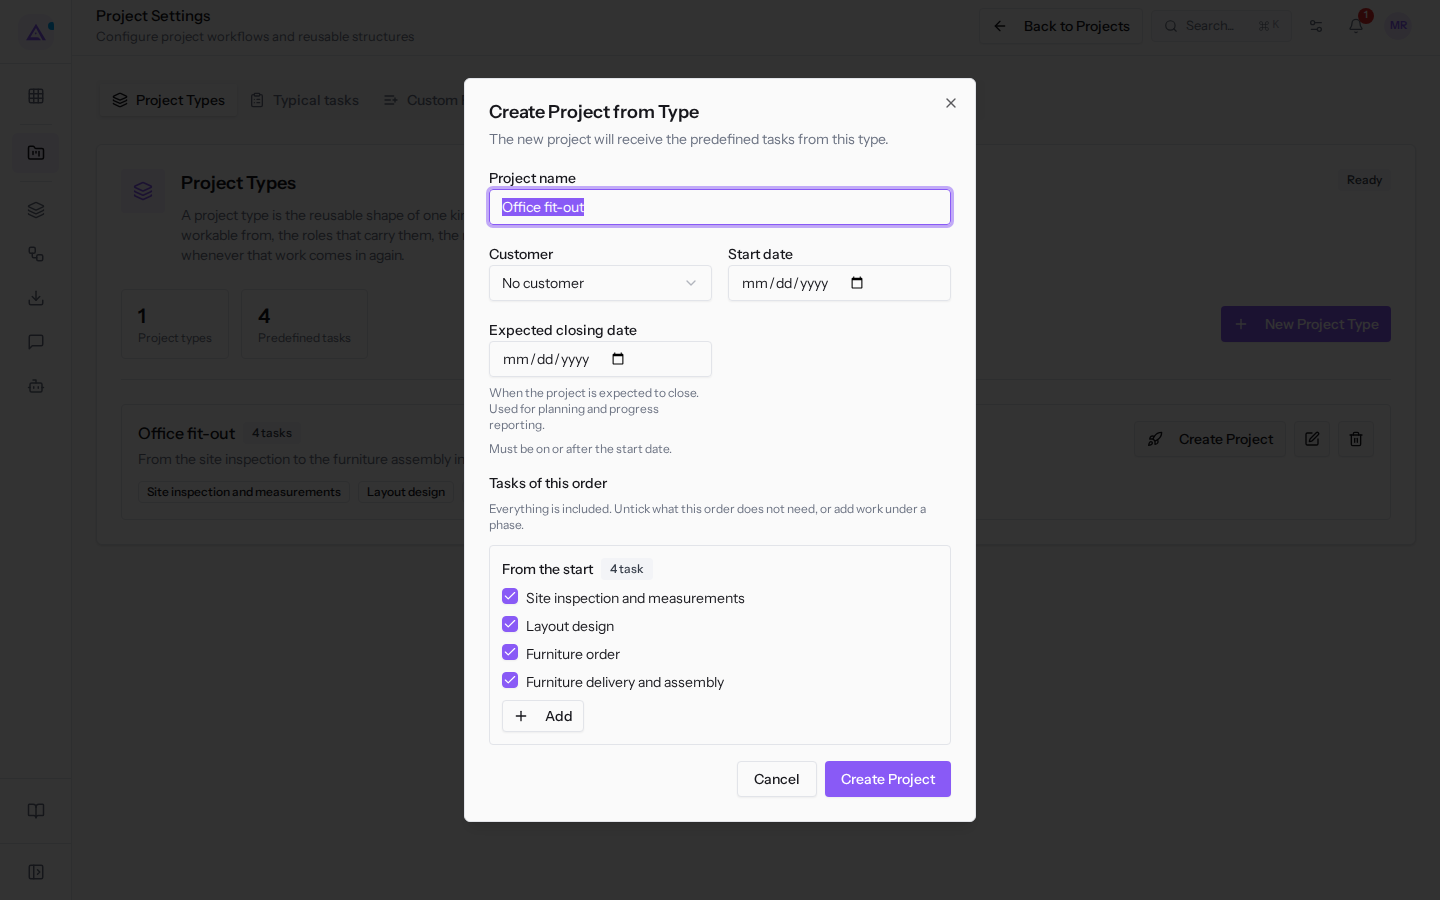
- Fill in the fields.
- In the Tasks of this order section, uncheck the tasks that are not needed.
- To add a task only to this order, click Add, fill in Task name and click Add.
- Click Create Project.
Dialog fields:
- Project name: suggested with the type name, for example
Office fit-out. Replace it with the order name. - Customer: the client for the order. The initial value is No customer.
- Start date: the start date of the order.
- Expected closing date: when the project is expected to close.
- Tasks of this order: the tasks from the type, all selected when the dialog opens. In
Office fit-outthese areSite inspection and measurements,Layout design,Furniture orderandFurniture delivery and assembly.
Note: you can also create a project from a type using the New Project button in the project list, by choosing Start from a template.
The Typical tasks tab
The tab shows the catalogue of typical tasks grouped by phase. Each group indicates how many entries it contains.
- Open Projects › Settings.
- Click the Typical tasks tab.
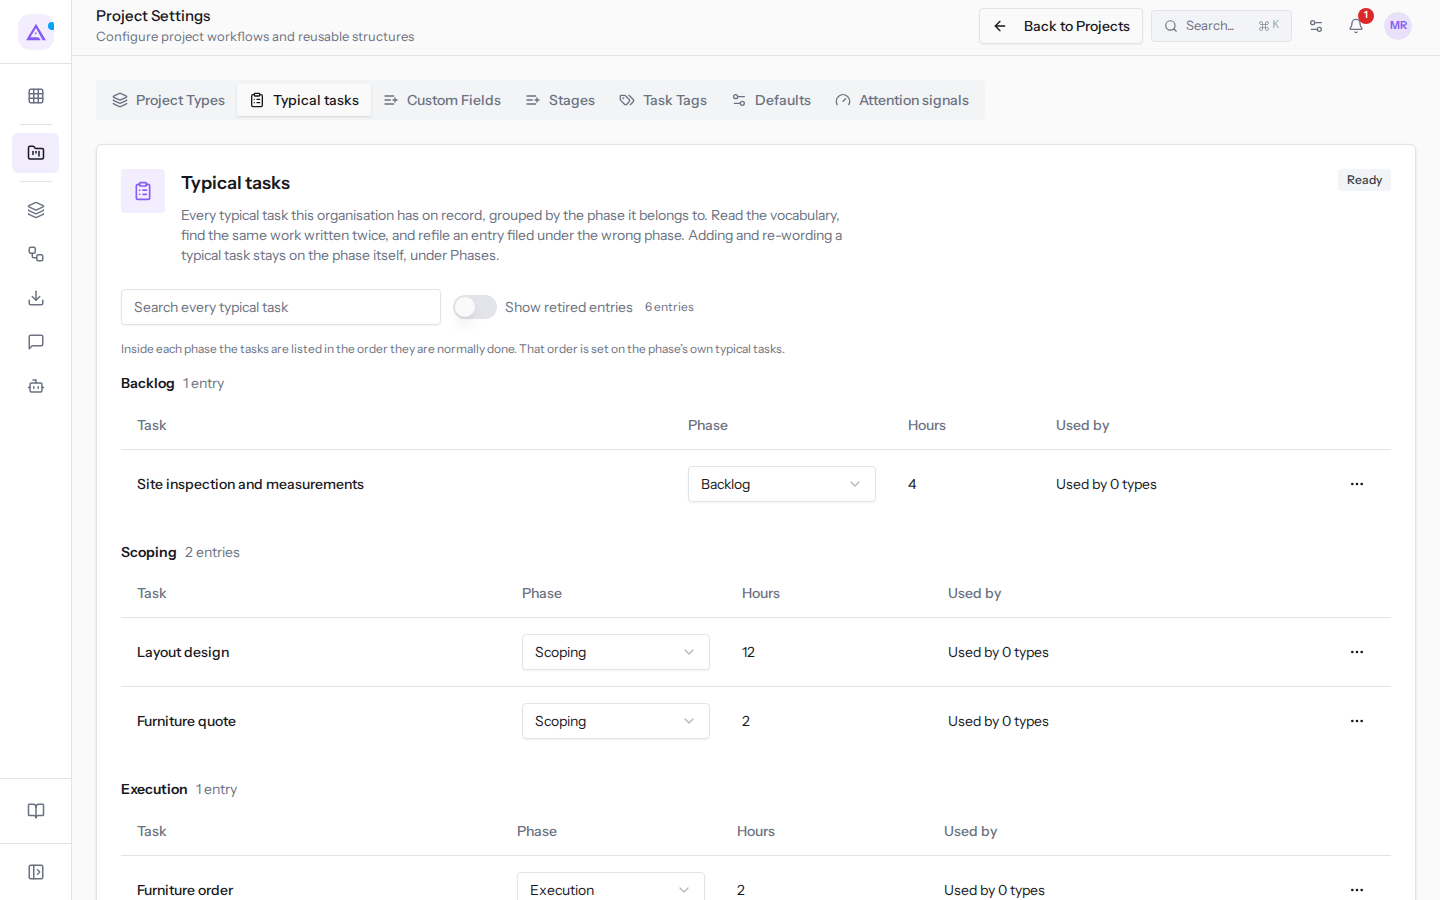
The catalogue contains, for example:
- in the Backlog phase:
Site inspection and measurements; - in Scoping:
Layout designandFurniture quote; - in Execution:
Furniture order; - in Handover:
Furniture delivery and assemblyandFinal check with the customer.
Each entry has a dropdown showing its phase. To move an entry to another phase, choose the new phase in the dropdown. The options are all the task phases, including Cancelled.
Searching for a typical task
The search filters entries across all phases.
- In the Typical tasks tab, type the text in Search every typical task.
The tab shows only the groups that contain matching entries. For example, furniture finds Furniture quote, Furniture order and Furniture delivery and assembly.
Merging two typical tasks
Use this action when the catalogue contains two entries for the same task.
- In the Typical tasks tab, open the action menu for the entry to be removed, for example
Site inspection and measurements. - Choose Merge typical task Site inspection and measurements into another. The Merge "Site inspection and measurements" into another entry panel appears.
- In Choose the entry to keep, select the entry that will remain in the catalogue.
- Click Merge. To cancel, click Cancel.
Retiring a typical task
Retire an entry you no longer want suggested. This way you don't need to remove it from the types that already use it.
- In the Typical tasks tab, open the entry's action menu.
- Choose Retire typical task Site inspection and measurements. The confirmation Retire "Site inspection and measurements"? opens.
- Click Retire.
The retired entry is no longer suggested when adding a task. It remains on all project types that already use it and you can put it back into use whenever you want.
To see retired entries as well, enable the Show retired entries toggle.
To use task tags or task fields in types, read Adding custom fields and setting default values.
See it on your company, not on a slide deck.
In 30 minutes we map the software you use today.We show you how much work and how much margin Archimedes gives back.
Show me on my business →What industry are you in?
One tap — it lets us prepare the demo around your world.
What tools do you use today?
Pick the ones you recognise — or just type them. It helps us show you how they migrate.
Last step: your details.
We reply within one working day — and right after, if you like, you pick the demo slot yourself.
We couldn't send your request. Try again, or write to us at [email protected].
By sending, you agree to your data being processed so we can get back to you about the demo. Privacy notice.
Preview form — nothing is sent from this page.
Want to schedule the demo now?
Your call: book the slot you prefer yourself, or we'll call you to arrange it.
Live availability, 30 minutes, instant confirmation. The calendar opens in a new tab.
Lock in your slot ↗We'll get back to you within one working day — and we'll join the call already knowing your world.
The calendar is open in another tab: pick a slot and the demo is booked. Can't see it? Reopen it ↗
Preview page: nothing was sent.
Our calendar is live: take the slot that suits you and the demo is booked. 30 minutes, instant confirmation, no waiting.
Lock in your slot ↗