All modules
Giving emails the company's look
Mail · 10 of 18 · 6 min read
The Email design page establishes how the emails the organization sends look: logo, color, header, footer and signature. It is set once and applies to every email sent on behalf of the organization, for example an invoice, a quote or a reply to a customer: whoever receives it immediately recognizes the company, and there is no need to repeat the logo and company details in the body of every email.
The page is reserved for the Email Manager group and is opened from Mail › Communications › Email design.
How the page is structured
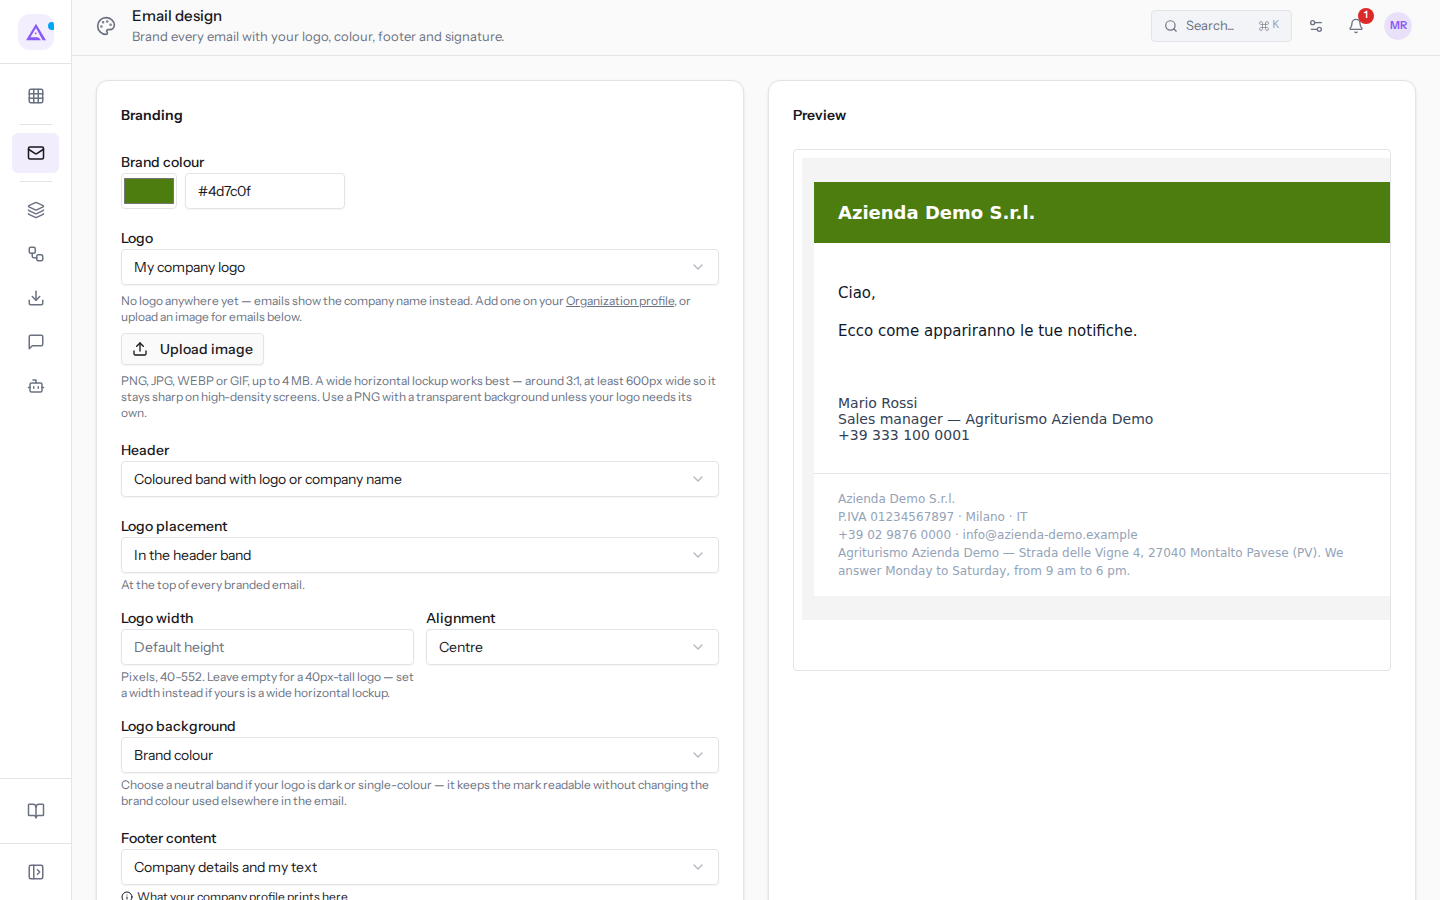
The Email design page has the subtitle «Brand every email with your logo, color, footer and signature.» and is divided into three parts.
- Branding: color, logo, header and footer. Changes apply to emails sent after pressing Save; emails already sent do not change.
- Signatures: the organization's signatures and the default signature, for example
Mario Rossi, the default, andReception. - Preview: shows what the recipient receives, with header, footer and signature. It updates as you change values, even before saving, so you can try a change without touching real emails. It sends nothing.
Choosing the logo
The email logo can be the one from the organization profile or an image uploaded specifically for emails.
- If you want emails to change along with the company logo, choose My company logo.
- If emails need a different version, for example a horizontal one, choose A different image for emails.
- In the Branding panel, choose a value in the Logo field.
- If you chose A different image for emails, press Upload image and select the file. The image uploads immediately, but emails only use it once this choice is saved.
- Press Save.
- Logo: where the image comes from.
- My company logo: emails use the logo from the organization profile. If you change it there, all emails update accordingly. If the profile has no logo, emails show the company name: for example, until the profile has a logo, the header shows
Azienda Demo S.r.l.on the colored band. - A different image for emails: emails use the image uploaded here, instead of the company logo.
- My company logo: emails use the logo from the organization profile. If you change it there, all emails update accordingly. If the profile has no logo, emails show the company name: for example, until the profile has a logo, the header shows
The image can be a PNG, JPG, WEBP or GIF up to 4 MB. A wide horizontal logo works best, approximately 3:1 and at least 600px wide, to stay sharp on high-density screens. Use a PNG with a transparent background, unless the logo requires its own.
Setting color and header
The brand color and header determine how every email opens.
- If you want the logo or company name at the top of the email, leave Coloured band with logo or company name.
- If you prefer the email to start straight with the text, choose No header — open with the message. Footer and signature do not change, and a logo positioned after the signature remains visible.
- If the logo is dark or solid-colored, choose Neutral band in Logo background: the brand remains legible and the brand color used elsewhere in the email does not change.
- In the Branding panel, set Brand colour.
- Choose Header, Logo placement, Logo width, Alignment and Logo background.
- Check the result in the Preview.
- Press Save.
- Brand colour: the organization's color in emails, for example the header band. Choose it from the color swatch or type it in hexadecimal, for example
#4d7c0f. - Header: what appears at the top of the email.
- Coloured band with logo or company name
- No header — open with the message
- Logo placement: where the logo appears.
- In the header band
- After the signature
- Both
- Logo width: in pixels, from 40 to 552. Leave the field empty for a logo 40px tall; set a width if the logo is horizontal and wide.
- Alignment: Left, Centre or Right.
- Logo background: Brand colour or Neutral band.
Setting the footer
The footer closes every email. It can show company details along with your text or just your text.
- If you want the footer to show company details, choose Company details and my text. The footer shows, for each field filled in the organization profile, the name, VAT number, city, country, phone, website and email address, for example «Azienda Demo S.r.l.», «P.IVA 01234567897 · Milano · IT» and «+39 02 9876 0000 · [email protected]». To change them, edit the organization profile: emails update without touching this page.
- If you choose My text only, only what you write in Footer text appears in emails, and no data from the organization profile.
- In the Branding panel, choose a value in Footer content.
- Write the text in Footer text.
- Press Save.
- Footer content: what appears in the footer.
- Company details and my text
- My text only
- Footer text: free text, for example a legal notice, a registration number or opening hours, such as
Agriturismo Azienda Demo — Strada delle Vigne 4, 27040 Montalto Pavese (PV). We answer Monday to Saturday, from 9 am to 6 pm.
Managing signatures
A signature is the closing block with name, role and contact details. It is written once and the platform adds it to emails, so nobody has to copy it out again. The default signature is added to every email, if the sender does not have their own; a template that excludes signatures continues to omit it.
- In the Signatures section, write the name in Signature name, for example
Reception. - Press Add. The signature appears in the list with its editor.
- Write the signature text in the editor. The text saves when you exit the editor.
- To use it in all emails, choose it in Default signature and press Save.
- Signature name: the name by which the signature appears in the list.
- Default signature: the signature added to emails.
- None: no default signature;
- one of the signatures in the list, for example Mario Rossi or Reception.
Each signature can also have an image, for example a scanned signature, with its width in Width (px). The bin icon next to the name deletes the signature immediately, without asking for confirmation.
Below each signature a note says where it is used. An empty signature adds nothing to emails; a signature that is not the default and is not assigned to a sender does not reach any email until you choose it.
See it on your company, not on a slide deck.
In 30 minutes we map the software you use today.We show you how much work and how much margin Archimedes gives back.
Show me on my business →What industry are you in?
One tap — it lets us prepare the demo around your world.
What tools do you use today?
Pick the ones you recognise — or just type them. It helps us show you how they migrate.
Last step: your details.
We reply within one working day — and right after, if you like, you pick the demo slot yourself.
We couldn't send your request. Try again, or write to us at [email protected].
By sending, you agree to your data being processed so we can get back to you about the demo. Privacy notice.
Preview form — nothing is sent from this page.
Want to schedule the demo now?
Your call: book the slot you prefer yourself, or we'll call you to arrange it.
Live availability, 30 minutes, instant confirmation. The calendar opens in a new tab.
Lock in your slot ↗We'll get back to you within one working day — and we'll join the call already knowing your world.
The calendar is open in another tab: pick a slot and the demo is booked. Can't see it? Reopen it ↗
Preview page: nothing was sent.
Our calendar is live: take the slot that suits you and the demo is booked. 30 minutes, instant confirmation, no waiting.
Lock in your slot ↗