All modules
Configuring the addresses you send from
Mail · 17 of 18 · 6 min read
The Email addresses page lists the addresses the organization sends from and those it receives on. From here you add a sending domain and verify senders; you also add receiving mailboxes here, for example an address for invoices, one for the newsletter, or the events office mailbox.
The page opens from Mail › Settings and is reserved for users in the Email Manager group.
Choosing the address type
An address can have three roles. The choice depends on where you want to read mail and who should send it.
- If you want invoices, quotes, and notifications to go out from your domain, choose Send from my domain. Without a verified sender, mail to customers and contacts is held back.
- If you want a mailbox on your domain hosted on the platform's mail server, choose Receive on a mailbox we host. You read and reply from Conversations.
- If you already have a mailbox with another provider and want to read its mail here, choose Connect a mailbox I already have.
For example [email protected] sends, is the default sender, and also receives; [email protected] is a sender awaiting DNS records; [email protected] is the events office mailbox, connected via IMAP.
Viewing the addresses
The page shows the conversation retention period and the list of all addresses.
- Go to Mail › Settings.
- Check the All addresses panel. The labels on each row show:
- what the address does: Sends, Receives, or Sends and receives. An address that sends and receives takes up a single row;
- where the mailbox is: Hosted, on the platform's mail server, or Connected, with another provider;
- Default, on the sender used when a template or campaign does not specify another;
- for receiving addresses, whether the AI sorts the mail: Ingest-only means mail arrives in Conversations but no archetype sorts it;
- the status: Working if the address is working, Pending if a step is still missing, such as the DNS records for
[email protected]. An address that Needs attention should be opened to understand what is wrong.
- Click an address to open its card.
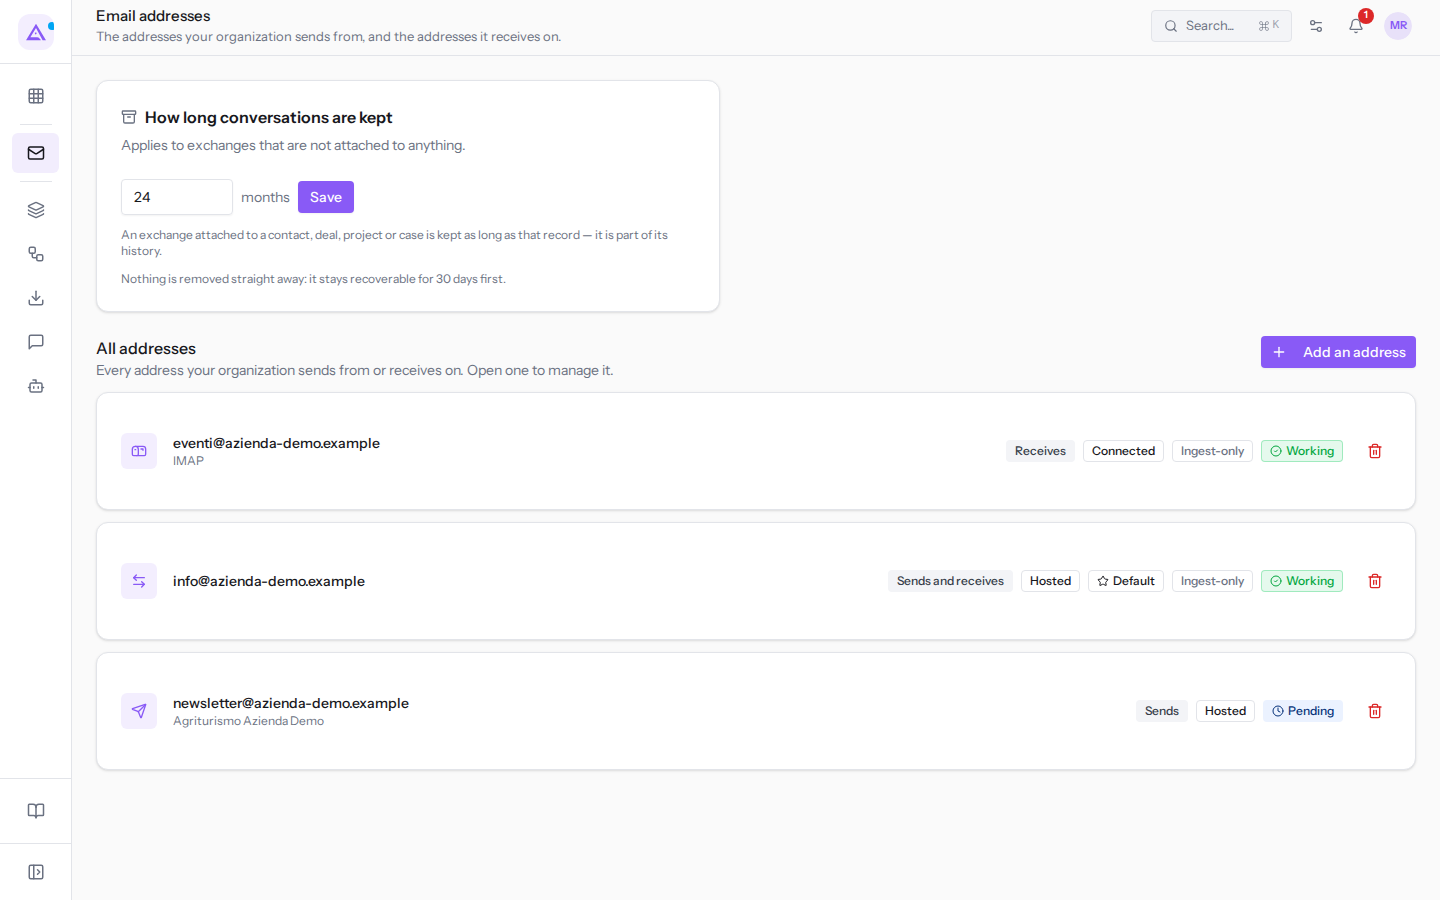
The bin icon at the end of a row removes the address after a confirmation: a removed sender can no longer send, a receiving address stops receiving mail, a connected mailbox is disconnected and its saved credentials are deleted. On a verified sender that is not the default, a star icon also appears, which makes it the default.
Setting how long conversations are kept
The How long conversations are kept panel sets how many months after the last message a conversation is deleted.
- In the How long conversations are kept panel, enter the number of months.
- Click Save.
The value applies to exchanges not linked to anything. A conversation linked to a contact, an opportunity, a project, or a ticket remains as long as that record does, because it is part of it. The default value is 24 months.
The rule prevents the platform from becoming an endless archive of other people's mail. Shortening the period does not delete anything immediately: expired conversations go to the bin first and remain recoverable for 30 days, so a mistake can be corrected in time. After 30 days they are permanently deleted.
Adding an address
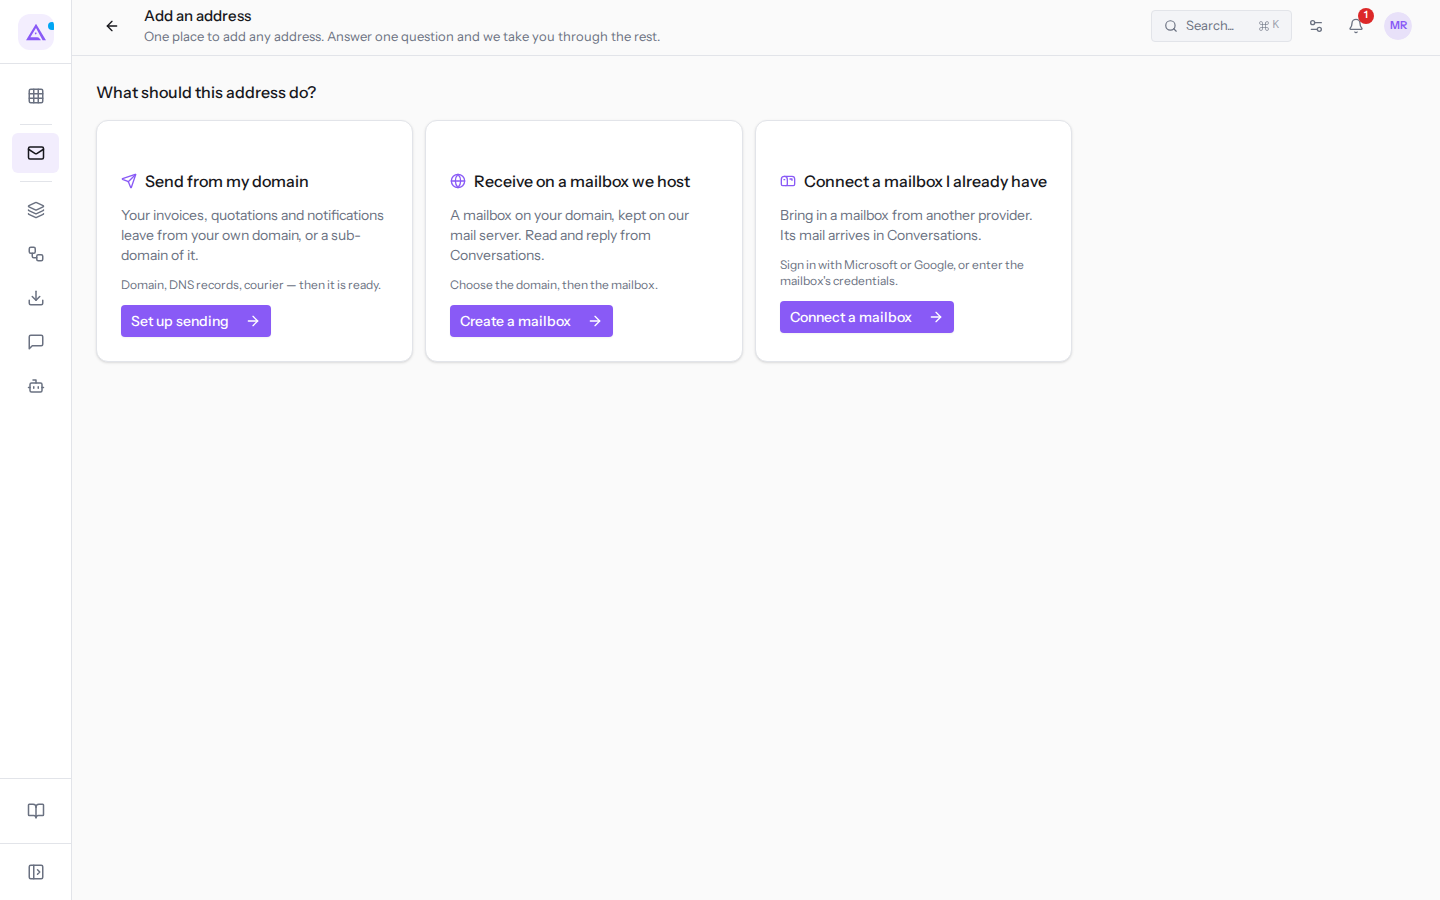
All addresses are added from the same page, by answering a question.
- In Mail › Settings, click Add an address.
- In response to the question What should this address do?, choose one of the three options:
- Send from my domain, with the Set up sending button;
- Receive on a mailbox we host, with the Create a mailbox button;
- Connect a mailbox I already have, with the Connect a mailbox button.
Configuring sending from a domain
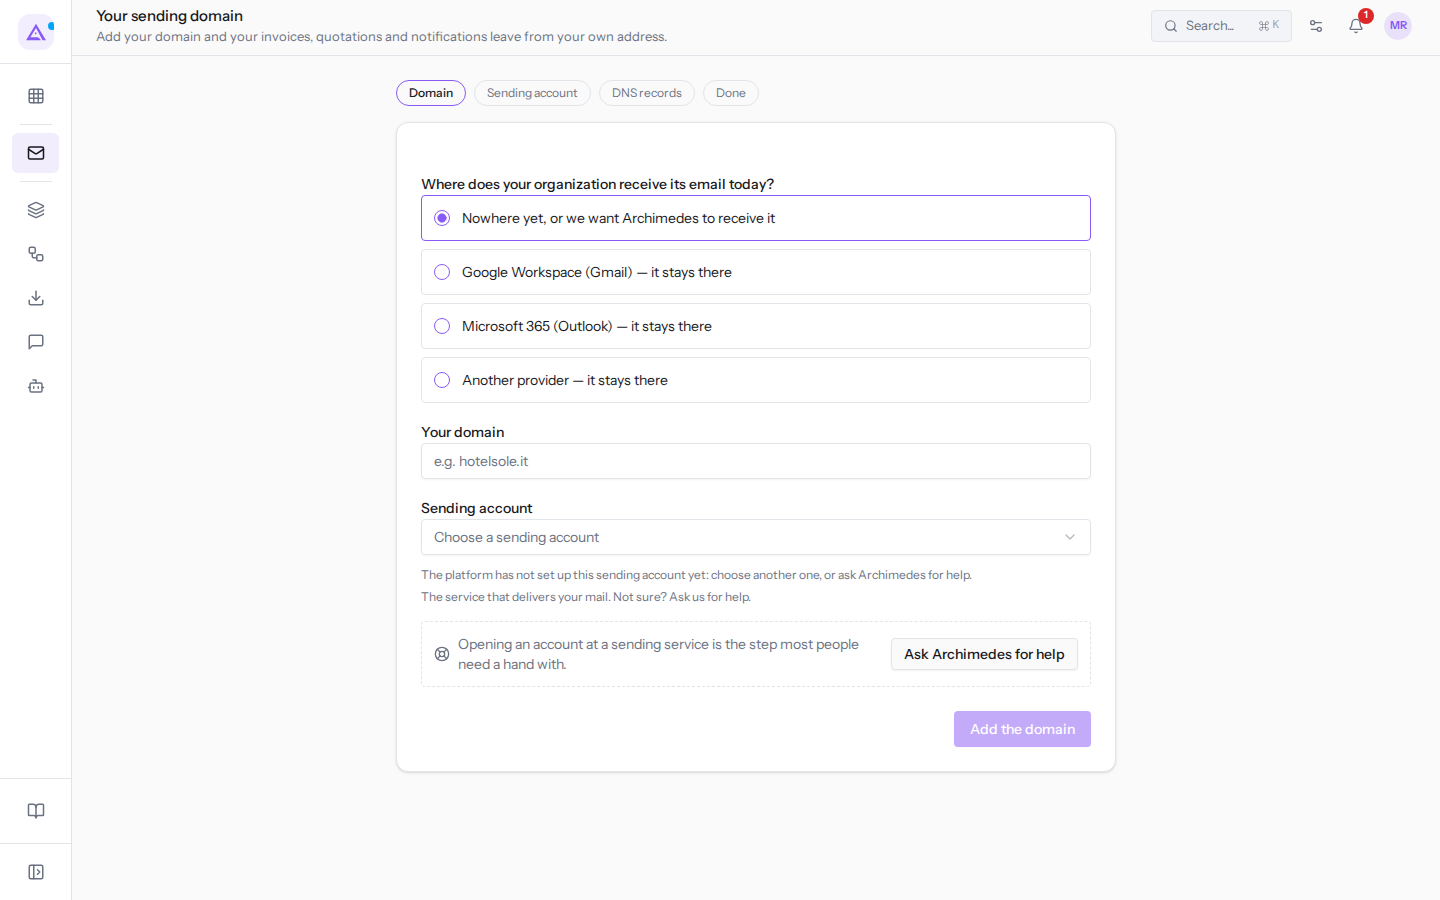
The Your sending domain page guides you through four steps: Domain, Sending account, DNS records, Done.
- In Add an address, click Set up sending.
- In Where does your organization receive its email today?, choose where your mail arrives today.
- Enter Your domain and choose the Sending account.
- Click Add the domain.
The page fields:
- Where does your organization receive its email today?: the answer determines which address mail will go out from.
- Nowhere yet, or we want Archimedes to receive it: mail goes out from your domain and the domain's mail is received here.
- Google Workspace (Gmail) — it stays there, Microsoft 365 (Outlook) — it stays there, and Another provider — it stays there: mail goes out from a dedicated subdomain and mail for your domain continues to arrive exactly where it arrives today. With these choices the form also asks Replies go to: your real address, the one customers write to when they reply.
- Your domain: the domain emails go out from, for example
hotelsole.it. - Sending account: the service that delivers your mail. If the chosen account is not yet configured, a warning appears below the field: choose another or press Ask Archimedes for help, which sends a request to the Archimedes team.
After Add the domain, the procedure moves to DNS records and shows the records to publish with your domain provider. The platform checks them every few minutes and, when it finds them, the domain activates on its own and the procedure reaches Done. From that point invoices, quotes, and notifications go out from your address, and any emails that were held back can be resent from the sending log.
Completing sender verification
A sender remains Pending until its DNS records are verified, for example [email protected]. While pending it does not appear among the senders for campaigns and templates. The records (MX and TXT) tell mail services that the platform can send on behalf of your domain.
- In Mail › Settings, click the sender, for example
[email protected]. - In the DNS Records panel, copy each value using the icon next to it and create the corresponding record with your DNS provider, with the same Type, Name / Host, Value, and, for the MX record, Priority.
The panel text invites you to click “Check verification”, but this button is not on the card. DNS record propagation can take from a few minutes to several hours; if after entering the records the status remains Pending, contact your Archimedes representative.
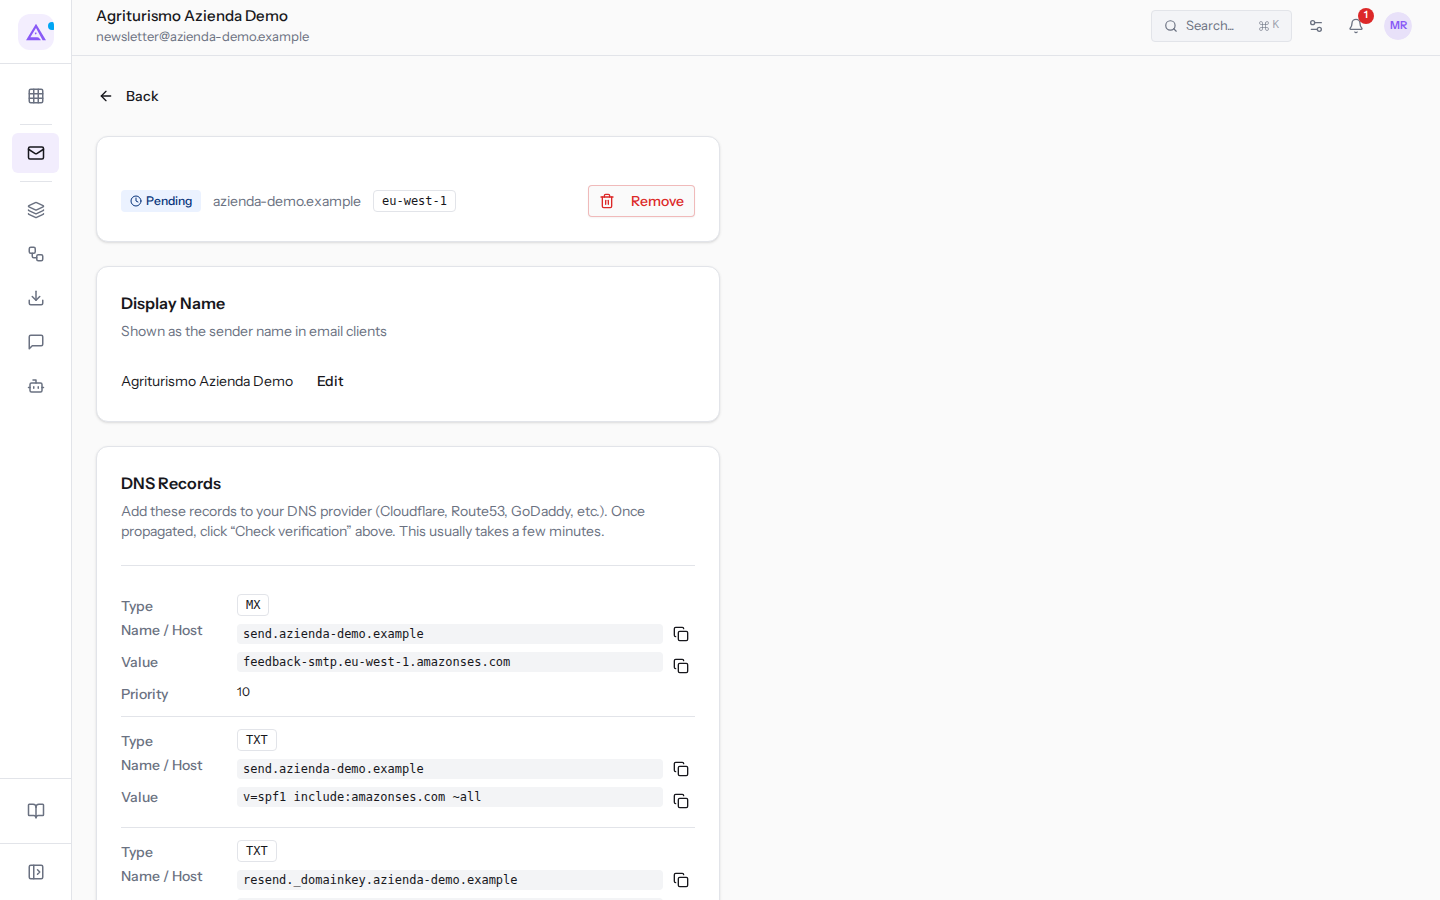
On the sender card you will find:
- the status and domain, for example Pending and
azienda-demo.example, next to a technical code for the sending region,eu-west-1; - Remove, which deletes the sender after a confirmation;
- Display Name: the sender name shown in mail clients, for example
Agriturismo Azienda Demo. It is changed with Edit; - the DNS Records panel, with the Name / Host column for each record.
After verification the status becomes Verified, the DNS Records panel disappears and in its place the date appears, Verified on ….
As long as no sender is verified, invoices, quotes, and order receipts are held back; after verification the documents can be resent from the sending log, as explained in Checking the sending log.
To receive mail on a hosted mailbox or connect one you already have, see Receiving mail on a hosted or connected mailbox.
See it on your company, not on a slide deck.
In 30 minutes we map the software you use today.We show you how much work and how much margin Archimedes gives back.
Show me on my business →What industry are you in?
One tap — it lets us prepare the demo around your world.
What tools do you use today?
Pick the ones you recognise — or just type them. It helps us show you how they migrate.
Last step: your details.
We reply within one working day — and right after, if you like, you pick the demo slot yourself.
We couldn't send your request. Try again, or write to us at [email protected].
By sending, you agree to your data being processed so we can get back to you about the demo. Privacy notice.
Preview form — nothing is sent from this page.
Want to schedule the demo now?
Your call: book the slot you prefer yourself, or we'll call you to arrange it.
Live availability, 30 minutes, instant confirmation. The calendar opens in a new tab.
Lock in your slot ↗We'll get back to you within one working day — and we'll join the call already knowing your world.
The calendar is open in another tab: pick a slot and the demo is booked. Can't see it? Reopen it ↗
Preview page: nothing was sent.
Our calendar is live: take the slot that suits you and the demo is booked. 30 minutes, instant confirmation, no waiting.
Lock in your slot ↗