All modules
Managing mailing lists and their subscribers
Mail · 11 of 18 · 8 min read
A mailing list collects the addresses to send a campaign to, for example a seasonal newsletter, invitations to an event or communications for client companies. For each subscriber the list records the subscription status and the consent basis, meaning what makes it lawful to write to them: a form filled in on the website, a signed list at a trade fair, an addition made by a colleague. A campaign sent to the list reaches only confirmed subscribers who are not among the organization's unsubscribed contacts.
The Mailing lists page
The page lists all the organization's lists. The subtitle is «Native lists and the shop newsletter».
- Open Mail › Communications › Mailing lists.
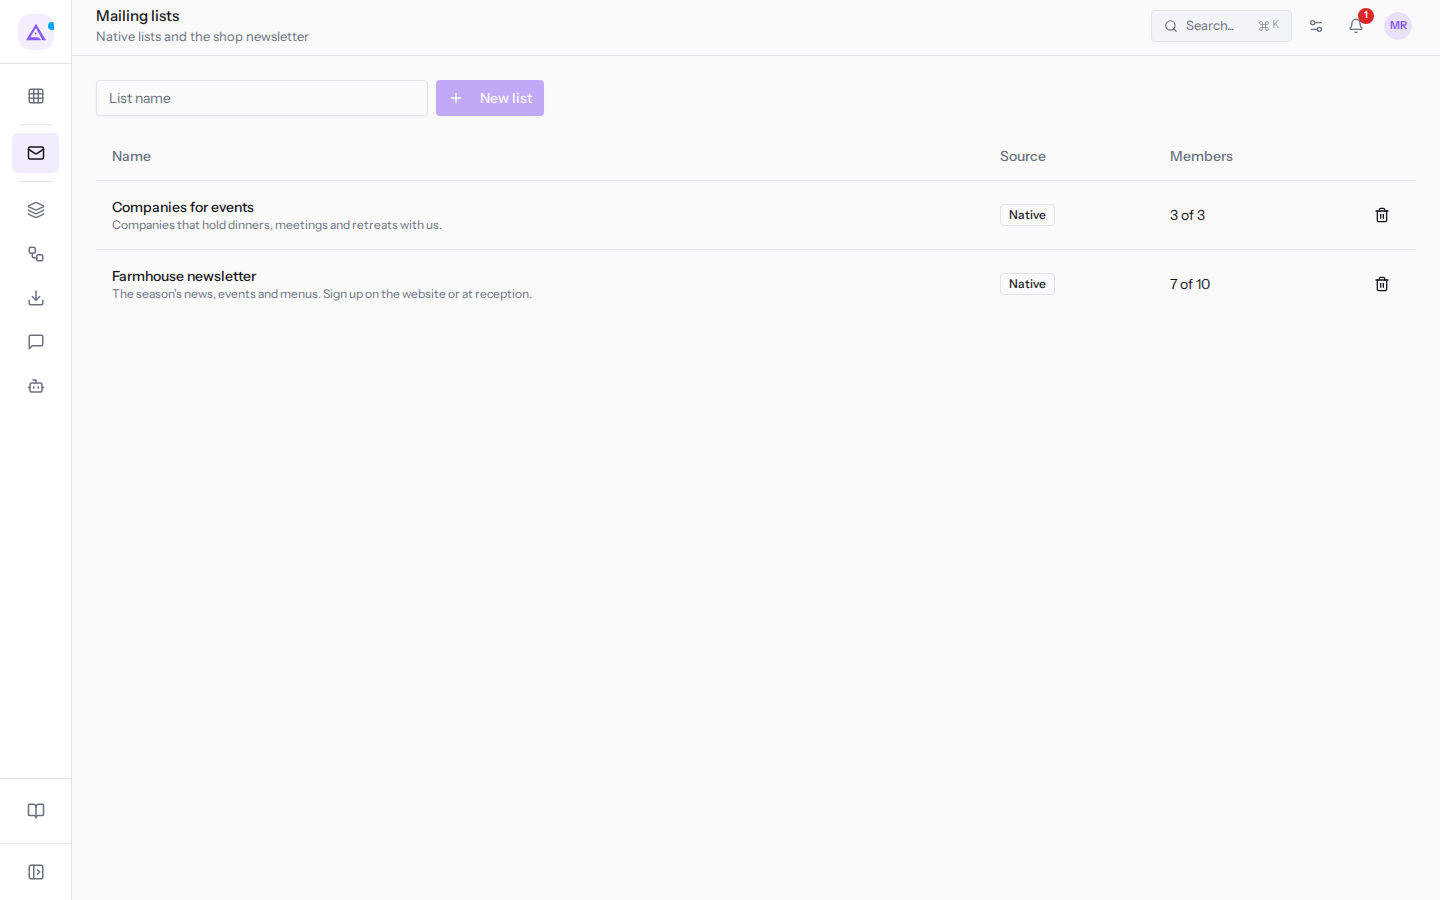
The list has these columns:
- Name: the name of the list, with its description below. For example
Companies for events, with the description «Companies that hold dinners, meetings and retreats with us.». - Source: where the list comes from.
- Native: the list was created on this page and you manage it from here.
- Shop newsletter: the list is kept aligned by the online shop with its newsletter subscribers. The name and subscribers cannot be edited here and the list cannot be deleted.
- Members: confirmed subscribers out of the total. For example
Farmhouse newslettershows7 of 10: 7 people receive campaigns, the other 3 are awaiting confirmation or have unsubscribed.Companies for eventsshows3 of 3.
A click on the name opens the list's card.
Creating and deleting a list
Create a native list when you want to reach a group of people with the same communications, for example the companies that organize events.
- Open Mail › Communications › Mailing lists.
- Type the name in the List name field.
- Press New list.
The name is the only piece of information needed to create the list. The description is added afterwards, from the list's card. The new list is empty: subscribers are added from its card.
To delete a native list, click the bin icon at the end of its row. The list is deleted immediately, without a confirmation prompt. Lists with the Shop newsletter source do not have the bin.
The list card
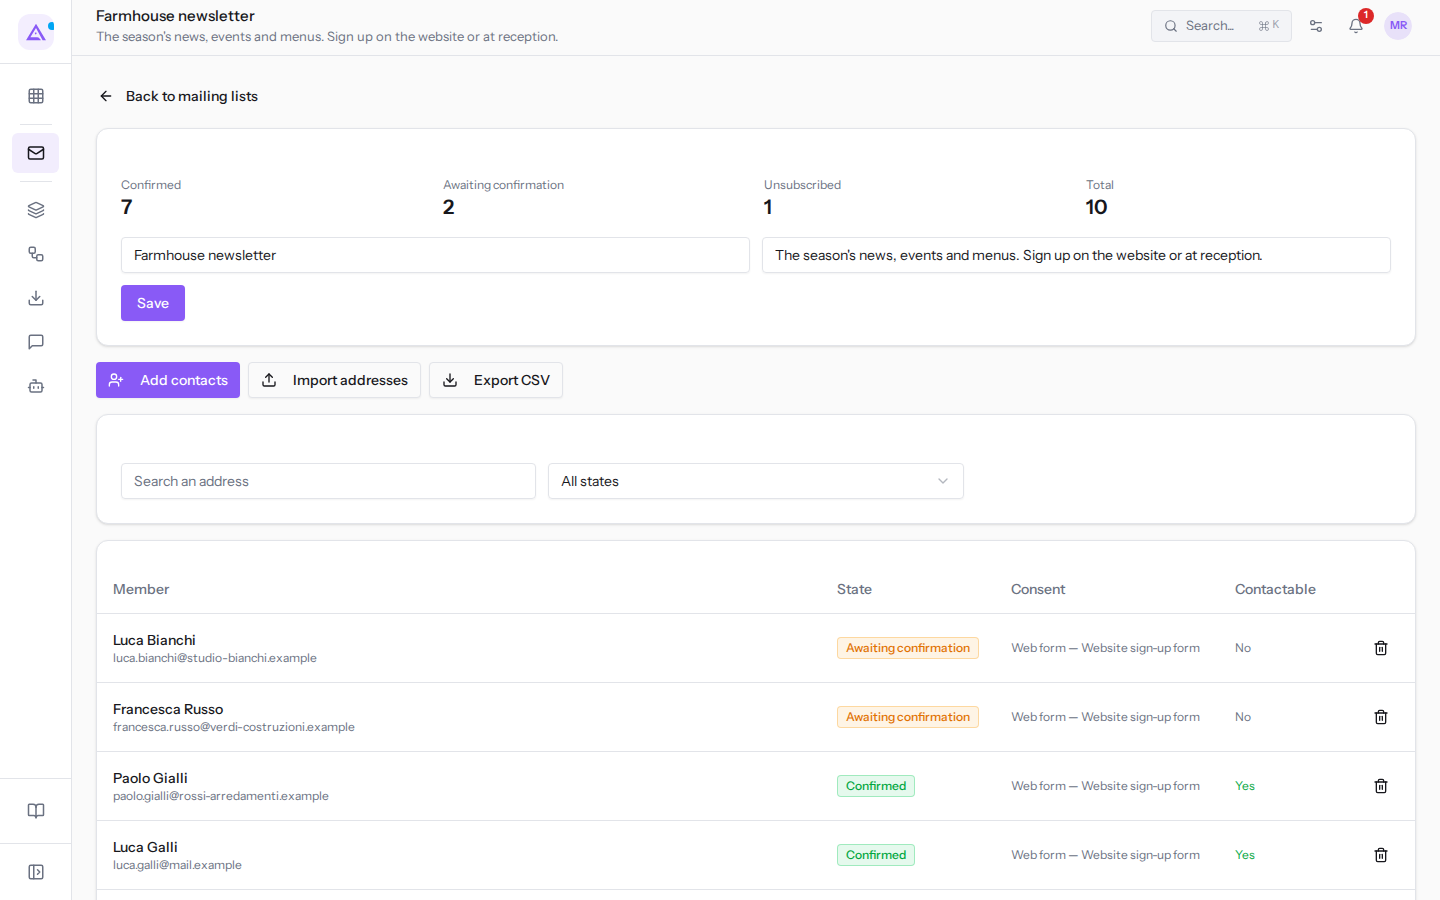
The list card shows how many subscribers are in each status, meaning how many people a campaign would actually reach, and allows you to change the name and description.
- In Mailing lists, click the name of the list, for example Farmhouse newsletter.
- To return to the list, press Back to mailing lists.
At the top of the card there are these boxes:
- Confirmed: subscribers who have confirmed their subscription or who were added manually or imported. These are the ones who receive campaigns. For example, in the
Farmhouse newsletterthere are 7. - Awaiting confirmation: those who subscribed via the website and have not yet clicked the link in the confirmation email. They do not receive campaigns until they confirm. For example 2.
- Unsubscribed: those who have left the list, for example via the unsubscribe link at the bottom of a campaign. They no longer receive campaigns for this list. For example 1.
- Total: all the list's subscribers, in any status. For example 10.
Below the boxes there are two fields: the list name, for example Farmhouse newsletter, and the description (placeholder «What this list is for»), which appears below the name in the list of lists, for example «The season's news, events and menus. Sign up on the website or at reception.». To change them, edit the fields and press Save.
In a list with the Shop newsletter source, instead of the fields the notice «This list is kept in step with another module, so its name and members cannot be edited here.» appears, and the Add contacts and Import addresses buttons are not there.
Adding contacts to the list
Use this procedure to subscribe people who are already among your contacts, for example customers who asked at reception to receive the newsletter. These contacts immediately become confirmed subscribers, without receiving the confirmation email. For this reason you must write the basis that makes it lawful to contact them: it is saved on every subscriber and you find it in the Consent column and in the export, if someone one day asks where their address came from.
- In the list card, press Add contacts. The Add contacts to this list dialog opens.
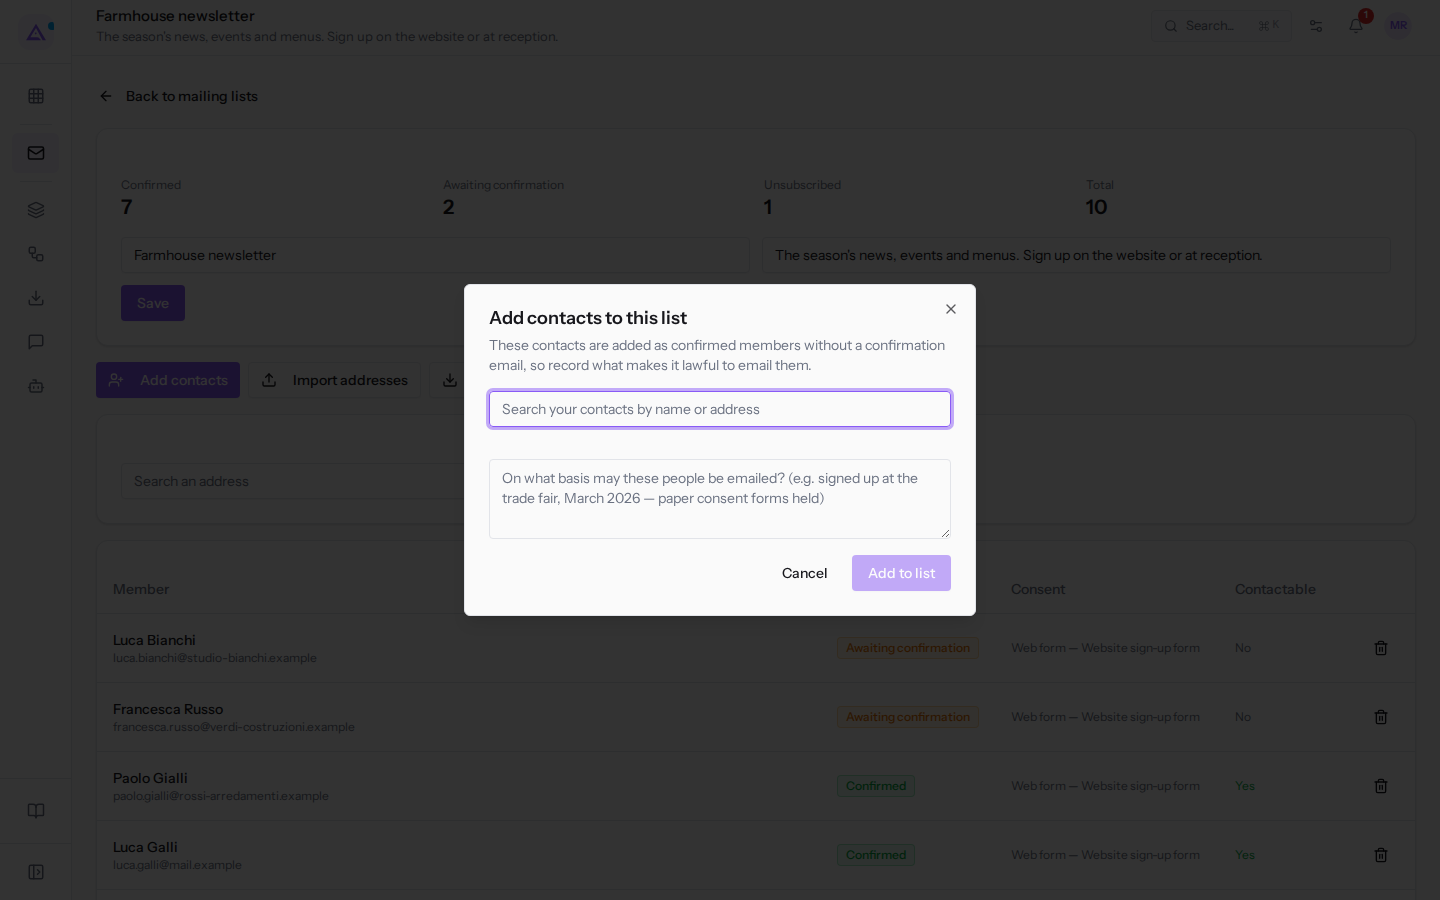
- Search for contacts by name or address and select them.
- Write the consent basis.
- Press Add to list. To close without adding anyone, press Cancel.
Dialogue fields:
- Search your contacts by name or address: find the contacts to subscribe. A contact without an email address cannot be subscribed and is skipped.
- Consent basis, with the question «On what basis may these people be emailed?»: write what makes it lawful to contact them, for example
signed up at the trade fair, March 2026 — paper consent forms held. Without this text Add to list remains disabled.
At the end a message indicates how many contacts were added and how many were skipped. In the Consent column, subscribers added this way appear as «Added by admin», followed by the text you wrote.
Importing addresses
Use import for addresses that are not among your contacts, for example a list collected on paper or exported from another programme. Each address that does not match an existing contact becomes a new contact. As with Add contacts, imported addresses immediately become confirmed subscribers, without a confirmation email.
- In the list card, press Import addresses.
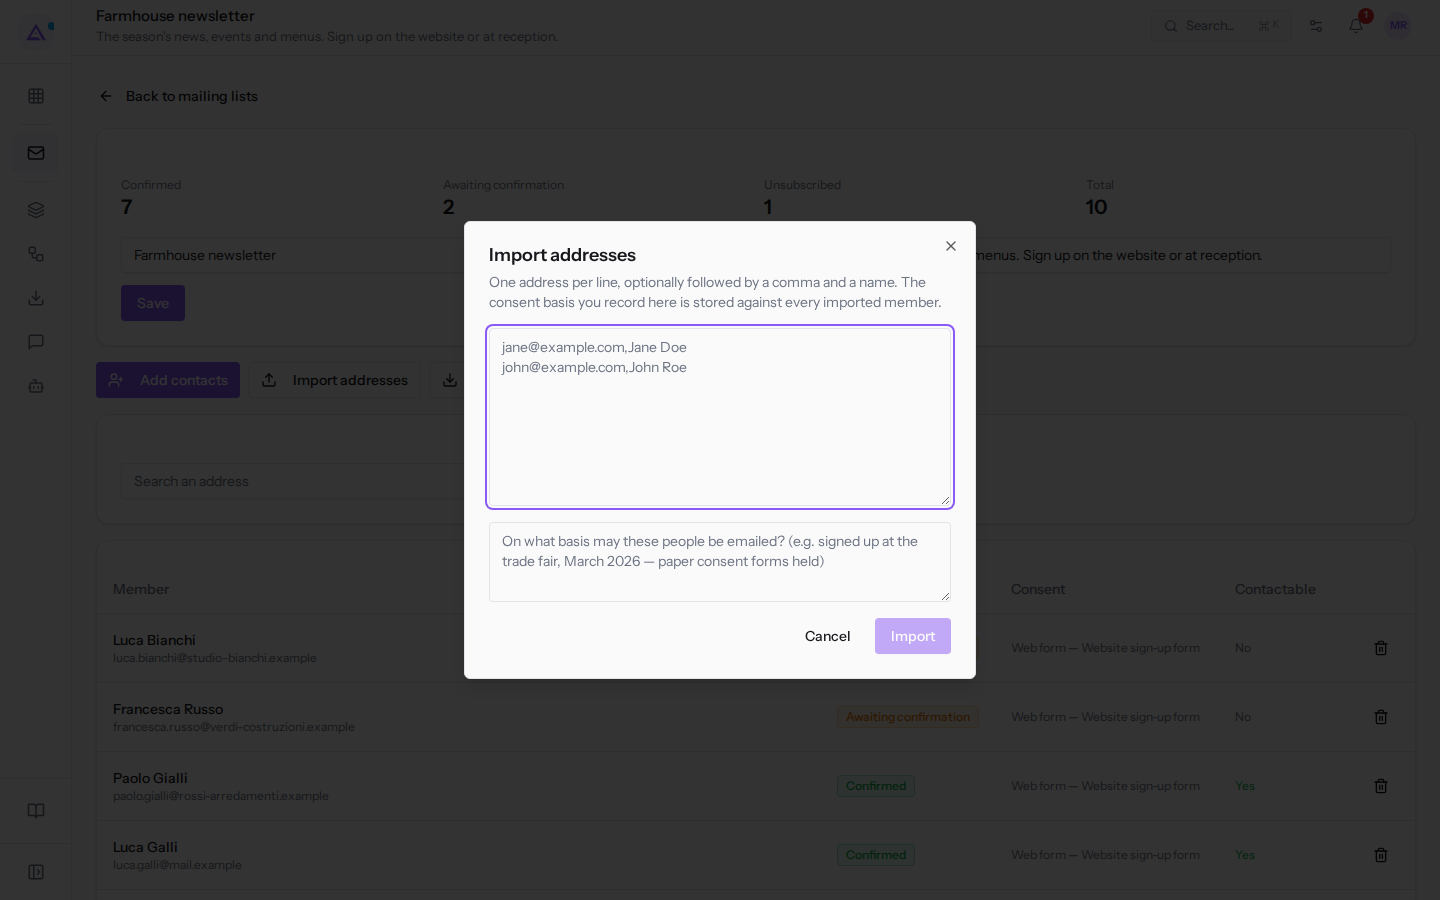
- Paste the addresses, one per line. After the address you can add a comma and the name.
- Write the consent basis.
- Press Import. To close without importing, press Cancel.
Dialogue fields:
- Address list: one address per line, optionally followed by a comma and a name, as in the examples shown in the field.
- Consent basis, with the same question as the previous dialog: the platform saves it on every imported subscriber, and in the Consent column «Imported» appears, followed by the text you wrote.
At the end a message indicates how many addresses were imported as new, how many were already present and how many could not be used, for example because they were written incorrectly.
An address among the organization's unsubscribed contacts, because they unsubscribed from everything, reported an email as spam or cannot receive mail, remains uncontactable even if you import it: the Contactable column shows «Unsubscribed elsewhere». Someone who has only left this list, however, is returned to the confirmed subscribers via import or Add contacts: do not re-add anyone who has asked to leave.
Searching and filtering subscribers
The subscriber table shows who is subscribed, in what status and with what consent, and whether they can be contacted today.
- To find a subscriber, type the address in the Search an address field.
- To see subscribers in a single status, choose the status in the All states filter.
- All states: shows all subscribers.
- Confirmed: shows only confirmed subscribers.
- Awaiting confirmation: shows only subscribers who have not yet confirmed.
- Unsubscribed: shows only subscribers who have left the list.
The table columns are:
- Member: the name and address, for example
Luca Bianchiwith[email protected]. - State: Confirmed, Awaiting confirmation or Unsubscribed.
- Consent: how and from where the subscription came: «Web form» for the website form, «Added by admin» for Add contacts, «Imported» for Import addresses, followed by the detail, for example «Web form — Website sign-up form».
- Contactable: whether the address will be reached by campaigns on this list. Yes for a confirmed subscriber; No for someone awaiting confirmation or who has unsubscribed from the list, for example
Luca Bianchi, still awaiting; Unsubscribed elsewhere for an address that is among the organization's unsubscribed contacts, because they unsubscribed from everything, marked an email as spam, or their mail is not being delivered. These addresses are managed in Mail › Communications › Unsubscribed.
Anyone who subscribes through the website form receives an email with a confirmation link and remains Awaiting confirmation until they click it: this ensures no one receives campaigns at an address entered by someone else.
The bin icon at the end of a row removes the subscriber from the list without asking for confirmation. This is a list correction, not an unsubscription: the person does not appear among the unsubscribed and can be added again.
Exporting subscribers
To get your subscribers in a file, press Export CSV on the list card. The file contains, for each subscriber, the address, name, status, origin, the consent basis with its detail, the subscription date, and whether they are contactable: this is useful, for example, to demonstrate where an address came from or to use the list in another application.
See it on your company, not on a slide deck.
In 30 minutes we map the software you use today.We show you how much work and how much margin Archimedes gives back.
Show me on my business →What industry are you in?
One tap — it lets us prepare the demo around your world.
What tools do you use today?
Pick the ones you recognise — or just type them. It helps us show you how they migrate.
Last step: your details.
We reply within one working day — and right after, if you like, you pick the demo slot yourself.
We couldn't send your request. Try again, or write to us at [email protected].
By sending, you agree to your data being processed so we can get back to you about the demo. Privacy notice.
Preview form — nothing is sent from this page.
Want to schedule the demo now?
Your call: book the slot you prefer yourself, or we'll call you to arrange it.
Live availability, 30 minutes, instant confirmation. The calendar opens in a new tab.
Lock in your slot ↗We'll get back to you within one working day — and we'll join the call already knowing your world.
The calendar is open in another tab: pick a slot and the demo is booked. Can't see it? Reopen it ↗
Preview page: nothing was sent.
Our calendar is live: take the slot that suits you and the demo is booked. 30 minutes, instant confirmation, no waiting.
Lock in your slot ↗