All modules
Preparing a campaign
Mail · 12 of 18 · 8 min read
A campaign is an email sent to one or more mailing lists, for example the announcement of a seasonal menu, an invitation to a party, or a proposal for company dinners. From this page you prepare the content and choose the recipients.
Before you choose
A campaign starts as a draft. While it is a draft you can edit and save it as many times as you like. It is sent only when you send it or schedule it.
- If the campaign resembles one you have already done, start from it with Start from…: the copy becomes a new draft and the original stays as it was.
- If you are starting from scratch, use New mailing.
- If you want the email to go out at a specific time, schedule the send. If it should go out now, use Send now.
- If you do not know which subject line works better, test two subjects on a portion of the audience.
A campaign only reaches people who have given consent to receive communications. Anyone who has unsubscribed or reported a message as spam is automatically excluded, even if they are still subscribed to a chosen list: you do not need to remove them manually. These addresses are described in Managing unsubscribed and suppressed addresses.
Preparing a campaign and sending it are two separate permissions. Someone who can write and save content, and send themselves a test, cannot thereby send or schedule the campaign to the audience: the Email Campaign Sender group is also required. This means whoever writes the newsletter cannot accidentally send it to all customers.
The campaign list
The Mailings page collects the bulk campaigns sent to your lists.
- Open Mail › Communications › Campaigns. The Mailings page opens.
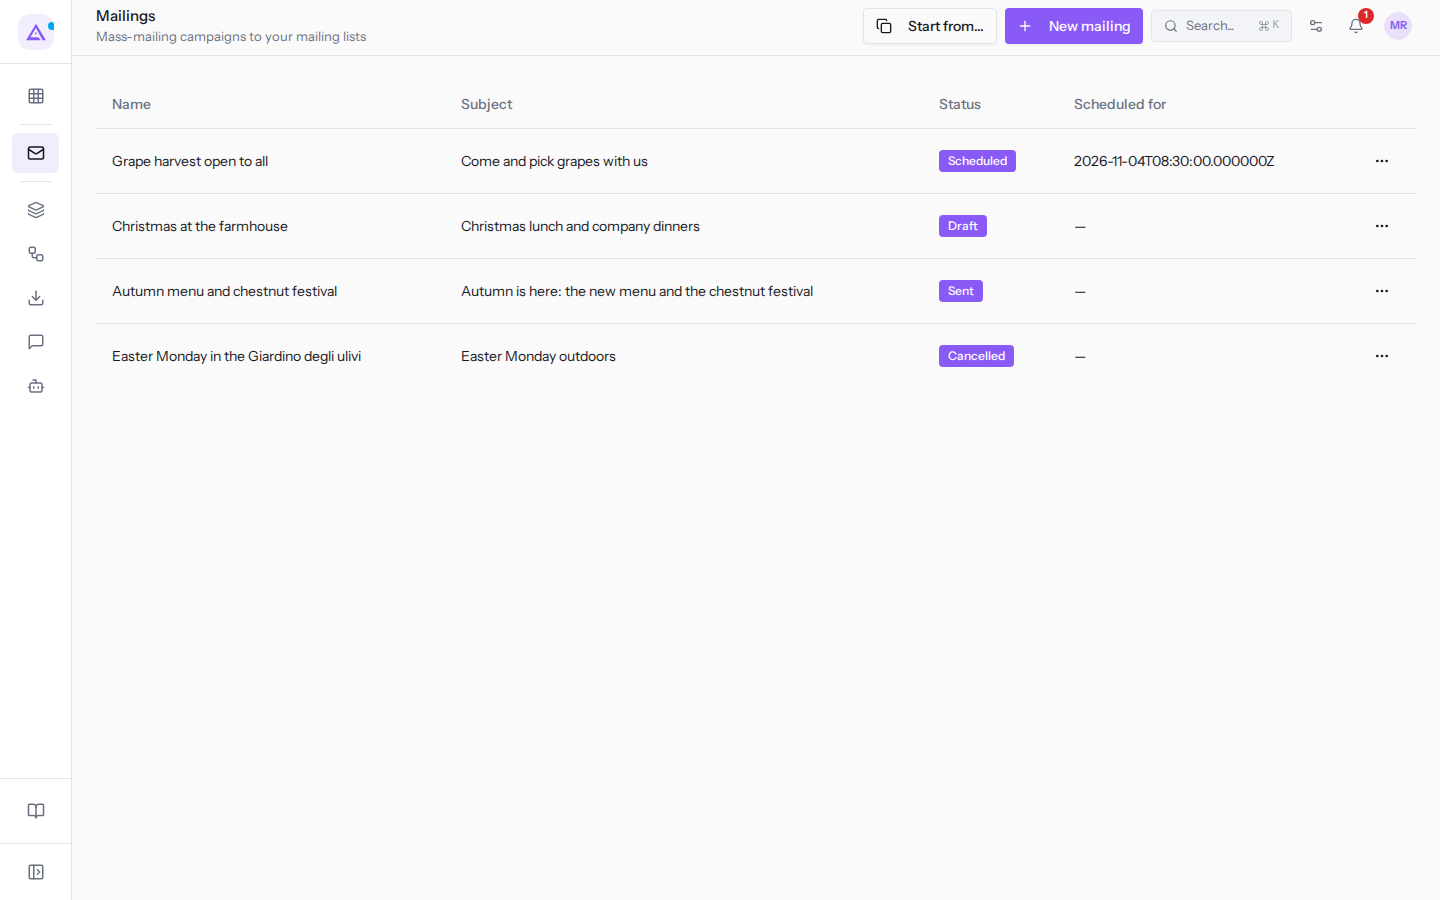
The list has these columns:
- Name: the internal name of the campaign, for example
Grape harvest open to all. - Subject: the subject line that recipients read, for example
Come and pick grapes with us. - Status: where the campaign is in its lifecycle. A draft can still be edited; a scheduled campaign goes out on its own at the specified time; a sent campaign is complete and its results can be read; a cancelled campaign will not go out. For example
Grape harvest open to allis scheduled,Christmas at the farmhouseis a draft,Autumn menu and chestnut festivalis sent andEaster Monday in the Giardino degli uliviis cancelled. - Scheduled for: the date and time of sending, for scheduled campaigns; for others a dash appears. For now the date is shown in technical format, in UTC, for example
2026-11-04T08:30:00.000000Z.
Click a row to open the campaign results page; from there Edit campaign opens the content. The content can only be changed while the campaign is a draft: for a scheduled, sent or cancelled campaign the fields remain locked. The results are described in Reading the results of a campaign.
The three-dot icon at the end of each row opens two commands, neither of which sends anything:
- Duplicate: immediately creates a new draft identical to the campaign and opens it for editing. The original does not change.
- Keep as a starting point: marks the campaign with the Starting point label and puts it at the top of the Start from… dialog list. Useful for a campaign you often reuse as a base, for example the seasonal newsletter. To remove the mark choose Stop keeping as a starting point.
Starting from an existing campaign
With Start from… you copy a previous campaign or one of your templates into a new draft.
- On the Mailings page press Start from…. The Start from something you already have dialog opens.
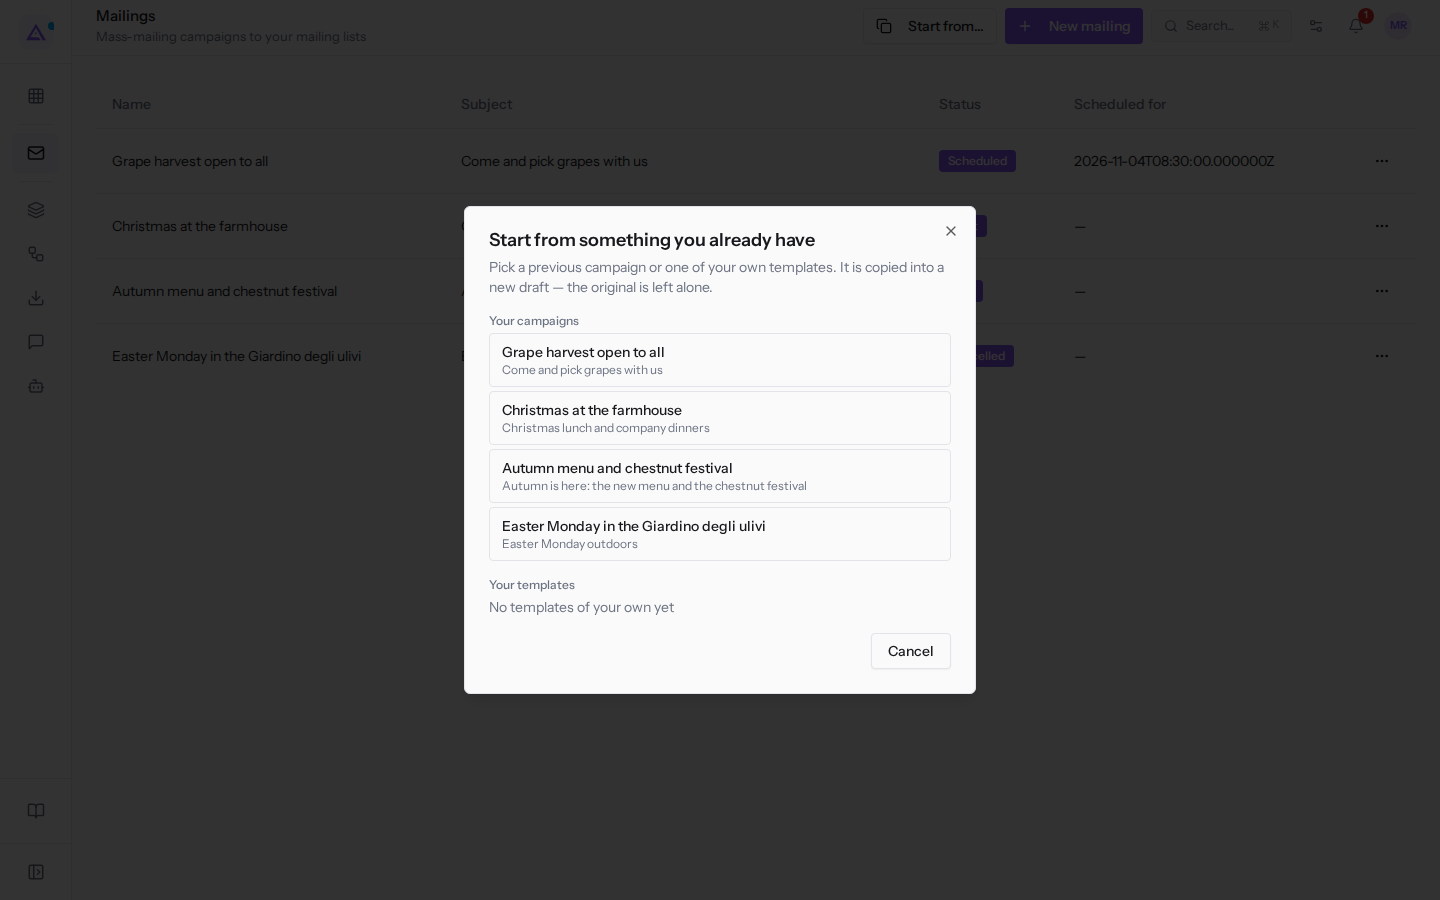
- In Your campaigns click the campaign to copy, for example
Autumn menu and chestnut festival. - The new draft opens with the name, subject, preview text, body, sender and list from the source campaign. The copy also takes the recipients, measurement, send speed and A/B test.
(copy)is added to the name: replace it with the new campaign's name. - Edit what you need and press Save.
In Your templates the email templates created by your organization appear: choosing one creates a draft with its subject, body and sender. Module templates, such as order confirmation or invoice, do not appear, because they are service emails and not campaigns. If the organization has no templates of its own, the section shows No templates of your own yet.
The copy is always a draft: nothing goes out until you send it or schedule it. Press Cancel to close the dialog without creating anything.
Writing the content
The campaign form opens with New mailing for a new campaign, or with Edit campaign for an existing draft, for example Christmas at the farmhouse.
- On the Mailings page press New mailing.
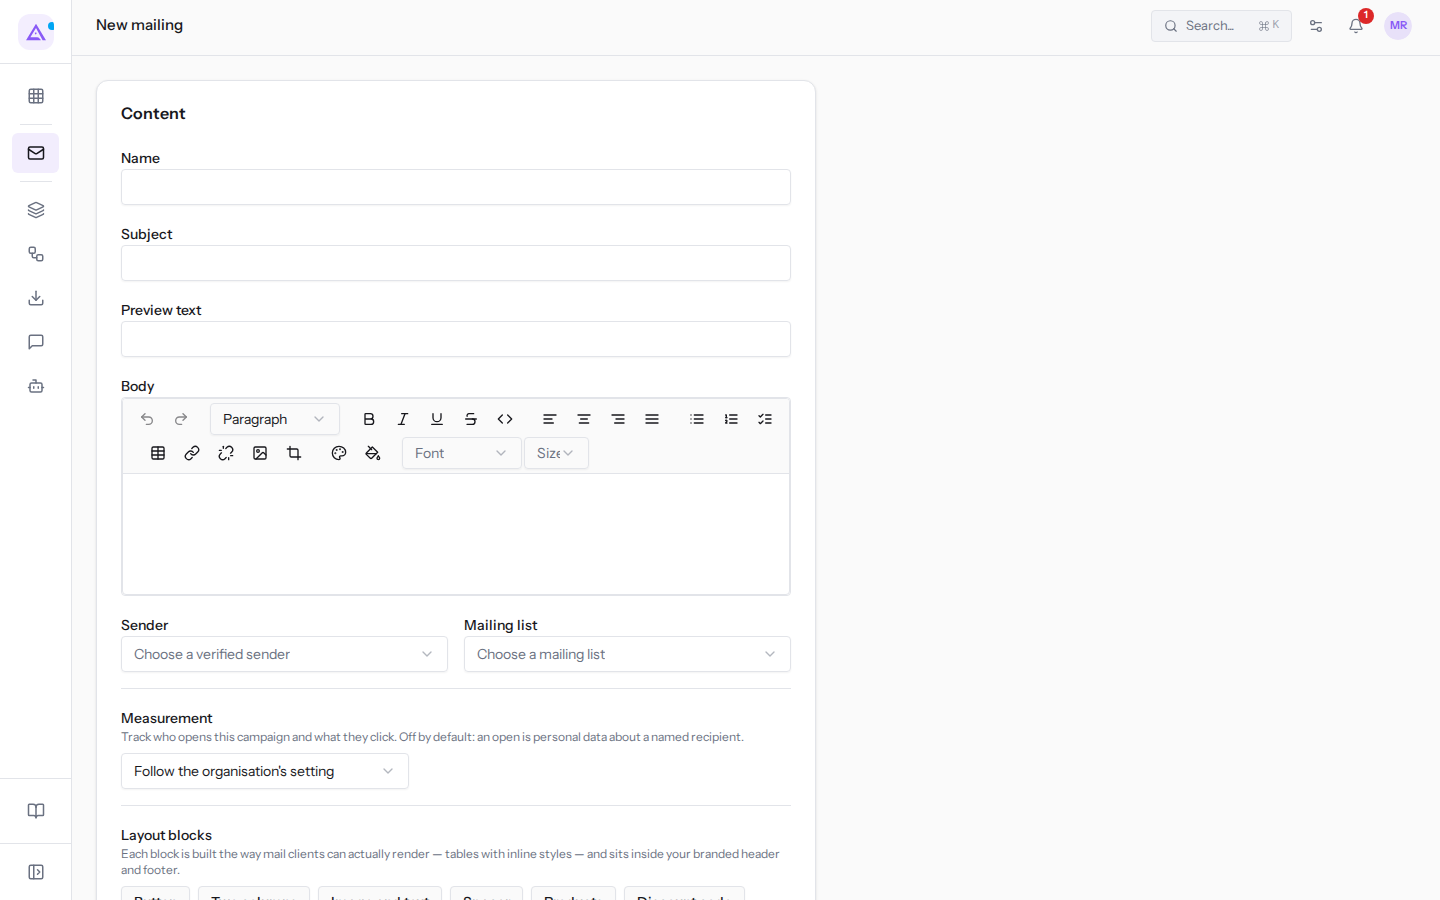
- Fill in the Content fields and, further down, Audience.
- Press Save. The button activates when there is a name, subject and sender and a list or recipients. Saving sends nothing: the campaign remains a draft.
The Content fields are:
- Name: the campaign name in the list, for example
Christmas at the farmhouse. - Subject: the email subject, for example
Christmas lunch and company dinners. - Preview text: the line that many email clients show next to the subject, before the email is opened. Together with the subject it helps decide whether to open it. For example the one for
Autumn menu and chestnut festivalisPumpkin, mushrooms and chestnuts: October Sundays at the farmhouse. - Body: the email text, written with the editor. The editor toolbar has bold, italic, lists, alignment, links and images.
- Sender: the address the campaign goes out from, which recipients see. The list offers only verified senders, for example
Agriturismo Azienda Demo <[email protected]>: an address still awaiting DNS verification, such as[email protected], does not appear. If there is no verified sender, the form signals this with the Verify a sending address link: without a sender the campaign cannot go out. - Mailing list: the main mailing list, for example
Companies for eventsorFarmhouse newsletter. Lists are managed in Managing mailing lists and their subscribers.
Layout blocks
Layout blocks add pre-formatted elements to the body: Button, Two columns, Image and text and Spacer. Each block is built so that email clients actually render it and it stays within your brand's header and footer: use them instead of pasting layouts from other programs. The inserted block contains example text, such as Read more for the button, to be replaced.
If other modules are active in the organization, their blocks also appear alongside, for example catalogue products or a shop discount code, with the Products and Discount code blocks. A click opens a dialog where you search for the element with Search for a block and add it to the body with Insert.
Personalization
Personalization means each person receives their own version of the email, for example with their name in the greeting instead of the same text for everyone. Insert a field and, at send time, each recipient finds it replaced with their own data.
- In the selector choose where to insert the field: Into the subject or Into the body.
- Click the field to insert: First name, Full name, Email, Company or Your organisation.
- In When there is no name, say enter the text to use for anyone who has no recorded name, for example
Dear customer. This way no one receives a greeting with an empty space.
Subject as a recipient reads it shows the subject with the fields already substituted. If the text contains a field that cannot be filled in, the form signals it: that field blocks sending until you correct it.
Choosing recipients
In Audience you decide who receives the campaign: include entire lists or a saved contact filter, and exclude lists or people who have already received a previous campaign. Only people who have given consent are contacted; unsubscribed and undeliverable addresses are removed automatically.
- Include lists: the lists that receive the campaign, for example
Companies for eventsandFarmhouse newsletter. - Include saved filters: the saved contact filters to add to recipients.
- Exclude lists: the lists whose subscribers should not receive the campaign.
- Exclude recipients of: the previous campaigns whose recipients should be excluded. The list only shows campaigns that have already been sent, for example
Autumn menu and chestnut festival.
Next to the Audience heading, the form shows how many people will receive the campaign out of how many selected, and a line explains who is left out: those who match the filter but have not given consent and those who are unsubscribed or undeliverable. If the number is lower than expected, the reason is in that line.
With Filter contacts you narrow the audience to contacts with certain characteristics. Press Add a condition and choose a field (Job title, Company, Is a customer, Is a supplier, Is a company or Language), a comparison (is, is not or contains) and the value; Remove removes the condition. To reuse the same audience in other campaigns, give it a name in the «Name this audience» field and press Save filter: it will appear in Include saved filters.
If you want to reach the newsletter without writing again to those who already received the autumn menu, include Farmhouse newsletter and exclude the recipients of Autumn menu and chestnut festival.
When the content and recipients are ready, the next step is to test the campaign and send it: see Testing, scheduling and sending a campaign.
See it on your company, not on a slide deck.
In 30 minutes we map the software you use today.We show you how much work and how much margin Archimedes gives back.
Show me on my business →What industry are you in?
One tap — it lets us prepare the demo around your world.
What tools do you use today?
Pick the ones you recognise — or just type them. It helps us show you how they migrate.
Last step: your details.
We reply within one working day — and right after, if you like, you pick the demo slot yourself.
We couldn't send your request. Try again, or write to us at [email protected].
By sending, you agree to your data being processed so we can get back to you about the demo. Privacy notice.
Preview form — nothing is sent from this page.
Want to schedule the demo now?
Your call: book the slot you prefer yourself, or we'll call you to arrange it.
Live availability, 30 minutes, instant confirmation. The calendar opens in a new tab.
Lock in your slot ↗We'll get back to you within one working day — and we'll join the call already knowing your world.
The calendar is open in another tab: pick a slot and the demo is booked. Can't see it? Reopen it ↗
Preview page: nothing was sent.
Our calendar is live: take the slot that suits you and the demo is booked. 30 minutes, instant confirmation, no waiting.
Lock in your slot ↗