All modules
Choosing which emails go out on their own
Mail · 7 of 18 · 8 min read
The Email automations page collects all the emails that the platform sends on behalf of the organization: those that go out when someone sends a document or takes an action (a quote, an invoice, the confirmation of a shop order) and those that the organization chooses to send on their own, such as the internal notification for a new lead. From here you decide which address they come from, turn optional emails on or off, add new automations, and open each email to change its text.
Opening the Email automations page
The page is reserved for the Email Manager group: those who are not members do not see the entry in the menu.
- Open Mail › Communications › Email automations.
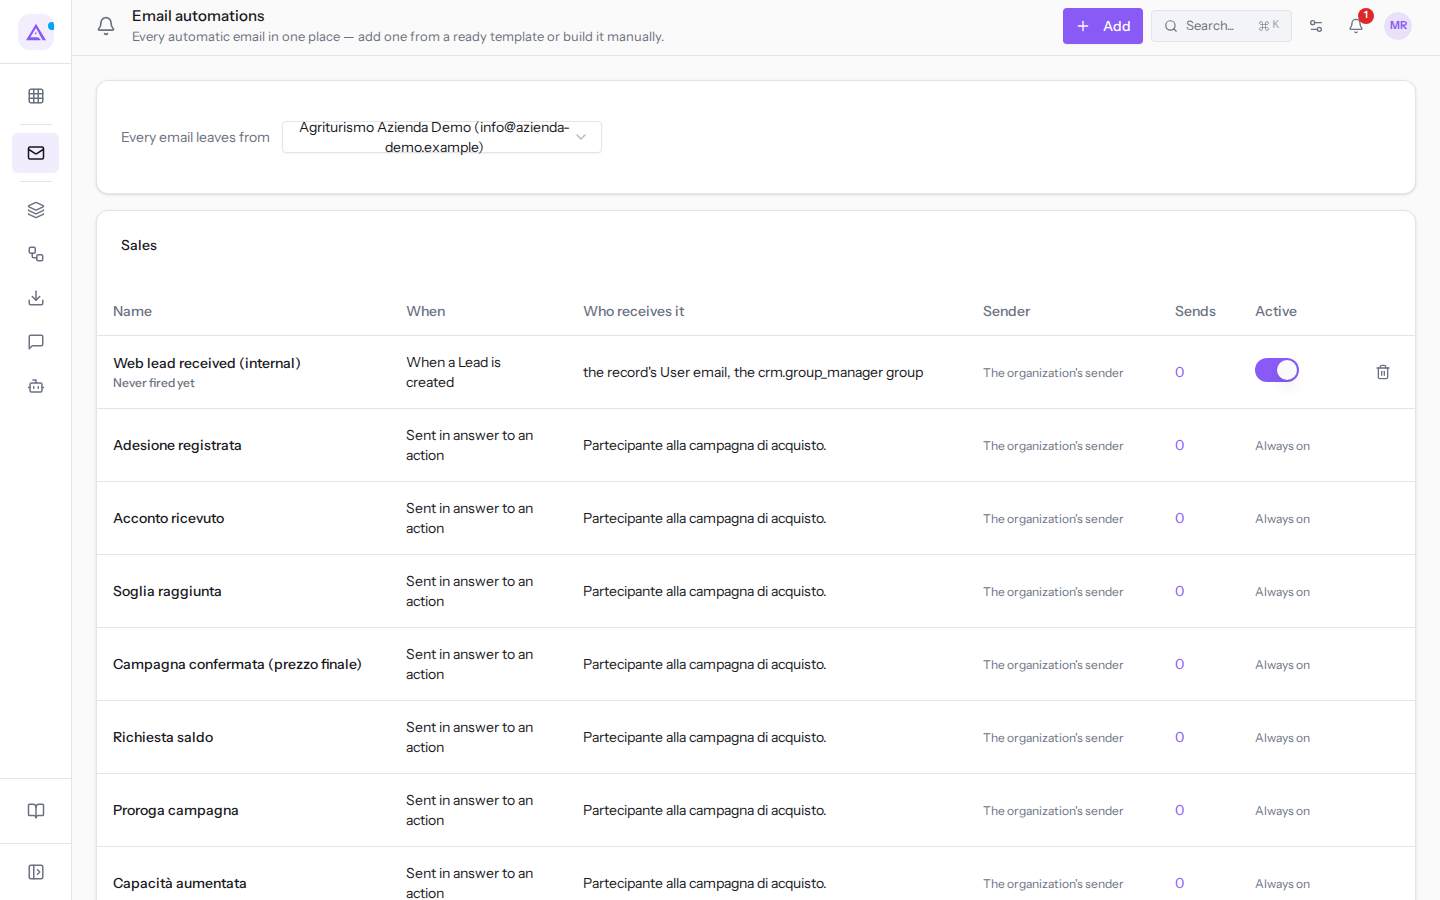
At the top you find the subtitle «Every automatic email in one place — add one from a ready template or build it manually.» and the Add button.
The sender for all emails
The Every email leaves from box sets the address from which every email of the organization is sent, for example Agriturismo Azienda Demo ([email protected]). The choice is made once and applies to all emails in the list, except those to which you have given a different sender from their card.
- Every email leaves from: the list contains only verified sender addresses. The choice is saved as soon as you change it, without pressing Save, and takes effect from the next send.
In the Sender column, the label The organization's sender indicates that the email uses this address. An email with its own address instead shows the Its own sender label followed by the address.
Without a verified address, no email goes out: instead of the drop-down list the box shows «No verified sender.» and the Add an address link. Emails that were due to go out in the meantime are held back and remain in the send log. An email linked to a document, such as an invoice or a quote, can be sent again from the document once the sender is ready. An email linked to a moment that has already passed, such as the confirmation of an order or a booking, is not recovered.
The emails in the list
The emails are grouped by work area, for example Sales, Services, Administration or Internal. Each row has these columns:
- Name: which email it is. Below the name a status line may appear: «Never fired yet» for an active automation that has never sent, or an orange warning when the email cannot go out (see further on).
- When: what triggers it. «Sent in answer to an action» indicates an email that goes out when someone sends a document or takes an action; for an automation the column describes the event, for example «When a Lead is created».
- Who receives it: the recipients, for example «Cliente a cui è intestato il preventivo.».
- Sender: which address it comes from.
- Sends: how many times it has been sent. The number is a link: a click opens the send log filtered on that email, useful for checking whether a customer has received it.
- Active: whether the email goes out or not (see the following section).
For example the row Email preventivo says that the email goes out on action, is received by the customer to whom the quote is addressed, uses the organization's sender and has been sent 3 times. The row Web lead received (internal) says that it goes out when a lead is created and that it has never gone out yet.
For some automations the Who receives it column shows the technical names of the configuration, for example «the record's User email, the crm.group_manager group».
Always-on emails and emails with a toggle
The Active column distinguishes two types of email.
- Always on: this is an email that someone outside the organization is waiting for, because they have just done something or because you have sent them a document: an invoice, a quote, the confirmation of a paid order, joining a group-buying campaign. It has no toggle: it goes out every time the action happens, as long as there is a verified sender. Hovering over the label shows the reason: «This email answers something the recipient did, so it cannot be switched off.»
- Toggle: this is an email that the organization chooses to send, for example a notification to colleagues (a new lead, an assigned deadline) or a send decided by the company (a payment reminder, recovery of an abandoned cart, a reminder). With the toggle on the email goes out on every occasion; with it off, it does not go out until you turn it back on. The change takes effect immediately.
The automations you add, from a ready template or manually, always have the toggle and, at the end of the row, the bin icon. For example Web lead received (internal) and Deadline reminder are automations added from a ready template.
Active emails that cannot go out
An email can be on but with no way to go out: a recipient is missing, the chosen sender is not verified, or the template is disabled. In this case the row has an orange background and below the name it says what is missing and what to do, for example «Not sending — sender not verified — verify the sender in Email → Addresses». Until you fix it, the email does not go out.
When there are emails in this situation, a warning appears above the list with their number, for example «2 emails are on but cannot leave.», and the Show only these button, which reduces the list to those emails. With Show all you return to the full list. If no email is blocked, the warning does not appear.
Adding an automation from a ready template
A ready template is a complete automation: it knows when to go out, who to write to, and what to say. Use it when the email you need is among those on offer; if you need a different event or recipient, create the automation manually.
- Click Add.
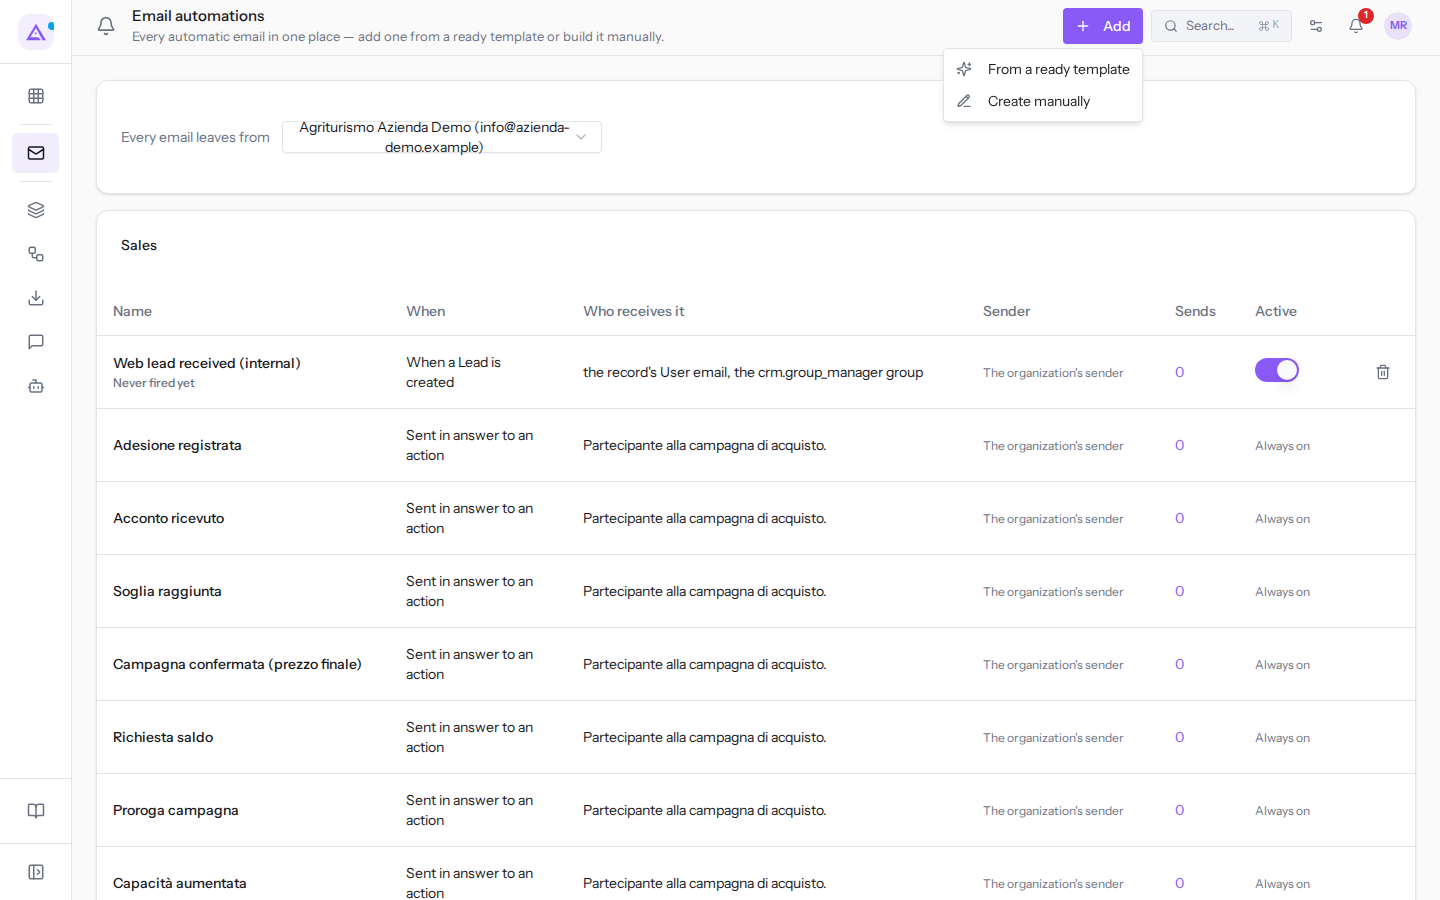
- Choose From a ready template. The Add from a ready template dialog opens, with templates from active modules grouped by area, for example Sales, Services and Internal.
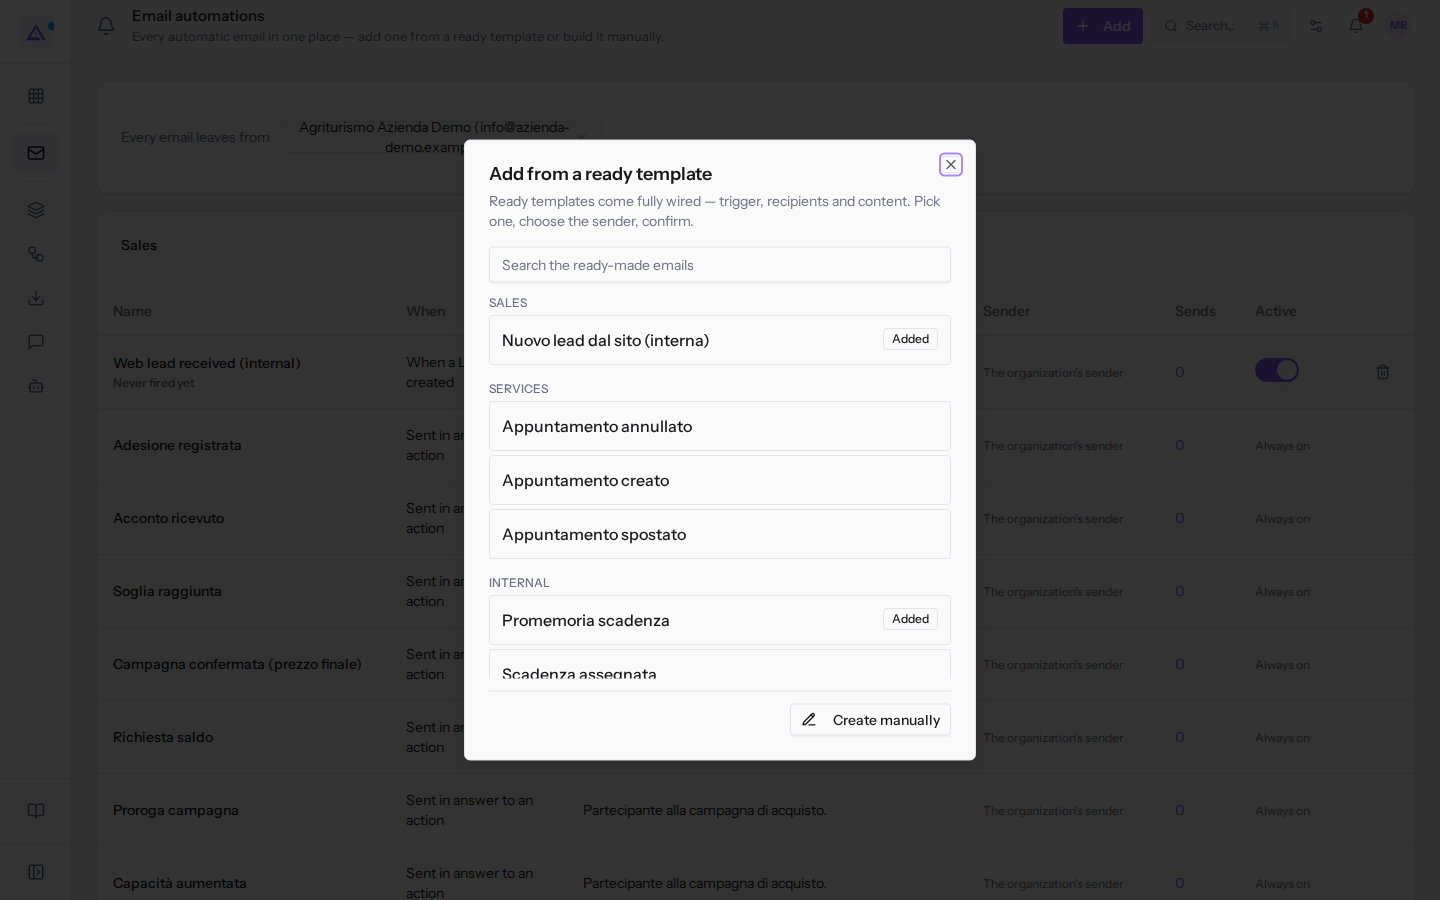
- If the list is long, type part of the name in Search the ready-made emails: for example with
ScadenzaonlyPromemoria scadenza,Scadenza assegnataandScadenza superataremain. - Click on the template you need, for example
Appuntamento creato. The dialog shows when it goes out, the subject and the text under Read the text, and the sender. - Click Activate. To return to the list of templates click Back.
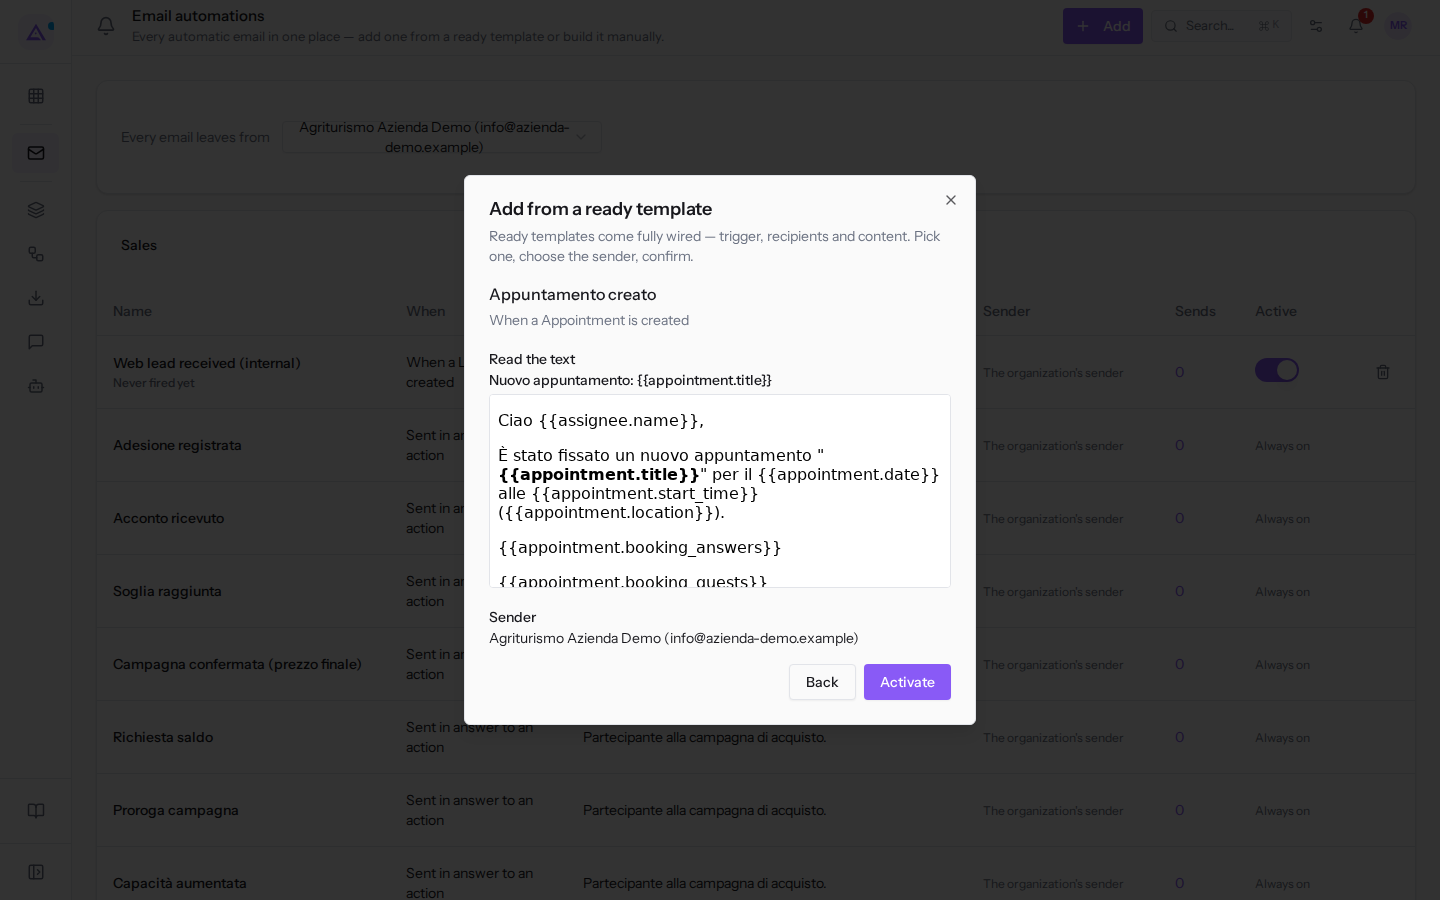
After Activate the automation appears in the list with the toggle on and goes out from the next event: for Appuntamento creato, from the next appointment created. It uses the organization's sender; if you want a different one, change it later from the email's card. Without a verified sender the Activate button remains disabled.
The summary describes the send moment with the technical name of the record, for example «When a Appointment is created».
In the dialog you also find:
- the Added label on already-activated templates: a click opens the email's card instead of adding it a second time;
- Create manually, at the bottom, to switch to manual creation;
- the X icon in the top right, which closes the dialog without adding anything.
Creating an automation manually
Use this route when no ready template suits your needs, for example to notify a shared mailbox when the status of an order changes.
- Click Add.
- Choose Create manually. The New automation page opens.
The automation is configured in three steps: 1. When, 2. What to send and 3. Who to notify. The fields are described in Creating or editing an email automation.
Opening an email's card
The card is where you read and change an email: when it goes out, who receives it, which address it comes from, and what text it uses.
- In the list click on the name of the email, for example
Web lead received (internal).
The card shows the area (for example Sales), the Module default label as long as the text has not been changed, the At a glance box with When it leaves, Who receives it and Sender, and the Content section with the Subject and body. For an automation there is also the Change when it is sent button. To return to the list click All emails.
Deleting an automation
Delete an automation when you no longer need it. If you only want to suspend it, turn off the toggle: deletion also removes its configuration (event, conditions, recipients). Only the automations you added have the trash icon; other emails cannot be deleted.
- In the automation row, click the trash icon.
- The browser asks for confirmation with the message «Delete "…"? Sends stop immediately.». Confirm.
After deletion the automation no longer runs. Sends already made remain in the send log.
See it on your company, not on a slide deck.
In 30 minutes we map the software you use today.We show you how much work and how much margin Archimedes gives back.
Show me on my business →What industry are you in?
One tap — it lets us prepare the demo around your world.
What tools do you use today?
Pick the ones you recognise — or just type them. It helps us show you how they migrate.
Last step: your details.
We reply within one working day — and right after, if you like, you pick the demo slot yourself.
We couldn't send your request. Try again, or write to us at [email protected].
By sending, you agree to your data being processed so we can get back to you about the demo. Privacy notice.
Preview form — nothing is sent from this page.
Want to schedule the demo now?
Your call: book the slot you prefer yourself, or we'll call you to arrange it.
Live availability, 30 minutes, instant confirmation. The calendar opens in a new tab.
Lock in your slot ↗We'll get back to you within one working day — and we'll join the call already knowing your world.
The calendar is open in another tab: pick a slot and the demo is booked. Can't see it? Reopen it ↗
Preview page: nothing was sent.
Our calendar is live: take the slot that suits you and the demo is booked. 30 minutes, instant confirmation, no waiting.
Lock in your slot ↗