All modules
Creating or editing an email automation
Mail · 8 of 18 · 8 min read
An email automation sends a message on its own when something happens to a record, without anyone having to remember to do it. For example, it notifies the sales team when a new lead comes in from the website, or reminds a follower about a deadline. Unlike «Sent in answer to an action» emails, which are sent when someone sends a document, an automation is defined by you: you choose the event, the text, and the recipients.
The New automation and Edit automation pages have the same fields: the name at the top, then three steps, 1. When, 2. What to send and 3. Who to notify, and finally the Preview & test panel.
Before you choose: ready-made template or manual automation
An automation can be added in two ways.
- If a ready-made template already exists for your use case, add the automation with From a ready template: the event, recipients and content are already configured.
- If no ready-made template fits your needs, choose Create manually and configure the three steps described on this page yourself.
To save, you must give the automation a name and choose a record type, an email template and at least one recipient.
Creating an automation
The page is restricted to the Email Manager group.
- Open Mail › Communications › Email automations.
- Click Add and choose Create manually. The New automation page opens.
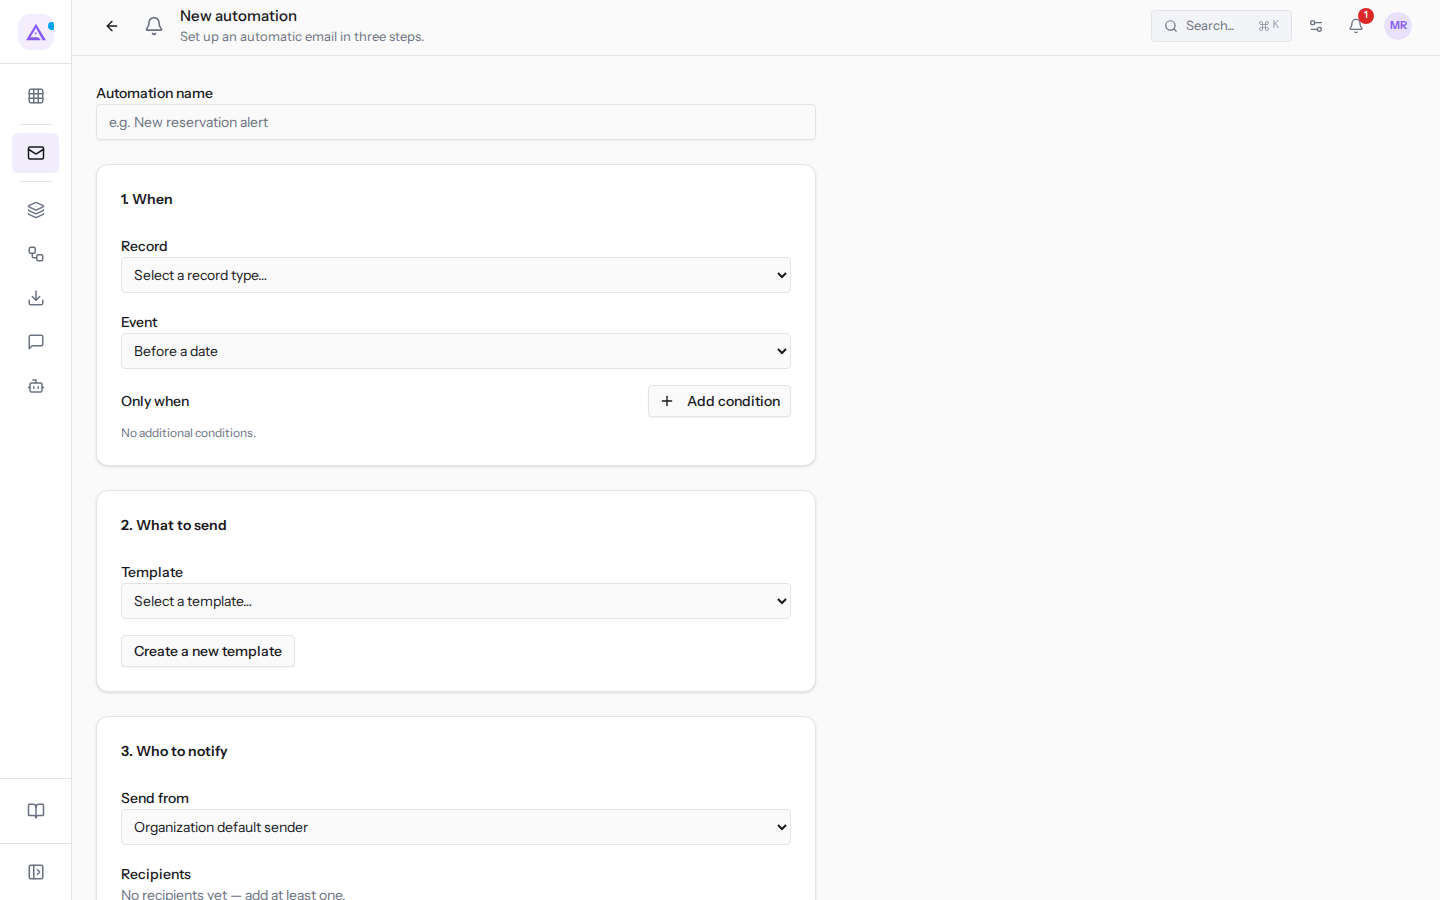
- Enter the Automation name, for example
Web lead received. This is the name the automation appears under in the list: choose one that describes what it does. - Fill in the steps 1. When, 2. What to send and 3. Who to notify, described in the following sections.
- Check the email in the Preview & test panel.
- Click Create automation, or Cancel to exit without saving.
After Create automation you return to the Email automations list: the new automation is already active and triggers from the next event. If the name, record type, template or a recipient is missing, the page does not save and shows «Give the automation a name, and pick a model, template and at least one recipient.»
Step 1. When
Here you decide which record type the automation is based on and when it triggers.
- In Record choose the record type, for example
Leadfor contacts that come from the website. - In Event choose when the email is sent.
- If the email should only be sent for certain records, click Add condition and fill in the condition.
- Record: the record type the automation starts from. The initial value is Select a record type…. In the list, types appear with their technical name, for example
Lead,InvoiceorAppointment, and some appear more than once. - Event: chosen after Record; until then the field is disabled and shows Before a date. Once the record is chosen, the list offers these options:
- «When created»: when the record is created. This is the default option;
- «When changed»: whenever the record is modified;
- «When a specific field changes»: when a specific field changes, which you choose in Which field?;
- «When deleted»: when the record is deleted;
- Before a date: a certain number of days before a date on the record. Choose the date in Schedule against and the number in Days before. For deadlines there is nothing to schedule: each deadline triggers according to its own reminder, and the page indicates this with a notice.
- Only when: optional conditions to limit sending to certain records. Without conditions the page shows «No additional conditions.» and the email is sent for every record. Each condition added with Add condition has three parts, plus the X icon to remove it:
- the record field to check;
- the operator: equals, not equals, greater than, greater or equal, less than, less or equal, contains, is null, is not null, days ago >, days ago <;
- the Value to compare. With is null and is not null no value is needed. With days ago > and days ago < the value is a number of days: for example «days ago > 30» applies to records whose date in the chosen field is more than 30 days ago.
With multiple conditions, the automation only triggers for records that satisfy all of them.
Step 2. What to send
Here you choose the email text, i.e. the template. The template contains the subject and body; the automation only decides when to send it and to whom.
- In Template choose an existing template, for example Promemoria scadenza or Nuovo lead dal sito (interna).
- If no template works, click Create a new template. The fields Template name, Subject and Body appear.
- Click Create & use to create the template and use it in this automation, or Cancel to return to template selection. Create & use becomes active when the name and subject are filled in.
- Template: the email template to send. The initial value is Select a template…. The list contains templates from active modules, for example Email fattura, Appuntamento creato or Conferma ordine del negozio, and those created by the organization. Most names appear in Italian; a few, for example «DDT refused by the ERP», appear in English.
A template's text is changed from the email record, not from here: see the article «Changing the text of an automated email». If multiple automations use the same template, a text change applies to all of them.
Step 3. Who to notify
Here you choose which address the email is sent from and who receives it.
- In Send from choose the sender.
- Click Add recipient. A recipient row appears.
- Choose the recipient type and fill in the field that appears next to it.
- Repeat from step 2 for each additional recipient. The bin icon at the end of a row removes it.
- Send from:
- Organization default sender: the initial value. The email is sent from the address chosen in Every email leaves from and follows that choice if it changes in the future;
- a verified sender address, for example Agriturismo Azienda Demo ([email protected]): the email is always sent from that address. Addresses not yet verified, such as
[email protected]which is awaiting DNS configuration, do not appear.
- Recipients: at least one recipient is required; until there is none the page shows «No recipients yet — add at least one.». For each one choose the type:
- Field on the record: an email address taken from the record itself, for example the lead's or the linked user's email. In Select a field… only fields containing an email address appear, with the technical name in parentheses, for example «User email (user.email)»;
- People on the record: users linked to the record, such as the manager or followers. Enter the relationship name in the field next to it, for example
managerorfollowers; - Specific users: one or more users chosen from the list, always the same regardless of the record;
- Role / team: all users in a permission group. Enter the group identifier in the Group identifier (e.g. sale.group_user) field, for example
crm.group_manager; - Fixed address: an address you enter yourself in the
[email protected]field, for example a shared mailbox. This is the type suggested when you add a recipient.
Without a verified sender the email is not sent: the send is held and remains in the send log.
Preview and test
The Preview & test panel lets you check the email before saving, so the first recipient is not the one who discovers a mistake in the text.
- Preview: shows the subject and the email as the recipient will receive it. Nothing is sent. A template must have been chosen.
- Send me a test: actually sends a test email to your account address, from the sender chosen in Send from. If the send succeeds «Test email sent to …» appears, otherwise «Could not send the test email.».
If the test does not send, check the sender: without a verified sender, real sends would not go out either.
Editing an automation
Edit an automation to change when it starts, the template, or the recipients. Changes take effect from the next sends; emails already sent do not change.
- Open Mail › Communications › Email automations.
- Click the automation name, for example Web lead received (internal). The email record opens, with the At a glance panel.
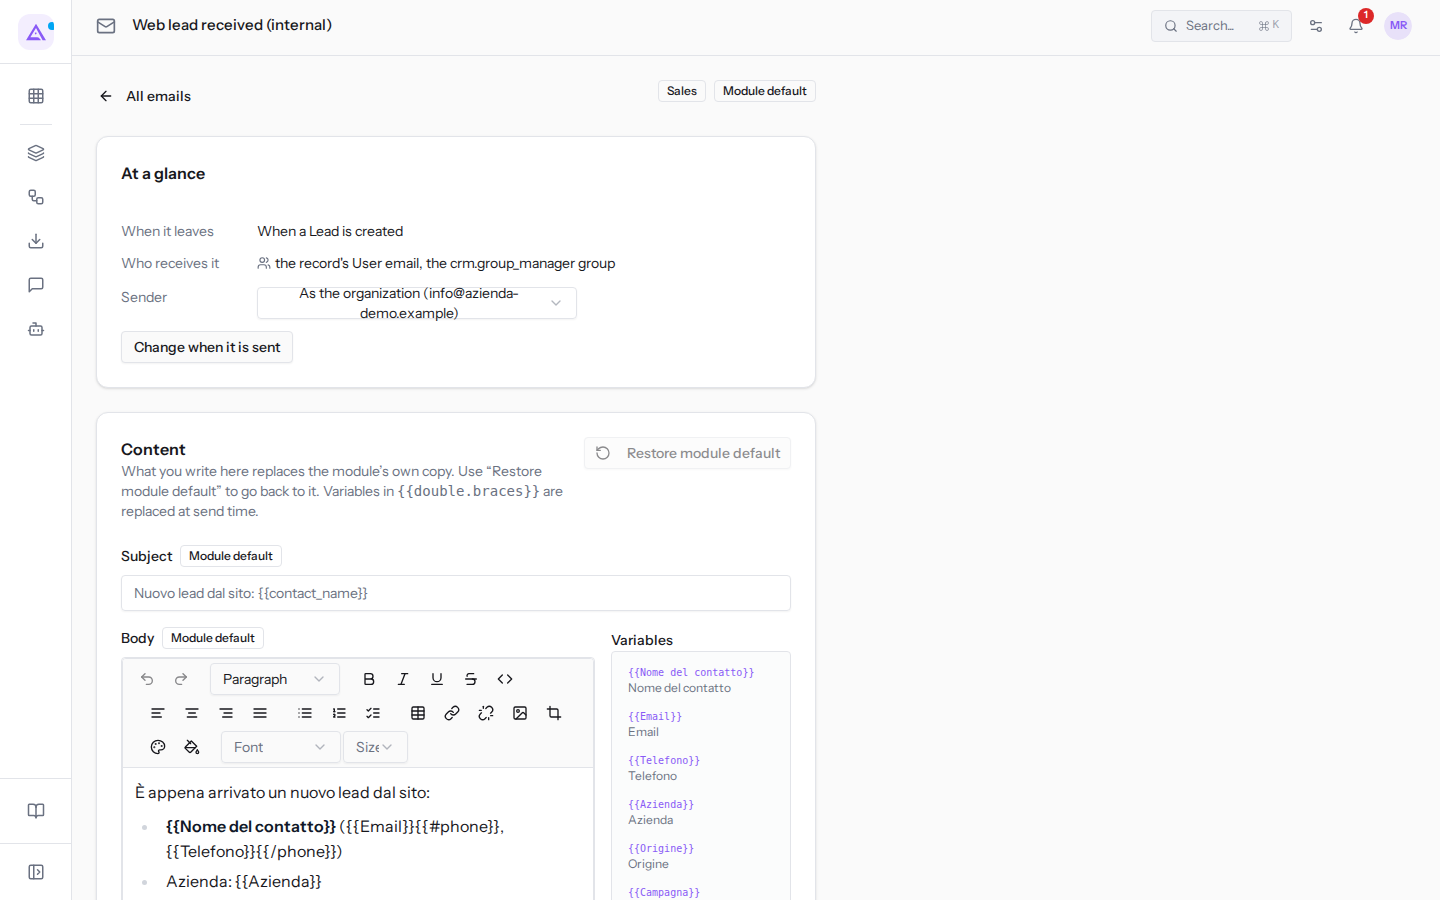
- Click Change when it is sent. The Edit automation page opens, with the same fields as when creating.
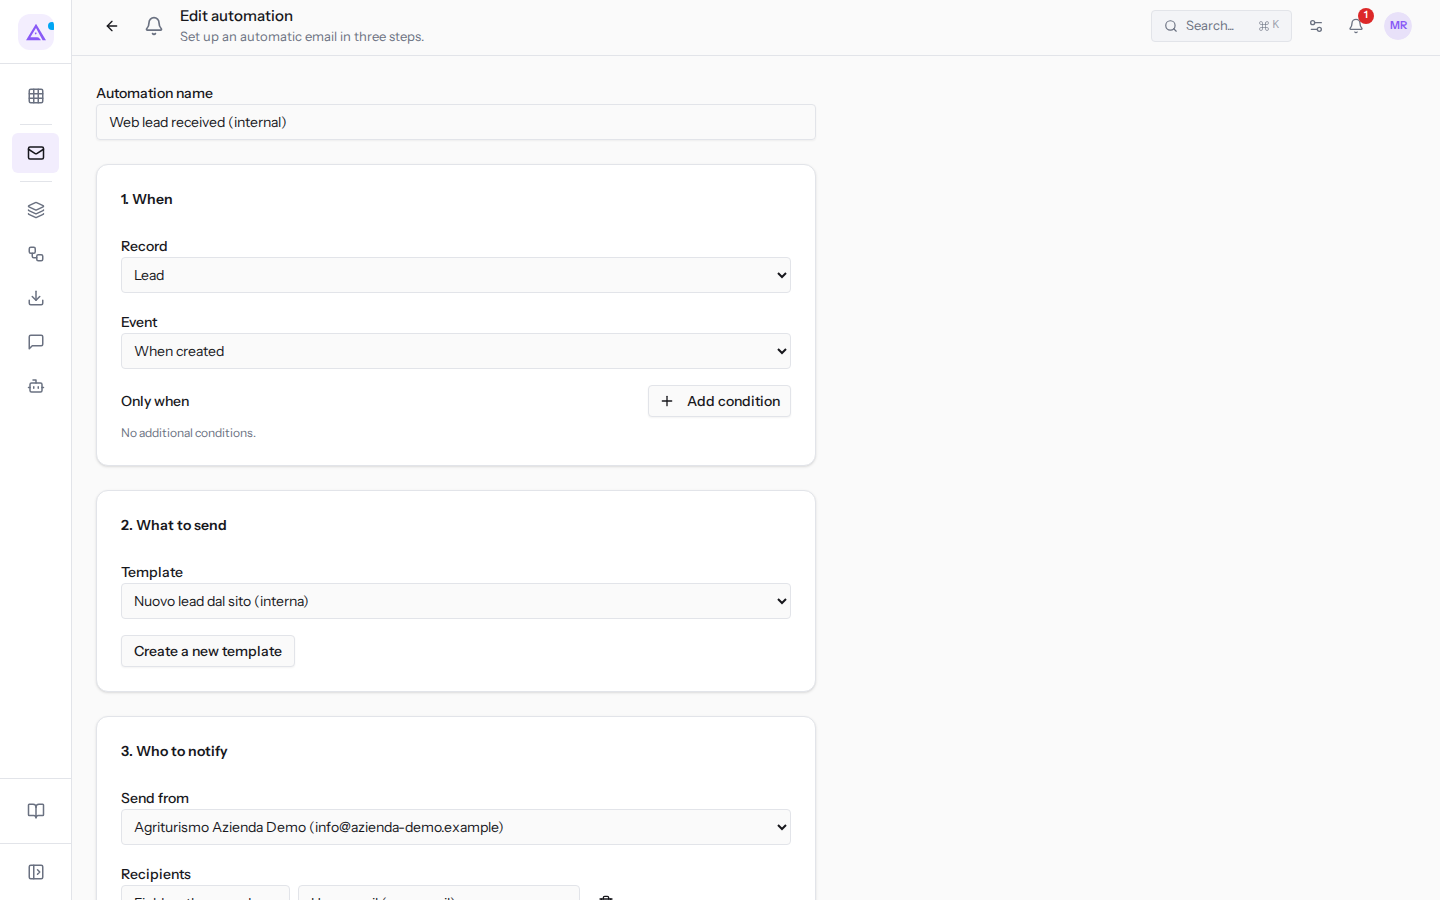
- Change the fields in the three steps.
- Click Save changes, or Cancel to exit without saving.
If an automation has steps or settings that this page cannot display, the page is read-only: a notice says so and links to the automations editor, where you can edit it.
Example: Web lead received (internal)
The automation Web lead received (internal), added from a ready-made template, notifies sales staff as soon as a lead arrives, so no one goes unanswered. In Edit automation its values are:
- Automation name:
Web lead received (internal). - Record:
Lead; Event: «When created», meaning at lead creation. - Only when: no condition, so it triggers for every new lead.
- Template: Nuovo lead dal sito (interna).
- Send from: Agriturismo Azienda Demo ([email protected]).
- Recipients: two entries. One of type Field on the record with the field «User email (user.email)», i.e. the user linked to the lead; one of type Role / team with the group
crm.group_manager.
See it on your company, not on a slide deck.
In 30 minutes we map the software you use today.We show you how much work and how much margin Archimedes gives back.
Show me on my business →What industry are you in?
One tap — it lets us prepare the demo around your world.
What tools do you use today?
Pick the ones you recognise — or just type them. It helps us show you how they migrate.
Last step: your details.
We reply within one working day — and right after, if you like, you pick the demo slot yourself.
We couldn't send your request. Try again, or write to us at [email protected].
By sending, you agree to your data being processed so we can get back to you about the demo. Privacy notice.
Preview form — nothing is sent from this page.
Want to schedule the demo now?
Your call: book the slot you prefer yourself, or we'll call you to arrange it.
Live availability, 30 minutes, instant confirmation. The calendar opens in a new tab.
Lock in your slot ↗We'll get back to you within one working day — and we'll join the call already knowing your world.
The calendar is open in another tab: pick a slot and the demo is booked. Can't see it? Reopen it ↗
Preview page: nothing was sent.
Our calendar is live: take the slot that suits you and the demo is booked. 30 minutes, instant confirmation, no waiting.
Lock in your slot ↗