All modules
Receiving mail on a hosted or connected mailbox
Mail · 18 of 18 · 6 min read
Besides sending, the organization receives customers' mail and processes it in Conversations. Mail arrives in two ways: on a mailbox hosted by the platform on your domain, or from a mailbox you already have with another provider that you connect. These mailboxes are managed from Mail › Settings, reserved for users in the Email Manager group. How to add an address and configure sending is explained in Configuring the addresses you send from.
For example [email protected] receives on a subdomain of the organization and [email protected], the events office mailbox, is connected via IMAP.
Creating a hosted mailbox
A hosted mailbox is an address on your domain stored on the platform's mail server.
It is useful when you want a real mailbox on your domain, to read here, in webmail and on your phone, without another provider. It requires a domain on the mail server, with its DNS records, and the Mailboxes app. If hosted mailboxes are not active for your organization, instead of the button an invitation appears to request activation from your Archimedes contact; if no domain is ready yet, under Domain the window warns that no domain can host mailboxes yet.
- In Add an address click Create a mailbox. The Mailboxes page opens with the New mailbox dialog.
- Fill in the fields and click New mailbox.
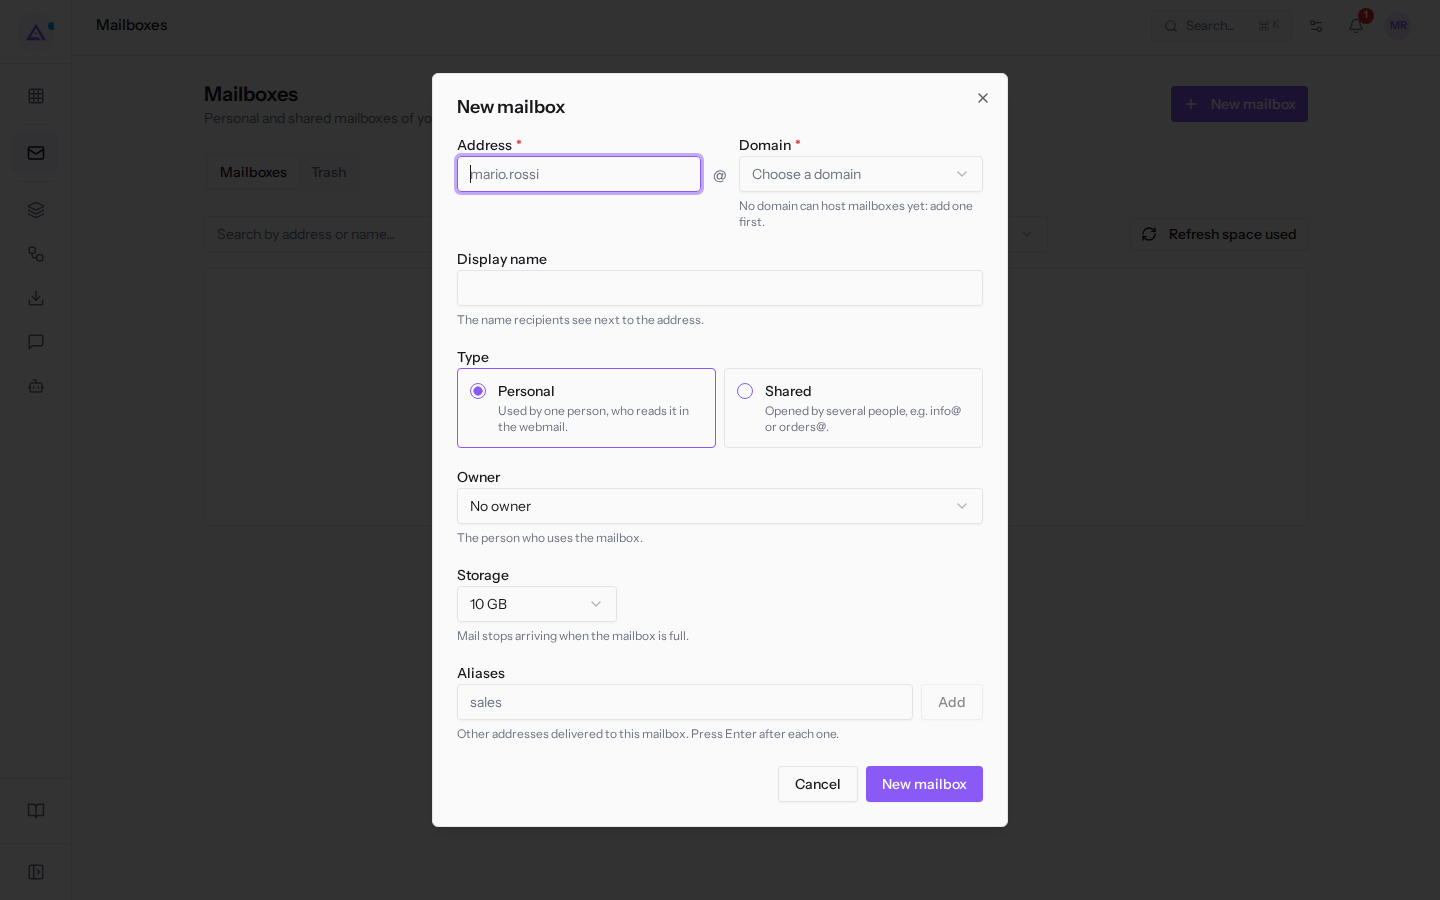
The dialog fields:
- Address: the part before the at sign. This field is required.
- Domain: the mailbox domain. This field is required.
- Display name: the name recipients see next to the address.
- Type:
- Personal: used by a single person, who reads it in webmail;
- Shared: opened by multiple people, for example info@ or orders@.
- Owner: No owner or a user, for example Giulia Verdi or Mario Rossi.
- Storage: the mailbox storage, from 1 GB to 50 GB or Custom…. The default value is 10 GB. When the mailbox is full mail stops arriving, so choose a size appropriate for the expected traffic.
- Aliases: other addresses that arrive in the same mailbox, for example
sales. Type the alias and press Add or Enter.
Managing a receiving address
The card for a receiving address, for example [email protected], shows the Receiving status and controls two things: whether the AI routes incoming mail and who can read it. For [email protected], which both sends and receives, the list row opens this card: sender data such as the display name and verification date are not visible from here.
- In Mail › Settings click the receiving address.
- In the Who reads this mailbox panel check the groups that can read the mailbox and its conversations. Each selection is saved immediately.
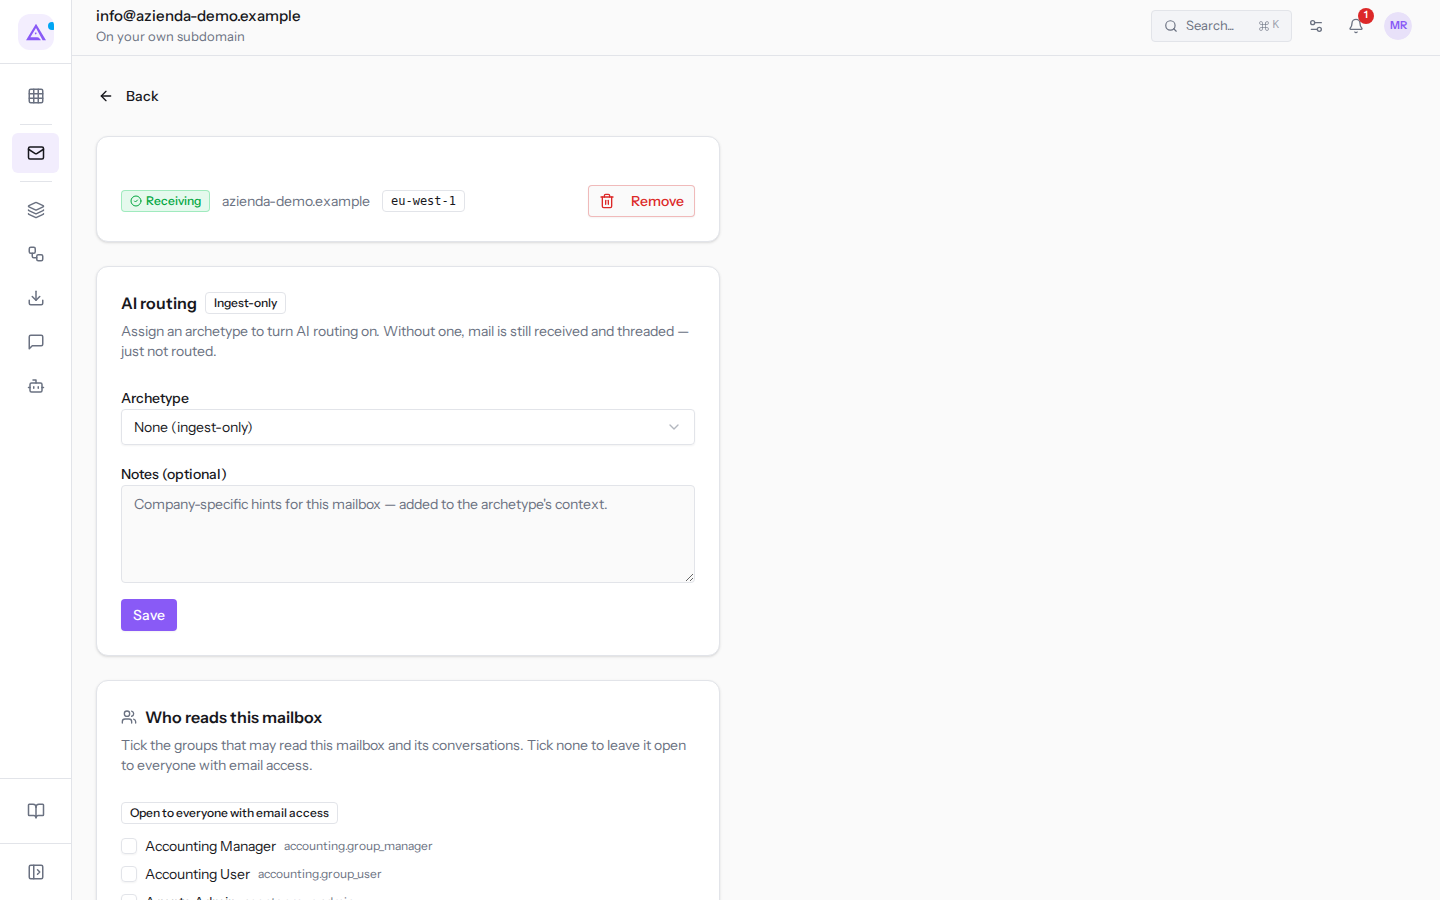
The card fields:
- AI routing: controls whether the AI routes incoming mail. Choosing an Archetype and pressing Save in the panel activates AI routing for this mailbox. With None (ingest-only) the address remains in Ingest-only: mail is received and grouped into conversations as usual, but nothing routes it automatically. Some archetypes require a module the organization has not activated and indicate this next to the name. When routing is active, Pause routing stops it without removing the archetype.
- Notes (optional): company instructions for this mailbox, added to the archetype's context.
- Who reads this mailbox: the groups that can read it. If you select no group, the mailbox is open to anyone with email access and the panel indicates this with Open to everyone with email access. Restricting it is useful for reserved mailboxes, for example the accounts department.
Connecting an existing mailbox
Connect an existing mailbox when mail must stay with your provider, for example a business address such as [email protected]. The mailbox stays where it is: the platform accesses it with credentials or with Microsoft or Google sign-in and imports its mail into Conversations. No DNS records are needed.
- In Add an address click Connect a mailbox. The Connect mailbox page opens.
- Enter the Mailbox address and choose how you connect.
- Fill in the access details and choose how much mail to import.
- Click Connect mailbox.
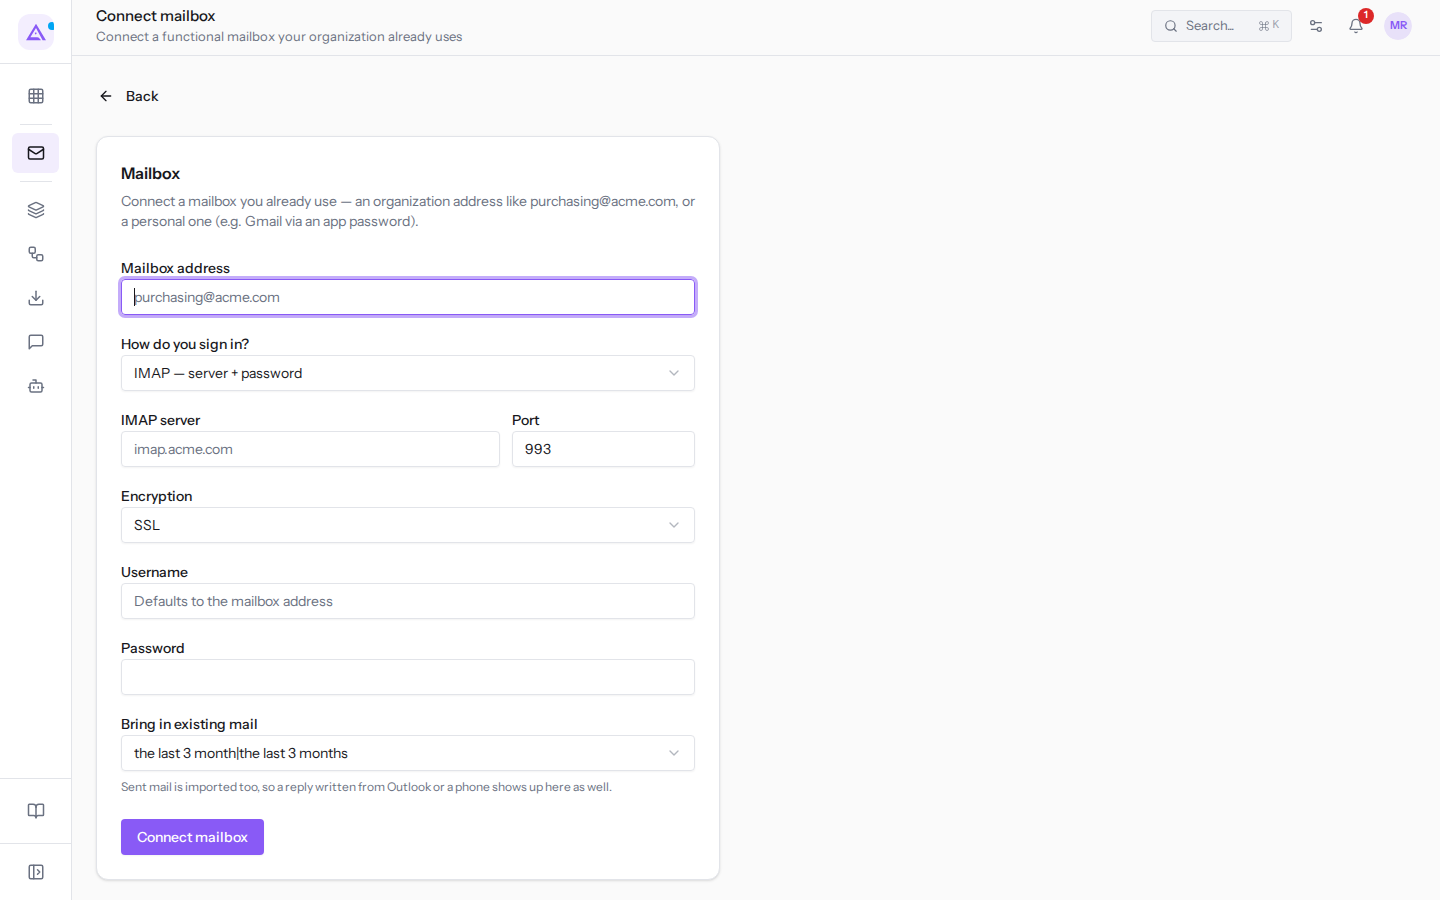
The form fields:
- Mailbox address: the address of the mailbox to connect.
- How do you sign in?:
- IMAP — server + password: shows the server fields;
- Microsoft 365 — sign in: the server fields are replaced by the Sign in with Microsoft button;
- Google — sign in: you sign in with your Google account to authorize the platform, without entering a password.
- IMAP server: the mail server address. Only shown with IMAP.
- Port: the default value is
993. Only shown with IMAP. - Encryption: SSL (default), STARTTLS or None. Only shown with IMAP.
- Username and Password: the mailbox credentials. Only shown with IMAP. If you leave the username blank the mailbox address is used; for a Gmail account an app password is required.
- Bring in existing mail: how much existing mail to bring into Conversations. Don't — start from today imports only mail that arrives after the connection; the other options also import the last 1, 3, 6 or 12 months. The default value is 3 months; for now the options appear with a singular and plural form, such as
the last 3 month|the last 3 months. Sent mail is also imported, so a reply written from Outlook or your phone also appears here.
Checking a connected mailbox
The card for a connected mailbox, for example [email protected], shows whether the connection is working.
- In Mail › Settings click the connected mailbox.
- Check the Connected status and the date after Last synced. The platform reads new mail on its own every few minutes, so a recent date means the connection is working. With the Sign-in failed status the saved password or sign-in is no longer valid and the mailbox must be reconnected.
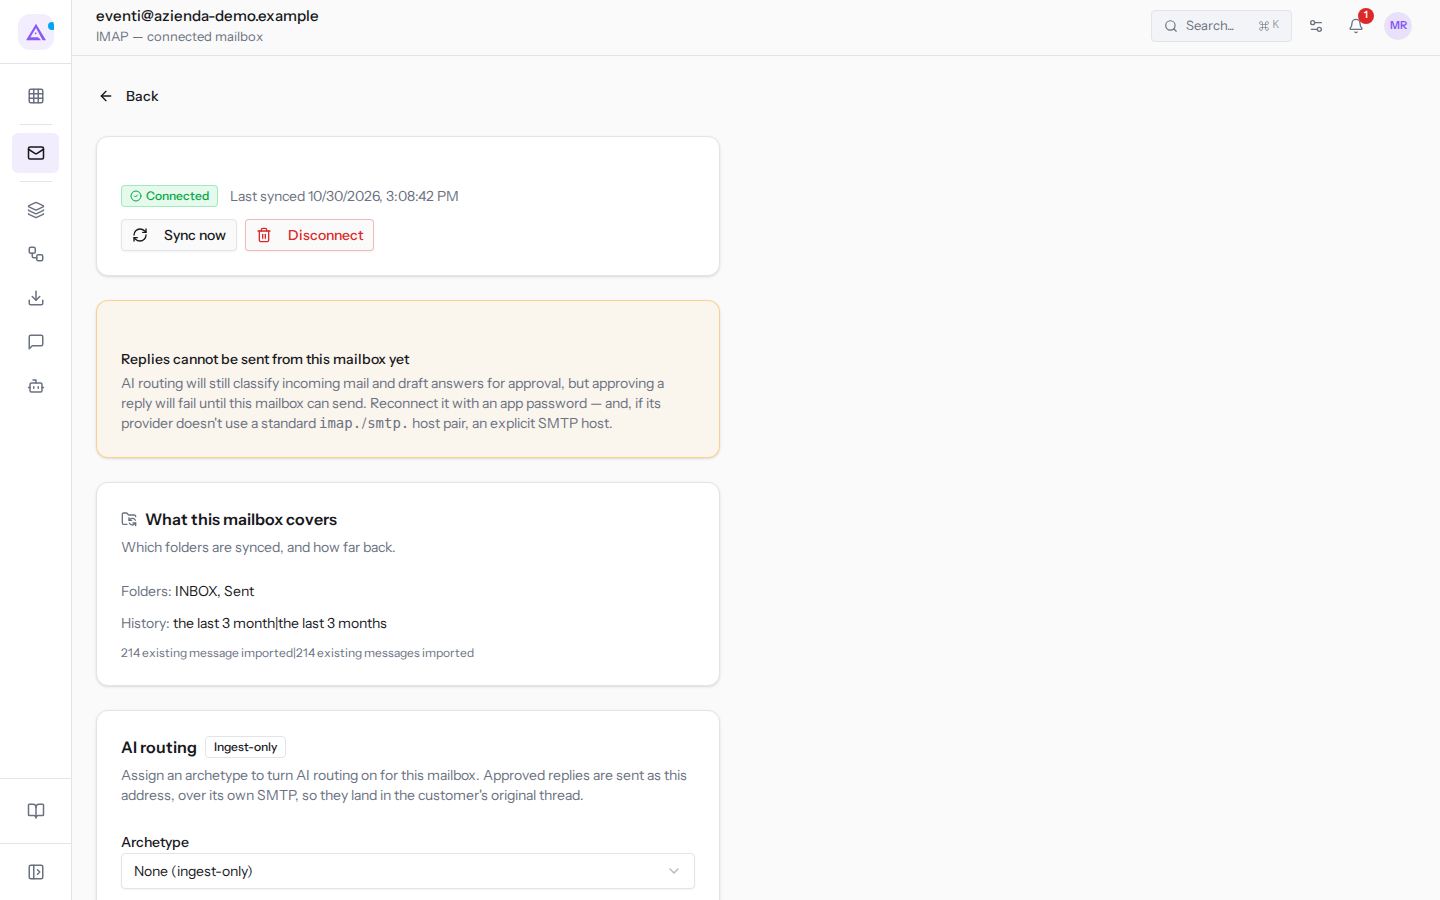
In the card you will find:
- the connection type, for example
IMAP — connected mailbox; - Sync now, which reads new mail from the server immediately instead of waiting for the next cycle; useful when you are waiting for a specific message;
- the red button with the trash icon, which disconnects the mailbox after confirmation: the saved credentials are removed and mail stops synchronizing. Its label is Disconnect;
- the What this mailbox covers panel: the synchronized folders, for example
INBOX, Sent, and from when. If a message does not appear in Conversations, check here whether its folder and date are covered. For now these lines also appear with a singular and plural form, such asthe last 3 month|the last 3 months; - Archetype and Notes (optional), as for receiving addresses. With an archetype, approved replies are sent from this address, via its mail server, and remain in the customer's original conversation.
For [email protected] a panel warns that Replies cannot be sent from this mailbox yet: mail arrives and the AI can prepare reply drafts, but approval fails until the mailbox can send. To fix it the mailbox must be reconnected with an app password and, if the provider does not use the standard names imap. and smtp., by specifying the SMTP server explicitly.
For received conversations see Working conversations with customers.
See it on your company, not on a slide deck.
In 30 minutes we map the software you use today.We show you how much work and how much margin Archimedes gives back.
Show me on my business →What industry are you in?
One tap — it lets us prepare the demo around your world.
What tools do you use today?
Pick the ones you recognise — or just type them. It helps us show you how they migrate.
Last step: your details.
We reply within one working day — and right after, if you like, you pick the demo slot yourself.
We couldn't send your request. Try again, or write to us at [email protected].
By sending, you agree to your data being processed so we can get back to you about the demo. Privacy notice.
Preview form — nothing is sent from this page.
Want to schedule the demo now?
Your call: book the slot you prefer yourself, or we'll call you to arrange it.
Live availability, 30 minutes, instant confirmation. The calendar opens in a new tab.
Lock in your slot ↗We'll get back to you within one working day — and we'll join the call already knowing your world.
The calendar is open in another tab: pick a slot and the demo is booked. Can't see it? Reopen it ↗
Preview page: nothing was sent.
Our calendar is live: take the slot that suits you and the demo is booked. 30 minutes, instant confirmation, no waiting.
Lock in your slot ↗