Employees
All modules
Archiving and accessing personnel documents
Employees · 8 of 20 · 5 min read
The personnel document archive collects each employee's files, such as contracts, identity documents, qualifications, and payslips. You can add a document from the employee's record, browse the archive for all employees on a single page, and bulk-upload documents you already have.
How the archive is organised
Every document has a category and a visibility. The category indicates the type of document. The visibility determines who can see it beyond the HR office.
The available categories are Contract, Identity document, Qualification, Payslip, Medical certificate, Disciplinary and Other.
Documents can be added in three ways:
- If you need to archive a single document for an employee, add it from their record.
- If you need to bring many existing documents into the archive — for example when you first start using the module — use Employees › Document Intake.
- If you receive payslips from your payroll consultant, upload them with Payslip Batches, which publishes them in each employee's archive.
Every category has a retention period. The default values are ten years for contracts, qualifications, and payslips; five years for medical certificates; two years for identity documents and disciplinary records; no limit for the Other category. Documents past the retention period are not deleted automatically: they are listed for review in HR Checks.
Adding a document from the employee's record
From an employee's record you archive one document at a time and choose its visibility.
- Open Employees › Employees and click the employee.
- Open the Documents tab.
- In the Add a document panel, choose the Category and the Visibility.
- Drag the file into the panel or click Choose file.
Fields in the Add a document panel:
- Category: the type of document, from Contract, Identity document, Qualification, Payslip, Medical certificate, Disciplinary and Other.
- Visibility: who can see the document.
- Default for this category: uses the visibility set for the chosen category.
- HR only: the document is visible only to the HR office.
- HR and employee (not the line manager): the employee can also see it, but not their manager.
- HR and line manager: the direct manager and those above them in the org chart can also see it, but not the employee.
- HR, line manager and employee: the HR office, the direct manager, those above them in the org chart, and the employee can all see it.
Note: the employee finds documents shared with them in My area, under the My documents section, where they can download them. For contracts, payslips, and disciplinary records they confirm they have read them with Acknowledge.
Managing an employee's documents
Next to the Add a document panel, the Documents tab lists the employee's documents. For each document you can change the Category and Visibility using the two drop-downs in the row: the change is saved immediately. If the employee has no documents, No documents on this record yet. is shown.
For contracts, payslips, and disciplinary records the acknowledgement status is also shown: Acknowledged or Not yet acknowledged.
For each document you can:
- Download: download the file.
- Replace: upload a new file in place of the archived one.
- Remove: delete the document. The message Document removed is shown.
Important: deleted documents remain recoverable for 90 days.
Browsing all personnel documents
The Personnel Documents page shows the documents of all employees. Each row is a document that you could also open from that employee's record.
- Open Employees › Personnel Documents.
- Narrow the list using the Category, Issued from, and Issued to filters.
- Click Download to download a document, or click the employee's name to open their record.
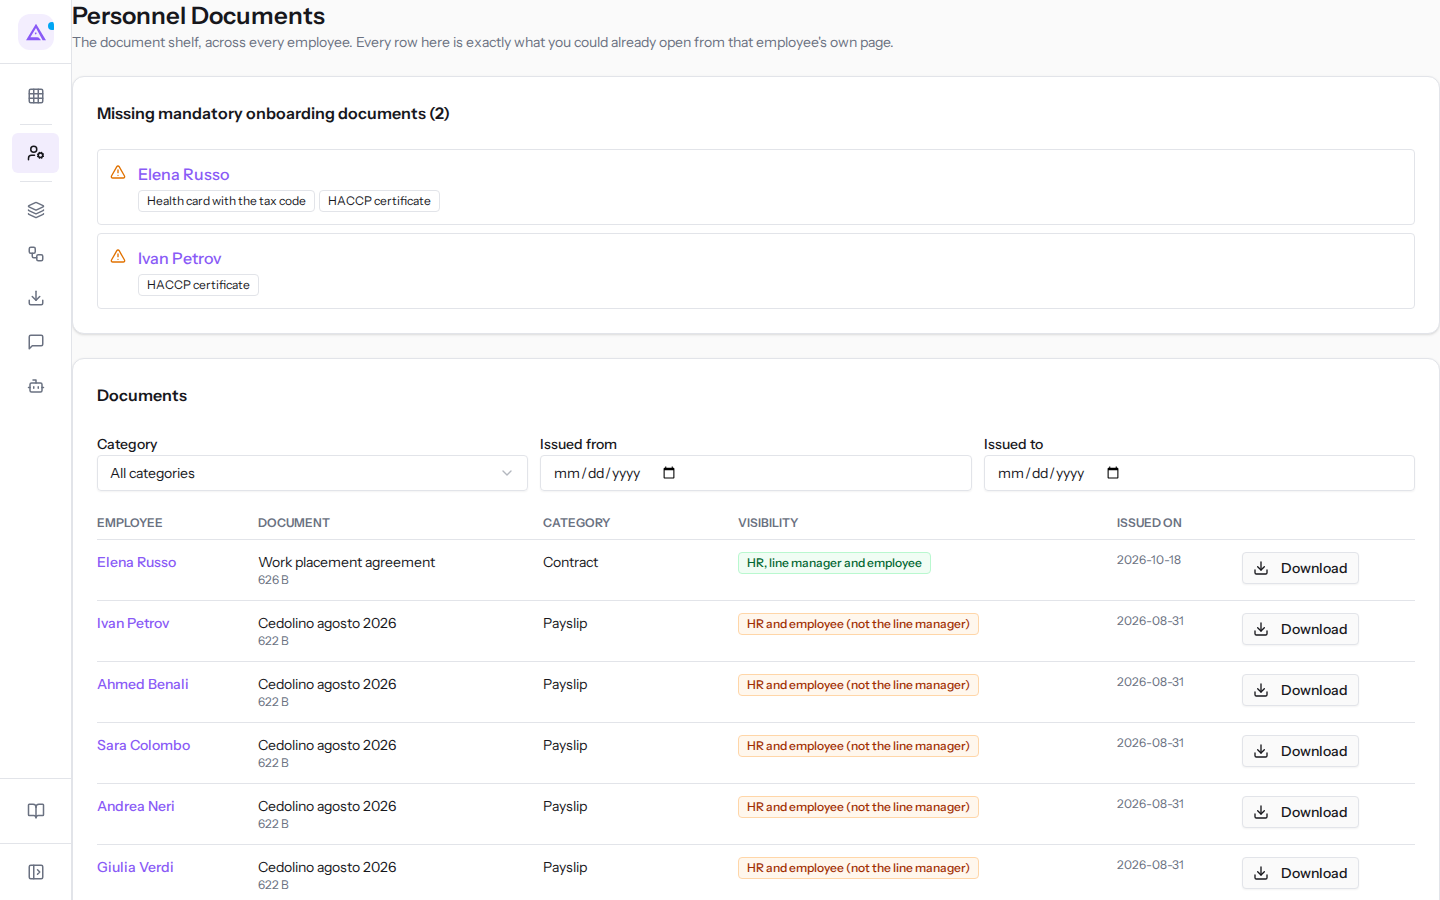
The page filters:
- Category: shows only documents of one category. The default value is All categories.
- Issued from: shows documents issued from this date onwards.
- Issued to: shows documents issued up to this date.
The list shows for each document the employee, the document, the category, the visibility, and the Issued on date. If no document matches the filters, No documents match these filters. is shown.
At the top, the page shows the Missing mandatory onboarding documents panel, listing new hires who have not yet submitted all mandatory documents, for example Elena Russo. When all have been submitted, Every mandatory onboarding document has been handed in. is shown.
Note: the list also includes documents belonging to archived employees, for example Chiara Galli.
Bulk-uploading existing documents
The Document intake page brings existing employee documents into the archive. Nothing is archived until you confirm the batch.
Before you start: the Document Intake menu item is visible only to members of the HR Manager group.
- Open Employees › Document Intake.
- In the Batch name field, enter a name that identifies the upload.
- Drag the files into the Drag files here, or area, or click Choose files or Choose folder.
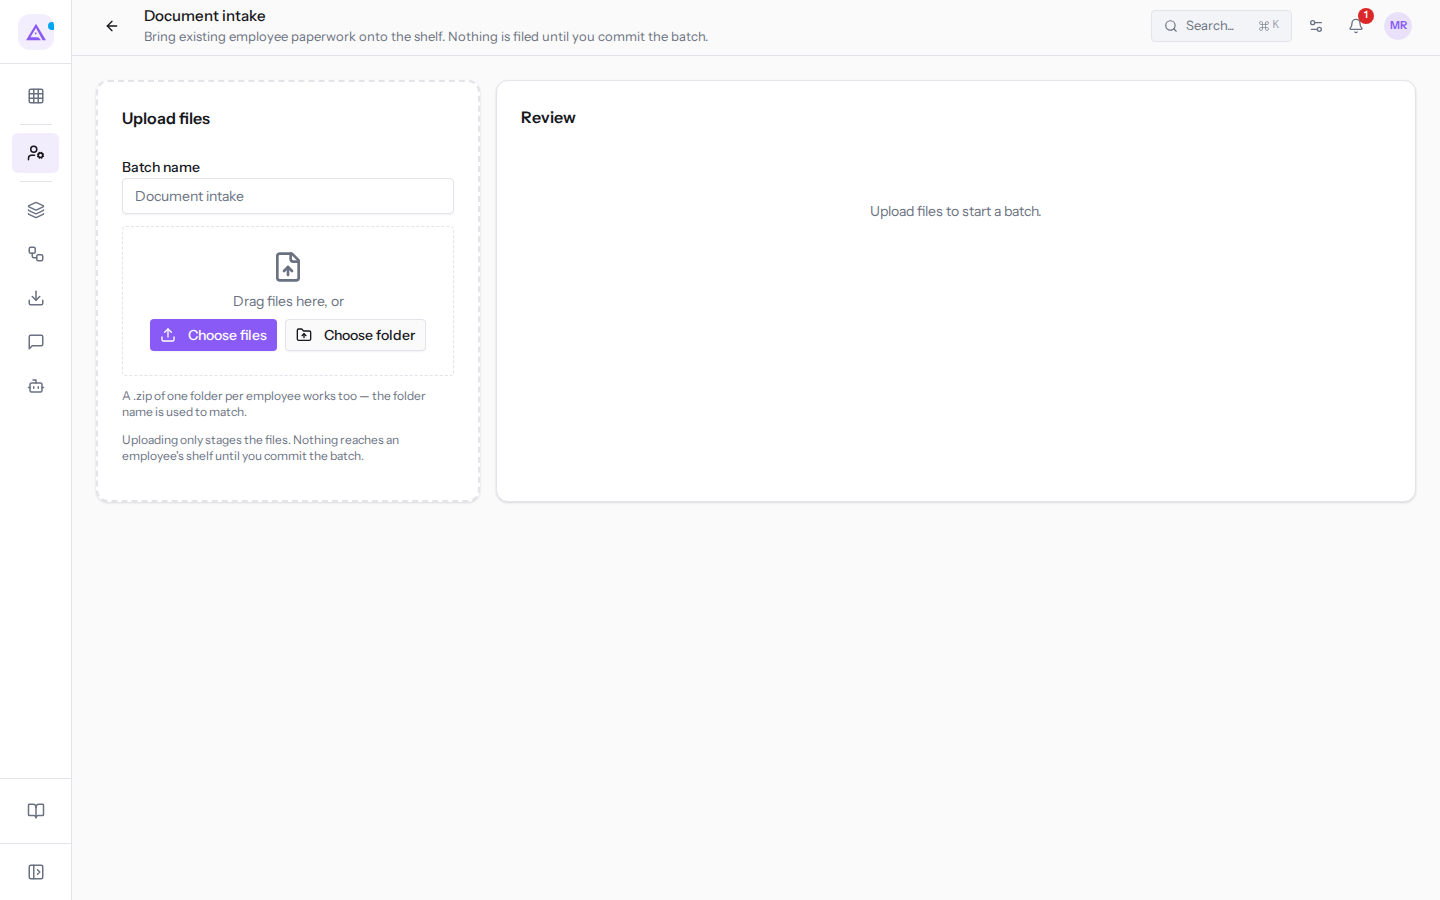
You can also upload a .zip file with a folder for each employee: the folder name is used for matching. The upload only prepares the files. Nothing reaches an employee's archive until you confirm the batch.
Tip: if you organize documents in a folder per employee, choose Choose folder or compress the folders into a .zip.
Reviewing and confirming the batch
After the upload, the page shows the batch review, one file per row.
- Check each row. If a file is Not matched or is matched to the wrong person, choose the correct employee in the Employee column. If needed, change the Category.
- Click Commit batch: the documents move into the employees' archive. The button stays disabled as long as any file has no employee assigned.
- If you do not want to archive the batch, click Discard. The message Batch discarded. is shown.
After confirming, to upload a new batch click Start another batch.
Important: until you click Commit batch, no document enters the employees' archive.
See it on your company, not on a slide deck.
In 30 minutes we map the software you use today.We show you how much work and how much margin Archimedes gives back.
Show me on my business →What industry are you in?
One tap — it lets us prepare the demo around your world.
What tools do you use today?
Pick the ones you recognise — or just type them. It helps us show you how they migrate.
Last step: your details.
We reply within one working day — and right after, if you like, you pick the demo slot yourself.
We couldn't send your request. Try again, or write to us at [email protected].
By sending, you agree to your data being processed so we can get back to you about the demo. Privacy notice.
Preview form — nothing is sent from this page.
Want to schedule the demo now?
Your call: book the slot you prefer yourself, or we'll call you to arrange it.
Live availability, 30 minutes, instant confirmation. The calendar opens in a new tab.
Lock in your slot ↗We'll get back to you within one working day — and we'll join the call already knowing your world.
The calendar is open in another tab: pick a slot and the demo is booked. Can't see it? Reopen it ↗
Preview page: nothing was sent.
Our calendar is live: take the slot that suits you and the demo is booked. 30 minutes, instant confirmation, no waiting.
Lock in your slot ↗