Employees
All modules
Organising departments and job positions
Employees · 5 of 20 · 4 min read
Departments and positions describe the organisation's structure: departments form a tree with a manager, positions are the available roles with the expected number of employees. For example the Reception department with sub-departments Kitchen and Dining room, or the Sales assistant position in the Sales department.
Sub-department or position
A department is a unit of the organisation with its own manager and its own employees. A position is a role, linked to a department, for which the expected and occupied slots are counted.
- If a group of people needs to be counted separately, create a sub-department: for example
KitcheninsideReception. - If you need to indicate a role and how many people should fill it, create a position: for example
Sales assistantin theSalesdepartment, with 2 expected employees.
Create departments first and then positions: in a position's dialog the department is chosen from existing ones.
Viewing departments
The Departments page shows all the organisation's departments, as a list or as a tree.
- Open Employees › Departments.
- Choose the view with List or Tree.
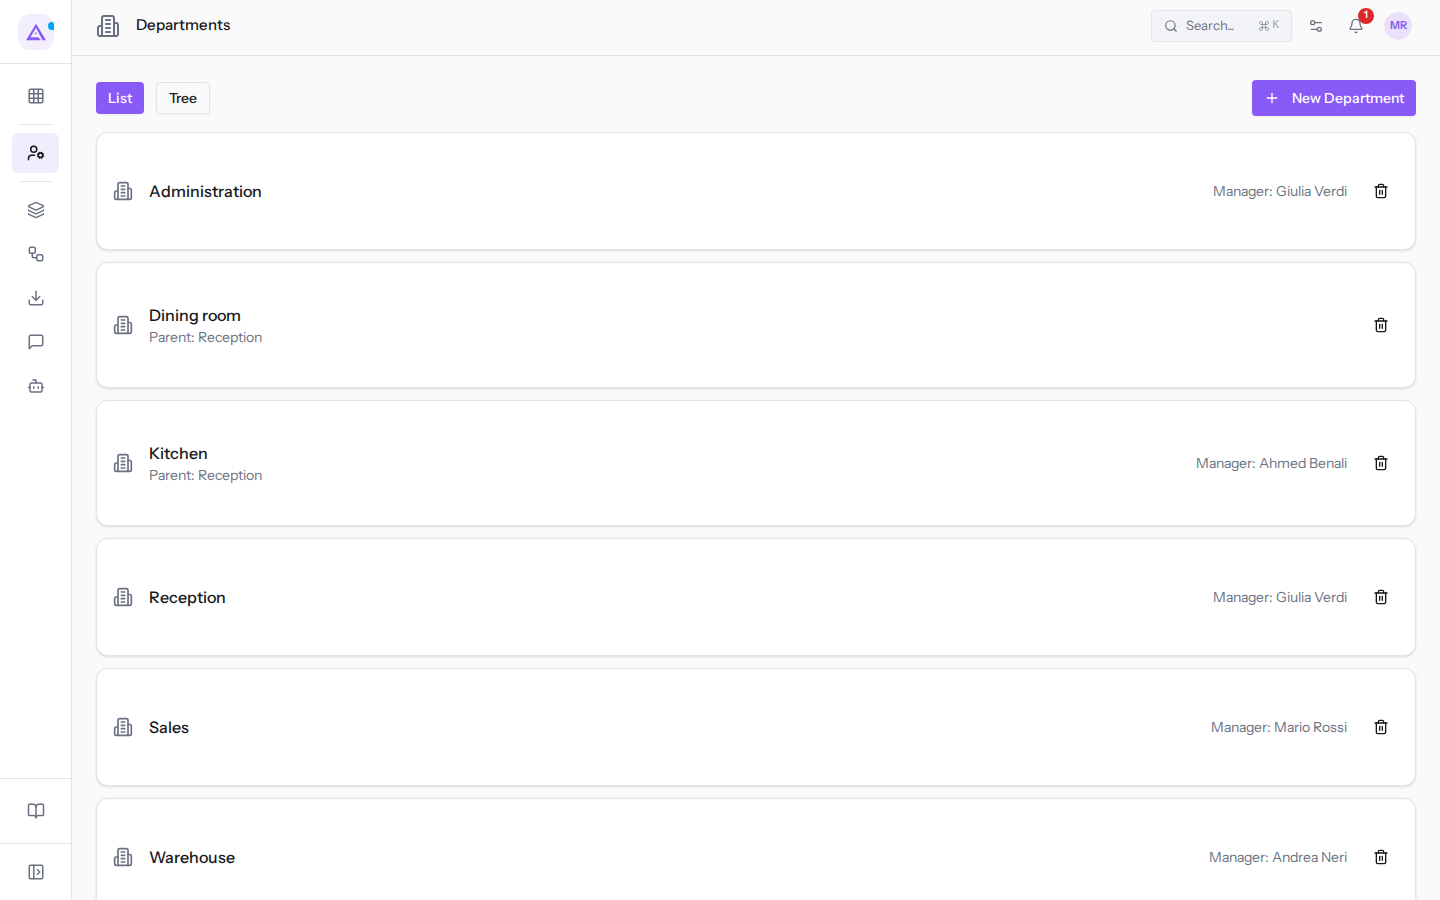
In the List view each department shows:
- the department name;
- the parent department, for sub-departments: for example
KitchenwithParent: Reception; - the manager: for example
ReceptionwithManager: Giulia Verdi,SaleswithManager: Mario Rossi.
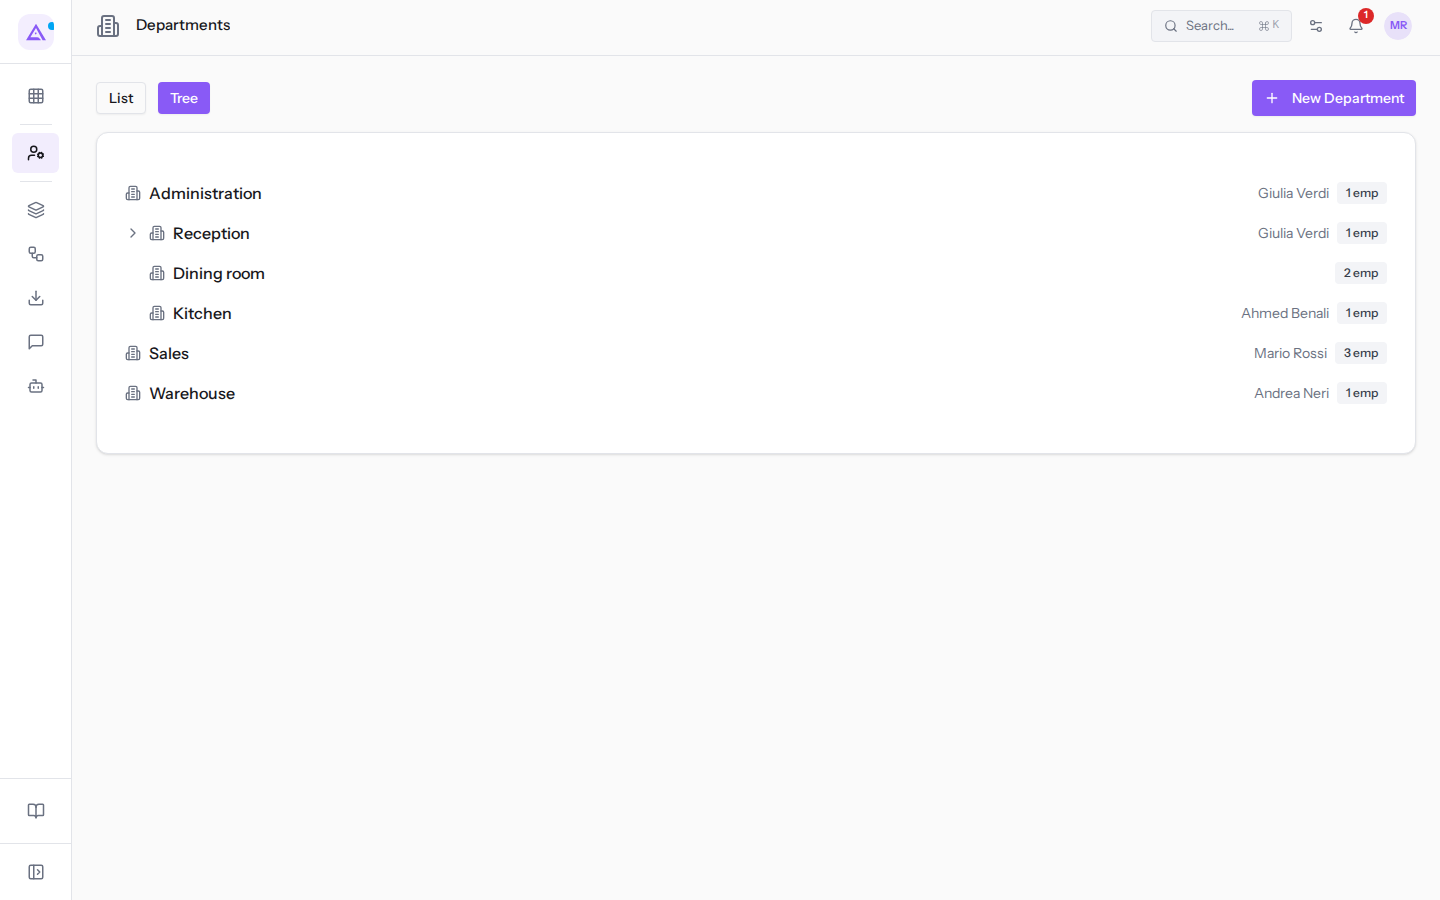
In the Tree view sub-departments appear below the parent department, with the manager and the number of employees. For example Reception (Giulia Verdi) contains Kitchen (Ahmed Benali) and Dining room; Sales (Mario Rossi) has 3 emp.
Creating a department
A new department is created from the New Department button, at the top level or under an existing department.
- Open Employees › Departments.
- Click New Department.
- Fill in the fields and click Create. To close without saving click Cancel.
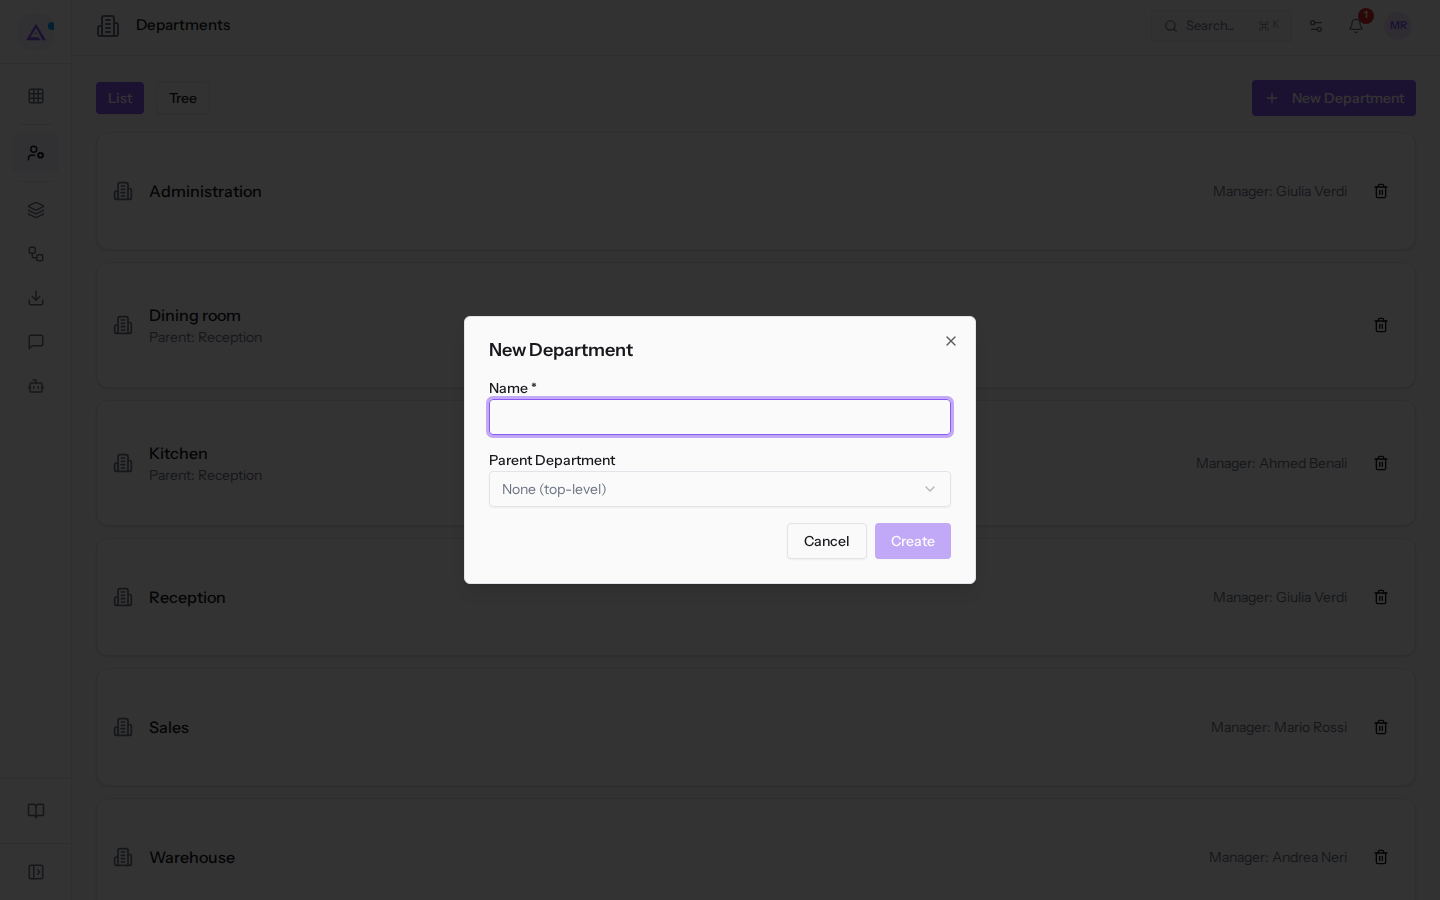
The fields of the New Department dialog:
- Name: the department name. The field is required.
- Parent Department: the department the new department belongs to.
- None: the department does not sit under any other. Until you choose, the field shows None (top-level).
- An existing department, for example
Reception: the new department becomes a sub-department of it. The list contains all departments, including sub-departments such asKitchenandDining room.
After creation the message Department created appears.
Note: a department's manager is not chosen from this page, either at creation or afterwards.
Deleting a department
A department is deleted from the List view.
- Open Employees › Departments in the List view.
- Click the bin icon in the department's row.
- Confirm the prompt
Delete this department?. The messageDepartment deletedappears.
Viewing job positions
The Job Positions page lists the organisation's roles and shows how many slots of each are filled.
- Open Employees › Job Positions.
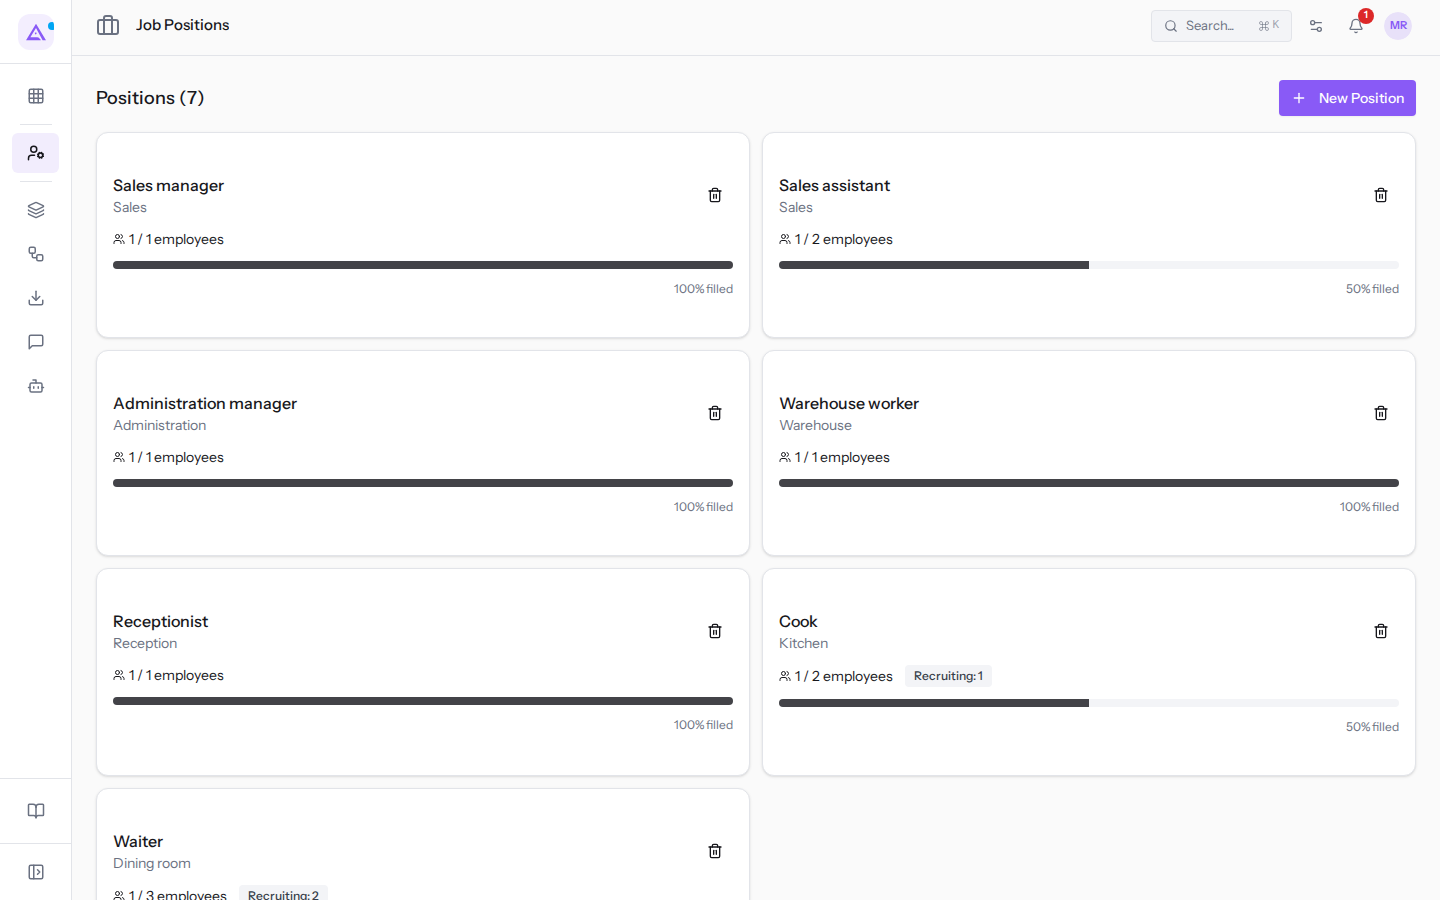
The list title shows the number of positions, for example Positions (7). Each position shows:
- the title and department: for example
Sales manager, departmentSales; - the occupied employees over expected employees: for example
1 / 2 employeesforSales assistant; - a bar with the occupied percentage:
100% filledforSales manager,50% filledforSales assistant; - the
Recruiting: Nbadge, on positions with a Recruitment Target greater than zero: N is the number of people to hire, for exampleRecruiting: 2forWaiter.
Creating a position
A new position is created from the New Position button.
- Open Employees › Job Positions.
- Click New Position.
- Fill in the fields and click Create. To close without saving click Cancel.
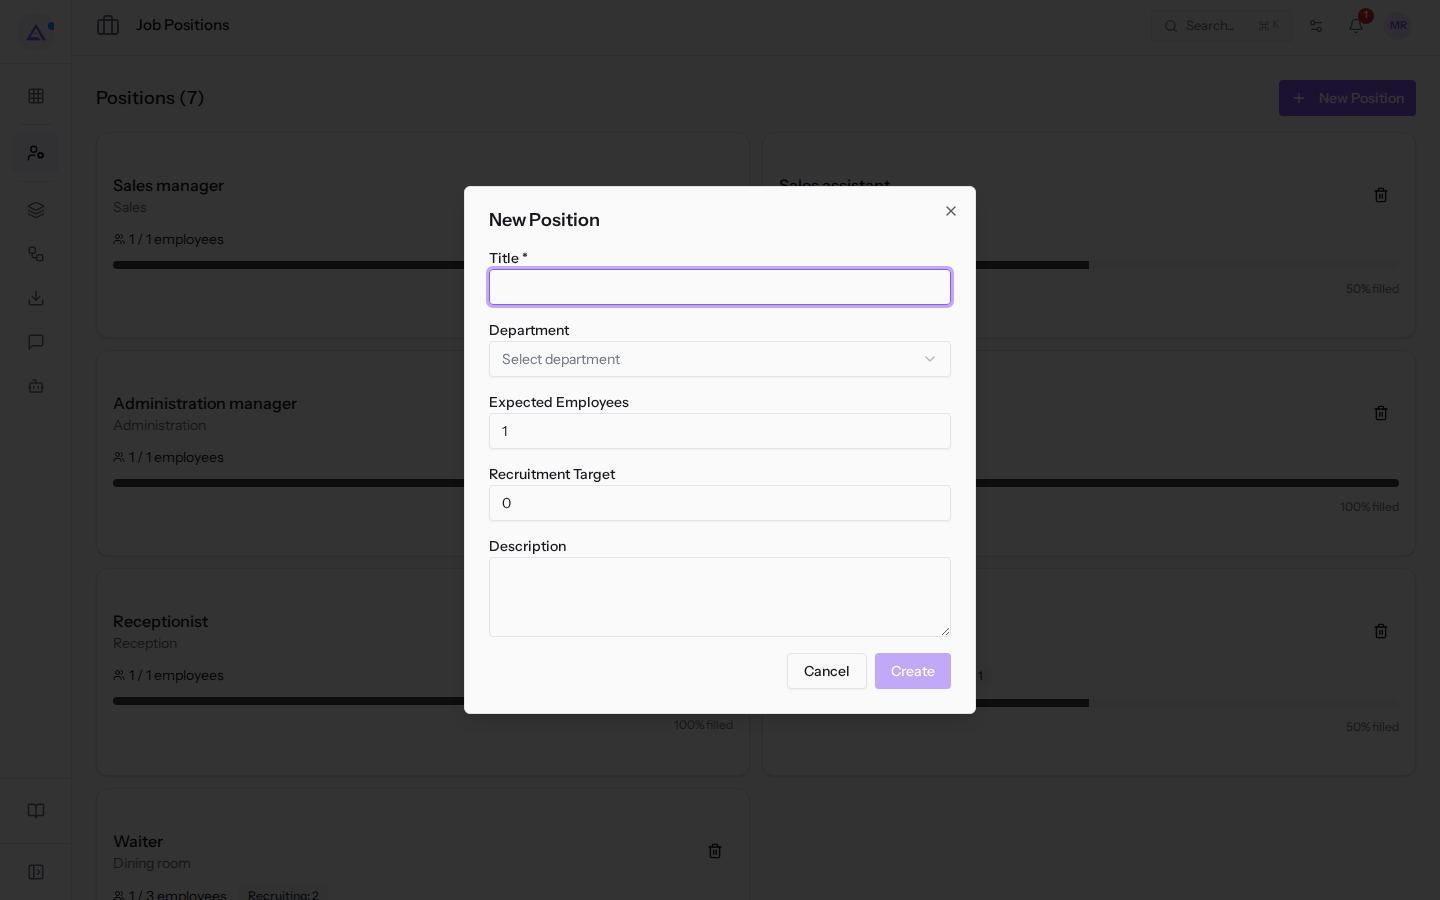
The fields of the New Position dialog:
- Title: the role name, for example
Sales assistant. The field is required. - Department: the position's department. The initial value is Select department. The list contains None and all departments, including sub-departments:
Reception,Administration,Sales,Kitchen,Warehouse,Dining room. - Expected Employees: how many people should fill the position. This is the value the page uses to calculate the occupied percentage.
- Recruitment Target: how many people you want to hire for the position. With a value greater than zero the position shows the
Recruitingbadge. - Description: the role description.
Tip: choose the most specific sub-department as the department, for example
Kitcheninstead ofReception, so the position appears where the people filling it actually work.
See it on your company, not on a slide deck.
In 30 minutes we map the software you use today.We show you how much work and how much margin Archimedes gives back.
Show me on my business →What industry are you in?
One tap — it lets us prepare the demo around your world.
What tools do you use today?
Pick the ones you recognise — or just type them. It helps us show you how they migrate.
Last step: your details.
We reply within one working day — and right after, if you like, you pick the demo slot yourself.
We couldn't send your request. Try again, or write to us at [email protected].
By sending, you agree to your data being processed so we can get back to you about the demo. Privacy notice.
Preview form — nothing is sent from this page.
Want to schedule the demo now?
Your call: book the slot you prefer yourself, or we'll call you to arrange it.
Live availability, 30 minutes, instant confirmation. The calendar opens in a new tab.
Lock in your slot ↗We'll get back to you within one working day — and we'll join the call already knowing your world.
The calendar is open in another tab: pick a slot and the demo is booked. Can't see it? Reopen it ↗
Preview page: nothing was sent.
Our calendar is live: take the slot that suits you and the demo is booked. 30 minutes, instant confirmation, no waiting.
Lock in your slot ↗