Employees
All modules
Using your personal area
Employees · 14 of 20 · 7 min read
Your personal area collects your employee data: profile, documents, onboarding, leave and time off, your time and your expenses. It allows you, for example, to request a day off, download a document, declare the hours of a week, or record the cost of a lunch with a client.
The area does not depend on a permission group: every employee who has an account linked to their own employee record can see it.
Opening My area
The My area page shows what the company has on you, divided into sections.
- From your user menu (the avatar at the top) open My area.
- Choose a section: My profile, My documents, Onboarding or My leave.
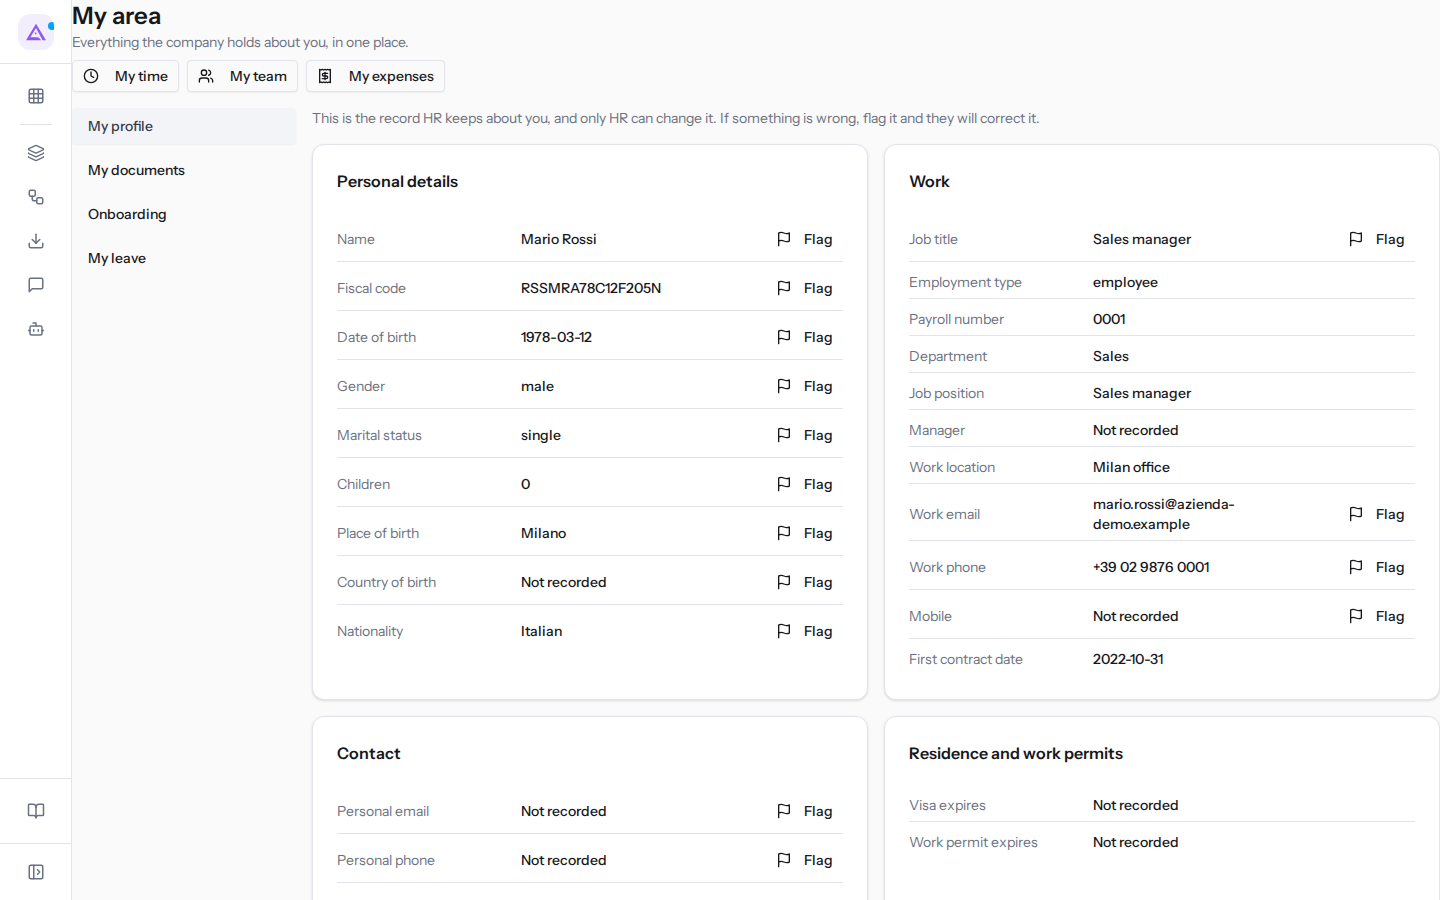
Below the title you will find the buttons that open the other personal areas:
- My time: your month, declared hours, shifts and availability.
- My expenses: your expenses and expense reports. It appears only if the organisation allows employees to enter expenses.
- My team: appears for those who have people reporting to them in the organisational chart.
Note: for collaborators on a contractor contract, the My Invoices button also appears, from which they submit their invoices. Other employees do not see it.
My profile
The My profile section shows the record that the HR office has on you, for example Personal details and, if applicable, Residence and work permits. Data cannot be edited here: if something is incorrect, report it to HR.
Reporting a correction
- Open My profile.
- Next to the data to correct, click Flag. Below the profile the Flag a correction panel appears, with the selected field in Field.
- Fill in the fields and click Send to HR. Use Cancel to close the panel without sending.
- It should say: the correct value for the field. The field is optional.
- Note: an explanation for HR. The field is optional.
Flag appears only next to data you can report. It is not shown on employment data decided by HR, such as the department, manager or employee number.
Submitted reports appear in My correction requests with their status: Open, Corrected or Not accepted.
Changing the PIN for the till and clocking in
In the My PIN for the till and clocking in panel you set your personal PIN.
- Fill in the panel fields.
- Click Save PIN.
- Your account password: the password you use to log in. The field is required.
- New PIN: the PIN to use, from 6 to 12 digits. The field is required.
- Repeat the new PIN: the same PIN, for confirmation. The field is required.
If your account does not use a PIN, the panel shows This account does not use a till or kiosk PIN.
My documents
The My documents section lists the documents that the HR office has shared with you, for example contracts and payslips.
- Open My documents.
- Click Download to save a document.
- If the document requires confirmation, click Acknowledge to let HR know you have read it.
Onboarding
The Onboarding section lists the documents the company requests from a new hire, for example an identity card, health card, HACCP certificate and bank details. To submit a document click Upload and choose the file. A document already submitted is marked as Received.
If nothing is requested of you, the section indicates this with a message, as is the case for Mario Rossi in the example.
My leave
The My leave section shows the balance, the form to request an absence and the requests already submitted.
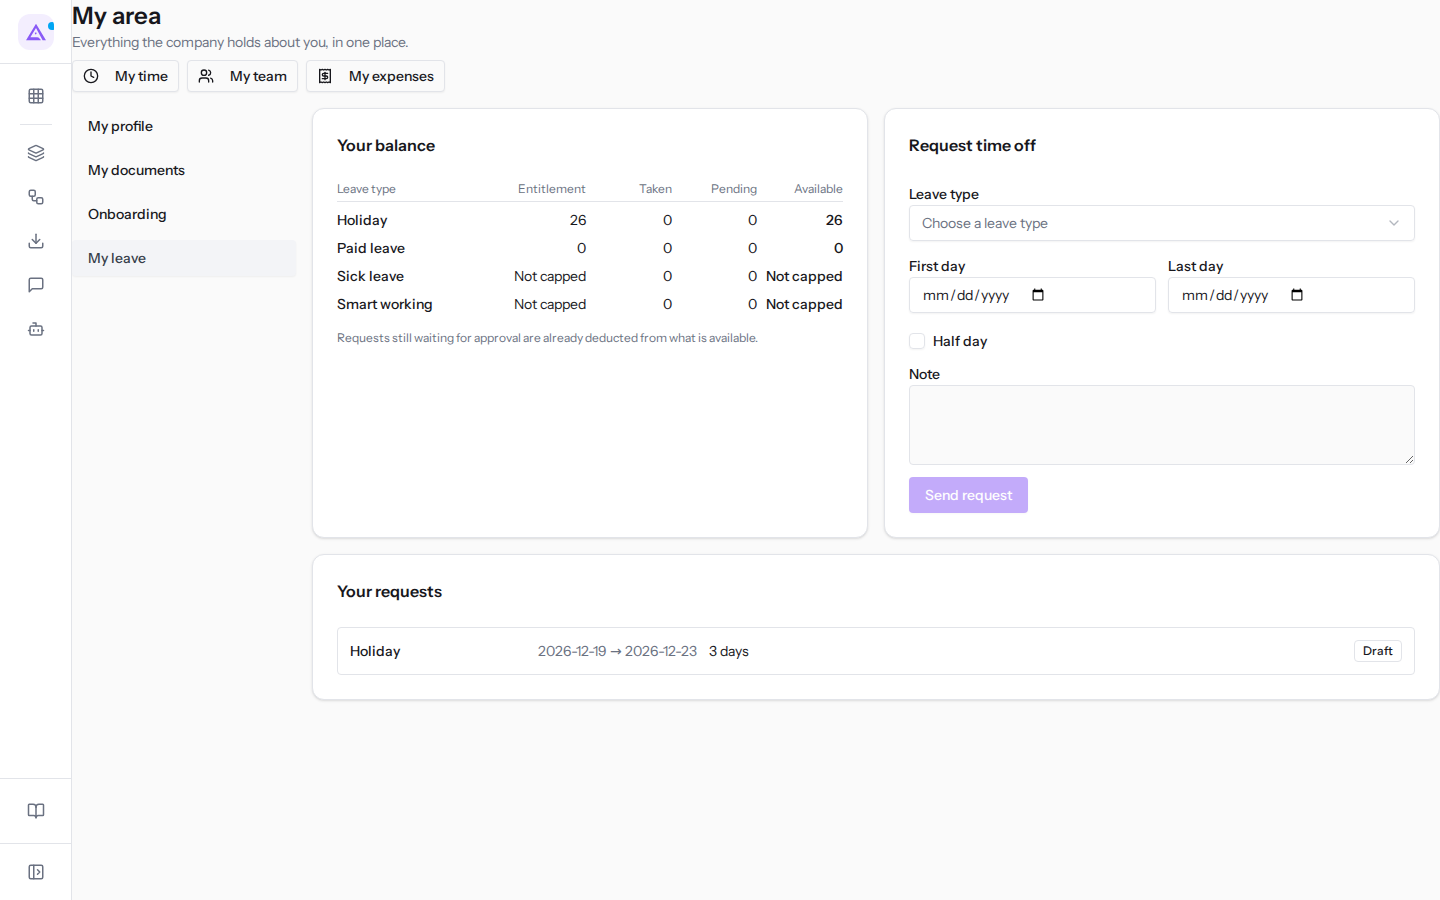
Your balance
The Your balance panel shows, for each absence type, the Entitlement, Taken, Pending and Available days. Requests still pending approval are already deducted from the available days.
Requesting an absence
Use the form to request leave or time off. The request must then be approved: manager approval follows the organisational chart, that is, the manager indicated on your record.
- Open My leave.
- Fill in the fields.
- Click Send request.
- Leave type: the type of request, for example Holiday, Paid leave, Sick leave or Smart working.
- First day: the first day of absence.
- Last day: the last day of absence.
- Half day: indicates that the absence lasts half a day.
- Note: information for the approver.
Withdrawing a request
In the Your requests list you will find the submitted requests with their status.
- In the row of a Waiting for approval request, click Withdraw.
- The request moves to the Withdrawn status.
Note: requests that have already been decided do not have the Withdraw button.
My time
The My time page collects your month, the hours you declare and the shifts assigned to you. It opens from the My time button in My area.
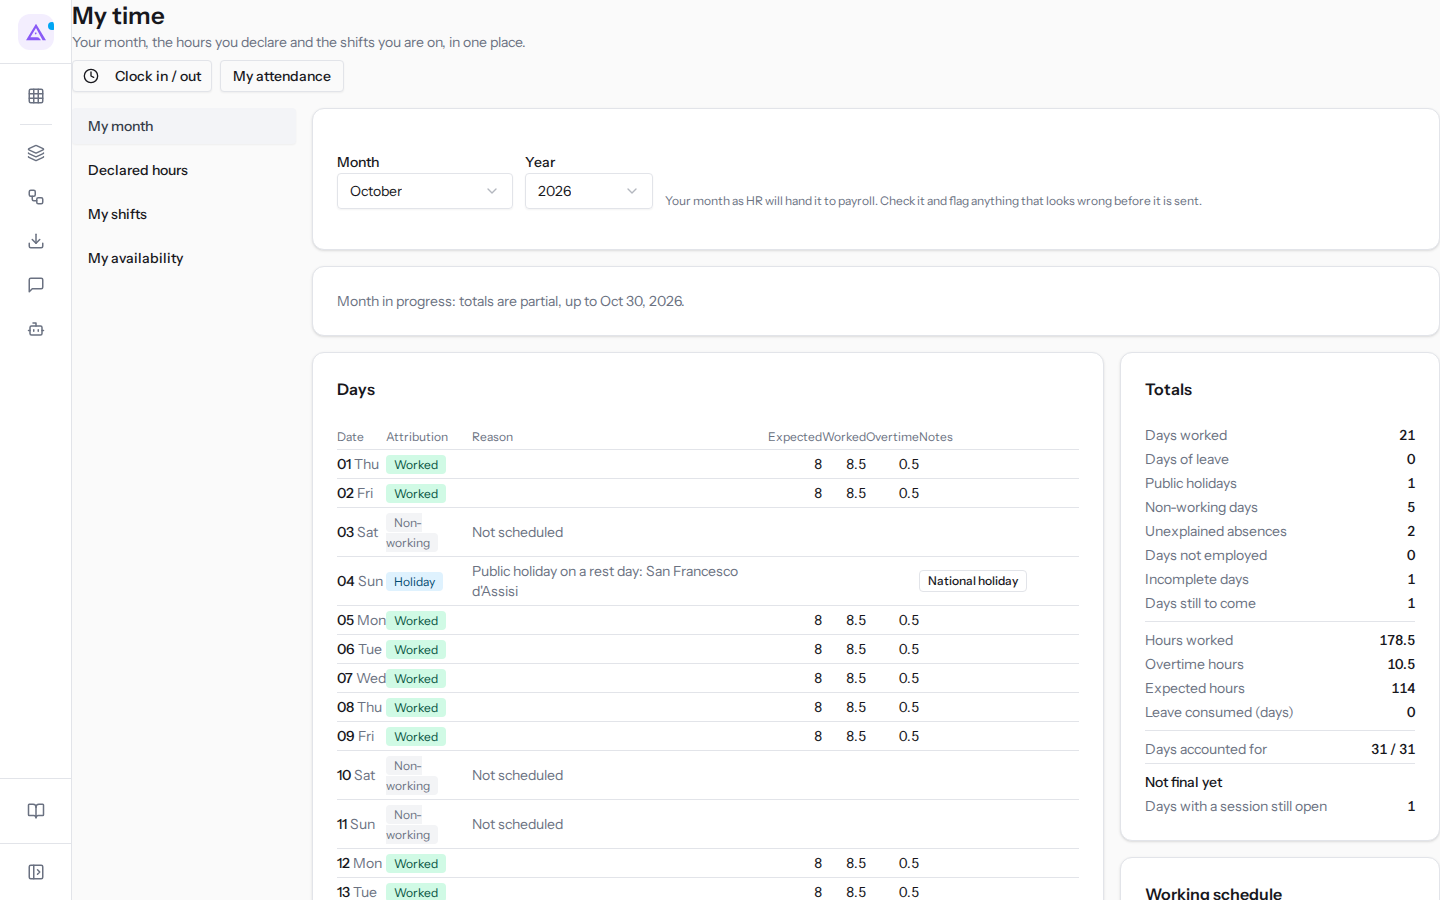
At the top you will find the Clock in / out and My attendance buttons, then the sections My month, Declared hours, My shifts and My availability.
Clocking in and out
Before you start: to clock in your account must be linked to an active employee record, and clocking from the app must be allowed for you by the organisation's recording settings. Otherwise the clock-in will be rejected.
- Click Clock in / out. The Clock In / Out page opens with the current time and Today's Sessions.
- If you wish, write a note in Add a note....
- Click the clock-in button. If you are already at work the button is Clock Out.
My month
The My month section shows the time for the month chosen with Month and Year. For the current month the totals are partial, for example Month in progress: totals are partial, up to Oct 28, 2026., and, at the bottom of Totals, the Not final yet entry indicates what can still change for the month.
Declared hours
Before you start: the section is provided by the attendance module and is missing if the module has never been activated.
Declare your hours if you work without clocking in, for example when working remotely.
- Open Declared hours.
- Choose the Day and fill in the fields.
- Click Submit week: the chosen day is submitted. Repeat for each day worked.
A manager approves the hours before they are counted.
- Day: the date of the day worked, defaulting to today. You cannot choose a future day. The field is required.
- Hours worked: the number of hours, defaulting to 8. The field is required.
- Work mode: where you worked.
- Remote
- On site
- Start time (optional): the time you started.
- Note (optional): information about that day.
My shifts
The My shifts section shows the shifts assigned to you. It is provided by the shifts module.
My availability
Indicate which days and time slots you work. Your manager sees this data in the team availability.
- Open My availability.
- Choose the week with Previous week, This week or Next week.
- For each day choose a status:
- Not stated
- Off
- Working
- For Working days use Add a range or Remove this range.
- Click Save.
My expenses
Before you start: expense entry depends on an organisation setting. If it is off, the page states that your organisation has not enabled it.
The My expenses page is used to enter expenses and track them through to approval and reimbursement. It opens from the My expenses button in My area.
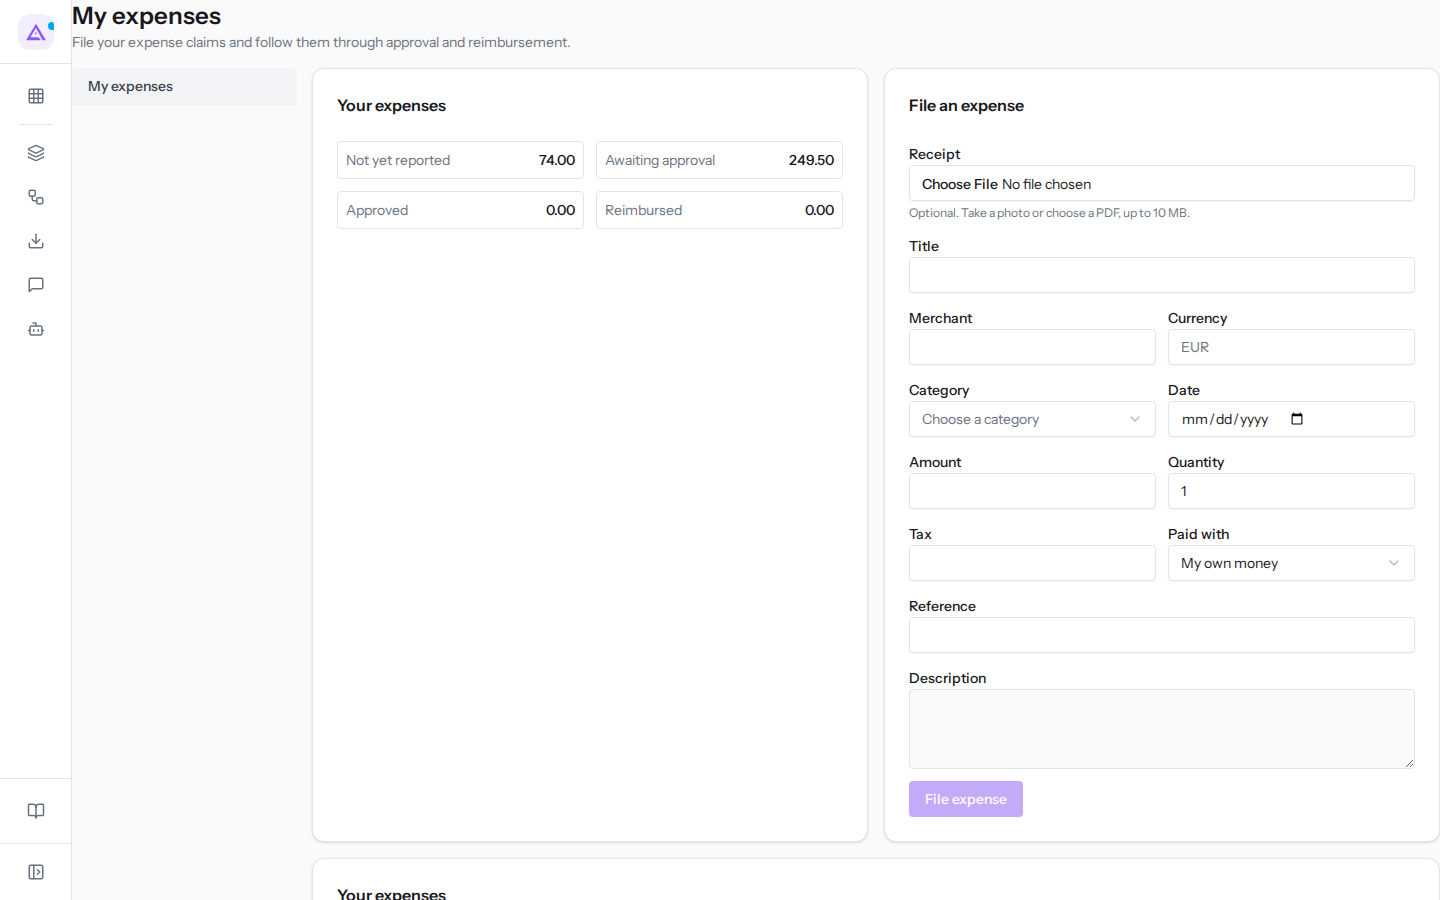
Filing an expense
- If you have the receipt, upload it in Receipt: a photo or PDF, up to 10 MB. If the organisation reads receipts, the expense is filled in from the receipt and you review it.
- Check or fill in the fields.
- Click File expense.
- Receipt: the photo or PDF of the receipt. The field is optional.
- Title: the name of the expense.
- Merchant: who issued the receipt.
- Currency: the currency of the expense.
- Category: Accommodation, Stationery, Fuel, Training, Meals or Travel.
- Date: the day of the expense.
- Amount: the unit price.
- Quantity: defaults to 1.
- Tax: the amount of VAT included in the expense.
- Paid with:
- My own money: you paid out of pocket, and the expense is reimbursed to you.
- Company account: you paid using a company payment method.
- Reference: a reference from the receipt.
- Description: additional information.
Note: if the receipt cannot be read, Couldn't read this receipt — fill it in by hand. appears. An expense filled in from the receipt shows Filled from the receipt — check before filing.
Your expenses
The Your expenses list shows expense totals by status, for example those Not yet reported, Awaiting approval and Approved. In the example Mario Rossi has 74.00 not yet reported and 249.50 awaiting approval. Use Add receipt or Replace receipt to attach a receipt to an already filed expense.
On this page
See it on your company, not on a slide deck.
In 30 minutes we map the software you use today.We show you how much work and how much margin Archimedes gives back.
Show me on my business →What industry are you in?
One tap — it lets us prepare the demo around your world.
What tools do you use today?
Pick the ones you recognise — or just type them. It helps us show you how they migrate.
Last step: your details.
We reply within one working day — and right after, if you like, you pick the demo slot yourself.
We couldn't send your request. Try again, or write to us at [email protected].
By sending, you agree to your data being processed so we can get back to you about the demo. Privacy notice.
Preview form — nothing is sent from this page.
Want to schedule the demo now?
Your call: book the slot you prefer yourself, or we'll call you to arrange it.
Live availability, 30 minutes, instant confirmation. The calendar opens in a new tab.
Lock in your slot ↗We'll get back to you within one working day — and we'll join the call already knowing your world.
The calendar is open in another tab: pick a slot and the demo is booked. Can't see it? Reopen it ↗
Preview page: nothing was sent.
Our calendar is live: take the slot that suits you and the demo is booked. 30 minutes, instant confirmation, no waiting.
Lock in your slot ↗