Employees
All modules
Managing expense reports and reimbursements
Employees · 16 of 20 · 5 min read
The Expenses page collects employee expenses, groups them into reports, and tracks their approval and reimbursement. Use it for example for a business trip to a client, a training course, or fuel for a company vehicle.
The Expenses page
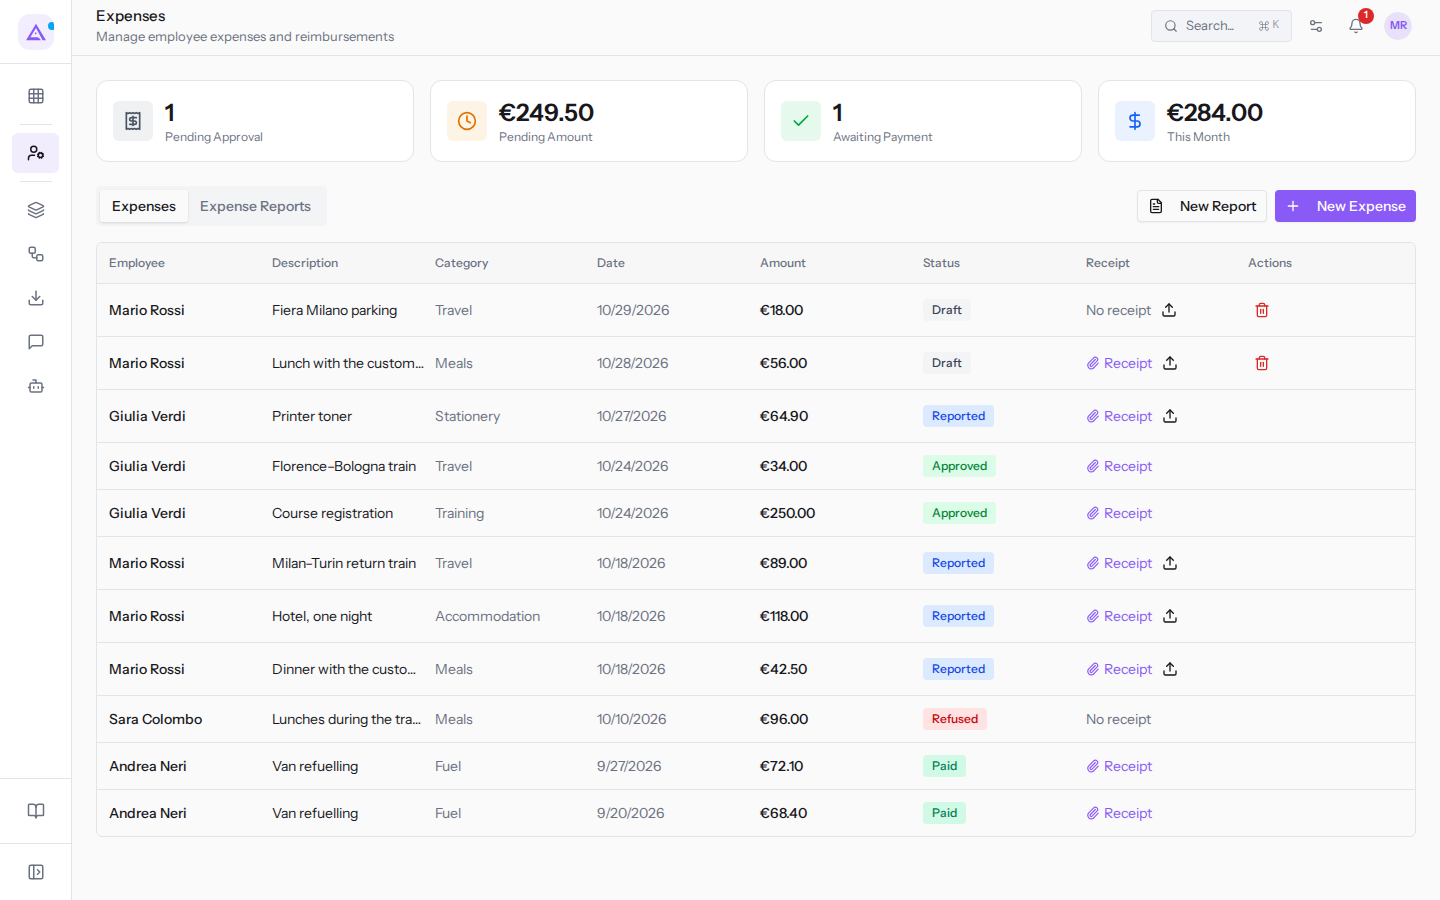
The page opens from Employees › Expenses and has the subtitle “Manage employee expenses and reimbursements”.
At the top, four cards summarise the situation:
- Pending Approval: the number of reports awaiting a decision. In the example it is 1.
- Pending Amount: the amount awaiting a decision. In the example it is €249.50.
- Awaiting Payment: the number of approved reports to be reimbursed. In the example it is 1.
- This Month: the amount of expenses approved or paid with a date in the current month. In the example it is €284.00.
Below the cards there are two list tabs: Expenses, with individual expenses, and Expense Reports, with the reports that collect them. In the top right you will find the New Expense and New Report buttons.
Expenses and reports: how they work
An expense is a single cost, such as a lunch or a parking fee. A report collects multiple expenses from an employee and goes through approval and reimbursement.
- If the employee paid the expense out of their own pocket, select Own Account: the expense must be reimbursed.
- If the expense was paid with a company resource, select Company Account.
Note: employees can also log their own expenses from their personal area, if the organisation allows it. If it is not enabled, the employee sees a notice that their organisation has not enabled it and that they should contact the HR department.
Logging an expense
Log an expense on behalf of an employee when you need to enter it yourself, for example starting from a receipt handed in to the office.
- Go to Employees › Expenses.
- Click New Expense.
- Fill in the fields and click Create.
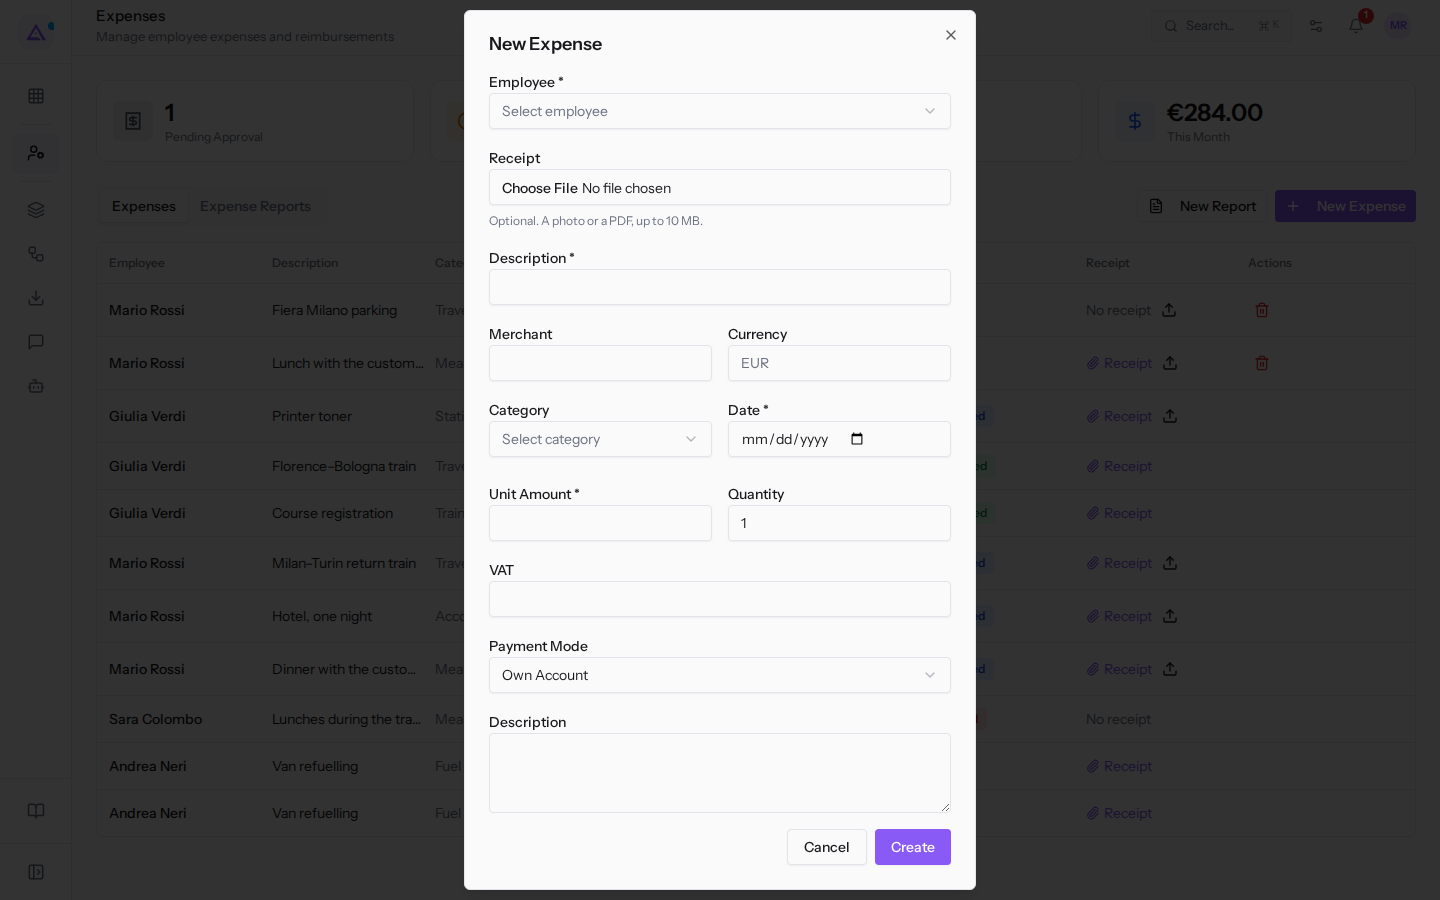
The fields in the New Expense dialog:
- Employee: the person who incurred the expense, selected from active employees, for example Mario Rossi. This field is required.
- Receipt: a photo or PDF, up to 10 MB. This field is optional.
- Description: the name of the expense, for example Fiera Milano parking. This field is required.
- Merchant: the shop or supplier that issued the receipt.
- Currency: the currency of the expense.
- Category: the type of expense.
- Accommodation
- Stationery
- Fuel
- Training
- Meals
- Travel
- Date: the day of the expense. This field is required.
- Unit Amount: the price of one unit. This field is required.
- Quantity: defaults to 1.
- VAT: the tax included in the expense.
- Payment Mode: how the expense was paid. The default value is Own Account.
- Own Account: paid by the employee.
- Company Account: paid by the company.
- Description: additional information. This field is optional.
Tip: if the organisation has enabled receipt reading, the expense is filled in from the uploaded receipt. Check the values before submitting. If the receipt cannot be read, fill in the expense manually.
Important: with reading enabled, receipts are sent to an external AI service. The option is called Read receipts to fill in expenses and is found in Employees › HR options.
Adding or replacing an expense receipt
An expense can be logged without a receipt and completed later, for example Mario Rossi's Fiera Milano parking.
- Open the Expenses tab.
- On the expense row, click the upload icon (Add receipt). If the expense already has a receipt, the same icon is Replace receipt.
- Select the photo or PDF.
An already attached receipt opens from Receipt.
Note: only draft expenses can be deleted.
Creating an expense report
The report collects an employee's expenses to be submitted together, for example “Turin trip – Verdi Costruzioni”. A report created from this page is empty: expenses are not added from here.
- Click New Report.
- Fill in the fields and click Create. The message Expense report created appears.
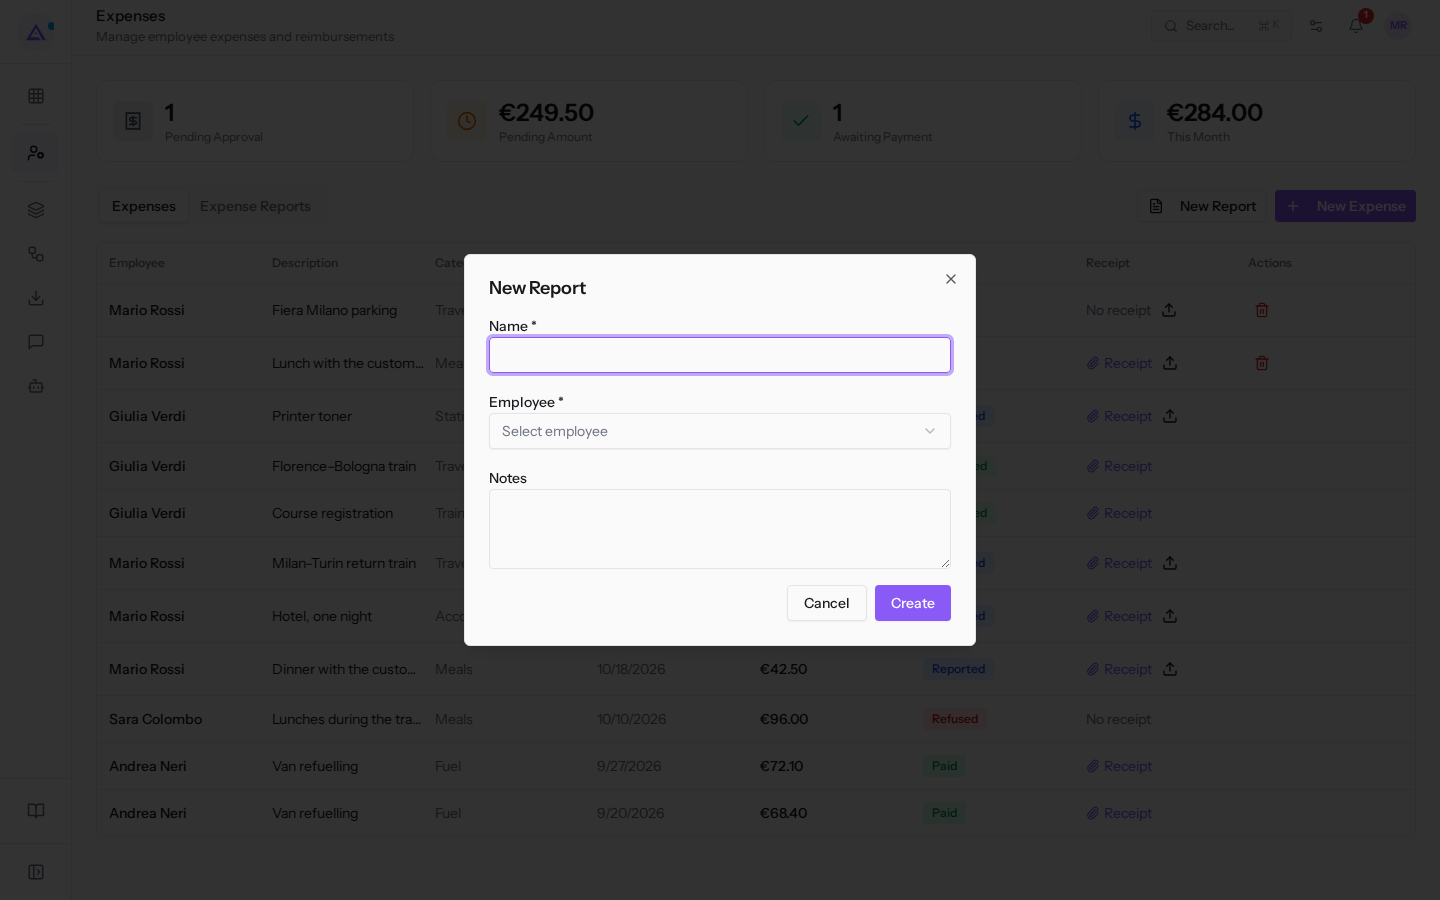
The fields in the New Report dialog:
- Name: the title of the report. This field is required.
- Employee: the person the report belongs to. This field is required.
- Notes: additional information for the approver. This field is optional.
The new report is in Draft status and contains no expenses.
Tracking reports through to reimbursement
The Expense Reports tab lists reports with their status. If there are none, No expense reports is displayed.
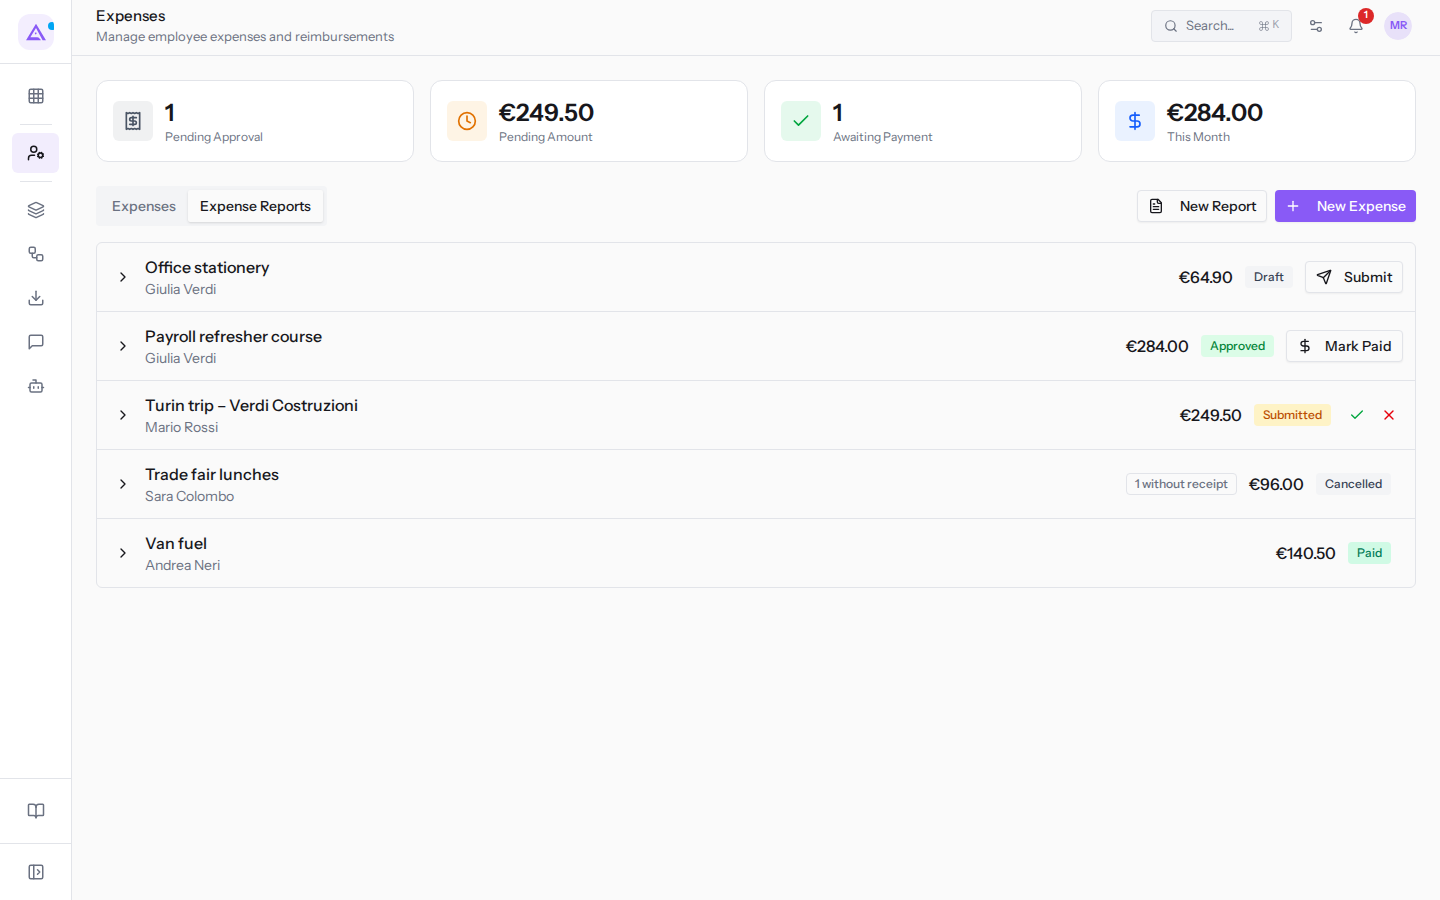
- Click the arrow to the left of the report (Show expenses) to see the expenses it contains, and again (Hide expenses) to collapse them.
- The summary “N without receipt” indicates how many expenses in the report have no receipt.
A report goes through the following steps:
- In Draft, review the report's expenses and click Submit. Report submitted appears and the report moves to Pending Approval.
- On a Submitted report, click the green tick to approve it or the red X to refuse it. Report approved and Report refused appear respectively. An approved report moves to Awaiting Payment.
- When you have reimbursed the employee, click Mark Paid on the approved report. Report marked as paid appears.
In the example, Mario Rossi's “Turin trip – Verdi Costruzioni” is pending approval, Giulia Verdi's “Payroll refresher course” is approved and awaiting payment, Andrea Neri's “Van fuel” is reimbursed, Sara Colombo's “Trade fair lunches” has been refused (in the Expense Reports tab it appears as Cancelled), and Giulia Verdi's “Office stationery” is in draft.
Note: when an employee leaves, an expense report with a reimbursement still to be settled is marked Needs a decision: it is not closed when the departure is confirmed and stays open to be handled.
See it on your company, not on a slide deck.
In 30 minutes we map the software you use today.We show you how much work and how much margin Archimedes gives back.
Show me on my business →What industry are you in?
One tap — it lets us prepare the demo around your world.
What tools do you use today?
Pick the ones you recognise — or just type them. It helps us show you how they migrate.
Last step: your details.
We reply within one working day — and right after, if you like, you pick the demo slot yourself.
We couldn't send your request. Try again, or write to us at [email protected].
By sending, you agree to your data being processed so we can get back to you about the demo. Privacy notice.
Preview form — nothing is sent from this page.
Want to schedule the demo now?
Your call: book the slot you prefer yourself, or we'll call you to arrange it.
Live availability, 30 minutes, instant confirmation. The calendar opens in a new tab.
Lock in your slot ↗We'll get back to you within one working day — and we'll join the call already knowing your world.
The calendar is open in another tab: pick a slot and the demo is booked. Can't see it? Reopen it ↗
Preview page: nothing was sent.
Our calendar is live: take the slot that suits you and the demo is booked. 30 minutes, instant confirmation, no waiting.
Lock in your slot ↗