Employees
All modules
Check identities, document retention, and residence permits
Employees · 9 of 20 · 4 min read
The HR Checks and Permit & Visa Alerts pages let you verify that staff data is consistent and compliant. For example, they show you a login with no linked employee record, a tax code registered twice, an identity card that must not be kept beyond a certain date, or a residence permit about to expire.
HR Checks: the Identity tab
The HR Checks page handles identity reconciliation and document retention review for your organisation. It has two tabs: Identity and Document retention.
- Open Employees › HR Checks.
- Stay on the Identity tab.
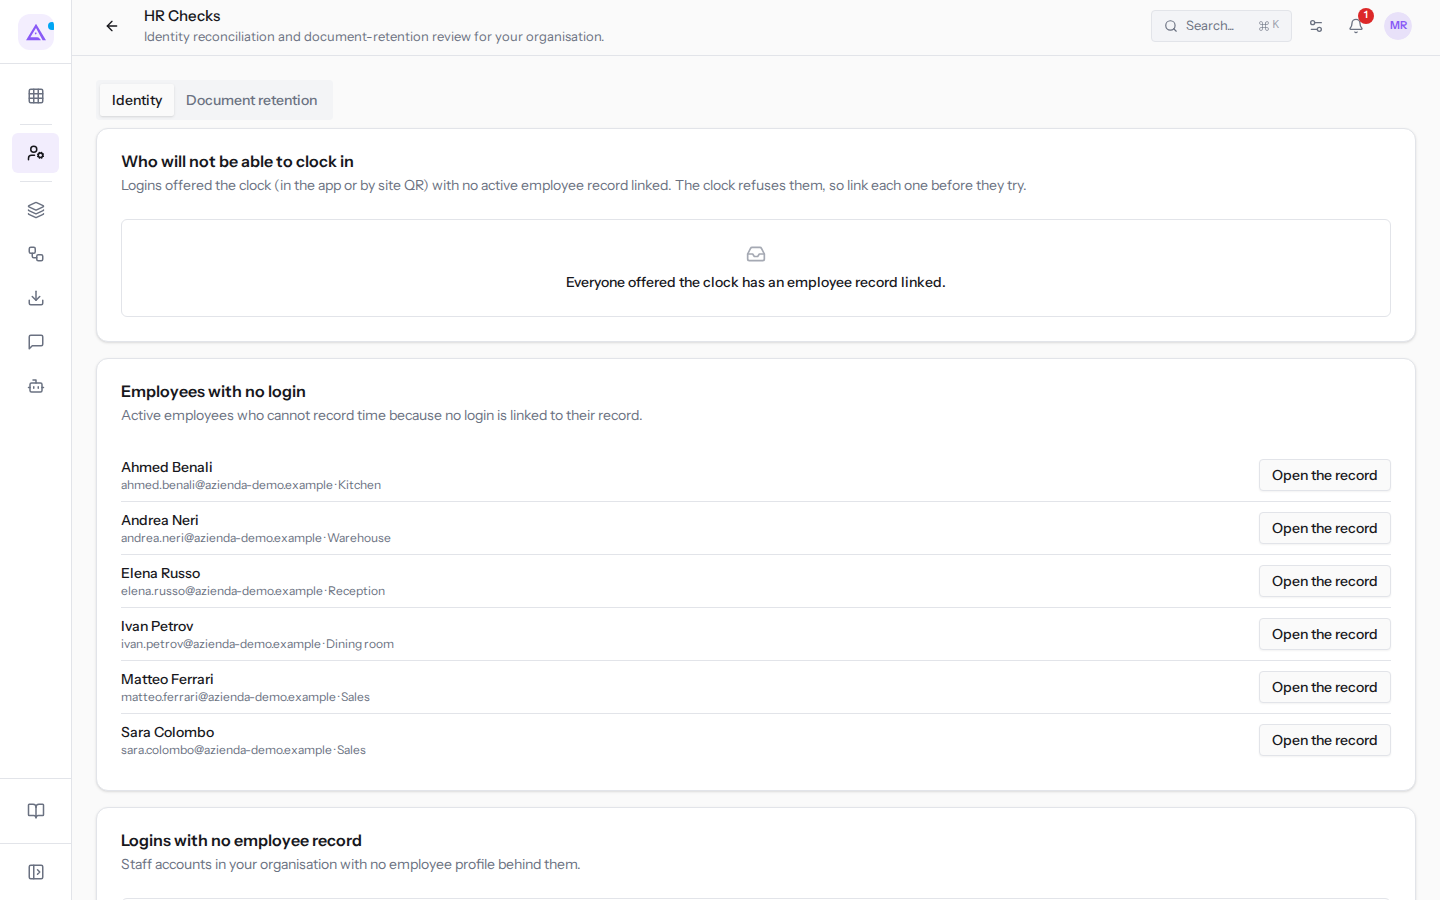
The tab groups checks into panels. Each panel lists the people or logins to fix and explains what to correct.
- Who will not be able to clock in: logins that are offered clock-in, via the app or the site's QR code, but have no active linked employee record. Clock-in rejects them. In the example the panel is empty.
- Employees with no login: active employees who cannot log hours because no login is linked to their record. In the example, all of them appear except Mario Rossi and Giulia Verdi. Use Open the record to open the employee record and link the login.
- Logins with no employee record: staff accounts that have no linked employee record. Create the employee record and link the login. The Go to Employees button opens the employee list.
- One login, two employee records: the same login is linked to more than one active employee record. Hours could end up on the wrong record. Keep the login linked to one record only.
- Employees sharing a codice fiscale: two active employees share the same tax code. This is usually a data-entry error.
A panel with no issues shows a confirmation message, for example Everyone offered the clock has an employee record linked., No login is claimed by more than one employee record. or No two active employees share a codice fiscale.
Tip: link the login to the record before the person tries to clock in. To create the record, see Adding an employee and filling in their record.
HR Checks: the Document retention tab
Each staff document category has a retention period. This tab lists the documents that have already exceeded it, so you can decide what to do with them.
- Open Employees › HR Checks.
- Click the Document retention tab.
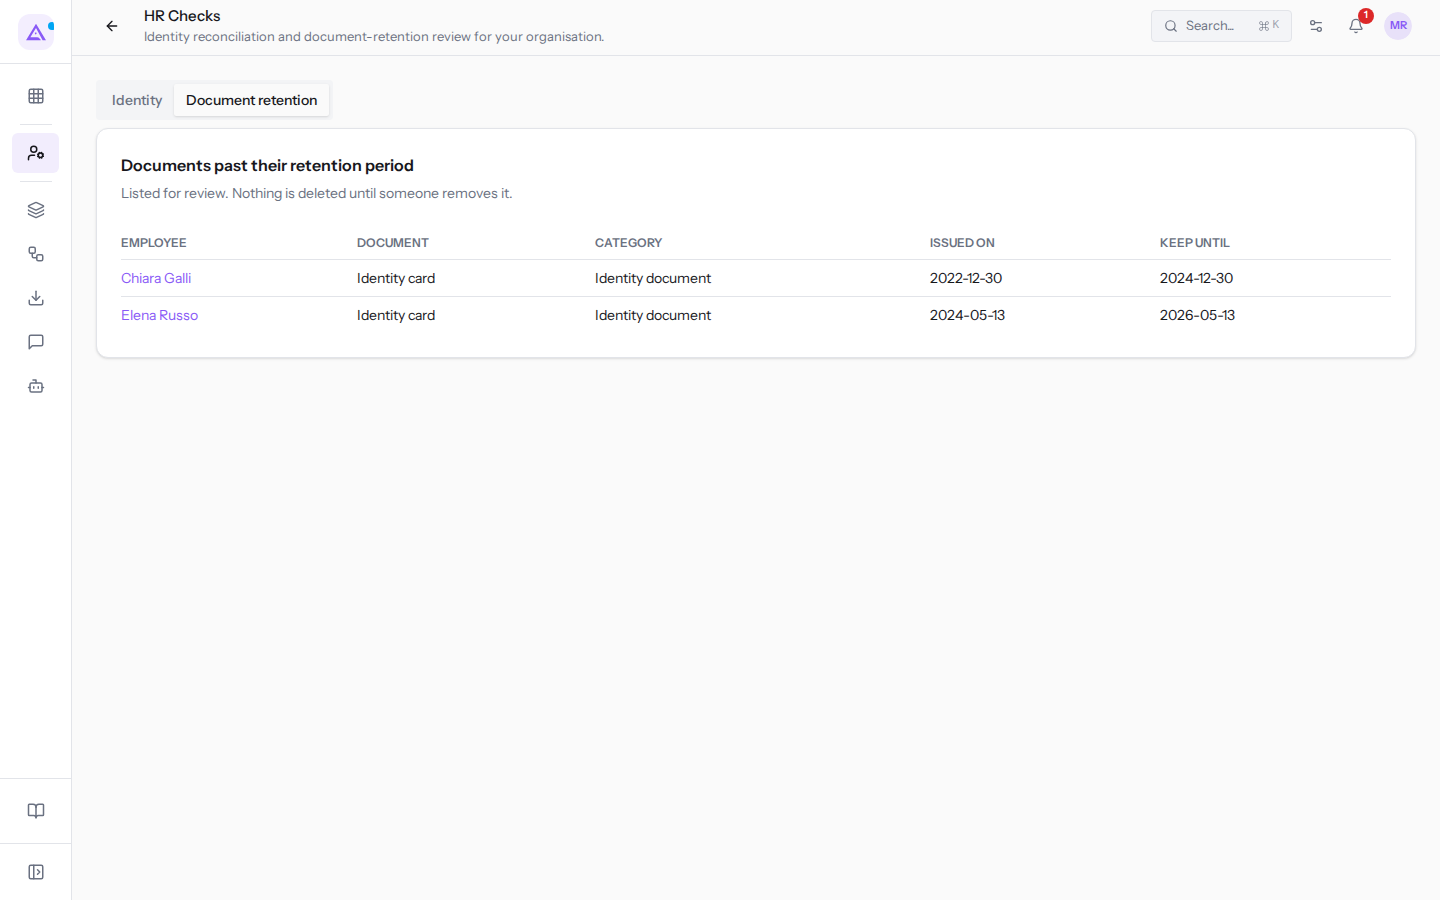
The Documents past their retention period panel has these columns:
- Employee: the person the document belongs to. The name opens their record.
- Document: the document name.
- Category: the document category, for example identity document.
- Issued on: the date the document was issued.
- Keep until: the date the retention period ends.
In the example the list shows the identity cards of Chiara Galli and Elena Russo. If no document has exceeded the period, the panel shows No document is past its retention period.
Important: documents do not delete themselves. They remain in the archive for review until someone removes them.
The default periods are: ten years for contracts, qualifications, and payslips; five for medical certificates; two for identity documents and disciplinary records. The Other category has no limit. You can change the periods in the organisation's legal and privacy settings.
Permit & Visa Alerts
The Permit & Visa Alerts page lists work permits and visas that are expiring or have already expired. It helps you renew them before the person falls out of compliance.
- Open Employees › Permit & Visa Alerts.
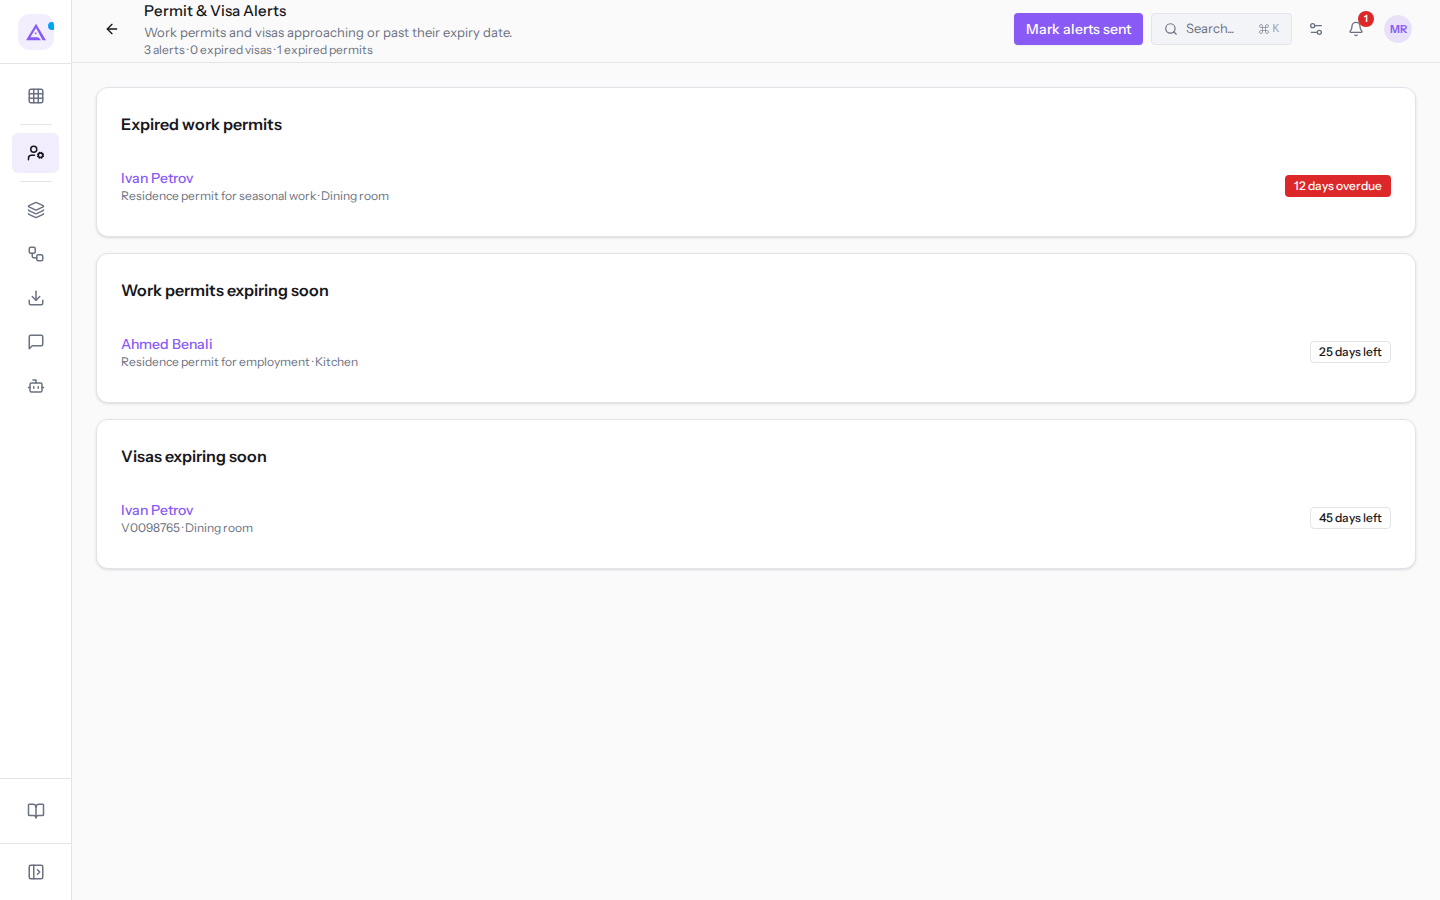
At the top you find the number of alerts, expired visas, and expired permits. In the example it reads 3 alerts · 0 expired visas · 1 expired permits.
Below the header there are panels:
- Expired work permits: permits whose date has already passed, with the number of days overdue. In the example Ivan Petrov appears, with a permit expired 12 days ago. If there are no expired permits,
No expired work permits.appears. - Work permits expiring soon: permits expiring shortly, with the days remaining. In the example Ahmed Benali appears, with 25 days remaining. If an alert has already been sent to a person, Alert sent appears. If there are no expiring permits,
No work permits expiring soon.appears. - Visas expiring soon: visas that are expiring. In the example Ivan Petrov's visa appears, expiring in 45 days. If there are no expiring visas,
No visas expiring soon.appears.
A person's name opens their employee record, where you find the visa number, its expiry date, and the permit number.
Once you have notified the people with work permits expiring in the next 30 days, click Mark alerts sent. The button does not send any messages: it marks those permits with Alert sent. Already-expired permits and visas are not marked.
See it on your company, not on a slide deck.
In 30 minutes we map the software you use today.We show you how much work and how much margin Archimedes gives back.
Show me on my business →What industry are you in?
One tap — it lets us prepare the demo around your world.
What tools do you use today?
Pick the ones you recognise — or just type them. It helps us show you how they migrate.
Last step: your details.
We reply within one working day — and right after, if you like, you pick the demo slot yourself.
We couldn't send your request. Try again, or write to us at [email protected].
By sending, you agree to your data being processed so we can get back to you about the demo. Privacy notice.
Preview form — nothing is sent from this page.
Want to schedule the demo now?
Your call: book the slot you prefer yourself, or we'll call you to arrange it.
Live availability, 30 minutes, instant confirmation. The calendar opens in a new tab.
Lock in your slot ↗We'll get back to you within one working day — and we'll join the call already knowing your world.
The calendar is open in another tab: pick a slot and the demo is booked. Can't see it? Reopen it ↗
Preview page: nothing was sent.
Our calendar is live: take the slot that suits you and the demo is booked. 30 minutes, instant confirmation, no waiting.
Lock in your slot ↗