Employees
All modules
Review contractors' hours and invoices
Employees · 13 of 20 · 5 min read
The pages in the Time group of the Employees menu collect contractors' time — that is, the time of people on a contractor agreement — and the invoices they submit. They let you check monthly hours and weekly declared hours. They also let you accept an invoice or send it back. For example, Matteo Ferrari has a VAT-number contractor agreement at €30 per hour.
Before you start: worked hours and approved time come from the Attendance module. If your organisation has not enabled it, these pages show a warning instead of data.
The pages serve different checks:
- If you need to check how much a contractor worked in a month, use Freelancer Worked Time.
- If you need to compare hours declared in a week against approved worked hours, use Planned Against Declared.
- If a contractor has submitted an invoice, review it in Collaborator Invoices.
Checking monthly worked hours
This page shows the days and hours worked by each contractor in the period you choose.
- Go to Employees › Freelancer Worked Time.
- Choose the period with Month and Year. The current month appears when you open the page.
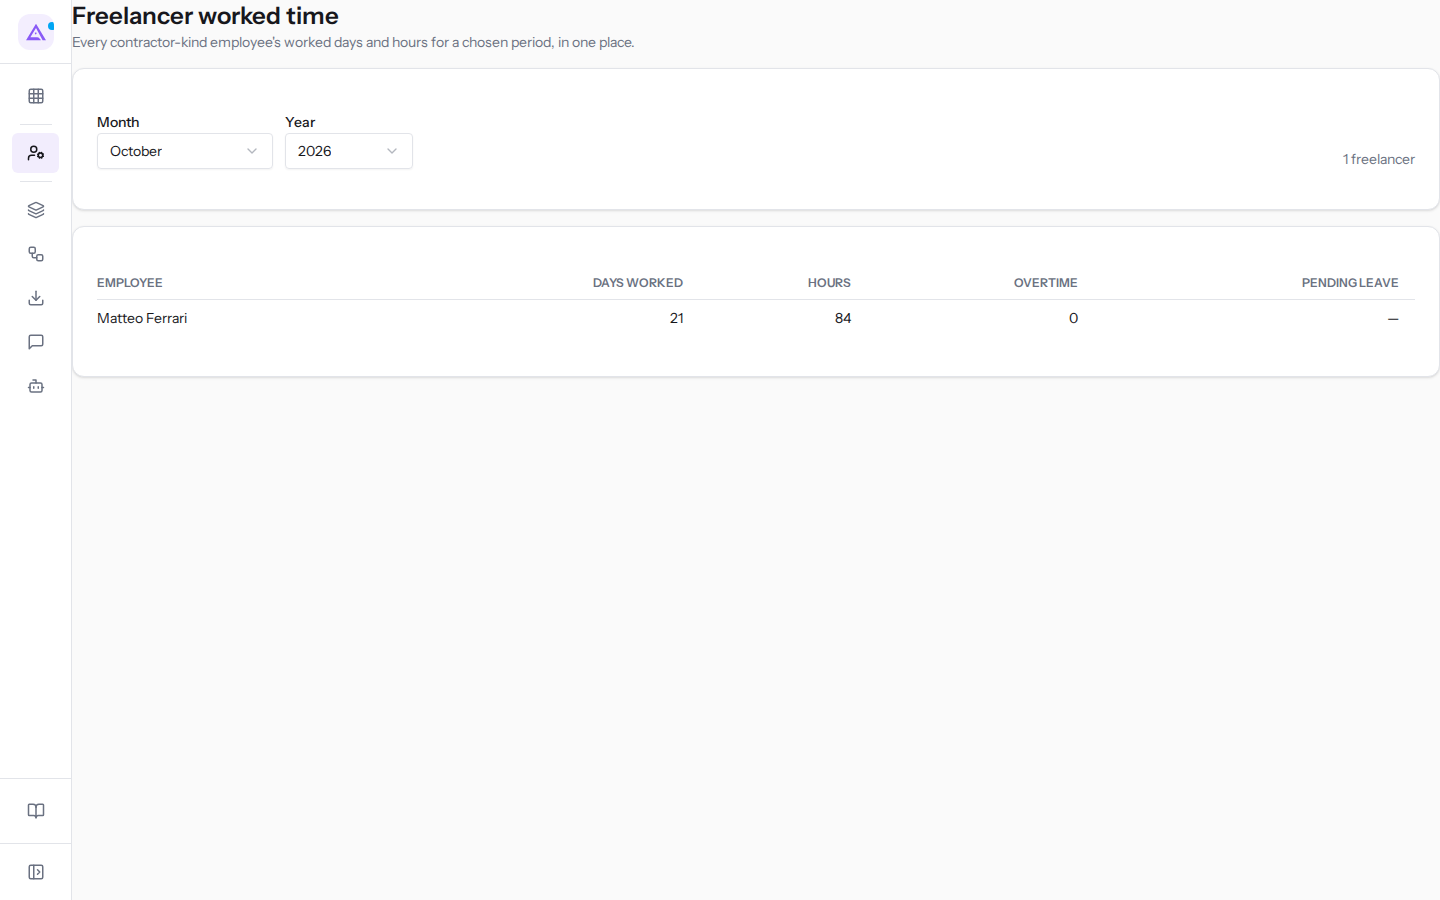
Above the table the number of contractors for the period appears, for example 1 freelancer. If there are no contractors in the period, the page shows No contractor-kind employees for this period.
Each row shows:
- Employee: the contractor's name, for example Matteo Ferrari.
- Days worked: the days with worked time in the period.
- Hours: the hours worked in the period.
- Overtime: overtime hours.
- Pending leave: days with a leave request still to be decided, not yet counted as absence.
Note: this page is for viewing hours only. Hours are recorded and corrected in the Attendance module.
Comparing declared hours against worked hours
This page shows, for one week, the hours declared by each contractor alongside the approved worked hours.
- Open Employees › Planned Against Declared, the last item in the Time group. The Planned against declared page opens.
- Change the week with the arrows on either side of Week of (Previous week and Next week). Use This week to return to the current week.
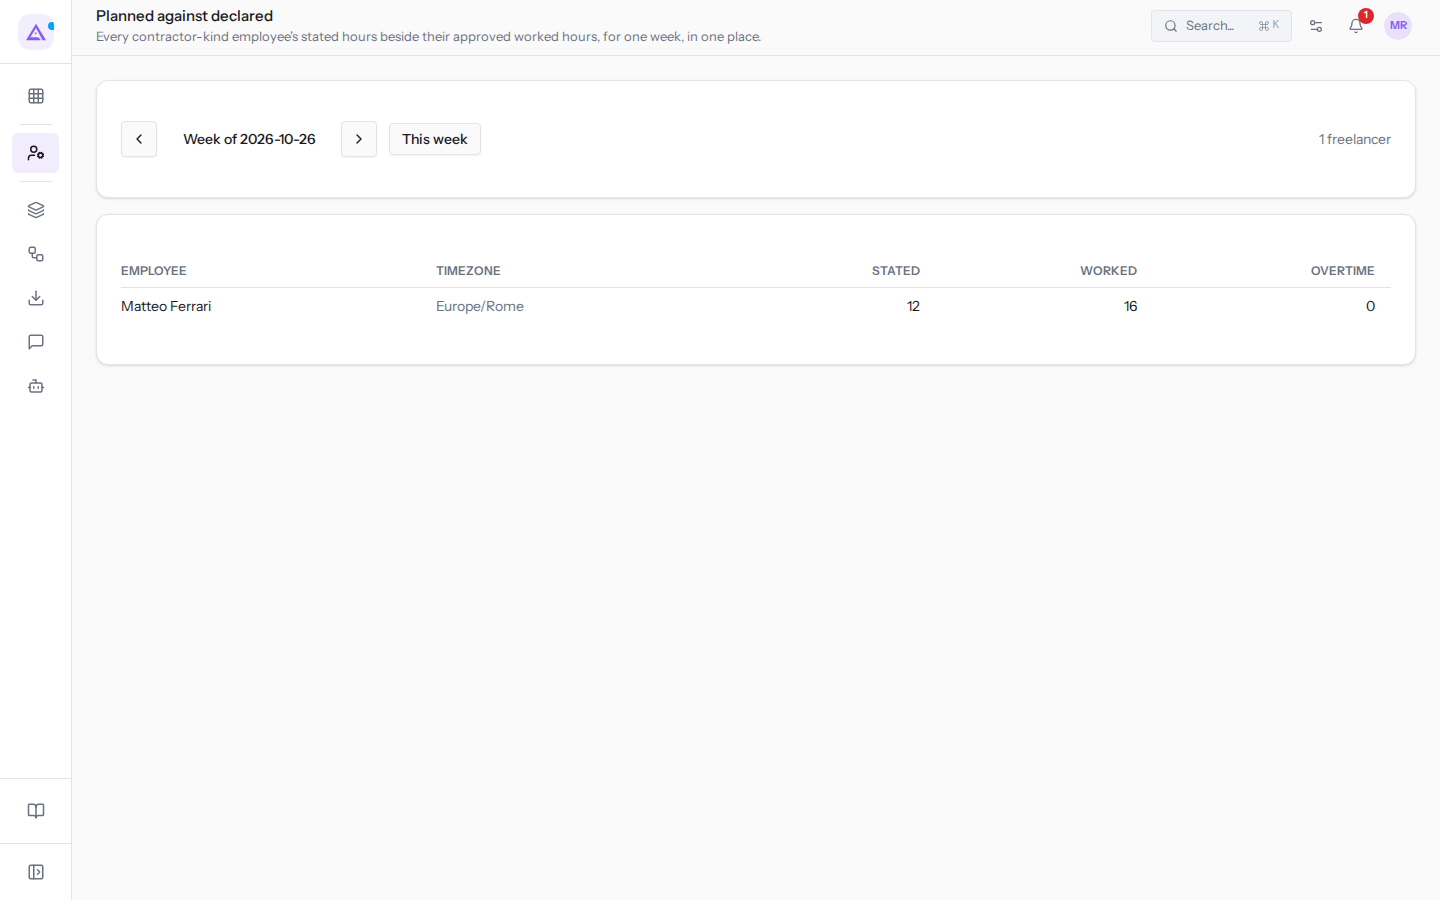
Each row shows:
- Employee: the contractor's name.
- Timezone: the contractor's time zone.
- Stated: the hours the contractor declared for the week. If nothing was declared, Not stated appears.
- Worked: the approved worked hours.
- Overtime: overtime hours.
Important: Not stated means the contractor did not declare any hours for the week. This is different from a week declared at zero hours.
If there are no contractors in the week, the page shows No contractor-kind employees for this week.
Reviewing contractor invoices
This page lists the invoices submitted by contractors. Next to each invoice the approved time for the same period appears.
- Go to Employees › Collaborator Invoices.
- Narrow the list with the filters.
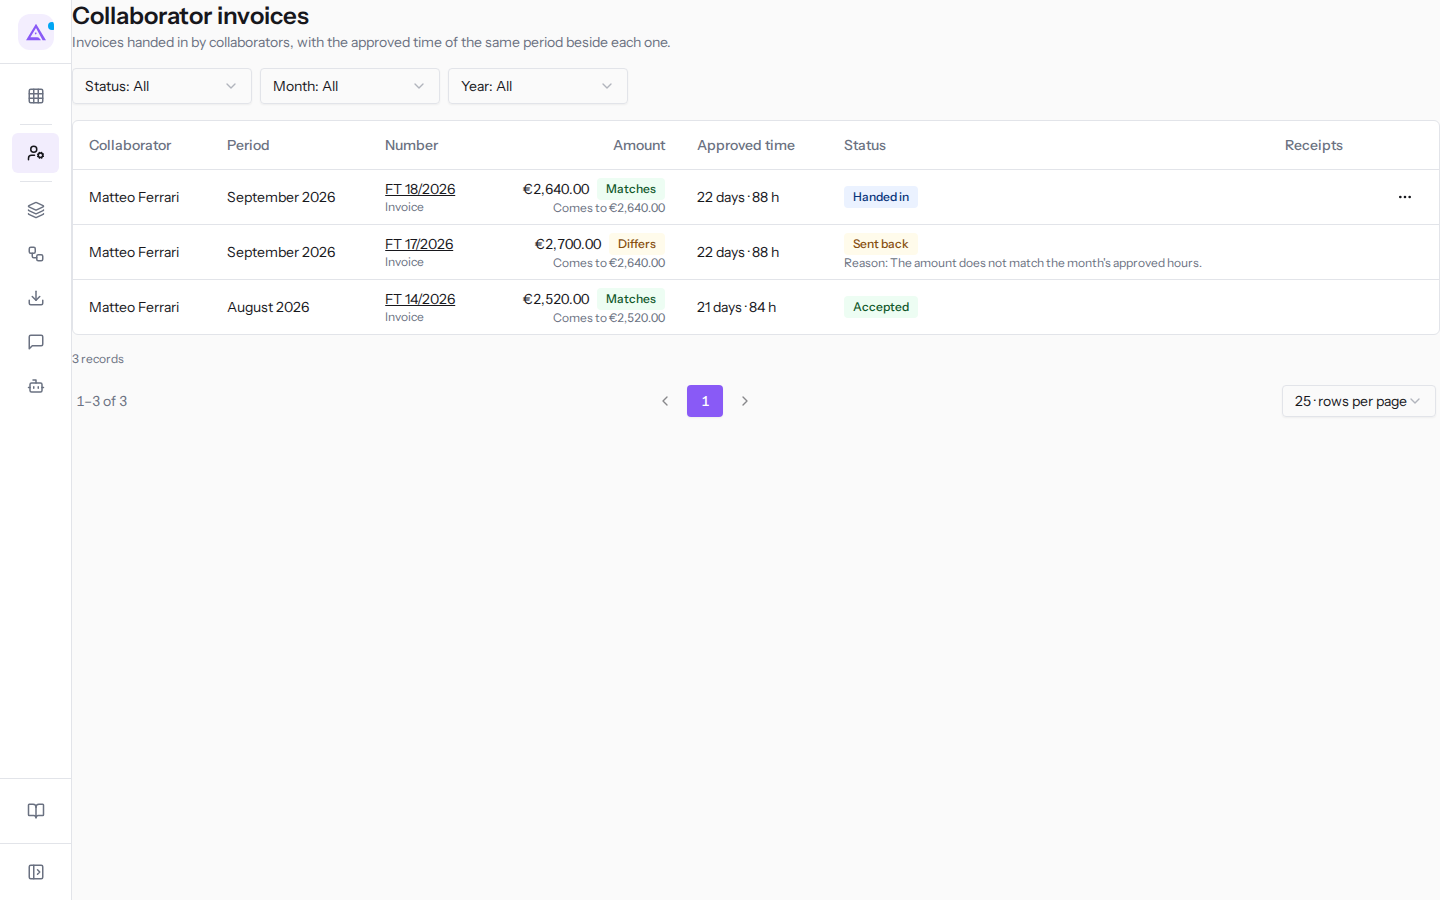
The filters are:
- Status: shows invoices in one state. The default value is Status: All.
- Handed in: the invoice has been submitted and is waiting for your review.
- Accepted: the invoice has been accepted.
- Sent back: the invoice has been sent back to the contractor.
- Month and Year: the invoice period. The default value is Month: All and Year: All.
- Rows per page: how many invoices you see per page. The default value is 25.
The list columns are:
- Collaborator: who submitted the invoice.
- Period: the month the invoice refers to.
- Number: the document number, for example
FT 18/2026. A contractor without a VAT number submits a Receipt for occasional work instead of an invoice. - Amount: the document amount. Below the amount Comes to appears with the amount calculated from the approved time and the contract hourly rate. Then either Matches or Differs appears.
- Approved time: the contractor's approved time for the same period.
- Status: the invoice status.
- Receipts: expense receipts that the invoice recharges.
In the example, Matteo Ferrari has three documents. FT 14/2026, from two months ago, is Accepted. FT 17/2026, from last month, is Sent back. FT 18/2026 replaced it and is Handed in.
Accepting an invoice
If the amount matches the approved time for the period, accept the invoice.
- In the invoice row, click the three-dot button (Actions).
- Choose Accept.
The message Invoice accepted. appears. The contractor receives a notification that their invoice has been accepted.
Note: the Actions button only appears on Handed in invoices that you can act on. An accepted or sent-back invoice can no longer be changed from this page. For example, the button is present on
FT 18/2026but not onFT 17/2026andFT 14/2026.
Sending an invoice back
If the amount differs from the approved time, or if the invoice contains an error, send it back to the contractor. The contractor receives the reason and can submit a corrected invoice.
- In the invoice row, click the three-dot button (Actions).
- Choose Send back. The Send the invoice back dialog opens, showing the invoice number and the contractor's name.
- Write the reason in the Reason field.
- Click Send back. To close without changing anything, click Cancel.
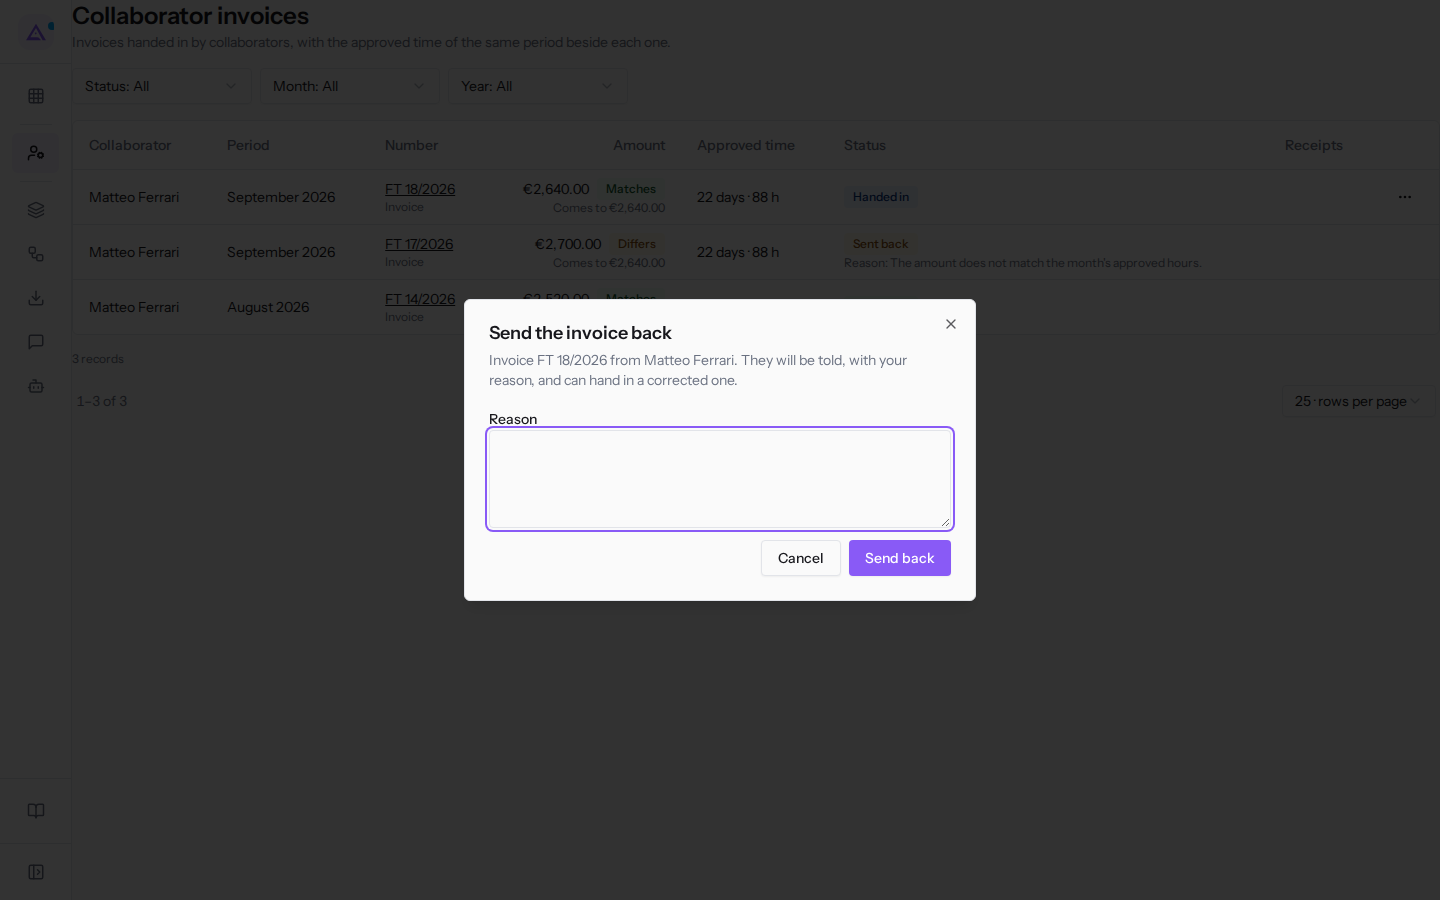
The dialog field is:
- Reason: the text the contractor receives with the notification.
The message Invoice sent back. appears. The invoice moves to the Sent back state. The contractor receives a notification and submits a new invoice with Hand in a corrected one. The new invoice arrives in the list as Handed in, for the same period.
In the example, FT 17/2026 from Matteo Ferrari was sent back. FT 18/2026 replaced it and is waiting for review.
See it on your company, not on a slide deck.
In 30 minutes we map the software you use today.We show you how much work and how much margin Archimedes gives back.
Show me on my business →What industry are you in?
One tap — it lets us prepare the demo around your world.
What tools do you use today?
Pick the ones you recognise — or just type them. It helps us show you how they migrate.
Last step: your details.
We reply within one working day — and right after, if you like, you pick the demo slot yourself.
We couldn't send your request. Try again, or write to us at [email protected].
By sending, you agree to your data being processed so we can get back to you about the demo. Privacy notice.
Preview form — nothing is sent from this page.
Want to schedule the demo now?
Your call: book the slot you prefer yourself, or we'll call you to arrange it.
Live availability, 30 minutes, instant confirmation. The calendar opens in a new tab.
Lock in your slot ↗We'll get back to you within one working day — and we'll join the call already knowing your world.
The calendar is open in another tab: pick a slot and the demo is booked. Can't see it? Reopen it ↗
Preview page: nothing was sent.
Our calendar is live: take the slot that suits you and the demo is booked. 30 minutes, instant confirmation, no waiting.
Lock in your slot ↗